
CLOUD COMPUTING SECURITY
“An essential guide to
securing the cloud.
Organizations running
workloads at the
scale their customers
demand need cloud
security. This book
contains essential
recipes that will set
them up for success
and allow them to scale
securely.“
—JK Gunnink
Google Cloud developer expert
“A must-read for anyone
working or trying to
get into cloud security.
Josh does a great
job of showing how
to implement various
components of a secure
cloud environment all
through the power of
Terraform.”
—Marcus Maxwell
Security Practice Lead, Contino
Cloud Native Security Cookbook
ISBN: 9781098106300
US $59.99 CAN $74.99
Twitter: @oreillymedia
linkedin.com/company/oreilly-media
youtube.com/oreillymedia
With the rise of the cloud, every aspect of IT has been
shaken to its core. The fundamentals for building systems are
changing, and although many of the principles that underpin
security still ring true, their implementation has become
unrecognizable. This practical book provides recipes for AWS,
Azure, and GCP to help you enhance the security of your own
cloud native systems.
Based on his hard-earned experience working with some of
the world’s biggest enterprises and rapidly iterating startups,
consultant Josh Armitage covers the trade-os that security
professionals, developers, and infrastructure gurus need to
make when working with dierent cloud providers. Each recipe
discusses the inherent compromises, as well as where clouds
have similarities and where they’re fundamentally dierent.
• Learn how the cloud provides superior security to what was
achievable in an on-premises world
• Understand the principles and mental models that enable
you to make optimal trade-os as part of your solution
• Learn how to implement existing solutions that are robust
and secure, and devise design solutions to new and
interesting problems
• Deal with security challenges and solutions both horizontally
and vertically within your business
Josh Armitage has been plying his trade as a consultant to
enterprises and startups for many years. He’s seen security from
many angles and has wide and deep technology expertise that
includes writing production assembly on mainframes and operating
a globally distributed machine learning system. Josh now focuses
on cloud native technologies, lean software development, and
taking teams through DevSecOps transformations.
ISBN: 978-1-492-09852-2


Josh Armitage
Cloud Native Security Cookbook
Recipes for a Secure Cloud
978-1-492-09852-2
[LSI]
Cloud Native Security Cookbook
by Josh Armitage
Copyright © 2022 Joshua Hagen Armitage. All rights reserved.
Printed in the United States of America.
Published by O’Reilly Media, Inc., 1005 Gravenstein Highway North, Sebastopol, CA 95472.
O’Reilly books may be purchased for educational, business, or sales promotional use. Online editions are
also available for most titles (http://oreilly.com). For more information, contact our corporate/institutional
sales department: 800-998-9938 or corporate@oreilly.com.
Acquisitions Editor: Jennifer Pollock
Development Editor: Corbin Collins
Production Editor: Jonathon Owen
Copyeditor: Sonia Saruba
Proofreader: Piper Editorial Consulting, LLC
Indexer: Judith McConville
Interior Designer: David Futato
Cover Designer: Karen Montgomery
Illustrator: Kate Dullea
April 2022: First Edition
Revision History for the First Edition
2022-04-20: First Release
See http://oreilly.com/catalog/errata.csp?isbn=9781098106300 for release details.
The O’Reilly logo is a registered trademark of O’Reilly Media, Inc. Cloud Native Security Cookbook, the
cover image, and related trade dress are trademarks of O’Reilly Media, Inc.
The views expressed in this work are those of the author and do not represent the publisher’s views. While
the publisher and the author have used good faith efforts to ensure that the information and instructions
contained in this work are accurate, the publisher and the author disclaim all responsibility for errors or
omissions, including without limitation responsibility for damages resulting from the use of or reliance
on this work. Use of the information and instructions contained in this work is at your own risk. If any
code samples or other technology this work contains or describes is subject to open source licenses or the
intellectual property rights of others, it is your responsibility to ensure that your use thereof complies
with such licenses and/or rights.
This work is part of a collaboration between O’Reilly and Palo Alto Networks. See our statement of edito‐
rial independence.

Table of Contents
Preface. . . . . . . . . . . . . . . . . . . . . . . . . . . . . . . . . . . . . . . . . . . . . . . . . . . . . . . . . . . . . . . . . . . . . . . ix
1.
Security in the Modern Organization. . . . . . . . . . . . . . . . . . . . . . . . . . . . . . . . . . . . . . . . . . . 1
1.1 Why Security Is Critical 1
1.2 What Is Meant by Cloud Native Security? 3
1.3 Where Security Fits in the Modern Organization 5
1.4 The Purpose of Modern Security 7
1.5 DevSecOps 7
1.6 How to Measure the Impact of Security 12
1.7 The Principles of Security 14
2.
Setting Up Accounts and Users. . . . . . . . . . . . . . . . . . . . . . . . . . . . . . . . . . . . . . . . . . . . . . . 19
2.1 Scalable Project Structures on GCP 19
2.2 Scalable Account Structures on AWS 27
2.3 Scalable Subscription Structures on Azure 35
2.4 Region Locking on GCP 40
2.5 Region Locking on AWS 43
2.6 Region Locking on Azure 47
2.7 Centralizing Users on GCP 49
2.8 Centralizing Users on AWS 54
2.9 Centralizing Users on Azure 58
3.
Getting Security Visibility at Scale. . . . . . . . . . . . . . . . . . . . . . . . . . . . . . . . . . . . . . . . . . . . 63
3.1 Building a Cloud Native Security Operations Center on GCP 64
3.2 Building a Cloud Native Security Operations Center on AWS 71
3.3 Building a Cloud Native Security Operations Center on Azure 75
3.4 Centralizing Logs on GCP 78
3.5 Centralizing Logs on AWS 82
v

3.6 Centralizing Logs on Azure 88
3.7 Log Anomaly Alerting on GCP 94
3.8 Log Anomaly Alerting on AWS 98
3.9 Log Anomaly Alerting on Azure 102
3.10 Building an Infrastructure Registry on GCP 106
3.11 Building an Infrastructure Registry on AWS 110
3.12 Building an Infrastructure Registry on Azure 118
4.
Protecting Your Data. . . . . . . . . . . . . . . . . . . . . . . . . . . . . . . . . . . . . . . . . . . . . . . . . . . . . . . 123
4.1 Encrypting Data at Rest on GCP 124
4.2 Encrypting Data at Rest on AWS 129
4.3 Encrypting Data at Rest on Azure 137
4.4 Encrypting Data on GCP with Your Own Keys 143
4.5 Encrypting Data on AWS with Your Own Keys 147
4.6 Encrypting Data on Azure with Your Own Keys 151
4.7 Enforcing In-Transit Data Encryption on GCP 156
4.8 Enforcing In-Transit Data Encryption on AWS 160
4.9 Enforcing In-Transit Data Encryption on Azure 162
4.10 Preventing Data Loss on GCP 165
4.11 Preventing Data Loss on AWS 170
4.12 Preventing Data Loss on Azure 174
5.
Secure Networking. . . . . . . . . . . . . . . . . . . . . . . . . . . . . . . . . . . . . . . . . . . . . . . . . . . . . . . . 181
5.1 Networking Foundations on GCP 182
5.2 Networking Foundations on AWS 188
5.3 Networking Foundations on Azure 195
5.4 Enabling External Access on GCP 203
5.5 Enabling External Access on AWS 208
5.6 Enabling External Access on Azure 214
5.7 Allowing Access to Internal Resources on GCP 219
5.8 Allowing Access to Internal Resources on AWS 225
5.9 Allowing Access to Internal Resources on Azure 231
5.10 Controlling External Network Connectivity on GCP 236
5.11 Controlling External Network Connectivity on AWS 243
5.12 Controlling External Network Connectivity on Azure 251
5.13 Private Application Access on GCP 257
5.14 Private Application Access on AWS 265
5.15 Private Application Access on Azure 272
6.
Infrastructure as Code. . . . . . . . . . . . . . . . . . . . . . . . . . . . . . . . . . . . . . . . . . . . . . . . . . . . . . 277
6.1 Building Secure Infrastructure Defaults on GCP 278
6.2 Building Secure Infrastructure Defaults on AWS 282
vi | Table of Contents

6.3 Building Secure Infrastructure Defaults on Azure 288
6.4 Functions as a Service on GCP 294
6.5 Functions as a Service on AWS 299
6.6 Functions as a Service on Azure 303
6.7 Robust Deployment on GCP 309
6.8 Robust Deployment on AWS 314
6.9 Robust Deployment on Azure 322
6.10 Deployment at Scale on GCP 329
6.11 Deployment at Scale on AWS 331
6.12 Deployment at Scale on Azure 336
7.
Compliance as Code. . . . . . . . . . . . . . . . . . . . . . . . . . . . . . . . . . . . . . . . . . . . . . . . . . . . . . . . 341
7.1 Labeling Resources on GCP 342
7.2 Tagging Resources on AWS 347
7.3 Tagging Resources on Azure 352
7.4 Detecting Noncompliant Infrastructure on GCP 357
7.5 Detecting Noncompliant Infrastructure on AWS 364
7.6 Detecting Noncompliant Infrastructure on Azure 369
7.7 Preventing Noncompliant Infrastructure on GCP 375
7.8 Preventing Noncompliant Infrastructure on AWS 379
7.9 Preventing Noncompliant Infrastructure on Azure 383
7.10 Remediating Noncompliant Infrastructure on GCP 388
7.11 Remediating Noncompliant Infrastructure on AWS 396
7.12 Remediating Noncompliant Infrastructure on Azure 400
8.
Providing Internal Security Services. . . . . . . . . . . . . . . . . . . . . . . . . . . . . . . . . . . . . . . . . . 407
8.1 Protecting Security Assets and Controls on GCP 408
8.2 Protecting Security Assets and Controls on AWS 412
8.3 Protecting Security Assets and Controls on Azure 417
8.4 Understanding Machine Status at Scale on GCP 422
8.5 Understanding Machine Status at Scale on AWS 426
8.6 Understanding Machine Status at Scale on Azure 430
8.7 Patching at Scale on GCP 435
8.8 Patching at Scale on AWS 439
8.9 Patching at Scale on Azure 442
8.10 Data Backup on GCP 447
8.11 Data Backup on AWS 451
8.12 Data Backup on Azure 456
9.
Enabling Teams. . . . . . . . . . . . . . . . . . . . . . . . . . . . . . . . . . . . . . . . . . . . . . . . . . . . . . . . . . . 461
9.1 Enabling Project Sharing on GCP 462
9.2 Enabling Account Sharing on AWS 465
Table of Contents | vii

9.3 Enabling Resource Group Sharing on Azure 468
9.4 Application Security Scanning on GCP 472
9.5 Application Security Scanning on AWS 475
9.6 Application Security Scanning on Azure 479
10. Security in the Future. . . . . . . . . . . . . . . . . . . . . . . . . . . . . . . . . . . . . . . . . . . . . . . . . . . . . . 483
10.1 The Infinite Game 484
10.2 Building Capability 484
10.3 Building Situational Awareness 486
10.4 Conclusion 488
11.
Terraform Primer. . . . . . . . . . . . . . . . . . . . . . . . . . . . . . . . . . . . . . . . . . . . . . . . . . . . . . . . . . 489
11.1 Authenticating with GCP 490
11.2 Authenticating with AWS 490
11.3 Authenticating with Azure 490
Index. . . . . . . . . . . . . . . . . . . . . . . . . . . . . . . . . . . . . . . . . . . . . . . . . . . . . . . . . . . . . . . . . . . . . . . 491
viii | Table of Contents

Preface
In the early 2000s, public cloud emerged as a new a paradigm that revolutionized
how technology is consumed across the world. Rather than waiting weeks to months
for new computers to be ordered, delivered, and racked, access to machines is mere
seconds away. The company bringing you one-click shopping was now bringing you
one-click computing.
In my first job out of university, I was working in the mainframe division of IBM,
building a cloud-delivered virtualized mainframe environment. We were looking to
bring DevOps to the world’s most venerated enterprises. What became a focus of the
customer conversations over time was security. How can they be assured that their
data is safe when they upload it to the cloud?
When the cloud was making waves in even the most risk-averse industries, I became
convinced that it was the way forward for businesses looking to excel in the digital
age.
Since IBM, I have spent the majority of my time working as a consultant in Australia
and the UK, focused on helping start-ups and enterprises alike use the cloud as their
innovation engine, empowering their developers to deliver exceptional outcomes.
Through my experience I have seen many false steps, patterns, and anti-patterns that
reappear as businesses and engineers make their first forays into a cloud-native
world. This book is focused on how to use the cloud securely.
The recipes in this book show you how to build a secure foundation in your cloud
environment and how to leverage the first-party security solutions to stay on top of
your estate as it organically scales.
Who This Book Is For
This book is about getting hands-on with the cloud. Each recipe comes with a fully
worked solution in Terraform, the most widely used infrastructure-as-code tool.
ix

For each problem presented, there is a recipe for each of the three primary cloud pro‐
viders, Amazon Web Services, Microsoft Azure, and Google Cloud Platform. As the
modern world is becoming increasingly multi-cloud, it is ever more valuable to be
cloud multilingual.
Although the three clouds have significant overlap in the services they provide, the
design decisions that went into the cloud itself have massive ramifications for secu‐
rity. With this book you’ll become empowered to translate between the three clouds
and rapidly solve problems wherever they present.
How This Book Is Organized
This book has nine chapters of recipes, each focused on a particular theme. These
range from how to structure your estate and manage users to how to ensure compli‐
ance at scale to the intricacies of identity and access management on each cloud pro‐
vider.
What You Need to Use This Book
In order to complete the recipes in this book, you will need access to your cloud of
choice. Depending on the recipe, you will need highly privileged credentials to make
the required changes.
All the recipes were developed using Terraform version 1.0. If you have not used Ter‐
raform before, then going through Chapter 11 will show you how to safely authenti‐
cate against your cloud.
Conventions Used in This Book
The following typographical conventions are used in this book:
Italic
Indicates new terms, URLs, email addresses, filenames, and file extensions.
Constant width
Used for program listings, as well as within paragraphs to refer to program ele‐
ments such as variable or function names, databases, data types, environment
variables, statements, and keywords.
Constant width bold
Shows commands or other text that should be typed literally by the user.
Constant width italic
Shows text that should be replaced with user-supplied values or by values deter‐
mined by context.
x | Preface

This element signifies a general note.
This element indicates a warning or caution.
Using Code Examples
Supplemental material (code examples, exercises, etc.) is available for download at
https://github.com/Armitagency/cloud-native-security-cookbook-tf.
If you have a technical question or a problem using the code examples, please send
email to bookquestions@oreilly.com.
This book is here to help you get your job done. In general, if example code is offered
with this book, you may use it in your programs and documentation. You do not
need to contact us for permission unless you’re reproducing a significant portion of
the code. For example, writing a program that uses several chunks of code from this
book does not require permission. Selling or distributing examples from O’Reilly
books does require permission. Answering a question by citing this book and quoting
example code does not require permission. Incorporating a significant amount of
example code from this book into your product’s documentation does require per‐
mission.
We appreciate, but generally do not require, attribution. An attribution usually
includes the title, author, publisher, and ISBN. For example: "Cloud Native Security
Cookbook by Josh Armitage (O’Reilly). Copyright 2022 Joshua Hagen Armitage,
978-1-098-10630-0.”
If you feel your use of code examples falls outside fair use or the permission given
above, feel free to contact us at permissions@oreilly.com.
O’Reilly Online Learning
For more than 40 years, O’Reilly Media has provided technol‐
ogy and business training, knowledge, and insight to help
companies succeed.
Preface | xi

Our unique network of experts and innovators share their knowledge and expertise
through books, articles, and our online learning platform. O’Reilly’s online learning
platform gives you on-demand access to live training courses, in-depth learning
paths, interactive coding environments, and a vast collection of text and video from
O’Reilly and 200+ other publishers. For more information, visit http://oreilly.com.
How to Contact Us
Please address comments and questions concerning this book to the publisher:
O’Reilly Media, Inc.
1005 Gravenstein Highway North
Sebastopol, CA 95472
800-998-9938 (in the United States or Canada)
707-829-0515 (international or local)
707-829-0104 (fax)
We have a webpage for this book, where we list errata, examples, and any additional
information. You can access this page at https://oreil.ly/cloudNativeCkbk.
Email bookquestions@oreilly.com to comment or ask technical questions about this
book.
For news and information about our books and courses, visit http://oreilly.com.
Find us on LinkedIn: https://linkedin.com/company/oreilly-media
Follow us on Twitter: http://twitter.com/oreillymedia
Watch us on YouTube: http://www.youtube.com/oreillymedia
Acknowledgments
This book stands upon the shoulders of other people’s ideas and knowledge. I am
indebted to the many people who have readily shared their expertise so that we can
explore further and higher rather than continually relearn the same lessons.
Above the main coworking space in my home city of Perth is the Greek proverb “A
society grows great when old men plant trees whose shade they know they shall never
sit in,” an ideal I try to hold close. I truly feel that everyone has valuable stories to
share. Wherever you are on your journey, there are people behind you or next to you
on their own journey who could benefit from your experience. This book is my
attempt to help people develop safer systems, protect their users, and have a more ful‐
filling and happier working life.
xii | Preface

Having spent a number of years consulting with the world’s biggest enterprises, I have
firsthand experience of both the pains and triumphs that come with digital and cloud
transformation, especially in the security domain. This book is a distillation of those
days in the trenches, with a bias for action that is imperative for real change to
happen.
Working with computers was almost preordained for me, as it seems the occupation
of choice for my family. My father and I both got jobs as mainframe developers
straight out of university about 30 years apart, much to his enjoyment when he
found out.
I started writing this book while in lockdown in the UK, attempting to find a project
to help keep me sane. I finished it in Australia just before my daughter was due to
arrive. I couldn’t have finished this book without the never-ending support of my
wife, Rebecca, who has had to deal with many late nights and weekends of me ham‐
mering the keyboard. In the end, the timing could not have worked out better as I
move on from this herculean labor to being a father.
Thank you to my triumvirate of tech reviewers who have challenged me and kept me
honest through the book, Marcus Maxwell, JK Gunnink, and Pete Yandell. Your
hours spent dissecting my writing has taken the book to a higher level and I am for‐
ever grateful.
To the amazing staff at O’Reilly, especially Corbin Collins for supporting me through‐
out this endeavor, Jennifer Pollock for giving me the chance to write this book, and
the production team, thank you for having the requisite patience and ensuring that
this book became a reality.
It’s hard to imagine this book existing were it not for the support of each and every
one of you.
Preface | xiii

CHAPTER 1
Security in the Modern Organization
In this chapter, you will learn the following:
• Why security is becoming ever more critical in the modern age
• What is meant by cloud native security
• Where security fits in the modern organization
• What the purpose of security is
•
What DevSecOps really is
• How to measure the impact of security
• The underlying principles of security
This foundation is critical for you to compellingly articulate why investment into
security is and will continue to be mandatory and how the advent of the cloud has
not invalidated the fundamental principles of security but has transformed how they
are applied.
1.1 Why Security Is Critical
Seeing as you’re reading this, you probably already believe in the criticality of secu‐
rity; however, it’s important to understand how security continues to be ever more
important day to day and year to year.
Life in the 21st century is digital first—our lives revolve around the internet and tech‐
nology. Everyone’s personal information is given to and stored by trusted third par‐
ties. We all believe that it will be handled safely and securely. What recent history has
shown us, however, is that security breaches are the norm; they are to be expected.
1
This information is the gold filling the 21st-century bank vaults of technology titans.
Where you have concentrations of wealth, you must scale your security to match.
Human instinct makes us believe that to go slowly is to go safely, which often mani‐
fests as lengthy security assessments, full multiweek penetration tests on every release,
and security being the slowest moving part on the path to production.
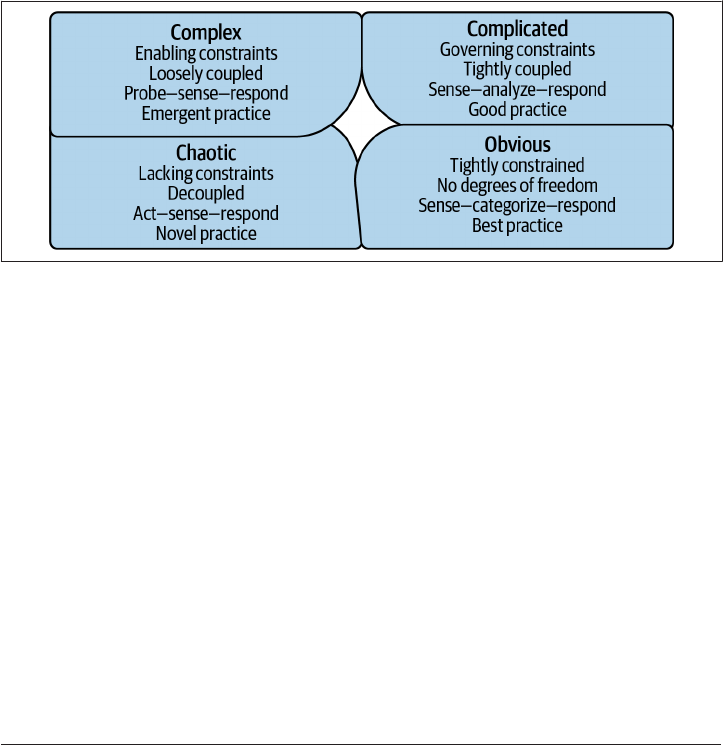
This is actively harmful in two ways. First, the systems that businesses operate are
inherently complex. Complexity theory and other models of complexity, such as the
Cynefin framework, shown in Figure 1-1, teach us that it is impossible to think our
way through a complex system. No amount of reading code and looking at architec‐
ture diagrams can allow you to fully understand all the possibilities and potential vul‐
nerabilities within a system. Being able to react and apply fixes quickly when issues
are discovered, such as the Log4j vulnerability in December 2021, results in a supe‐
rior security posture when compared to lengthy, time-intensive review cycles.
Figure 1-1. Cynen framework
But even if it were possible with sufficient time to root out all security vulnerabilities,
for a business, moving slowly in the 21st century is a recipe for disaster. The level of
expectation set by the Googles, Microsofts, and Amazons of the world has laid down
a gauntlet. Move fast or die. Security teams are caught between two unstoppable
forces: the business imperative for agility through speed and the exponential growth
in breach impacts.
When a breach happens, the business suffers in a number of ways, to name but a few:
• Reputational damage
• Legal liabilities
• Fines and other financial penalties
• Operational instability and loss of revenue
•
Loss of opportunity
2 | Chapter 1: Security in the Modern Organization

The vast majority of businesses are either already in the cloud or are exploring how
they can migrate their estates. With the near ubiquity of cloud infrastructure, both
governments and regulators are investing significantly in their understanding of how
companies are using the cloud. Examples such as the General Data Protection Regu‐
lation (GDPR) and the California Consumer Privacy Act are just the tip of a wave of
increased security expectations, controls, and scrutiny. Over time, the damage suf‐
fered by a business from a breach will exponentially and catastrophically increase.
Our principles of security are not invalidated by this new reality, but how they are
applied, embedded, and upheld needs to fundamentally transform.
1.2 What Is Meant by Cloud Native Security?
A common trope of the technology industry is that definitions become loose over
time. In this book, cloud native is defined as leveraging technology purpose-built to
unlock the value of, and accelerate your adoption of, the cloud. Here is a list of common
properties of cloud native solutions:
•
It is automation friendly and should be fully configurable through infrastructure
as code (IaC).
• It does not place unnecessary, artificial constraints on your architecture. For
example, per machine pricing is not considered a cloud native pricing model.
•
It elastically scales. As your systems and applications grow in size, the solution
scales in lockstep.
• It natively supports the higher-level compute offerings on the cloud platforms. It
should support serverless and containerized workloads, as well as the plethora of
managed service offerings.
In this book, where possible, the recipes use the managed services provided by the
cloud platforms themselves. They have all the previous properties, are purpose-built
to support customers in their cloud journey, and are easily integrated into your estate.
IT security has existed from the day there was something of value stored on a com‐
puter. As soon as things of value were stored on computers, it was necessary to
defend them. As an industry, IT has proven the ability to undergo seismic shifts with
frightening regularity; embracing cloud native is simply the most recent. As more
value is poured into technology and systems, the potential value to be gained by
attacking them increases, therefore our security must increase in kind. The cloud can
bring so much good, but with it comes new challenges that will need cloud native
people, processes, and tools to overcome.
1.2 What Is Meant by Cloud Native Security? | 3

The Beginnings of the Cloud
Back in 2006, Amazon first announced Amazon Web Services (AWS), offering pay-
as-you-go technology to businesses. Over the intervening 15 years, a tectonic shift
fundamentally altered how companies approach technology. Historically, businesses
ordered and managed hardware themselves, investing huge sums of capital up front
and employing large teams to perform “undifferentiated heavy lifting” to operate this
infrastructure. What Amazon started, followed in 2008 by Google and 2010 by
Microsoft, allowed businesses to provision new infrastructure on demand in seconds,
as opposed to waiting months for the hardware to arrive and be racked, configured,
and released for use.
Infrastructure became a commodity, like water or electricity. This enabled businesses
to rapidly experiment, become more agile, and see technology as a business differen‐
tiator rather than a cost center. Over time, the cornucopia of services offered by the
Cloud Service Providers (CSPs) has grown to encompass almost everything a busi‐
ness could need, with more being released every day. Nearly every company on the
planet, including the most ancient of enterprises, is cloud first. The cloud is here to
stay and will fundamentally define how businesses consume technology in the future.
Old Practices in the New Reality
When something as transformational as cloud computing occurs, best practices
require time to emerge. In the intervening gap, old practices are applied to the new
reality. The security tools and processes which served us well in the pre-cloud age
were not built to contend with the new normal. The pace of change posed by the
cloud presented new security challenges the industry was not equipped to face.
Through effort, time, and experimentation, it is now understood how to achieve our
security objectives by working with, not against, the cloud. You can now have cloud
native security.
Cloud native security is built around the following fundamental advantages of cloud
computing:
Pay for consumption
In a cloud native world, expect to only pay for services as you use them, not for
idle time.
Economies of scale
As the CSP is at hyperscale, it can achieve things which cannot be done in isola‐
tion, including lower pricing, operational excellence, and superior security
postures.
4 | Chapter 1: Security in the Modern Organization

No capacity planning
Cloud resources are made to be elastic; they can scale up and down based on
demand rather than having to go through the effort-intensive and often inaccu‐
rate process of capacity planning.
Unlock speed and agility
By allowing companies and teams to rapidly experiment, change their mind, and
move quickly, the cloud allows for capturing business value that would be impos‐
sible otherwise.
Stop spending money on
“undierentiated heavy liing”
Rather than focus on activities that cannot differentiate you from your competi‐
tion, allow the CSP to focus on those tasks while you focus on core competencies.
Span the globe
The CSP allows businesses to scale geographically on demand by having loca‐
tions all over the world that operate identically
When you look at the processes and tools that constitute cloud native security, you
enable the consumption and promised benefits of the cloud, not constrain them.
1.3 Where Security Fits in the Modern Organization
Historically, security has operated as a gatekeeper, often as part of change advisory
boards (CABs), acting as judge, jury, and executioner for system changes. This siloed
approach can only take you so far. The waste incurred by long feedback loops, long
lead times, and slow pace of change is incompatible with a digital-first reality.
By looking to block rather than enable change, the security and delivery teams are
forced into a state of eternal conflict, creating friction that breeds animosity and pre‐
vents the business from achieving its goals. Team Topologies, by Matthew Skelton and
Manual Pais (IT Revolution Press), examines the four team archetypes that are fun‐
damental to exceptional technology performance: enabling teams, platform teams,
complicated-subsystem teams, and stream-aligned teams, as shown in Figure 1-2.
1.3 Where Security Fits in the Modern Organization | 5
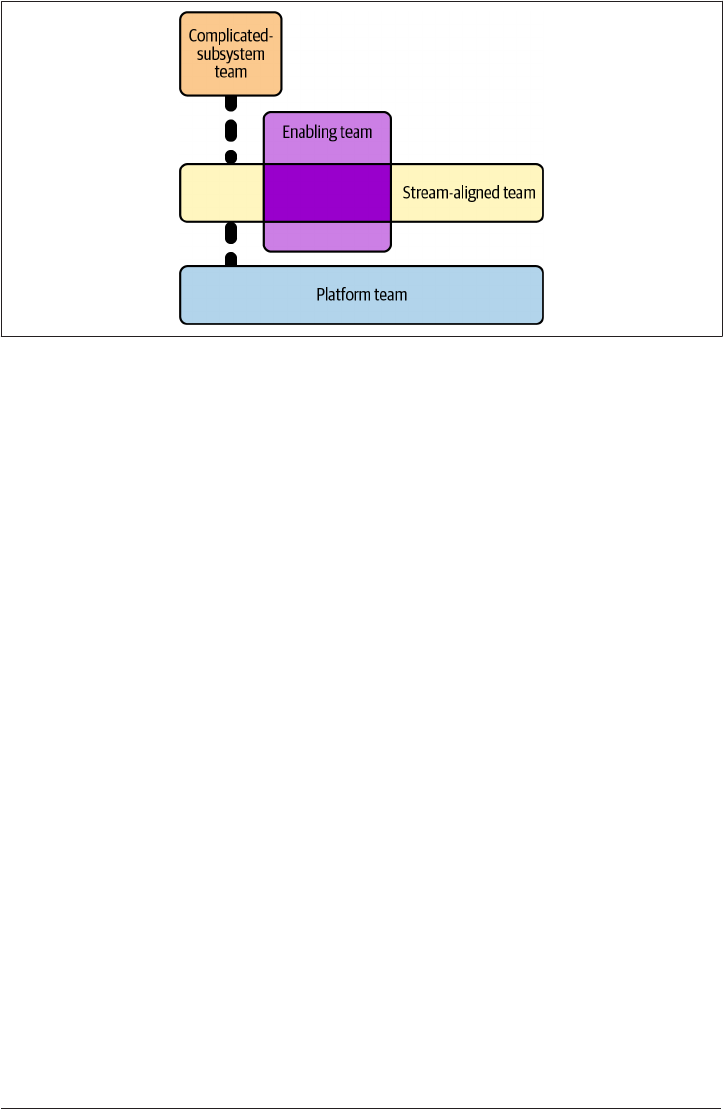
Figure 1-2. Team topologies
Stream-aligned teams are how the business directly delivers value. They build the sys‐
tems and services that allow the business to function, interact with customers, and
compete in the market.
Complicated-subsystem teams look after systems that require their own deep domain
expertise, such as a risk calculation system in an insurance company.
Platform teams produce compelling internal products that accelerate stream-aligned
teams, such as an opinionated cloud platform, which is the focus of Chapter 2.
Enablement teams are domain specialists who look to impart their understanding of
other teams within the business.
Simply put, all other teams are there to enable the stream-aligned team. Security
needs to operate as an enablement team; i.e., they are domain experts that actively
collaborate with other teams. It is unrealistic and infeasible to expect that all engi‐
neers become security experts throughout a company, although it is not unrealistic or
infeasible to expect and embed a base level of security competency in all engineers.
Even in a highly automated world, developing systems is knowledge work—it is peo‐
ple who determine the success of your security initiatives.
It is through this enablement lens that many of the recipes in this cookbook make the
most sense. Through working with enterprises around the world, I have seen that the
paradigm shift from gatekeeper to enabler can be difficult to undertake; the animosity
and lack of trust between security and delivery built over many years are powerful
inhibitors of change. However, to take full advantage of cloud native security, this
shift must happen, or misaligned incentives will scupper any and all progress.
6 | Chapter 1: Security in the Modern Organization

1.4 The Purpose of Modern Security
Security operates in the domain of risk. Perfect security is not a realistic or achievable
goal; at any one time, you cannot provide services and be known to be immune to all
threats. This reality is even borne out in how fines are handed out following breaches:
a substantial percentage of the fine is negated if reasonable attempts have been made
to prevent the breach. So, if you cannot achieve complete security, then what is your
north star? What is your goal?
At the macro level, your goal is to make commercially reasonable efforts to minimize
the chance of security incidents. What is deemed commercially reasonable varies
wildly among companies. Often, startups have a significantly higher risk tolerance for
security than regulated enterprises, as common sense would lead us to predict. What
is important to keep in mind is that this much lower risk tolerance does not mean
that an enterprise cannot move as fast as a startup due to overbearing security con‐
cerns. Throughout this book you will see how, with the correct principles and recipes
in place, you do not handicap your stream-aligned teams.
At the micro level, your goal is to ensure that a single change does not present an
intolerable amount of risk. Again, what is tolerable is highly context specific, but
thankfully, techniques to minimize risk are often universal. Later in this chapter, as I
discuss DevSecOps, I will drill into what properties of changes allow you to minimize
the risk and how embracing a DevSecOps culture is required for aligning teams
around security objectives.
1.5 DevSecOps
Before I can dive into what DevSecOps is, you first need to understand its precursor,
DevOps.
What Is DevOps?
At its heart, DevOps is a cultural transformation of software delivery. It is heavily
influenced by lean theory and is most simply described as bringing together what his‐
torically were two disparate silos, development and operations, hence DevOps, or the
commonly used soundbite, “You build it, you run it.”
To put it into numbers, elite teams operating in a DevOps model do the following:
•
deploy code 208 times more frequently
• deploy code 106 times faster
• recover from incidents 2,604 times faster
•
make 1/7 the amount of changes that fail
1.4 The Purpose of Modern Security | 7

As you can see from the numbers, DevOps was revolutionary, not evolutionary, and
DevSecOps has the same potential.
Understanding these numbers is crucial for modern security as it allows for align‐
ment around a common set of constraints—security objectives need to be achieved
without preventing teams from becoming elite performers. Being elite for lead time
means that changes are in production within an hour, meaning that mandatory secu‐
rity tests that take a day to complete are incompatible with the future direction of the
company. A classic example of this in the enterprise is a mandatory penetration test
before every release; although the goal of the penetration test is valuable, the activity
itself and its place in the process need to change. The increasingly popular approach
of bug bounties is a potential replacement for penetration tests. These challenges that
security teams are now facing are the same ones that operations teams faced at the
birth of DevOps in the early 2000s.
It’s crucial to set the context, as it leads to the right conversations, ideas, problems,
and solutions to achieve the right outcomes. As you can see, the engineering and cul‐
tural principles needed to allow companies to merely survive today forces wide-scale
changes in security, the reality of which is what the industry calls DevSecOps.
Two of the seminal texts in DevOps,
e Phoenix Project (by Gene Kim et al., IT Rev‐
olution Press) and e Unicorn Project (by Gene Kim, IT Revolution Press), elaborate
“the Three Ways” and “the Five Ideals” as underlying principles. I’ll examine them
briefly here as they also underpin DevSecOps.
The Three Ways
These are the Three Ways:
Flow and Systems inking
The first way tells us that you need to optimize for the whole system, not simply
for one component. Local optimization can often come at the expense of the sys‐
tem as a whole, which leads us to the realization that the most secure system is
not necessarily in the best interests of the business. Delaying a critical feature
because of a vulnerability is a trade-off that needs to be made on a case-by-case
basis.
Amplify Feedback Loops
The second way tells us that feedbacks loops are the mechanisms that allow for
correction; the shorter they are, the faster you can correct. This leads us to the
potential value of the short-term embedding of security specialists in teams, and
also adopting tooling that allows for rapid feedback on changes, such as in IDE
SAST tooling.
8 | Chapter 1: Security in the Modern Organization

Culture of Continual Experimentation and Learning
The third way is how you need to embrace risk, and only by taking and learning
from risks can you achieve mastery. This leads us to the realization that the tech‐
nology domain is moving forward ever more rapidly, and you need to move with
it, not fight against it. Dogma leads to ruin.
The Five Ideals
These are the Five Ideals:
Locality and Simplicity
The first ideal around locality means that you should enable autonomous teams;
changes should be able to happen without approval from many people and
teams. Teams should own their entire value stream, which is a significant shift
from the siloed approach of the past, where handoffs reduced accountability and
added waste.
Focus, Flow, and Joy
The second ideal means that you should be looking to enable teams to focus on
their objectives and find flow, as working in a state of flow brings joy. Rather than
getting in each other’s way and working in the gatekeeper functions of the past,
you need to find how you can help people and teams achieve flow and make the
passage of work easy and enjoyable.
Improvement of Daily Work
Historically, the rush for features has drowned systems and teams in seas of tech‐
nical debt. Instead, you need to be mindful and enable teams to pay down their
technical debt. There may be systems that are in need of decommissioning, sys‐
tems that have started to struggle to scale, or decisions that have proved less than
optimal over time.
Psychological Safety
People should feel secure and safe to express themselves and should not be
blamed for mistakes, which instead are used as opportunities for learning.
Through rigorous and meticulous study, Google found that psychological safety
is one of the key properties of high-performing teams.
Customer Focus
Systems fall into one of two categories: core and context. Core generates a dura‐
ble competitive advantage for the business; context is everything else. Security for
most businesses is context; it exists to enable core but is not core itself, as it is not
generally a source of competitive advantage. This is shown by the fact that secu‐
rity operates as an enablement team and is there to support core in delivering the
greatest value.
1.5 DevSecOps | 9

What Is DevSecOps?
DevSecOps is the natural extension of DevOps into the security domain. You are now
charged with a goal of enabling business agility securely. Within that shift comes peo‐
ple, process, and tool changes, but it is important to understand that it is, at its core, a
shift in culture. Simply replacing tools in isolation will not allow you to thrive in the
new reality, no matter what the vendor might say.
As I said previously, security operates in the domain of risk. As part of the approval
and testing processes, for a change, you are trying to build confidence that you are
not introducing a large amount of risk. This is analogous to functional testing of soft‐
ware: you cannot prove the nonexistence of bugs, but you can pass a confidence
threshold, meaning that you can release into production. Proving that a change con‐
tains no security issues is impossible; being confident that a major issue is not intro‐
duced is possible. This brings us to the following two properties of a change that
impact risk:
Size of the change
Size is the most critical property of a change to consider when looking at risk.
The more you change, the more risk is involved. This is something that is hard to
definitively measure, as most things in security unfortunately are. But as a base,
heuristic lines of code are effective more often than not. You want many small
changes as opposed to fewer large ones. This allows you to more easily under‐
stand which change caused an adverse impact and to more effectively peer-
review the change, and it means that one bad change does not block all other
changes.
Lead time for changes
Based on our shared understanding that changes with security vulnerabilities are
inevitable, the speed with which you can resolve introduced issues becomes cru‐
cial. The total risk posed by a change is capped by the length of time it is exposed
and live. When an issue is discovered in production, the lower the lead time, the
less the exposure. In reality, the teams that pose the greatest challenge when first
embarking on DevSecOps, the pioneers moving the fastest, have the highest
potential for security. The days of “move fast and break things” are behind us;
today’s mantra is “Better Value, Sooner, Safer, Happier”.
Resolving issues with roll forward versus roll back
Upon discovery of an issue, in an ideal world you want to roll forward—introduce a
new change to resolve the issue—rather than roll back and revert all changes. An
operationally mature team has more options—the same processes and tools that
allow them to deploy many times a day give them a scalpel to target and resolve
issues. Teams early in their DevOps journey often only have sledgehammers, mean‐
ing that the business impact of resolving an issue is much worse.
10 | Chapter 1: Security in the Modern Organization

Continuous integration and continuous delivery
Continuous integration (CI) and continuous delivery (CD) are two foundational pat‐
terns that enable DevOps; they are how system change happens. Teams possess a
CI/CD pipeline which takes their code changes and applies them to environments.
Security teams possessing their own pipelines can rapidly enact change, while hook‐
ing into all pipelines in the organization allows them to enact change at scale.
Before I discuss what exactly continuous integration and continuous delivery are, let’s
segue briefly into how code is stored.
Version Control
Version control is the process of maintaining many versions of code in parallel. There
is a base branch, often called trunk or main, which has a full history of every change
that has ever happened. When a team member wishes to make a change, they make a
new branch, make their changes independently, and merge them back into the base
branch.
Companies will have at least one version control system they use, most commonly
GitHub, GitLab, or BitBucket. Becoming familiar with how version control operates
is a required skill for the modern security engineer.
What is continuous integration?
Continuous integration is the practice of regularly testing, at least daily, against the
base branch. Its primary purpose is to check that the proposed changes are compati‐
ble with the common code. Often, a variety of checks and tests are run against the
code before it is allowed to be merged back into the base branch, including a human
peer review.
As this process allows for barring changes, you can embed security tooling that ana‐
lyzes code and dependencies to stop known issues from being merged and ever
reaching a live environment.
What is continuous delivery?
Continuous delivery is the practice of having the common code maintained in a
deployable state; i.e., the team is able to perform a production release at any time. The
intent is to make releasing a business decision rather than a technical one. As the
code exists to fulfill a business need, it makes sense for this decision to be purely busi‐
ness driven.
This approach runs in opposition to significant human oversight on changes. A
mandatory human-operated penetration test before release means that continuous
delivery cannot be achieved, and the business loses agility as its ability to react is
constrained.
1.5 DevSecOps | 11

What is continuous deployment?
Continuous delivery and deployment are often confused, as they are very closely
related. Continuous deployment is the practice of performing an automated produc‐
tion release when new code is merged into the shared common code. By building the
apparatus around this, teams can be elite and release tens to hundreds of times a day.
The level of automation required shifts almost 100% of quality control onto tooling,
with the sole human interaction being the peer review. Teams reaching for this goal
introduces a need for a mature, fully automated DevSecOps tool chain.
CI/CD pipelines
As mentioned previously, teams possess CI/CDs, which is how change is applied to
environments. These pipelines are the only way to make production changes, and
provide the vector for embedding practices across all teams in an organization. As
long as you can automate something, it can become part of a pipeline and can be run
against every change as it makes its way to production and even after. Pipelines
become the bedrock for the technical aspects of the DevSecOps cultural shift.
Want to start running dependency checks of imported packages? Embed it into the
pipeline. Want to run static code analysis before allowing the code to be merged?
Embed it into the pipeline. Want to check infrastructure configuration before it’s live
in the cloud? Embed it into the pipeline.
Additionally, these pipelines operate as information radiators. As all change goes
through them, they become the obvious choice for where to surface information
from. As I am now broaching the topic of measuring the impact of security, many of
the metrics are observed from the pipelines themselves.
1.6 How to Measure the Impact of Security
I often find myself quoting Peter Drucker: “What gets measured, gets managed.” With
that in mind, how can you tackle measuring the impact of security? This has often
proved to be a vexing question for many chief information security officers (CISOs),
as security is only ever top of mind when something has gone wrong. While I do not
believe I have the one true answer, let’s discuss some ideas and heuristics that are
often used.
Time to Notify for Known Vulnerabilities
As modern systems are built on the shoulders of giants—i.e., software is built
depending on frameworks and libraries from innumerable developers and companies
—we need an ability to notify teams when one of their dependencies is known to
have a potential vulnerability.
12 | Chapter 1: Security in the Modern Organization

For example, I’m building a serverless function in Python, and I have used the latest
version of a library. Two days after that code is deployed into production, a vulnera‐
bility is identified and raised against the library. How long a wait is acceptable before
my team is notified of the vulnerability?
Time to Fix a Known Vulnerability
Coupled to the notification time, what is an acceptable wait time for the vulnerability
to be fixed? Fixing in this context can take a few different guises, the simplest being
deploying a new version of the function with a patched, updated library; slightly
more complicated is the decommissioning of the function until a patch is available,
and potentially most complicated is self-authoring the library fix.
The selection of the solution is context specific, but the metric will help drive matur‐
ity and will produce concrete examples around what risk is truly tolerable from the
business.
Service Impacts Incurred Through Security Vulnerabilities
Often the quickest way to close a potential security threat is to turn something off,
whether literally flicking a switch or making something inaccessible. As an organiza‐
tion operationally matures, the service impact of fixing a security issue should be neg‐
ligible. As talked about previously, you want to roll forward fixes, thereby not impact‐
ing service availability, but there will be cases along the journey where it is better to
place the service in a degraded state while the fix is applied. Improvements in this
metric are correlated with increased operational maturity.
Attempted Breaches Prevented
Modern tooling is sophisticated enough to identify breaches being attempted or ret‐
roactively identify past breach attempts. To make the impact of investment in security
more tangible, understanding how many potential incidents have been prevented is a
powerful metric to obtain. It is important, however, that there is nuance in the meas‐
urement. Being able to drill down to the component level is crucial; for example,
reducing your attack surface by decommissioning infrastructure will make the aggre‐
gate count decrease but could be misconstrued as a loss in tooling efficacy, or it could
simply be that fewer attempts are being made.
Compliance Statistics
Having a robust set of controls that define compliant cloud resource configurations is
crucial in a scalable security approach, as you will see in greater detail later in the
book. For now, consider an AWS organization with hundreds of S3 buckets spread
across tens of accounts—you should be able to track and report on how many of
1.6 How to Measure the Impact of Security | 13

them have sufficient levels of server-side encryption enabled. By tracking this metric
across many resource types and configuration options, you can understand our base‐
line security posture at scale and show the impact of security initiatives.
Percentage of Changes Rejected
As part of a security team’s enablement objective, over time you need to determine
efficacy. Over time, teams should understand the security context they operate
within, and doing things securely should be the default. A metaphor I like for this is
that developers are like lightning—they pursue the path of least resistance. If you can
make the secure path the one of least resistance, you will observe the percentage of
changes rejected on security grounds decrease over time.
1.7 The Principles of Security
By establishing principles, a common set of beliefs, and embedding them through
action, you make significant progress on two pivotal goals. First, you strengthen a
culture that takes security seriously. Second, you build the foundations for autonomy.
Fundamentally, scaling is achieved by giving people the tools and mental models
required to make the correct decisions. It is not enough for people to be able to parrot
answers back; they need to be able to arrive at the same answer independently. To that
end, let’s look at a starting set of principles.
Least Privilege
Often the first principle that comes to mind when discussing security, the principle of
least privilege is that actors in the system, both human and robot, have enough privi‐
lege to perform their jobs and no more. For example, a human cannot make changes
to production environments without using the CI/CD pipeline, or a system cannot
provision infrastructure in regions that are not needed for the application.
Currently this is hard to achieve and maintain. As I have already discussed, the busi‐
ness needs to be agile, which means that the scope of permissions someone requires
can rapidly change. The most common issue I’ve seen is that although getting exten‐
ded permissions is normally streamlined and fairly trivial, permissions are rarely
revoked or challenged. Often what was least privileged in the past is now overly privi‐
leged due to a decrease in scope. We’ll evaluate recipes later in the book around both
the initial creation of permission sets and their ongoing maintenance.
Only as Strong as Your Weakest Link
Your security posture is not determined by your strongest point but by your weakest.
Having a castle doesn’t help keep you safe if you leave the gate unlocked and open.
14 | Chapter 1: Security in the Modern Organization

When you look at how to implement cloud native security, you need to make sure
you’re focusing on the weak points, not reinforcing areas of strength.
There’s no value in investing significant time in finely tuned identity and access man‐
agement (IAM) policies, if users are not ubiquitously using multifactor authentication
(MFA).
Defense in Depth
This principle is closely related to the concept of weakest links. To have a robust secu‐
rity posture, you need layered solutions. For example, company systems are often
only accessible over a virtual private network (VPN), and the intent is that the VPN is
only accessible by authenticated users; however, you should not implicitly trust that
all users coming from the VPN address space have been authenticated. Otherwise, a
compromise in one system cascades, and the potential impact of a breach is magni‐
fied.
Another example is when designing networking, as discussed in Chapter 5. Applica‐
tions in the cloud have distinct identities that define access, beneath that should be
additional firewall rules that use IP address ranges to allow groups of systems to com‐
municate, and beneath that are the routes which dictate where traffic can flow. These
combine to iteratively reduce the blast radius of a breach: a compromise in one layer
does not completely negate all controls.
Security Is Job Zero
A phrase initially coined by Amazon, this principle speaks to how security is the first
step in the process. Although I have already discussed how not everyone can be secu‐
rity experts, everyone must become security conscious, literate, and cognizant. Allow‐
ing people to look through a security lens is the most critical aspect of a security
team, which we’ll discuss as part of the enablement strategies in Chapter 4.
Culturally, security has to be the basis from which both technical and social systems
are built. An insecure foundation will undermine anything built on top of it. Bad
password management undoes password complexity requirements. Unencrypted
traffic can make encryption at rest pointless.
You can’t out-engineer a culture that doesn’t value security at its core.
Quality Is Built In
This principle goes hand in hand with security as job zero. Historically, security was a
“bolt-on”—once the functionality was built, it was then made secure, to varying levels
of efficacy. In a world centered around the need for business agility, it is hard to see
how this “bolt-on” approach, even if it was effective in preventing incidents, allowed
teams to be agile and effective. Security is an aspect of system quality. In the
1.7 The Principles of Security | 15

preceding principle, it is the alpha quality; without a secure foundation the change
should never see the light of day. Code, architectures, and systems need to be
designed to allow for security, meaning that security is something that needs to be
prioritized and invested in from day one.
Businesses can often be myopic in the pursuit of new functionality, and under pres‐
sure to hit release dates, security is often deprioritized. This technical debt accrues
over time and becomes incredibly expensive to pay back, orders of magnitude more
than was initially required to build in at the start.
DevSecOps initiatives, tooling, and processes like threat modeling make security a
first-class initiative from before a line of code is written. By enforcing security stand‐
ards from the beginning, it is no longer work that can be dropped when there is
schedule pressure. It’s part of the standard operating procedure.
Chapter Summary
Let’s review the learning objectives.
Modern life means that ever more value is being created digitally, and with that come
more incentives for cyber criminals and worse damages as regulation increases. As
the attacks grow in sophistication, so must our defenses. Cloud native security is
security principles applied in true symbiosis with the cloud, ensuring that you are
building fit-for-purpose processes, using the right tools, and making sure our people
understand the new reality.
Security is an enablement function in a modern organization, as opposed to the gate‐
keeper position it often previously occupied. It needs to allow for change to flow
quickly, easily, and safely. Security exists to manage risk, both at the macro and micro
levels. Risk is introduced through change, so being able to understand change at scale
is critical in managing risk. Smaller, more frequent change is far less risky than bigger,
less frequent change.
DevSecOps is a cultural shift that transforms how security works in concert with
delivery teams. You cannot achieve DevSecOps by buying a new tool; instead, it is a
deep-rooted change that starts and ends with people. I talked about a few quantitative
measures that could be used together to understand how security is maturing at your
organization, such as the percentage of compliant infrastructure, the speed with
which the issues are rectified, and the number of potential breaches negated.
The fundamental principles of security have not changed in decades; instead it is
their application that has changed. From least privilege to defense in depth, under‐
standing these principles enables you to form a security strategy and understand how
the recipes in this book stem from a strong, principled foundation.
16 | Chapter 1: Security in the Modern Organization

With the introduction done, we’ll now look at the recipes that allow you to establish a
solid foundation in the cloud. As with a shaky foundation, everything built on top
will quickly come crashing down around you.
1.7 The Principles of Security | 17

CHAPTER 2
Setting Up Accounts and Users
In Chapter 1, you saw the principles that underly modern security and, specifically,
how security functions as cloud native becomes the dominant paradigm in the indus‐
try. Now, let’s move on to the initial configuration of your cloud estate. Investing in a
scalable, programmatic approach will let you move with the business, allowing teams
to rapidly onboard and innovate and allowing you to focus your energies and efforts
on higher-value activities.
You’ll see how to do the following:
• Create the fundamental building blocks of cloud estates
• Deploy a region-based guardrail to constrain teams to only approved regions
• Centralize and create users to allow people to access your estate in a manageable
way
2.1 Scalable Project Structures on GCP
Problem
You need to deploy the projects required to rapidly onboard a new team in to your
organization.
Solution
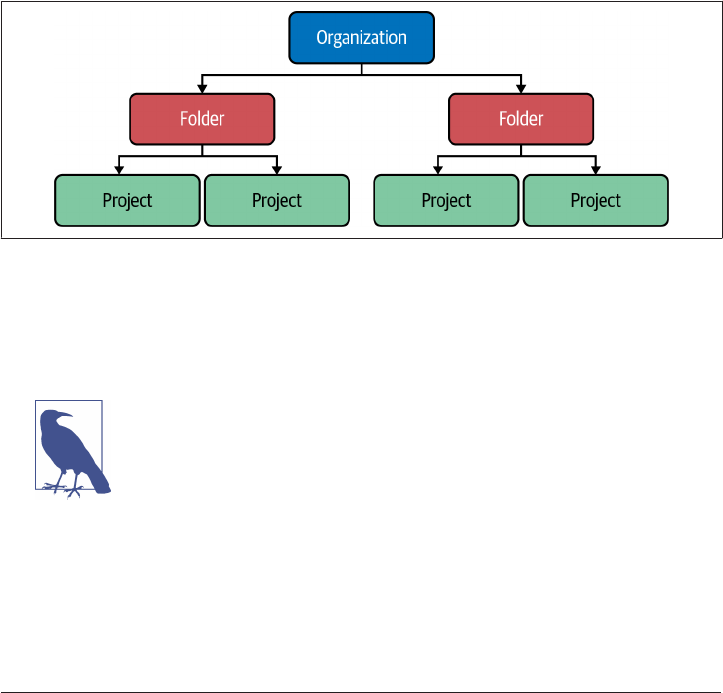
In this recipe, you will deploy a new folder for a team, with the four required projects
underneath, as shown in Figure 2-1.
19
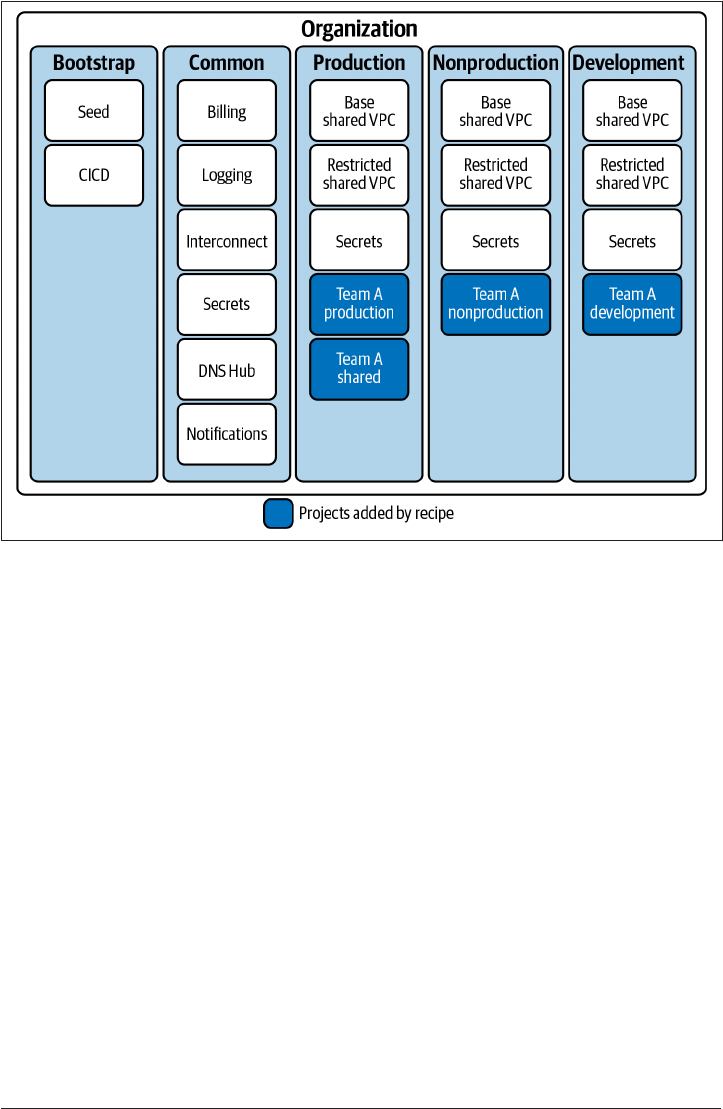
Figure 2-1. Recommended organization structure
If you haven’t already done so, familiarize yourself with Terraform and the different
authentication mechanisms in Chapter 11.
Create a variables.tf file and copy the following contents:
variable "production_folder_name" {
type = string
description = "The name of the production folder"
}
variable "nonproduction_folder_name" {
type = string
description = "The name of the nonproduction folder"
}
variable "development_folder_name" {
type = string
description = "The name of the development folder"
}
variable "project_prefix" {
type = string
description = "Used to prefix the project names to ensure global uniqueness"
20 | Chapter 2: Setting Up Accounts and Users

}
variable "team_name" {
type = string
description = "The name of the team to be onboarded"
}
Then fill out the corresponding terraform.tfvars file:
production_folder_name = ""
nonproduction_folder_name = ""
development_folder_name = ""
project_prefix = ""
team_name = ""
Create the following provider.tf file and run terraform init:
provider "google" {}
terraform {
required_providers {
google = {
source = "hashicorp/google"
version = "~> 3"
}
}
}
Create the following main.tf file and run terraform plan:
data "google_folder" "production" {
folder = var.production_folder_name
}
data "google_folder" "nonproduction" {
folder = var.nonproduction_folder_name
}
data "google_folder" "development" {
folder = var.development_folder_name
}
resource "google_project" "production" {
name = "${var.team_name}Production"
project_id = "${var.project_prefix}-${var.team_name}-prod"
folder_id = data.google_folder.production.name
}
resource "google_project" "preproduction" {
name = "${var.team_name}PreProduction"
project_id = "${var.project_prefix}-${var.team_name}-preprod"
folder_id = data.google_folder.nonproduction.name
}
2.1 Scalable Project Structures on GCP | 21
resource "google_project" "development" {
name = "${var.team_name}Development"
project_id = "${var.project_prefix}-${var.team_name}-dev"
folder_id = data.google_folder.development.name
}
resource "google_project" "shared" {
name = "${var.team_name}Shared"
project_id = "${var.project_prefix}-${var.team_name}-shared"
folder_id = data.google_folder.production.name
}
Review the resources that are going to be created, and then run terraform apply to
make the changes.
Discussion
On Google Cloud Platform (GCP), you have a three-tier resource hierarchy that
allows you to define your organizational structure, as shown in Figure 2-2.
Figure 2-2. e organization hierarchy in GCP
Through a GCP organization, you are able to centrally manage identity (see Recipe
2.7), apply policies (see Recipe 2.4), and get visibility of security issues at scale (see
Recipe 3.1).
It is highly recommended that you have two organizations set up.
This allows you to test and measure the impact of changes made at
the organization level, e.g., enabling a new organization policy for
the entire organization.
22 | Chapter 2: Setting Up Accounts and Users

Core folders
Google best practice recommends five core folders you should have underneath your
organization:
•
Common, which contains the centralized and shared resources for the entire
organization. It can include the following projects:
— Billing, which gives centralized management of billing logs.
—
Logging, where you store an immutable copy of all logs for audit and investi‐
gation purposes.
— Interconnect, where you deploy the Cloud Interconnect and related resources
for hybrid networking.
— Secrets, for housing the organization-wide secrets allowing for centralized
access, management, and rotation.
— DNS Hub, for configuring peered DNS between Google Cloud and on-
premise.
—
Notifications, where you centrally configure alerting from a Security Com‐
mand Center (see Recipe 3.1).
• Production, which holds all the projects containing production resources. In
addition to one or more projects for each production application, it can include
the following projects:
— Base Shared VPC, which hosts the base production shared VPC.
— Restricted Shared VPC, which hosts the restricted production shared VPC.
— Secrets, for housing the shared production secrets.
•
NonProd, which holds all the projects containing nonproduction resources. It
will have a nonproduction copy of all production projects.
• Dev, which holds all the projects containing development resources. It will have a
development copy of all production projects.
• Bootstrap, which contains the projects used to create the resource hierarchy. It
will contain these two projects:
— CI/CD, which houses the CI/CD pipeline to deploy the resource hierarchy.
— Seed, which contains the Terraform state and service account required for the
CI/CD pipeline to operate.
To create the Bootstrap folder and move the current project underneath it, copy and
apply the following Terraform. The current project then becomes the Seed project
outlined previously.
2.1 Scalable Project Structures on GCP | 23

resource "google_folder" "bootstrap" {
display_name = "Bootstrap"
parent = data.google_organization.this.name
}
resource "null_resource" "move_initial_project" {
provisioner "local-exec" {
command = "gcloud beta --quiet projects move ${var.project_id}" +
"--folder ${split("/", google_folder.bootstrap.id)[1]}"
}
}
Per workload projects
This recipe created the following four projects for the team onboarding to your GCP
organization:
• Production, which holds all the resources for the production instance of the
service:
— User access to this project should be disabled by default.
— All change should happen via infrastructure as code and CI/CD pipelines.
—
In an emergency, user access can be reenabled.
• Preproduction, which holds a full copy of production without production data.
— This project is used to test changes before promoting them to production.
—
Access to this project should be identical to production, by default through
automation.
— User changes result in differences between nonproduction and production,
which decreases testing efficacy, resulting in more production issues.
• Development, which is for developers to rapidly experiment against.
—
Developers should have direct access to this project.
— By allowing developers direct access, they are able to iterate much faster.
— Ideally, changes are made through locally executed infrastructure as code.
• Shared, which holds the shared infrastructure for the application.
— For example, DNS infrastructure and artifact repositories.
—
Changes here should be done via infrastructure as code through CI/CD
pipelines.
— If the CI/CD pipelines fail, then user access will be required to recover them.
24 | Chapter 2: Setting Up Accounts and Users

Strategies for converging organizations
Over time, it often becomes necessary to migrate projects between GCP organiza‐
tions. This can be due to mergers and acquisitions, business requirements necessitat‐
ing multiple organizations, or pulling together business unit–owned organizations
under centralized IT management.
To enable this, two folders are often used temporarily when migrating projects
between organizations: Import and Export. These folders are used during the
onboarding and offboarding process, respectively, and allow you to test that the
workloads in the projects operate as expected when moved. This also means that you
can explicitly only allow for the migration of projects that are contained within these
folders, allowing you to more closely observe the principle of least privilege.
As of the time of writing, migrating projects between organizations is an alpha fea‐
ture, whereas historically it required a support ticket to action. As this process is
becoming increasingly common among companies, let’s discuss the potential strate‐
gies that exist:
Migrate projects
Depending on the nature of the resources within a project, this can vary in diffi‐
culty from trivial to requiring significant amounts of planning. Using Cloud
Asset Inventory allows you to understand all the resources within a project, the
details of which can be exported to BigQuery, allowing you to run queries to
determine the required approach.
Migrate workloads
into fresh accounts. If the workload has been created with infrastructure as code
and its data is not cost prohibitive to move, it can be easier to simply stand the
workload up in a new project within the new organization. For a lot of develop‐
ment and test workloads that do not have full production databases, this can be
an easy solution to test that the new organization is configured to support pro‐
duction.
Upgrade the existing foundation
It is possible to maintain multiple organizations such that they function similarly
with high levels of infrastructure as code. This should only be selected as the
enduring option when it proves too complex or expensive to bring all workloads
under a single organization.
Maintain all organizations
Not considered an enduring option, based on business priorities, it can make
sense to allow two organizations to coexist and not make short-term investments
into merging them together. However, over the long term, this can prove very
2.1 Scalable Project Structures on GCP | 25

expensive as significant amounts of engineering effort must be expended to
maintain both to a sufficient standard.
26 | Chapter 2: Setting Up Accounts and Users

Summarizing the Recipe
Let’s summarize what was covered in this recipe:
•
GCP organizations are built from a root organization node, with folders and
projects underneath.
• A set of core folders suffice for the requirements of most organizations:
—
Bootstrap, where the initial project goes and the organization is modified
from.
— Common, where the core infrastructure pieces such as shared networking
exist.
— Production, where delivery teams are able to deploy their production
workloads.
— NonProduction, where delivery teams are able to deploy their nonproduction
workloads.
—
Development, where delivery teams are able to deploy their development
workloads.
• There are additional folders which organizations often use, and you learned
about having explicit Import and Export folders for managing moving projects
between organizations.
2.2 Scalable Account Structures on AWS
Problem
You need to deploy the accounts required to rapidly onboard a new team into your
organization.
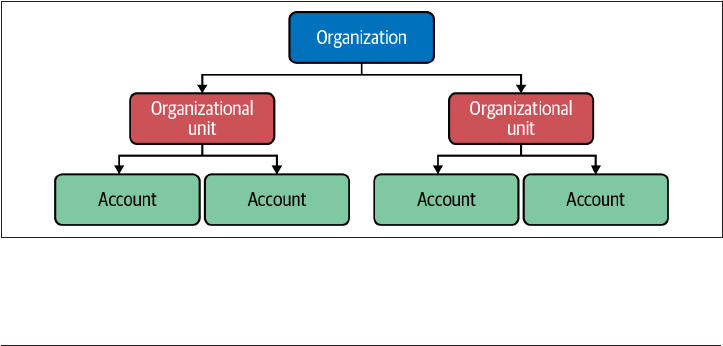
Solution
This recipe builds out four accounts, as shown in Figure 2-3.
2.2 Scalable Account Structures on AWS | 27

Figure 2-3. Recommended organization structure
If you haven’t already done so, familiarize yourself with Terraform and the different
authentication mechanisms in Chapter 11.
Create a variables.tf file and copy the following contents:
variable "production_ou_id" {
type = string
description = "The ID of the production OU"
}
variable "preproduction_ou_id" {
type = string
description = "The ID of the preproduction OU"
}
variable "development_ou_id" {
type = string
28 | Chapter 2: Setting Up Accounts and Users

description = "The ID of the development OU"
}
variable "team_name" {
type = string
description = "The name of the team to be onboarded"
}
variable "production_account_email" {
type = string
description = "The production root account email"
}
variable "preproduction_account_email" {
type = string
description = "The preproduction root account email"
}
variable "development_account_email" {
type = string
description = "The development root account email"
}
variable "shared_account_email" {
type = string
description = "The shared root account email"
}
Then fill out the corresponding terraform.tfvars file:
production_ou_id = ""
preproduction_ou_id = ""
development_ou_id = ""
team_name = ""
production_account_email = ""
preproduction_account_email = ""
development_account_email = ""
shared_account_email = ""
Create the following provider.tf file and run terraform init:
provider "aws" {}
terraform {
required_providers {
aws = {
source = "hashicorp/aws"
version = "~> 3"
}
}
}
Create the following main.tf file and run terraform plan:
2.2 Scalable Account Structures on AWS | 29
resource "aws_organizations_organizational_unit" "team" {
name = var.team_name
parent_id = var.organizational_unit_parent_id
}
resource "aws_organizations_account" "production" {
name = "${var.team_name}-production"
email = var.production_account_email
parent_id = aws_organizations_organizational_unit.team.id
}
resource "aws_organizations_account" "preproduction" {
name = "${var.team_name}-preproduction"
email = var.preproduction_account_email
parent_id = aws_organizations_organizational_unit.team.id
}
resource "aws_organizations_account" "development" {
name = "${var.team_name}-development"
email = var.development_account_email
parent_id = aws_organizations_organizational_unit.team.id
}
resource "aws_organizations_account" "shared" {
name = "${var.team_name}-shared"
email = var.shared_account_email
parent_id = aws_organizations_organizational_unit.team.id
}
Review the resources that are going to be created, and then run terraform apply to
make the changes.
Discussion
On AWS, cloud estates are built from three foundational resources—organizations,
organizational units, and accounts—which create the hierarchy shown in Figure 2-4.
Figure 2-4. e organization hierarchy in AWS
30 | Chapter 2: Setting Up Accounts and Users

The organization works as the root of the entire estate, and a number of security
activities are done at the organizational level, as it allows you to look holistically
across all accounts. Both Recipes 3.2 and 3.8 aggregate data from across the organiza‐
tion.
It is highly recommended that you have two AWS organizations.
This allows you to test and measure the impact of changes made at
the organization level, e.g., enabling a new service control policy
(SCP) for the entire organization, such as in Recipe 2.5.
The organizational units you should have
Organization units (OUs) are a way of grouping accounts, and other organizational
units together. In this recipe, you created one for a specific team, but when initially
creating your organization, there are a number of AWS-recommended OUs and
accounts to create based on function and ownership:
e Security OU
This houses the centralized security resources and facilitates cross-account
access. It should contain both production and test OUs to allow for the proper
management of workloads. Under the Security OU should be the following
accounts and OUs:
• The log archive account, which serves as the central log aggregation location,
allowing users to review immutable logs from across the entire estate. See
Recipe 3.5.
• The cloud native security tooling account, which acts as the centralized
aggregator for AWS security services for the organization. These include
Amazon GuardDuty (see Recipe 3.8) and AWS Security Hub (see Recipe
3.2).
•
A production and test account for each self-hosted security tool, such as
Splunk or HashiCorp Vault.
• The security read-only account, which serves as a gateway to read-only
access in all accounts across the estate for incident investigation and threat
hunting.
•
The security break-glass account, which serves as a privileged gateway to
accounts within the estate in case of an emergency.
• The quarantine OU, which locks down accounts that have potentially been
compromised.
2.2 Scalable Account Structures on AWS | 31

e Workload OU
This is the parent of delivery team–specific OUs and accounts as created in this
recipe.
e Infrastructure OU
This can contain the following accounts:
• A production and a preproduction transit or networking account, which
serves to enable centralized, secure North-South connectivity to on-premise
workloads and East-West connectivity between AWS Accounts.
• An organization health account, which serves as a central, operations-
focused, single pane of glass for the entire organization. Commonly, services
such as AWS Systems Manager Explorer, seen in Recipe 8.5, are managed
and viewed from this account.
There are also some additional OUs that can be helpful in specific scenarios, includ‐
ing the following:
e Exceptions OU
Sometimes you have accounts that house workloads that are particularly unusual
or hard to fit within your guardrails. In these cases, you can create an exceptions
OU that allows them to run in the cloud.
e Transitional OU
At times you may need to merge disparate AWS organizations, and the accounts
being moved will need to be retrofitted to work in the new organization. This OU
can be used as a temporary holder while the required changes are made to the
accounts.
e Suspended OU
This houses accounts that are awaiting decommissioning or have been sus‐
pended.
e Policy Staging OU
This is recommended by AWS for the testing and promotion of policies such as
service control policies (SCPs). In general, this is better served by a full secondary
organization, as it provides a higher signal testing approach.
e Sandbox OU
This houses accounts with minimal guardrails, which allows users to experiment
with the full breadth of what AWS has to offer. They are often completely
removed from the shared infrastructure, and should regularly have all resources
deleted to control costs.
32 | Chapter 2: Setting Up Accounts and Users

e Individual Business Owners OU
This houses resources that do not constitute a full workload, such as a public S3
bucket holding certain public assets.
Per workload accounts
This recipe created four accounts to house the workload of the onboarding team:
Production
This holds all the required production resources.
•
Human access to this account should be disabled by default.
• All change should happen via infrastructure as code and CI/CD pipelines.
• In an emergency, user access can be reenabled.
Preproduction
This holds a full copy of production resources but not production data.
• This account is used to test changes before promoting to production.
• Access to this account should be identical to production, by default through
automation.
•
User changes result in differences between nonproduction and production,
which decreases testing efficacy, resulting in more production issues.
Development
This account is for developers to rapidly experiment against.
• Developers should have direct access to this account.
• Direct access lets developers iterate much faster.
•
Ideally, changes are made through locally executed infrastructure as code.
Shared
This account holds the shared infrastructure for the application.
• This might include DNS infrastructure and artifact repositories.
• Changes here should be done via infrastructure as code through CI/CD
pipelines.
•
If the CI/CD pipelines fail, then user access will be required to recover them.
Strategies for converging organizations
It might be that after reading this recipe and others further in the book, your existing
AWS organization needs reworking or potentially recreating. With that in mind, let’s
quickly talk through the options that exist for handling multiple organizations.
2.2 Scalable Account Structures on AWS | 33

Migrate accounts
Depending on the complexity of the workloads hosted in the accounts, this can
range from easy to nearly impossible. Workloads that are running self-
sufficiently from a connectivity and infrastructure perspective can be moved with
a reasonable amount of effort. If they are dependent on resources from many
other accounts in the organization, the effort grows exponentially.
Migrate workloads
If the workload has been created with infrastructure as code, then there is poten‐
tial to easily recreate the workloads in a new account. The complexity here is
often due to two factors: the cost to potentially extricate the data and move it into
the new account and the service outage necessitated by this movement.
Upgrade the existing organizations
This is where you invest effort to bring the organizations into feature and imple‐
mentation parity. This enables workloads to be housed where they currently
reside and ideally look to move all new workloads to one organization over the
other. This can be a large effort depending on the differences between the two
organizations.
Maintain all organizations
This should not be considered as a realistic, enduring option, as you commit to
duplicating effort on an ongoing basis. However, due to prioritization and budget
constraints, this can be the chosen option for the short to medium term. In this
case, ensure that all new workloads go to the organization which would become
enduring if the call was made.
Summarizing the Recipe
Let’s review what was covered as part of this recipe:
• Within an AWS organization, you have organizational units and accounts.
• Organizational units allow you to group accounts and other organizational units
together
• Thea recommended set of core organizational units includes the following:
— Security, which houses the accounts for security activities
— Workloads, where all the business workloads are housed
— Infrastructure, where common shared infrastructure pieces live, like Transit
Gateway
• To fully test organization structure changes, it is recommended to have a second
organization as a preproduction mirror of the production organization.
•
Organization structures can be created through code.
34 | Chapter 2: Setting Up Accounts and Users
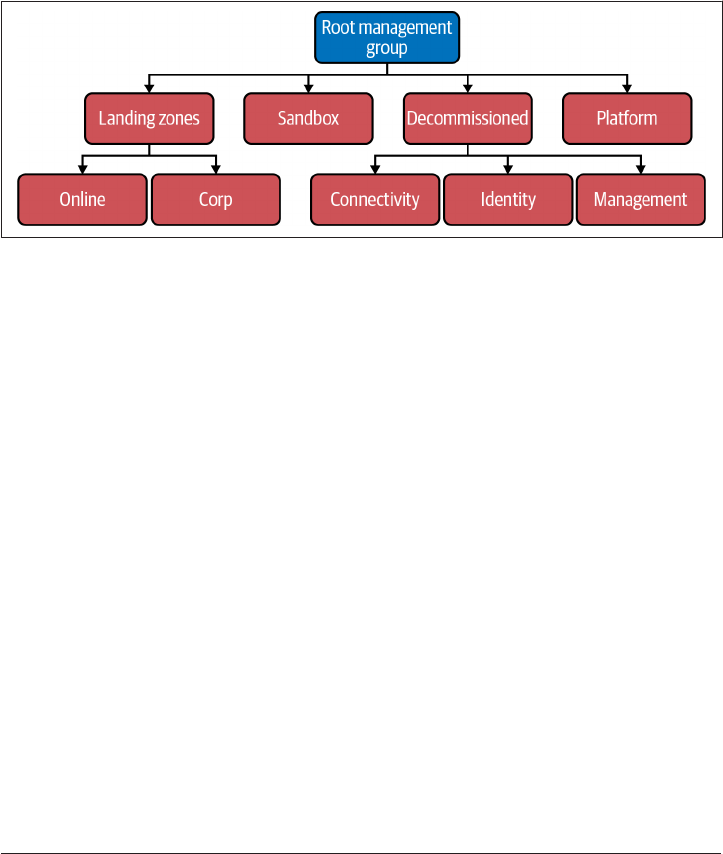
2.3 Scalable Subscription Structures on Azure
Problem
You need to deploy the subscriptions required to rapidly onboard a new team into
your organization.
Solution
This recipe builds out four subscriptions, as shown in Figure 2-5.
Figure 2-5. Recommended tenant structure
If you haven’t already done so, familiarize yourself with Terraform and the different
authentication mechanisms in Chapter 11.
Create a variables.tf file and copy the following contents:
variable "management_group_parent_id" {
type = string
description = "The ID of the parent for the team's management group"
}
variable "billing_account_name" {
type = string
description = "The name of the Azure billing account"
}
variable "enrollment_account_name" {
type = string
description = "The name of the Azure enrollment account"
}
variable "team_name" {
type = string
description = "The name of the team to be onboarded"
}
Then fill out the corresponding terraform.tfvars file:
2.3 Scalable Subscription Structures on Azure | 35

management_group_parent_id = ""
billing_account_name = ""
enrollment_account_name = ""
team_name = ""
Create the following provider.tf file and run terraform init:
provider "azurerm" {
features {}
}
terraform {
required_providers {
azurerm = {
source = "hashicorp/azurerm"
version = "~> 2"
}
}
}
Create the following main.tf file and run terraform plan:
resource "azurerm_management_group" "team" {
display_name = var.team_name
parent_management_group_id = var.management_group_parent_id
subscription_ids = [
azurerm_subscription.production.subscription_id,
azurerm_subscription.preproduction.subscription_id,
azurerm_subscription.development.subscription_id,
azurerm_subscription.shared.subscription_id
]
}
data "azurerm_billing_enrollment_account_scope" "root" {
billing_account_name = var.billing_account_name
enrollment_account_name = var.enrollment_account_name
}
resource "azurerm_subscription" "production" {
billing_scope_id = data.azurerm_billing_enrollment_account_scope.root[0].id
subscription_name = "${var.team_name}Production"
}
resource "azurerm_subscription" "preproduction" {
billing_scope_id = data.azurerm_billing_enrollment_account_scope.root[0].id
subscription_name = "${var.team_name}Preproduction"
}
resource "azurerm_subscription" "development" {
billing_scope_id = data.azurerm_billing_enrollment_account_scope.root[0].id
subscription_name = "${var.team_name}Development"
}
36 | Chapter 2: Setting Up Accounts and Users
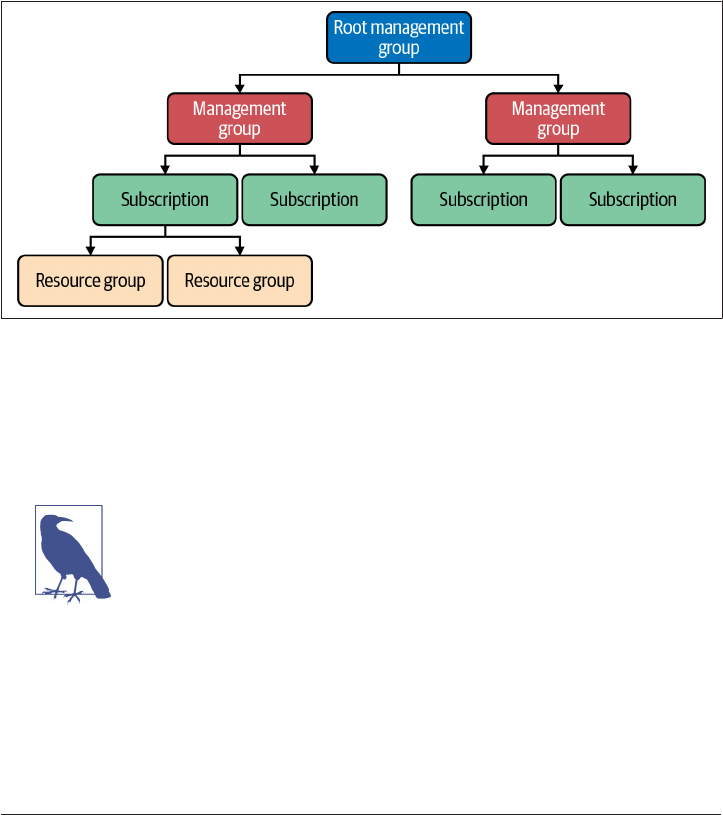
resource "azurerm_subscription" "shared" {
billing_scope_id = data.azurerm_billing_enrollment_account_scope.root[0].id
subscription_name = "${var.team_name}Shared"
}
Review the resources that are going to be created, and then run terraform apply to
make the changes.
Discussion
In Azure, there is a three-tier hierarchy for creating your estate: management groups,
subscriptions, and resource groups, as shown in Figure 2-6.
Figure 2-6. e tenant hierarchy in Azure
At the top level you have a root management group, and underneath that you can
have subscriptions and other management groups. You can apply policies at the man‐
agement group level, so you can apply guardrails high up your hierarchy to simplify
management at scale.
It is highly recommended that you create two tenants. This allows
you to test and measure the impact of changes made at the tenant
level, e.g., making core networking changes, such as in Recipe 5.9.
The management groups you should have
Underneath the root management group, there are a series of management groups
you should have to enable different parts of the business:
2.3 Scalable Subscription Structures on Azure | 37

Sandbox
This management group gives users a space to experiment with Azure. You
should not allow production workloads to be run from here; instead, they should
be in the outlined landing zones management group. This also gives you a man‐
agement group to automatically assign new subscriptions if not specified; other‐
wise they are created under the root management group.
Platform
This management group exists for the creation and management of platform
level resources and other shared services. Underneath this management group,
you should look to create three more:
•
Identity, a management group to hold all the subscriptions required for iden‐
tity management, containing resources such as Active Directory Domain
Services
• Management, a management group to cater to platform-level monitoring
and logging
•
Connectivity, a management group to hold all the central networking com‐
ponents, such as the Hub VNet at the center of your networking topology, as
seen in Recipe 5.9
Decommissioned
This management group is for subscriptions that are being decommissioned or
retired. Subscriptions self-delete 90 days after being cancelled or can be force
deleted after 72 hours have passed.
Landing zones
This management group allows you to create areas that are preconfigured to sup‐
port teams with a particular application architecture. Underneath this manage‐
ment group, two common landing zone flavors are Online, which are externally
accessible applications, and Corp, for applications only reachable from the inter‐
nal network. As your estate scales, you’ll need to create landing zones to cater to
different requirements and architectures.
Per workload subscriptions
This recipe created four subscriptions to house the workload of the onboarding team:
Production
This holds all the required production resources.
• User access to this subscription should be disabled by default.
• All change should happen via infrastructure as code and CI/CD pipelines.
• In an emergency, user access can be reenabled.
38 | Chapter 2: Setting Up Accounts and Users

Preproduction
This holds a full copy of production resources but not production data.
• This subscription is used to test changes before promoting to production.
•
Access to this subscription should be identical to production, by default
through automation.
• User changes result in differences between nonproduction and production,
which decreases testing efficacy, resulting in more production issues.
Development
This subscription is for developers to rapidly experiment against.
• Developers should have direct access to this subscription.
•
Direct access allows developers to iterate much faster.
• Ideally, changes are made through locally executed infrastructure as code.
Shared
This subscription holds the shared infrastructure for the application.
• This may include DNS infrastructure and artifact repositories.
• Changes here should be done via infrastructure as code through CI/CD
pipelines.
•
If the CI/CD pipelines themselves fail, then user access will be required to
recover them.
Considerations for subscriptions
Subscriptions in Azure are a unit of management, billing, and scale. You can apply
Azure policies directly to subscriptions. Taking the example of personally identifiable
information (PII), you can apply required policies to those subscriptions without
needing a dedicated management group. This allows you to have coarse-grained con‐
trols at the management group layer and to use subscriptions to be able to apply fine-
grained controls.
Furthering on that governance theme, subscriptions should be used to segment pro‐
duction and nonproduction environments. Often, access controls are tighter for pro‐
duction resources, but to enable teams to move and experiment rapidly, development
controls are relaxed.
The important thing with subscriptions is to be flexible; as more teams move into the
cloud, they will often have unique or new requirements that must be catered to. As
these new requirements surface, you can build out further subscriptions and policies
to achieve your governance objectives without producing too much friction for
teams.
2.3 Scalable Subscription Structures on Azure | 39

Summarizing the Recipe
Let’s summarize what you learned and deployed in this recipe:
•
Azure organizations are built from management groups, subscriptions, and
resource groups.
• They are centered around a root management group.
•
There are four core recommended management groups:
— Sandbox, where users can experiment with Azure.
— Platform, where centralized services are created. Underneath this manage‐
ment group, you should have further management groups based on what ser‐
vice is being provided.
— Decommissioned, where subscriptions that are pending decommission are
stored.
— Landing zones, where teams are onboarded. Underneath this management
group, you should have further management group applications based on
infrastructure requirements.
2.4 Region Locking on GCP
Problem
You are setting up your initial GCP organization, and you need to ensure that teams
are only able to deploy resources into Australian regions for data sovereignty and
limit the blast radius in case of a breach.
Solution
If you haven’t already done so, familiarize yourself with Terraform and the different
authentication mechanisms in Chapter 11.
Create a variables.tf file and copy the following contents:
variable "organization_domain" {
type = string
description = "The domain for your Organization"
}
variable "allowed_location" {
type = string
description = "The allowed location for resources"
}
Then fill out the corresponding terraform.tfvars file:
40 | Chapter 2: Setting Up Accounts and Users

organization_domain = ""
allowed_location = ""
Create the following provider.tf file and run terraform init:
provider "google" {}
terraform {
required_providers {
google = {
source = "hashicorp/google"
version = "~> 3"
}
}
}
Create the following main.tf file and run terraform plan:
data "google_organization" "this" {
domain = var.organization_domain
}
resource "google_organization_policy" "region_lock" {
org_id = data.google_organization.this.org_id
constraint = "constraints/gcp.resourceLocations"
list_policy {
allow {
values = ["in:${var.allowed_location}"]
}
}
}
Review the resources that are going to be created, and then run terraform apply to
make the changes.
Discussion
On GCP, to enact region locking, you should use organization policies. You can use
these to region lock your entire organization as in the preceding solution, or you can
apply them directly to folders or even specific projects. The policies are implicitly
inherited down your organization hierarchy but can be overruled by an explicit
assignment further down.
For example, to apply a policy that also allows access to Singapore (asia-
southeast-1), you can use the same google_project_organization_policy and
apply it directly to a given project:
resource "google_project_organization_policy" "region_lock_policy" {
project = ""
constraint = "constraints/gcp.resourceLocations"
2.4 Region Locking on GCP | 41

list_policy {
allow {
values = ["in:australia-locations", "in:asia-southeast1-locations"]
}
}
}
Region locking on GCP only applies to resource creation; it will not
impact running resources unless they themselves create resources.
Also, some GCP services store and process data in different regions
from where the resource is actually created. Consult the service
documentation directly when there are data sovereignty concerns.
The
dierent kinds of locations
Within GCP there are three levels of locations: multiregion, region, and zone. You
can use all of these in organization policies to restrict resource creation.
Multiregion
These locations are backed by hardware across multiple regions; typically this
only applies for storage-based resources. Examples include global, asia, europe.
Region
These locations are geographically isolated from each other. Examples include
australia-southeast1, europe-west4, and us-central1.
Zone
These locations are isolated failure domains, i.e., data centers, within a region.
Examples include australia-southeast1-a, europe-west4-b, and us-
central1-c.
Value groups
Value groups are Google-curated lists that allow for selecting locations that will
naturally expand as new locations are added. For example, you can select to allow
regions and zones within the European Union by using the selector in: eu-
locations. This allows for simplified policies, with minimal management over‐
head due to regulatory or data sovereignty requirements.
Some resources in GCP are global and therefore are unaffected by
the resource locations’ organization policies.
For example, to create a secret in the Secrets Manager with auto‐
matic replication, the global region must be allowed.
Summarizing the recipe
Let’s summarize what was learned and deployed in this recipe:
42 | Chapter 2: Setting Up Accounts and Users

• Organization policies allow you to implement region locking in GCP.
• They are automatically inherited down your organization structure, but you can
override from down the hierarchy, so start with the maximum restriction at the
top level.
• Certain resources are global and are automatically exempted from being affected
by the policy.
• The recipe creates an organization policy that locks resource creation specifically
to the specified regions.
2.5 Region Locking on AWS
Problem
You are setting up your initial AWS organization, and you need to ensure that teams
are only able to deploy resources into Australian regions for data sovereignty and
limit the blast radius in case of a breach.
Solution
If you haven’t already done so, familiarize yourself with Terraform and the different
authentication mechanisms in Chapter 11.
Create a variables.tf file and copy the following contents:
variable "allowed_regions" {
type = list(string)
description = "The allowed regions for resources"
}
Then fill out the corresponding terraform.tfvars file:
allowed_regions = []
Create a locals.tf file and copy the following contents:
locals {
service_exemptions = [
"a4b:*",
"acm:*",
"aws-marketplace-management:*",
"aws-marketplace:*",
"aws-portal:*",
"awsbillingconsole:*",
"budgets:*",
"ce:*",
"chime:*",
"cloudfront:*",
"config:*",
2.5 Region Locking on AWS | 43

"cur:*",
"directconnect:*",
"ec2:DescribeRegions",
"ec2:DescribeTransitGateways",
"ec2:DescribeVpnGateways",
"fms:*",
"globalaccelerator:*",
"health:*",
"iam:*",
"importexport:*",
"kms:*",
"mobileanalytics:*",
"networkmanager:*",
"organizations:*",
"pricing:*",
"route53:*",
"route53domains:*",
"s3:GetAccountPublic*",
"s3:ListAllMyBuckets",
"s3:PutAccountPublic*",
"shield:*",
"sts:*",
"support:*",
"trustedadvisor:*",
"waf-regional:*",
"waf:*",
"wafv2:*",
"wellarchitected:*"
]
}
Create the following provider.tf file and run terraform init:
provider "aws" {}
terraform {
required_providers {
aws = {
source = "hashicorp/aws"
version = "~> 3"
}
}
}
Create the following main.tf file and run terraform plan:
data "aws_organizations_organization" "this" {}
resource "aws_organizations_policy_attachment" "root" {
policy_id = aws_organizations_policy.top_level_region_lock.id
target_id = data.aws_organizations_organization.this.roots[0].id
}
44 | Chapter 2: Setting Up Accounts and Users

resource "aws_organizations_policy" "top_level_region_lock" {
name = "region-lock"
content = data.aws_iam_policy_document.region_lock_policy.json
}
data "aws_iam_policy_document" "region_lock_policy" {
statement {
effect = "Deny"
not_actions = local.service_exemptions
resources = ["*"]
condition {
test = "StringNotEquals"
values = var.allowed_regions
variable = "aws:RequestedRegion"
}
}
}
Review the resources that are going to be created, and then run terraform apply to
make the changes.
Discussion
To implement region locking on AWS, you need to use SCPs. They can be applied at
any point of your organization hierarchy, be that at the organization root, as per the
solution, or against an organizational unit or individual account.
SCPs do not apply to the management account. This is one of the
reasons it is recommended to minimize the amount of infrastruc‐
ture deployed in the management account.
You will have noticed, as part of the solution, a long list of API calls that are exempted
from the lock. This is due to one of the following reasons:
• The service is global in nature and therefore needs to be exempted, such as a web
application firewall.
•
The service has a hard requirement on a particular region, such as CloudFront.
To dive a bit further into the hard requirement on a particular region, for certain
AWS services, the control plane for that service exists only in one region. In the case
of CloudFront, as noted, the certificate to be used for TLS must be in us-east-1.
Unfortunately, the only way to find these is to read the service documentation.
2.5 Region Locking on AWS | 45

The exemption list is unfortunately not provided as an artifact that
can be referenced. However, the SCP example documentation is
routinely updated with the most recent list.
What you can also do as part of the SCP is allow certain principals to circumnavigate
the restrictions. The SCP defined in the solution stops you not only from creating
resources in unapproved regions but also from deleting, listing, or describing them.
By adding a condition to the IAM policy, you can allow particular roles to operate in
all regions so you can more readily react in case of a breach or incident. To achieve
this, you can add a condition as shown in the following Terraform. You will need to
fill the role_exemptions local variable with the Amazon Resource Names (ARNs) of
the required roles.
locals {
role_exemptions = []
}
data "aws_iam_policy_document" "sydney_region_lock_policy" {
statement {
effect = "Deny"
not_actions = local.service_exemptions
resources = ["*"]
condition {
test = "StringNotEquals"
values = ["ap-southeast-2"]
variable = "aws:RequestedRegion"
}
condition {
test = "ArnNotLike"
values = local.role_exemptions
variable = "aws:PrincipalARN"
}
}
}
IAM principals acting from outside your organization, for example,
an IAM user that has cross-account S3 bucket access, are not affec‐
ted by SCPs.
Instead, if they must assume a role in the account, then they are
beholden to the SCPs in place.
Summarizing the recipe
Let’s summarize what was learned and deployed in this recipe:
•
SCPs allow you to implement region locking in AWS.
46 | Chapter 2: Setting Up Accounts and Users

• They are automatically inherited down your organization structure, so you
should start with the most permissive and narrow as required.
• You can also add conditions to allow certain users, often security personnel, to
subvert the region locking when needed.
• Certain resources require us-east-1 to function, so you need to maintain a ser‐
vice exception list.
•
Your organization management account is unaffected by SCPs, so you should
look to minimize the resources deployed into that account.
•
IAM principals acting from outside your organization are not affected by SCPs.
2.6 Region Locking on Azure
Problem
You are setting up your initial Azure tenancy, and you need to ensure that teams are
only able to deploy resources into Australian regions for data sovereignty and limit
the blast radius in the case of a breach.
Solution
If you haven’t already done so, familiarize yourself with Terraform and the different
authentication mechanisms in Chapter 11.
Create a variables.tf file and copy the following contents:
variable "root_management_group_uuid" {
type = string
description = "The UUID for the root management group"
}
variable "allowed_locations" {
type = list(string)
description = "The locations to allow resources"
}
Then fill out the corresponding terraform.tfvars file:
root_management_group_uuid = ""
allowed_locations = []
Create the following provider.tf file and run terraform init:
provider "azurerm" {
features {}
}
terraform {
required_providers {
2.6 Region Locking on Azure | 47

azurerm = {
source = "hashicorp/azurerm"
version = "~> 2"
}
}
}
Create the following main.tf file and run terraform plan:
data "azurerm_management_group" "root" {
name = var.root_management_group_uuid
}
resource "azurerm_policy_assignment" "root_region_lock" {
name = "root-region-lock"
scope = data.azurerm_management_group.root.id
policy_definition_id = join("", [
"providers/Microsoft.Authorization/policyDefinitions/",
"e56962a6-4747-49cd-b67b-bf8b01975c4c"
])
parameters = <<PARAMETERS
{
"listOfAllowedLocations": {
"value": ${var.allowed_locations}
}
}
PARAMETERS
}
Review the resources that are going to be created, and then run terraform apply to
make the changes.
Discussion
To enable region locking on Azure, you use Azure Policy. Azure provides a built-in
policy that allows you to restrict resources to particular regions but has a built-in
escape hatch for global resources as required. These policies can be applied at the
management group, subscription, and resource group level, which allows you to
explicitly control the restrictions at any point in your hierarchy.
48 | Chapter 2: Setting Up Accounts and Users

Summarizing the recipe
Let’s summarize what you learned and deployed in this recipe:
• Azure Policy allows you to implement region locking in Azure.
•
Polies are automatically inherited down your organization structure, so you
should start with the most permissive and narrow as required.
• The built-in Azure Policy maintains a list of required exceptions for global
resources.
2.7 Centralizing Users on GCP
Problem
You have a new team looking to onboard into your GCP organization. You need to be
able to give them access that follows the principle of least privilege and will be main‐
tainable in the long term.
Solution
If you haven’t already done so, familiarize yourself with Terraform and the different
authentication mechanisms in Chapter 11.
You need to create a service account to interact with the Google Workspace APIs.
Create a variables.tf file and copy the following contents:
variable "identity_project_id" {
type = string
description = "The project ID for your centralized Identity project"
}
Then fill out the corresponding terraform.tfvars file:
identity_project_id = ""
Create the following provider.tf file and run terraform init:
provider "google" {
project = var.identity_project_id
}
terraform {
required_providers {
google = {
source = "hashicorp/google"
version = "~> 3"
}
local = {
2.7 Centralizing Users on GCP | 49

source = "hashicorp/local"
version = "~> 2"
}
}
}
Create the following main.tf file and run terraform plan:
resource "google_project_service" "admin" {
service = "admin.googleapis.com"
}
resource "google_service_account" "workspace_admin" {
account_id = "workspace-admin"
display_name = "Workspace Admin"
}
resource "google_service_account_key" "workspace_admin" {
service_account_id = google_service_account.workspace_admin.name
public_key_type = "TYPE_X509_PEM_FILE"
}
resource "local_file" "workspace_admin" {
content = base64decode(google_service_account_key.workspace_admin.private_key)
filename = "workspace_admin.json"
}
Review the resources that are going to be created, and then run terraform apply to
make the changes.
With the service account now created, you need to authorize it to perform the
required operations against your Google Workspace account. The instructions for
this can be found in the Google Workspace for Developers documentation. Ensure
that the service account has the following scopes when configuring the domain-wide
delegation:
• _https://www.googleapis.com/auth/admin.directory.user_
•
_https://www.googleapis.com/auth/admin.directory.group_
In a new directory, create a variables.tf file and copy the following contents:
variable "service_account_key_path" {
type = string
description = "Path to where the service account key is located"
}
variable "customer_id" {
type = string
description = <<DESCRIPTION
Customer ID for your Google Workspace account
Can be found at https://admin.google.com/ac/accountsettings
50 | Chapter 2: Setting Up Accounts and Users

DESCRIPTION
}
variable "impersonated_user_email" {
type = string
description = "The email address of a privileged user in your Google Workspace"
}
variable "identity_project_id" {
type = string
description = "The project ID for your centralized Identity project"
}
variable "target_project_id" {
type = string
description = "The project ID to give the group read-only access"
}
variable "users" {
type = map(map(any))
description = "A list of user data objects"
}
variable "team_name" {
type = string
description = "The name of the team"
}
variable "team_description" {
type = string
description = "The description of the team"
}
variable "team_email" {
type = string
description = "The email address for the team"
}
Then fill out the corresponding terraform.tfvars file:
service_account_key_path = ""
customer_id = ""
impersonated_user_email = ""
identity_project_id = ""
target_project_id = ""
users = {
"[email protected]" = {
given_name = "Jane"
family_name = "Doe"
}
}
team_name = ""
2.7 Centralizing Users on GCP | 51

team_email = ""
team_description = ""
Create the following provider.tf file and run terraform init:
provider "google" {
project = var.identity_project_id
}
provider "googleworkspace" {
credentials = var.service_account_key_path
customer_id = var.customer_id
impersonated_user_email = var.impersonated_user_email
oauth_scopes = [
"https://www.googleapis.com/auth/admin.directory.user",
"https://www.googleapis.com/auth/admin.directory.group"
]
}
terraform {
required_providers {
google = {
source = "hashicorp/google"
version = "~> 3"
}
googleworkspace = {
source = "hashicorp/googleworkspace"
version = "~> 0.3"
}
random = {
source = "hashicorp/random"
version = "~> 3"
}
}
}
Create the following main.tf file and run terraform plan:
resource "random_password" "password" {
for_each = var.users
length = 16
special = true
}
resource "googleworkspace_user" "user" {
for_each = var.users
name {
family_name = each.value.family_name
given_name = each.value.given_name
}
change_password_at_next_login = true
password = random_password.password[each.key].result
primary_email = each.key
52 | Chapter 2: Setting Up Accounts and Users

}
resource "googleworkspace_group" "team" {
email = var.team_email
name = var.team_name
description = var.team_description
}
resource "googleworkspace_group_member" "team" {
for_each = var.users
group_id = googleworkspace_group.team.id
email = googleworkspace_user.user[each.key].primary_email
}
resource "google_project_iam_binding" "target_project_access" {
project = var.target_project_id
role = "roles/viewer"
members = [
"group:${googleworkspace_group.team.email}",
]
}
output "passwords" {
sensitive = true
value = [
for user in googleworkspace_user.user :
{(user.primary_email) = user.password}
]
}
Review the resources that are going to be created, and then run terraform apply to
make the changes.
To get the passwords for the created users, run terraform output passwords to
print out all the initial passwords set for the users. They will be forced to change their
password as soon as they log in.
Discussion
Identity in native GCP environments is managed between Cloud IAM and Google
Workspaces. By creating users and groups in Google Workspaces, you have central‐
ized authentication which can be used for not only GCP, but also for managing other
Google services like Drive and Docs.
As you scale your organization to hundreds, or maybe even thousands, of users, writ‐
ing wrapper code to simplify the assignments of users to teams will be required. As
the relationship between teams and users is many to many, this can lead to an explo‐
sion in the amount of data captured in the variables, which becomes unmaintainable.
This is also why in the solution, permissions were applied using groups, not individ‐
ual users, as that simplifies access management at scale.
2.7 Centralizing Users on GCP | 53

In this solution, you applied the permissions directly at the project level. In practice,
you would often apply permissions as high in the hierarchy as possible. Due to the
nature of how Google IAM functions, you want to apply minimal permissions and
then explicitly allow permissions as low as possible. For example, if you have a folder
containing all the projects for a team, then you can apply the same roles/viewer to
the folder to allow the team read access but then add roles/editor directly on the
Development project to allow for rapid experimentation in a safe environment.
Summarizing the recipe
Let’s summarize what you’ve learned and created through this recipe:
1. User access on GCP is managed between Google Workspaces and Cloud IAM.
2. Google Workspaces gives you a centralized directory to manage users and groups
for all Google services.
3. To interact programmatically with Google Workspaces, you need to create a ser‐
vice account and assign it the requisite permissions.
4. Cloud IAM is responsible for assigning users permissions, and it is recom‐
mended that you do this through groups to allow for simplified management at
scale.
2.8 Centralizing Users on AWS
Problem
You have a new team looking to onboard into your AWS organization. You need to be
able to give them access that follows the principle of least privilege and will be main‐
tainable in the long term.
Solution
If you haven’t already done so, familiarize yourself with Terraform and the different
authentication mechanisms in Chapter 11.
Create a variables.tf file and copy the following contents:
variable "target_account_id" {
type = string
description = "The account to give the users access to"
}
variable "auth_account_id" {
type = string
description = "The account to create the users in"
}
54 | Chapter 2: Setting Up Accounts and Users

variable "cross_account_role" {
type = string
description = "The name of the role for the target and auth accounts"
}
variable "users" {
type = list(string)
description = "A list of user email addresses"
}
Then fill out the corresponding terraform.tfvars file:
target_account_id = ""
auth_account_id = ""
cross_account_role = ""
users = [""]
Create the following provider.tf file and run terraform init:
provider "aws" {
alias = "auth_account"
assume_role {
role_arn = join("" , [
"arn:aws:iam::",
var.auth_account_id,
":role/",
var.cross_account_role
])
}
}
provider "aws" {
alias = "target_account"
assume_role {
role_arn = join("" , [
"arn:aws:iam::",
var.target_account_id,
":role/",
var.cross_account_role
])
}
}
terraform {
required_providers {
aws = {
source = "hashicorp/aws"
version = "~> 3"
}
}
}
Create the following main.tf file and run terraform plan:
2.8 Centralizing Users on AWS | 55

resource "aws_iam_role" "target_read_only" {
provider = aws.target_account
assume_role_policy = data.aws_iam_policy_document.assume_policy.json
managed_policy_arns = ["arn:aws:iam::aws:policy/ReadOnlyAccess"]
}
data "aws_iam_policy_document" "assume_policy" {
statement {
effect = "Allow"
principals {
type = "AWS"
identifiers = ["arn:aws:iam::${var.auth_account_id}:root"]
}
actions = ["sts:AssumeRole"]
}
}
resource "aws_iam_user" "user" {
provider = aws.auth_account
for_each = toset(var.users)
name = each.value
force_destroy = true
}
resource "aws_iam_group" "group" {
provider = aws.auth_account
name = "read_only"
path = "/${var.target_account_id}/"
}
resource "aws_iam_group_membership" "group" {
provider = aws.auth_account
name = "${var.target_account_id}_read_only"
users = [for user in var.users : user]
group = aws_iam_group.group.name
}
resource "aws_iam_group_policy" "target_read_only" {
provider = aws.auth_account
name = "${var.target_account_id}_read_only"
group = aws_iam_group.group.name
policy = data.aws_iam_policy_document.target_read_only.json
}
56 | Chapter 2: Setting Up Accounts and Users

data "aws_iam_policy_document" "target_read_only" {
statement {
actions = [
"sts:AssumeRole"
]
effect = "Allow"
resources = [
aws_iam_role.target_read_only.arn
]
}
}
Review the resources that are going to be created, and then run terraform apply to
make the changes.
Discussion
In AWS, you should centralize all IAM users into a single AWS account that exists
solely for this purpose. This allows you to simplify management and monitoring of
your users at scale, and there is even an AWS Config managed rule for detecting the
presence of IAM users in an account. For more on AWS Config managed rules, see
Recipe 7.5.
For tooling deployed into your AWS accounts that require privileged access to AWS
APIs, there are a few options.
For an external software-as-a-service (SaaS) tool, leverage cross-account roles with an
external ID to obtain the required permissions in your account. The following is an
example assume role policy.
data "aws_iam_policy_document" "assume_policy" {
statement {
effect = "Allow"
principals {
type = "AWS"
identifiers = ["arn:aws:iam::${var.external_account_id}:root"]
}
actions = ["sts:AssumeRole"]
condition {
test = "StringEquals"
variable = "sts:ExternalId"
values = [
var.external_id
]
}
2.8 Centralizing Users on AWS | 57

}
}
If deployed within your AWS environment, users should be able to leverage the roles
or profiles attached to their resources, e.g., the attached AWS Lambda execution role
or the attached instance profile on the EC2 machine. Unfortunately, there are still
older tools that require explicit IAM users to be created, but this should be a last
resort as the user credentials are inherently long-lived compared to the routinely
rotated credentials used by the other options. This increases the chance of a sustained
compromise.
When it comes to assuming roles in AWS, a bidirectional trust must be created, the
user must be allowed to call sts:AssumeRole on the role, and the assume role policy
on the target role must allow the user to assume the role. This gives you options such
as allowing one user to assume a read-only role in an account while allowing another
to assume the read-only role but additionally a privileged role.
Summarizing the recipe
Let’s summarize what was learned and deployed in this recipe:
• AWS users should all exist in a dedicated account for this purpose.
• Assuming roles in other accounts requires bidirectional trust.
—
The AssumeRolePolicy on the target should explicitly allow the user.
— The user should be able to invoke sts:assumerole on the target.
2.9 Centralizing Users on Azure
Problem
You have a new team looking to onboard into your Azure tenant. You need to be able
to give them access that follows the principle of least privilege and will be maintaina‐
ble in the long term.
Solution
If you haven’t already done so, familiarize yourself with Terraform and the different
authentication mechanisms in Chapter 11.
Create a variables.tf file and copy the following contents:
variable "target_subscription_id" {
type = string
description = "The subscription ID to give the users access to"
}
58 | Chapter 2: Setting Up Accounts and Users

variable "users" {
type = map(map(any))
description = "A map of read-only users to create"
}
Then fill out the corresponding terraform.tfvars file:
target_subscription_id = ""
users = {
"[email protected]" = {
display_name = "Jane Doe"
}
}
Create the following provider.tf file and run terraform init:
provider "azuread" {}
provider "azurerm" {
features {}
}
provider "random" {}
terraform {
required_providers {
azuread = {
source = "hashicorp/azuread"
version = "~> 1"
}
azurerm = {
source = "hashicorp/azurerm"
version = "~> 2"
}
random = {
source = "hashicorp/random"
version = "~> 3"
}
}
}
Create the following main.tf file and run terraform plan:
resource "random_password" "password" {
for_each = var.users
length = 16
special = true
}
resource "azuread_user" "this" {
for_each = var.users
force_password_change = true
display_name = each.value.display_name
2.9 Centralizing Users on Azure | 59

password = random_password.password[each.key].result
user_principal_name = each.key
}
resource "azuread_group" "target_read_only" {
display_name = "${data.azurerm_subscription.target.display_name}ReadOnly"
members = [
for user in azuread_user.this : user.object_id
]
}
data "azurerm_subscription" "target" {
subscription_id = var.target_subscription_id
}
resource "azurerm_role_assignment" "target_read_only" {
scope = data.azurerm_subscription.target.id
role_definition_name = "Reader"
principal_id = azuread_group.target_read_only.object_id
}
output "passwords" {
sensitive = true
value = [
for user in azuread_user.this : {(user.user_principal_name) = user.password}
]
}
Review the resources that are going to be created, and then run terraform apply to
make the changes.
To retrieve a user’s initial password, run terraform output passwords to print out a
list of all initial passwords. When the user logs in, they will be forced to change their
password and configure two-factor authentication, so the only time the password is
known by more than just the user is from user creation and first sign-in.
Discussion
Managing users on Azure is centered around Azure Active Directory (Azure AD).
When managing the loud infrastructure for an organization, you should ideally have
one production Azure AD tenancy and one testing Azure AD tenancy. As Azure AD
becomes the focal point for identity, it also becomes your source for Single Sign On
(SSO), device management, and licensing, amongst others.
Permissions should only be assigned directly to users in truly exceptional cases, but
standard permissions should be defined by a user’s group memberships. This is the
approach taken in the solution, as when the number of users grows into the hundreds
or thousands, managing permissions on an individual basis becomes nearly
60 | Chapter 2: Setting Up Accounts and Users

impossible. Even if the group only had a single member, you retain a more readily
understood and extensible identity architecture by creating the group.
The user principal name for members of your Azure AD tenant
must be from a tenant-approved domain. You can easily add new
domains through the Azure AD console and by adding some DNS
records to verify domain ownership.
Unfortunately, the Azure AD Terraform provider and the Azure AD APIs do not give
Azure the ability to automatically generate initial passwords; hence, in this instance
you use the Terraform Random Provider to set the initial passwords. As was men‐
tioned in the solution, the initial password will only exist until first sign-in, so it is
critical that as a security team you ensure that users log in soon after their accounts
are created in Azure AD to mitigate the risk of compromised credentials.
Summarizing the recipe
Let’s summarize what was learned and deployed in this recipe:
•
Production identity and access management on Azure should be managed
through a single centralized Azure AD tenant.
• It is recommended to have a second Azure AD tenant for testing.
•
As creating users requires an initial password for the user, you need to be mind‐
ful of how that password is created and stored.
— By using the Terraform Random Provider, you can create unique random
passwords that fit basic security requirements.
— You can use Terraform Outputs to retrieve the initial password.
•
Authorization is best handled using Azure AD groups rather than assigning to
particular users, as it is more manageable at scale.
2.9 Centralizing Users on Azure | 61
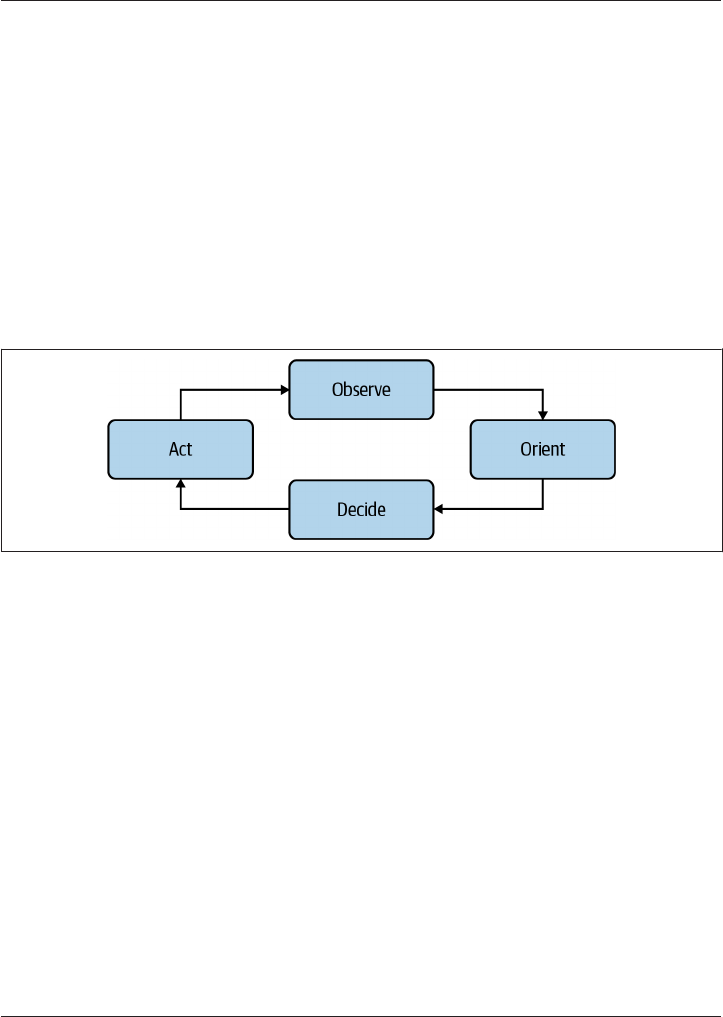
CHAPTER 3
Getting Security Visibility at Scale
When looking at security, an often-referenced framework for looking at how teams
can operate during incidents is John Boyd’s OODA loop, shown in Figure 3-1.
Figure 3-1. e OODA loop
What this model implies is that the quicker you can cycle through this loop, the more
you will outmaneuver and outperform your competitors and adversaries. John him‐
self was a decorated US Air Force fighter pilot and Pentagon consultant who was
dubbed “Forty-Second Boyd” for his standing bet that he would beat any other pilot
from a state of disadvantage in 40 seconds. Applied in a security context, it means
that during an incident, you need to able to rapidly cycle through this loop to be able
to react and act proactively.
With this model in mind, this chapter focuses on visibility, building the ability for you
to observe your estate at scale. Without the right infrastructure in place, you will be
stuck fumbling around in the dark or having to invest too much time trying to see
what’s going on to be able to take control of the situation and act.
63
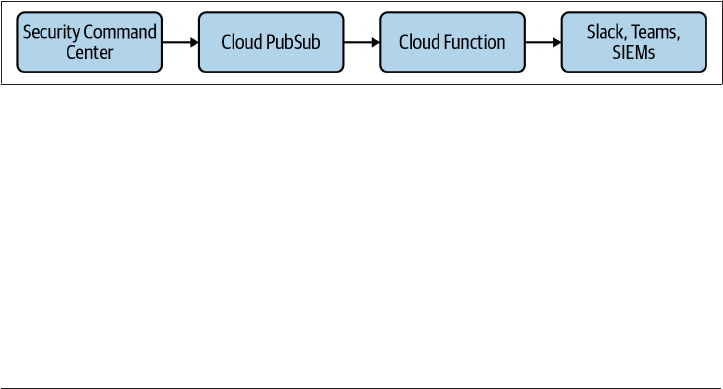
In this chapter, you will learn how to accomplish the following:
• Build a lightweight cloud native Security Operations Center
• Centralize your logs into a secure location for analysis and investigations
• Leverage the automated log anomaly detection available from your CSP to detect
common threat vectors
•
Build an asset registry so you can understand what infrastructure has been
deployed across your entire estate
3.1 Building a Cloud Native Security Operations Center
on GCP
Problem
You need to create a centralized Security Operations Center (SOC) to allow you to
understand your security posture at scale across your estate. You also wish to be noti‐
fied as soon as high-level threats are identified.
Solution
First, to enable Security Command Center (SCC), browse to Security Command Cen‐
ter Initial Set Up and complete the wizard. Once that is done, the management of all
GCP resources will be enabled for your subscription level; see “Discussion” on page
70 for more details.
Next, you need to build the architecture shown in Figure 3-2, which provides real-
time alerting of identified threats.
Figure 3-2. Security Command Center notication architecture
Interacting with Security Command Center APIs must be done via a service account.
If you haven’t already done so, familiarize yourself with Terraform and the different
authentication mechanisms in Chapter 11.
Create and enter an auth folder in your working directory.
Then create a variables.tf file and copy the following contents:
64 | Chapter 3: Getting Security Visibility at Scale

variable "project_id" {
type = string
description = "The project ID to create the resources"
}
variable "organization_domain" {
type = string
description = "The organization domain of your Google Cloud estate"
}
And fill out the corresponding terraform.tfvars file:
project_id = ""
organization_domain = ""
Create the following provider.tf file and run terraform init:
provider "google" {
project = var.project_id
}
terraform {
required_providers {
google = {
source = "hashicorp/google"
version = "~> 3"
}
local = {
source = "hashicorp/local"
version = "~> 2"
}
}
}
Create the following main.tf file and run terraform plan:
resource "google_project_service" "scc" {
service = "securitycenter.googleapis.com"
}
data "google_organization" "this" {
domain = var.organization_domain
}
resource "google_service_account" "scc_admin" {
account_id = "scc-admin"
display_name = "SCC Admin"
}
resource "google_organization_iam_binding" "scc_admin" {
role = "roles/securitycenter.notificationConfigEditor"
org_id = data.google_organization.this.org_id
members = [
3.1 Building a Cloud Native Security Operations Center on GCP | 65

"serviceAccount:${google_service_account.scc_admin.email}",
]
}
resource "google_service_account_key" "scc_admin" {
service_account_id = google_service_account.scc_admin.name
public_key_type = "TYPE_X509_PEM_FILE"
}
resource "local_file" "scc_admin" {
content = base64decode(google_service_account_key.scc_admin.private_key)
filename = "scc_admin.json"
}
Review the resources that are going to be created, and then run terraform apply to
make the changes.
With the service account created, and the access key stored locally, you can now cre‐
ate the notification mechanism for SCC findings.
Move back to the parent folder.
Install google-cloud-securitycenter==1.3.0 into your local Python environment.
Create a variables.tf file and copy the following contents:
variable "project_id" {
type = string
description = "The project to create the resources in"
}
variable "region" {
type = string
description = "The region to create the resources in"
}
variable "organization_domain" {
type = string
description = "The organization domain of your Google Cloud estate"
}
variable "python_path" {
type = string
description = "Path to a python instance with required libraries"
default = "python"
}
Then fill out the corresponding terraform.tfvars file:
project_id = ""
region = ""
organization_domain = ""
python_path = ""
66 | Chapter 3: Getting Security Visibility at Scale

Create the following provider.tf file and run terraform init:
provider "google" {
project = var.project_id
region = var.region
}
terraform {
required_providers {
google = {
source = "hashicorp/google"
version = "~> 3"
}
null = {
source = "hashicorp/null"
version = "~> 3"
}
archive = {
source = "hashicorp/archive"
version = "~> 2"
}
}
}
Create the following main.py:
import base64
def handle(event, _):
if "data" in event:
print(base64.b64decode(event["data"]).decode("utf-8"))
And the following
create_notication_cong.py:
import sys
from google.cloud import securitycenter
client = securitycenter.SecurityCenterClient.from_service_account_json(
"auth/scc_admin.json"
)
def run(org_id, project_id, topic_id):
org_name = f"organizations/{org_id}"
created_notification_config = client.create_notification_config(
request={
"parent": org_name,
"config_id": f"{project_id}-scc",
"notification_config": {
"description": "Notification for active findings",
"pubsub_topic": topic_id,
3.1 Building a Cloud Native Security Operations Center on GCP | 67

"streaming_config": {"filter": 'state = "ACTIVE"'},
},
}
)
print(created_notification_config)
if __name__ == "__main__":
run(sys.argv[1], sys.argv[2], sys.argv[3])
Create the following main.tf file and run terraform plan:
data "google_organization" "this" {
domain = var.organization_domain
}
resource "null_resource" "create_notification_config" {
provisioner "local-exec" {
command = join(" ", [
var.python_path,
"create_notification_config.py",
data.google_organization.this.org_id,
var.project_id,
google_pubsub_topic.scc.id
])
}
}
resource "google_pubsub_topic" "scc_findings" {
name = "scc-findings"
}
resource "google_pubsub_subscription" "scc_findings" {
name = "scc-findings"
topic = google_pubsub_topic.scc_findings.name
}
resource "google_pubsub_topic_iam_binding" "scc-admin" {
project = google_pubsub_topic.scc.project
topic = google_pubsub_topic.scc.name
role = "roles/pubsub.admin"
members = [
"serviceAccount:scc-admin@${var.project_id}.iam.gserviceaccount.com",
]
}
resource "google_project_service" "cloudfunctions" {
service = "cloudfunctions.googleapis.com"
}
resource "google_project_service" "cloudbuild" {
service = "cloudbuild.googleapis.com"
68 | Chapter 3: Getting Security Visibility at Scale

}
resource "google_storage_bucket" "bucket" {
name = "${split(".", var.organization_domain)[0]}-scc-notifications"
}
data "archive_file" "code" {
type = "zip"
source_dir = "${path.module}/src"
output_path = "${path.module}/main.zip"
}
resource "google_storage_bucket_object" "code" {
name = "index.zip"
bucket = google_storage_bucket.bucket.name
source = data.archive_file.code.output_path
}
resource "google_cloudfunctions_function" "function" {
name = "scc_findings"
runtime = "python39"
available_memory_mb = 128
source_archive_bucket = google_storage_bucket.bucket.name
source_archive_object = google_storage_bucket_object.code.name
entry_point = "handle"
event_trigger {
event_type = "google.pubsub.topic.publish"
resource = google_pubsub_topic.scc_findings.name
}
depends_on = [
google_project_service.cloudfunctions,
google_project_service.cloudbuild
]
}
Review the resources that are going to be created, and then run terraform apply to
make the changes.
The deployed Cloud Function will now be automatically triggered whenever there is a
new finding in the SCC. This can now be extended to integrate into your wide tool‐
chain by extending the main.py file.
For more details on Cloud Functions, see Recipe 6.4.
3.1 Building a Cloud Native Security Operations Center on GCP | 69

Discussion
On GCP, your cloud native SOC is centered around SCC. It summarizes all your find‐
ings from a variety of sources, allowing you to understand your security posture and
threats at scale. The SCC comes in two editions: Standard and Premium.
Standard Edition, which comes free, includes the following:
•
Security Health Analytics, which analyzes resources for common misconfigura‐
tions such as open ports, multifactor authentication not being enforced, or logs
not being exported.
• Web Security Scanner custom scans, which find common security issues in
public-facing applications such as OWASP top 10 vulnerabilities.
• Integration with Google Cloud services such as
— Cloud Data Loss Prevention, which protects your sensitive data
— Google Cloud Armor, which protects your applications against external web
threats such as distributed denial-of-service (DDoS) attacks
—
Anomaly Detection, which discovers usage anomalies in your projects and
Virtual Machines
Premium Edition, which costs a percentage of your Google Cloud bill, includes the
following on top of everything in Standard Edition:
• Event Threat Detection; for more information, see Recipe 3.7.
• Container Threat Detection, which identifies issues in your running containers.
• Security Health Analytics, which performs compliance monitoring for the fol‐
lowing standards:
—
CIS 1.1
— CIS 1.0
— PCI DSS v3.2.1
— NIST 800-53
— ISO 27001
•
Web Security Scanner managed scans, which continually scan your applications
for issues.
The SCC comes preconfigured when you enable it through the console, which is cur‐
rently the only method. This recipe focused on giving you a framework to turn find‐
ings into actionable insights by allowing you to integrate the notifications into what‐
ever tooling you choose. A common problem that undermines the usefulness of these
single panes of glass is that since they become falling trees with no one around to hear
70 | Chapter 3: Getting Security Visibility at Scale

them fall, it is critical that the findings from tooling such as the SCC become embed‐
ded in your processes.
Without real-time alerts that are low noise and high signal, it becomes impossible for
your team to react to the active security incidents, or even be aware that breaches
occurred.
Summarizing the Recipe
Let’s review what you learned and created during this recipe:
• The central hub for understanding your security on Google Cloud is the SCC.
• It comes in two editions, Standard and Premium.
— Standard Edition is free with every Google Cloud organization.
—
Premium Edition is charged based on your total Cloud Bill.
• Once enrolled through the console, all available GCP services are automatically
enrolled.
•
You created the requisite infrastructure to allow you to build SCC notifications
into your internal processes.
— As the SCC APIs are service account only, you created a minimally privileged
service account for this purpose.
— You created a Pub/Sub topic, with a target Cloud Function, as a target for
Findings.
— Last, you ran a Python script that links the Pub/Sub topic with your SCC
installation.
3.2 Building a Cloud Native Security Operations Center
on AWS
Problem
You need to create a centralized Security Operations Center to allow you to under‐
stand your security posture at scale across your estate.
Solution
First, you will need to assume a privileged role in your organization root account, i.e.,
the account that has access to the organizations APIs.
If you haven’t already done so, familiarize yourself with Terraform and the different
authentication mechanisms in Chapter 11.
3.2 Building a Cloud Native Security Operations Center on AWS | 71

Create a variables.tf file and copy the following contents:
variable "delegated_admin_account" {
type = string
description = "The account ID for the account to be the delegated admin"
}
variable "cross_account_role" {
type = string
description = "The cross account role to assume"
}
Then fill out the corresponding terraform.tfvars file:
delegated_admin_account = ""
cross_account_role = ""
Create the following provider.tf file and run terraform init:
provider "aws" {}
provider "aws" {
alias = "delegated_admin_account"
assume_role {
role_arn = join("", [
"arn:aws:iam::",
var.delegated_admin_account,
":role/${var.cross_account_role}"
}
}
terraform {
required_providers {
aws = {
source = "hashicorp/aws"
version = "~> 3"
}
}
}
Your aws_organizations_organization resource should only
exist in one location. The following Terraform shows an example of
that resource. You need to add securityhub.amazonaws.com to
your aws_service_access_principals list and create the other
resources outlined in the following file.
Create the following main.tf file and run terraform plan:
resource "aws_organizations_organization" "this" {
aws_service_access_principals = [
"cloudtrail.amazonaws.com",
"guardduty.amazonaws.com",
72 | Chapter 3: Getting Security Visibility at Scale

"ram.amazonaws.com",
"config-multiaccountsetup.amazonaws.com",
"config.amazonaws.com",
"member.org.stacksets.cloudformation.amazonaws.com",
"securityhub.amazonaws.com",
"sso.amazonaws.com"
]
enabled_policy_types = [
"SERVICE_CONTROL_POLICY",
"TAG_POLICY",
]
}
resource "aws_securityhub_organization_admin_account" "this" {
depends_on = [aws_organizations_organization.this]
admin_account_id = var.delegated_admin_account
}
resource "aws_securityhub_organization_configuration" "this" {
auto_enable = true
}
Review the resources that are going to be created, and then run terraform apply to
make the changes.
Discussion
On AWS, the service that provides a summarized view of security across your estate is
AWS Security Hub. It aggregates data from the following sources:
• Amazon GuardDuty, seen in Recipe 3.8
• AWS Systems Manager, seen in Recipe 8.5
• Amazon Inspector, which provides rules for keeping your EC2 machines secure
• AWS Firewall Manager, which allows for centralized firewall management across
your estate
• IAM Access Analyzer, which helps protect against the unintended sharing of
resources
• Amazon Macie, which scans your S3 buckets for PII data
• An ever-increasing array of third-party solutions
It also provides the option to provide automated reporting against industry-standard
benchmarks such as the CIS AWS Benchmarks and PCI DSS.
By centralizing administration into a dedicated account, you can see your security
posture at scale with a glance. This allows you to more quickly and easily triage and
3.2 Building a Cloud Native Security Operations Center on AWS | 73

prioritize active security issues. This recipe does not automatically handle existing
accounts in your organization. The following create_members.py Python file resolves
this issue:
import sys
import boto3
delegated_admin_account = sys.argv[1]
role_name = sys.argv[2]
organizations = boto3.client("organizations")
credentials = boto3.client("sts").assume_role(
RoleArn=f"arn:aws:iam::{delegated_admin_account}:role/{role_name}",
RoleSessionName="SecurityHubDelegatedAdmin",
)["Credentials"]
securityhub = boto3.Session(
aws_access_key_id=credentials["AccessKeyId"],
aws_secret_access_key=credentials["SecretAccessKey"],
aws_session_token=credentials["SessionToken"],
).client("securityhub")
account_paginator = organizations.get_paginator("list_accounts")
for page in account_paginator.paginate(PaginationConfig={"MaxItems": 50}):
accounts = page["Accounts"]
securityhub.create_members(
AccountDetails=[
{"AccountId": account["Id"], "Email": account["Email"]}
for account in accounts
],
)
To execute the Python file, run python create_members.py <delega
ted_admin_account_id> <cross_account_role>, filling in the two parameters.
Summarizing the Recipe
Let’s summarize what was learned and deployed in this recipe:
•
Security Hub is your centralized, single pane of glass for understanding your
security on AWS.
• You should delegate Security Hub administration to a dedicated security account,
as specified in Recipe 2.2.
• Security Hub should be enabled at the organization level to automatically enroll
new accounts.
• You used Terraform to elect your delegated administrator account.
• Python can be used to enable Security Hub across all existing accounts in an
organization.
74 | Chapter 3: Getting Security Visibility at Scale

3.3 Building a Cloud Native Security Operations Center on
Azure
Problem
You need to create a centralized Security Operations Center to allow you to under‐
stand your security posture at scale across your estate. You want to ensure that your
SOC reports on common threats in your estate.
Solution
If you haven’t already done so, familiarize yourself with Terraform and the different
authentication mechanisms in Chapter 11.
Create a variables.tf file and copy the following contents:
variable "root_management_group_uuid" {
type = string
description = "The UUID of your Root Management Group"
}
variable "location" {
type = string
description = "The location to deploy your resource into"
}
Then fill out the corresponding terraform.tfvars file:
root_management_group_uuid = ""
location = ""
Create the following provider.tf file and run terraform init:
terraform {
required_providers {
azurerm = {
source = "hashicorp/azurerm"
version = "~> 2"
}
}
}
provider "azurerm" {
features {}
}
Create the following main.tf file and run terraform plan:
resource "azurerm_resource_group" "sentinel" {
name = "sentinel"
location = "Australia East"
3.3 Building a Cloud Native Security Operations Center on Azure | 75

}
resource "azurerm_log_analytics_workspace" "sentinel" {
name = "sentinel"
location = azurerm_resource_group.sentinel.location
resource_group_name = azurerm_resource_group.sentinel.name
sku = "PerGB2018"
}
resource "azurerm_log_analytics_solution" "sentinel" {
solution_name = "SecurityInsights"
location = azurerm_resource_group.sentinel.location
resource_group_name = azurerm_resource_group.sentinel.name
workspace_resource_id = azurerm_log_analytics_workspace.sentinel.id
workspace_name = azurerm_log_analytics_workspace.sentinel.name
plan {
publisher = "Microsoft"
product = "OMSGallery/SecurityInsights"
}
}
resource "azurerm_sentinel_data_connector_azure_security_center" "this" {
name = "security_center"
log_analytics_workspace_id = azurerm_log_analytics_workspace.sentinel.id
}
resource "azurerm_sentinel_data_connector_threat_intelligence" "this" {
name = "threat_intelligence"
log_analytics_workspace_id = azurerm_log_analytics_workspace.sentinel.id
}
Review the resources that are going to be created, and then run terraform apply to
make the changes.
Discussion
On Azure, your cloud native SOC is Azure Sentinel. This service brings together data
from across your Azure estate, your on-premise infrastructure, and other clouds into
a fully managed, cloud native Security Incident and Event Management (SIEM)
solution.
Some integrations, such as Azure Security Center and Microsoft Threat Intelligence,
are natively supported by Terraform. For other integrations, you may need to reverse
engineer the specifics of the resources to be configured. For example, the following
Terraform enables the Key Vault operations connector:
data "azurerm_management_group" "root" {
name = var.root_management_group_uuid
}
resource "azurerm_policy_assignment" "key_vault_sentinel" {
76 | Chapter 3: Getting Security Visibility at Scale

name = "key_vault_sentinel"
location = azurerm_resource_group.sentinel.location
scope = data.azurerm_management_group.root.id
policy_definition_id = join("", [
"/providers/Microsoft.Authorization/policyDefinitions/",
"951af2fa-529b-416e-ab6e-066fd85ac459"
])
identity {
type = "SystemAssigned"
}
parameters = <<PARAMETERS
{
"logAnalytics": {
"value": "${azurerm_log_analytics_workspace.sentinel.name}"
}
}
PARAMETERS
}
data "azurerm_sentinel_alert_rule_template" "sensitive_key_vault" {
log_analytics_workspace_id = azurerm_log_analytics_workspace.sentinel.id
display_name = "Sensitive Azure Key Vault operations"
}
locals {
key_vault = data.azurerm_sentinel_alert_rule_template.sensitive_key_vault
}
resource "azurerm_sentinel_alert_rule_scheduled" "sensitive_key_vault" {
name = "sensitive_key_vault"
log_analytics_workspace_id = azurerm_log_analytics_workspace.sentinel.id
display_name = local.key_vault.display_name
severity = local.key_vault.scheduled_template[0].severity
query = local.key_vault.scheduled_template[0].query
}
To configure Azure Sentinel to detect incidents, you need to use analytics rules. There
are currently five built-in types of rules:
Microso Security
These rules automatically create Sentinel alerts when other Microsoft products
alert. By default, Sentinel records that the alerts happened but does not generate
an alert itself.
Fusion
These rules are machine learning–based and correlate low-fidelity events across
many systems to generate high-fidelity events and alerts.
3.3 Building a Cloud Native Security Operations Center on Azure | 77

Machine Learning Behavioral Analytics
These rules are built on top of proprietary Microsoft machine learning algo‐
rithms, operating as black boxes.
Anomaly
These rules use configurable machine learning models to generate alerts. You can
configure them yourself, running in parallel to ensure they provide alerts that are
signal, not noise.
Scheduled
These rules are written by Microsoft security experts, and the query within can
be customized. The alerts from scheduled rules are key data points that enable
several of the Fusion rules to operate.
By understanding the types of rules that exist and how they are modified and exten‐
ded, you can ensure Azure Sentinel reports with a high signal-to-noise ratio. By only
being alerted on findings that are both relevant and actionable, you prevent security
teams from suffering alert fatigue, where they begin to ignore incoming alerts as they
are likely to be redundant.
Summarizing the Recipe
Let’s review what you learned and created through this recipe:
• Azure Sentinel is a managed service that provides SOC functionality in the cloud.
• For Azure Sentinel to function optimally, you need to configure and enable the
data connectors.
•
You configured the Azure Security Center and Microsoft Threat Intelligence data
connectors.
• You ensured that a high signal-to-noise ratio is maintained for alerts so the team
will actively respond.
3.4 Centralizing Logs on GCP
Problem
You need to centralize all audit logs for the organization into a central location so you
can perform retrospective analysis and allow for alerting of potential security inci‐
dents in real-time.
Solution
If you haven’t already done so, familiarize yourself with Terraform and the different
authentication mechanisms in Chapter 11.
78 | Chapter 3: Getting Security Visibility at Scale

The ideal project for this recipe is the Logging project under the
Common folder, as explained in Recipe 2.1.
Create a variables.tf file and copy the following contents:
variable "project" {
type = string
description = "The ID of the project to deploy the resources into"
}
variable "organization_domain" {
type = string
description = "The domain of your Google Organization"
}
Then fill out the corresponding terraform.tfvars file:
project = ""
organization_domain = ""
Create the following provider.tf file and run terraform init:
provider "google" {
project = var.project
}
terraform {
required_providers {
google = {
source = "hashicorp/google"
version = "~> 3"
}
}
}
Create the following main.tf file and run terraform plan:
data "google_organization" "this" {
domain = var.organization_domain
}
resource "google_bigquery_dataset" "organization_audit_logs" {
dataset_id = "organization_audit_logs"
}
resource "google_logging_organization_sink" "organization_sink" {
name = "organization_audit"
org_id = data.google_organization.this.org_id
include_children = true
filter = "logName:cloudaudit.googleapis.com"
3.4 Centralizing Logs on GCP | 79

destination = join("",[
"bigquery.googleapis.com/",
google_bigquery_dataset.organization_audit_logs.id
])
}
resource "google_bigquery_dataset_access" "access" {
dataset_id = google_bigquery_dataset.organization_audit_logs.dataset_id
role = "OWNER"
user_by_email = split(
":",
google_logging_organization_sink.organization_sink.writer_identity
)[1]
}
Review the resources that are going to be created, and then run terraform apply to
make the changes.
Discussion
This recipe elects to store the logs directly in BigQuery instead of Cloud Storage as
the data storage costs for hot data are identical. This has the benefit of the logs being
immediately queryable in BigQuery. For long term archival storage, you will want to
configure an organizational sink that pushes directly into a coldline archival cloud
storage bucket.
The sink you created has an active filter, meaning only cloud audit logs are captured.
Cloud audit logs capture who, is doing what, where, and when against any GCP API
within your estate. This data is critical to being able to proactively and retrospectively
act when a breach occurs, as it is your source of truth for what happened in and to
your estate.
It is also possible to capture application logs on a per-project basis. Although this can
be achieved through an organizational sink, as a cost control measure, you often need
to enable this explicitly on a per project basis.
The following Terraform deploys a project sink into the list of projects identified in
the local projects variable. Currently, it selects all active projects within the organi‐
zation; however, you can modify it to filter for selected projects.
data "google_projects" "active" {
filter = "lifecycleState:ACTIVE"
}
locals {
projects = toset([
for project in data.google_projects.active.projects : project.project_id
])
}
80 | Chapter 3: Getting Security Visibility at Scale

resource "google_bigquery_dataset" "oal" {
dataset_id = "organization_application_logs"
}
resource "google_logging_project_sink" "project_sink" {
for_each = local.projects
name = "${each.value}_application_logs"
project = each.value
unique_writer_identity = true
exclusions {
name = "no_audit_logs"
filter = "logName:cloudaudit.googleapis.com"
}
destination = join("",[
"bigquery.googleapis.com/",
google_bigquery_dataset.oal.id
])
}
resource "google_bigquery_dataset_access" "project_access" {
for_each = local.projects
dataset_id = google_bigquery_dataset.oal.dataset_id
role = "OWNER"
user_by_email = split(
":",
google_logging_project_sink.project_sink[each.value].writer_identity
)[1]
}
There is also a third sink option, a folder sink. This works as you would expect from
the name, allowing you to collect logs from all projects within a folder. Depending on
how your organization is structured, this can be a useful tool.
Summarizing the Recipe
Let’s summarize what you learned and created through this recipe:
•
Logs on GCP come in two dominant flavors: audit logs and application logs.
• Audit logs are a record of every API call done against the Google Cloud control
plane.
• Application logs are created through workloads running in your organization.
• There are two kinds of log sinks:
—
Organization sinks, as the name implies, pull logs indiscriminately from your
entire organization. You configured an organization sink to forward only
audit logs to a purpose-built BigQuery dataset.
3.4 Centralizing Logs on GCP | 81

— Project sinks forward logs from a project to another destination. You config‐
ured a project sink for every project in your organization to forward logs to a
centralized BigQuery dataset.
•
By storing logs in BigQuery, you can leverage its tremendous querying power to
quickly crunch your logs in case of a security incident.
3.5 Centralizing Logs on AWS
Problem
You need to centralize all audit logs for the organization into a central location so you
can perform retrospective analysis and allow for alerting of potential security inci‐
dents in real-time.
Solution
This recipe needs to be run in the organization root account.
If you haven’t already done so, familiarize yourself with Terraform and the different
authentication mechanisms in Chapter 11.
Create a variables.tf file and copy the following contents:
variable "logging_account_id" {
type = string
description = "The account ID to deploy resources into"
}
variable "cross_account_role" {
type = string
description = "The name of the role that is assumable in the logging account"
}
variable "bucket_name" {
type = string
description = "The name of the centralized storage bucket"
}
Then fill out the corresponding terraform.tfvars file:
logging_account_id = ""
cross_account_role = ""
bucket_name = ""
Create the following provider.tf file and run terraform init:
provider "aws" {}
provider "aws" {
alias = "logging"
82 | Chapter 3: Getting Security Visibility at Scale

assume_role {
role_arn = join("", [
"arn:aws:iam::",
var.logging_account_id,
":role/",
var.cross_account_role
])
}
}
terraform {
required_providers {
aws = {
source = "hashicorp/aws"
version = "~> 3"
}
}
}
Create the following main.tf file and run terraform plan:
data "aws_organizations_organization" "current" {}
resource "aws_cloudtrail" "organizational_trail" {
name = "organizational_trail"
s3_bucket_name = aws_s3_bucket.centralized_audit_logs.id
include_global_service_events = true
is_multi_region_trail = true
is_organization_trail = true
enable_log_file_validation = true
depends_on = [
aws_s3_bucket_policy.cloudtrail_access,
]
}
resource "aws_s3_bucket" "centralized_audit_logs" {
provider = aws.logging
bucket = var.bucket_name
}
resource "aws_s3_bucket_policy" "cloudtrail_access" {
provider = aws.logging
bucket = aws_s3_bucket.centralized_audit_logs.id
policy = <<POLICY
{
"Version": "2012-10-17",
"Statement": [
{
"Sid": "AWSCloudTrailAclCheck",
"Effect": "Allow",
"Principal": {
"Service": "cloudtrail.amazonaws.com"
3.5 Centralizing Logs on AWS | 83

},
"Action": "s3:GetBucketAcl",
"Resource": "${aws_s3_bucket.centralized_audit_logs.arn}"
},
{
"Sid": "AWSCloudTrailWrite",
"Effect": "Allow",
"Principal": {
"Service": "cloudtrail.amazonaws.com"
},
"Action": "s3:PutObject",
"Resource": join("/", [
aws_s3_bucket.centralized_audit_logs.arn,
"AWSLogs",
var.logging_account_id,
"*"
])
"Condition": {
"StringEquals": {
"s3:x-amz-acl": "bucket-owner-full-control"
}
}
},
{
"Sid": "AWSCloudTrailWriteOrgWrite",
"Effect": "Allow",
"Principal": {
"Service": [
"cloudtrail.amazonaws.com"
]
},
"Action": "s3:PutObject",
"Resource": join("/", [
aws_s3_bucket.centralized_audit_logs.arn,
"AWSLogs",
data.aws_organizations_organization.current.id,
"*"
])
"Condition": {
"StringEquals": {
"s3:x-amz-acl": "bucket-owner-full-control"
}
}
}
]
}
POLICY
}
Review the resources that are going to be created, and then run terraform apply to
make the changes.
84 | Chapter 3: Getting Security Visibility at Scale
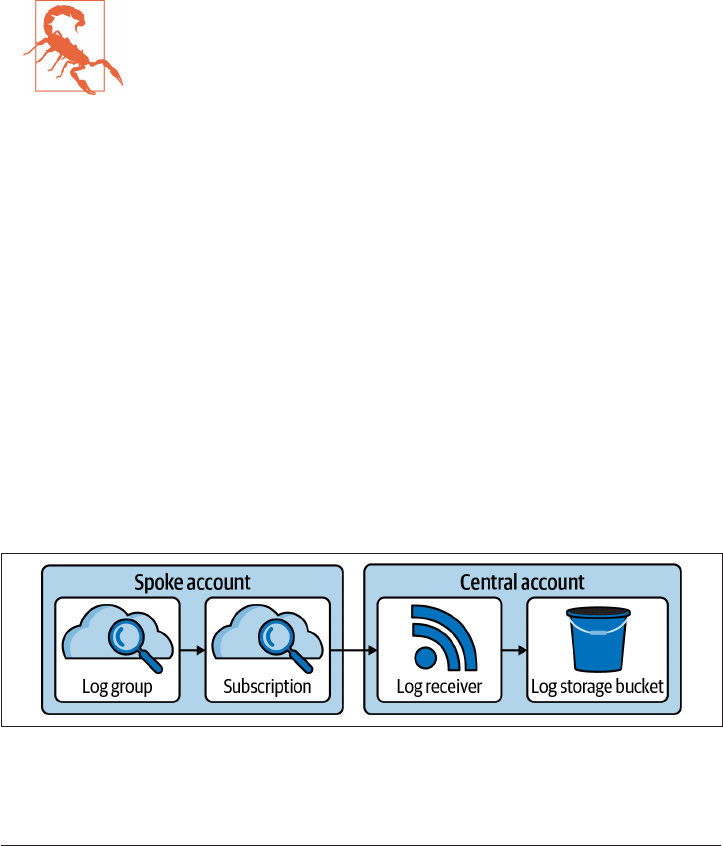
Discussion
Capturing audit logs from across the entire organization is critical to maintaining a
solid security posture in AWS. They contain critical data for both proactively and ret‐
rospectively responding to breaches as they provide a full history of what has hap‐
pened across your estate.
By configuring an organizational trail, you don’t allow teams to disable that trail in
their accounts. This prevents the loss of audit logs and allows the teams to create and
manage their own distinct trails.
If operating with accounts that already have CloudTrail enabled, it
is recommended to leave the account trail enabled for up to a day
once the organizational-level trail is enabled to ensure that events
are not lost. Once that day has passed, ensure that account-level
trails are disabled, as they can attract significant cost at high vol‐
umes.
Once the recipe is deployed, it can be extended in a number of ways:
• You can write the logs directly to CloudWatch to be able to leverage its analytical
capabilities.
• You can trigger notifications via Simple Notification Service (SNS) upon log file
delivery to alert users and other systems.
•
You can attach Lambda functions to S3 to perform bespoke actions.
• You can set up S3 bucket Lifecycle policies to automatically archive older logs to
save on storage costs.
Capturing application logs
The core service used to capture application logs is AWS CloudWatch. Unfortunately,
to date, there is no method of turning on log centralization at an organization level;
instead the solution shown in Figure 3-3 has to be deployed.
Figure 3-3. Centralized CloudWatch logs architecture
3.5 Centralizing Logs on AWS | 85

The solution can be extended to perform automated analysis on the logs with
Lambda functions or fire logs directly into Elasticsearch or Splunk.
The following Terraform deploys the centralized components on the solution:
data "aws_caller_identity" "c" {}
data "aws_organizations_organization" "current" {}
resource "aws_s3_bucket" "centralized_application_logs" {
force_destroy = true
}
resource "aws_iam_role" "kinesis_firehose_role" {
assume_role_policy = <<POLICY
{
"Statement":
{
"Effect": "Allow",
"Principal":
{
"Service": "firehose.amazonaws.com"
},
"Action": "sts:AssumeRole",
"Condition":
{
"StringEquals": {
"sts:ExternalId": ${data.aws_caller_identity.c.account_id}
}
}
}
}
POLICY
}
resource "aws_kinesis_firehose_delivery_stream" "log_delivery_stream" {
name = "log_delivery_stream"
destination = "s3"
s3_configuration {
role_arn = aws_iam_role.kinesis_firehose_role.arn
bucket_arn = aws_s3_bucket.centralized_application_logs.arn
}
}
resource "aws_iam_role" "cloudwatch_logs_role" {
assume_role_policy = <<POLICY
{
"Statement": {
"Effect": "Allow",
"Principal": { "Service": "logs.amazonaws.com" },
"Action": "sts:AssumeRole"
86 | Chapter 3: Getting Security Visibility at Scale

}
}
POLICY
inline_policy {
policy = <<POLICY
{
"Statement":[
{
"Effect":"Allow",
"Action":["firehose:*"],
"Resource":[
"arn:aws:firehose:region:${data.aws_caller_identity.c.account_id}:*"
]
}
]
}
POLICY
}
}
resource "aws_cloudwatch_log_destination" "kinesis_firehose" {
name = "firehose_destination"
role_arn = aws_iam_role.cloudwatch_logs_role.arn
target_arn = aws_kinesis_firehose_delivery_stream.log_delivery_stream.arn
}
resource "aws_cloudwatch_log_destination_policy" "policy" {
for_each = toset(data.aws_organizations_organization.current.accounts[*].id)
destination_name = aws_cloudwatch_log_destination.kinesis_firehose.name
access_policy = <<POLICY
{
"Version" : "2012-10-17",
"Statement" : [
{
"Sid" : "",
"Effect" : "Allow",
"Principal" : {
"AWS" : "${each.value}"
},
"Action" : "logs:PutSubscriptionFilter",
"Resource" : "${aws_cloudwatch_log_destination.kinesis_firehose.arn}"
}
]
}
POLICY
}
3.5 Centralizing Logs on AWS | 87

Summarizing the Recipe
Let’s summarize what you learned and created through this recipe:
•
Logs on AWS come in two dominant flavors: audit logs and application logs.
•
Audit logs record all actions done against the AWS Control Plane.
— They are managed via CloudTrail.
•
Application logs are created through workloads running in your organization.
— They are managed via CloudWatch.
• You configured CloudTrail at an organization level to automatically centralize
logs into a selected account.
• You then configured a solution using Amazon Kinesis Data Firehose to centralize
all your application logs.
3.6 Centralizing Logs on Azure
Problem
You need to centralize all activity logs for the tenant into a central location so you can
perform retrospective analysis and allow for alerting of potential security incidents in
real time.
Solution
If you haven’t already done so, familiarize yourself with Terraform and the different
authentication mechanisms in Chapter 11.
Create a variables.tf file and copy the following contents:
variable "location" {
type = string
description = "The location to create the resources in"
}
variable "storage_account_name" {
type = string
description = "The name of the storage account"
}
Then fill out the corresponding terraform.tfvars file:
location = ""
storage_account_name = ""
Create the following provider.tf file and run terraform init:
88 | Chapter 3: Getting Security Visibility at Scale

terraform {
required_providers {
azurerm = {
source = "hashicorp/azurerm"
version = "~> 2"
}
}
}
provider "azurerm" {
features {}
}
Create the following main.tf file and run terraform plan:
data "azurerm_subscriptions" "available" {}
locals {
log_categories = toset([
"Administrative",
"Security",
"ServiceHealth",
"Alert",
"Recommendation",
"Policy",
"Autoscale",
"ResourceHealth"
])
}
resource "azurerm_resource_group" "activity-log-archive" {
name = "activity-log-archive"
location = var.location
}
resource "azurerm_storage_account" "activity-logs" {
name = var.storage_account_name
resource_group_name = azurerm_resource_group.activity-log-archive.name
location = azurerm_resource_group.activity-log-archive.location
account_tier = "Standard"
account_replication_type = "GRS"
}
resource "azurerm_storage_container" "activity-logs" {
name = "activity-logs"
storage_account_name = azurerm_storage_account.activity-logs.name
container_access_type = "private"
}
resource "azurerm_log_analytics_workspace" "activity-logs" {
name = "activity-logs"
location = azurerm_resource_group.activity-log-archive.location
resource_group_name = azurerm_resource_group.activity-log-archive.name
3.6 Centralizing Logs on Azure | 89

sku = "PerGB2018"
retention_in_days = 30
}
resource "azurerm_monitor_diagnostic_setting" "activity-to-storage" {
for_each = {
for subscription in data.azurerm_subscriptions.available.subscriptions :
subscription.subscription_id => subscription
}
name = "activity-${each.value.subscription_id}"
target_resource_id = each.value.id
log_analytics_workspace_id = azurerm_log_analytics_workspace.activity-logs.id
storage_account_id = azurerm_storage_account.activity-logs.id
dynamic "log" {
for_each = local.log_categories
content {
category = log.value
}
}
}
Review the resources that are going to be created, and then run terraform apply to
make the changes.
Discussion
On Azure, the central pieces of the puzzle when it comes to logging are Log Analytics
workspaces and Diagnostic Settings. Log Analytics workspaces allow you to dynami‐
cally query logs streamed from many locations, allowing you to build out specific
workspaces for teams and use cases. Diagnostic Settings are how you define log desti‐
nations such as Log Analytics workspaces, storage accounts, and event hubs.
The two key log types in Azure are activity logs and resource logs. Activity logs record
all Azure control plane interactions, including API calls, resource health notifica‐
tions, and policy enforcements. Resource logs are generated through the running of a
service, such as application logs, system logs, and container runtime logs.
Activity logs are critical to understanding your security posture at scale. Being able to
see who did what where against the Azure APIs is fundamental in both proactive and
reactive response to security incidents. By default, in an Azure tenant, activity logs are
collected across all management groups and subscriptions; what you did in the solu‐
tion is bring them to a central location that allows you to turn them into actionable
insights.
Currently, for Subscription Activity logs, eight types of logs can be captured:
•
Administrative
•
Security
90 | Chapter 3: Getting Security Visibility at Scale

• ServiceHealth
• Alert
• Recommendation
•
Policy
• Autoscale
•
ResourceHealth
As these continue to get added to over time, you will need to extend the log_cate
gories local variable to include them.
In the next section, you will see an example of using Terraform to
dynamically discover the different log types for a particular
resource. Unfortunately, that lookup does not support subscrip‐
tions at the current time.
Resource logs
For application logs in Azure, you again want to make use of Log Analytics workspa‐
ces; however, you will need to deploy infrastructure into each subscription. For exam‐
ples of how to do this, see Recipes 6.3 and 6.12.
The following Terraform does three things:
•
Creates an Azure Web App from a demo Docker container in the delivery team
subscription
• Creates a Log Analytics workspace in a central subscription
• Sets up the Diagnostic Settings so that logs are automatically streamed from the
delivery team subscription to the central Log Analytics workspace
Create a variables.tf file and copy the following contents:
variable "location" {
type = string
description = "The location to create the resources in"
}
variable "delivery_subscription_id" {
type = string
description = "The delivery team subscription ID"
}
variable "central_subscription_id" {
type = string
description = "The centralized team subscription ID"
}
3.6 Centralizing Logs on Azure | 91

Then fill out the corresponding terraform.tfvars file:
location = ""
delivery_subscription_id = ""
central_subscription_id = ""
Create the following provider.tf file and run terraform init:
terraform {
required_providers {
azurerm = {
source = "hashicorp/azurerm"
version = "~> 2"
}
}
}
provider "azurerm" {
alias = "delivery"
features {}
subscription_id = var.delivery_subscription_id
}
provider "azurerm" {
alias = "central"
features {}
subscription_id = var.central_subscription_id
}
Create the following main.tf file and run terraform plan:
resource "azurerm_resource_group" "cal" {
provider = azurerm.central
name = "centralized-application-logs"
location = var.location
}
resource "azurerm_log_analytics_workspace" "application-logs" {
provider = azurerm.central
name = "application-logs"
location = azurerm_resource_group.cal.location
resource_group_name = azurerm_resource_group.cal.name
sku = "PerGB2018"
retention_in_days = 30
}
resource "azurerm_resource_group" "delivery" {
provider = azurerm.delivery
name = "delivery-rg"
location = var.location
}
resource "azurerm_app_service_plan" "delivery" {
provider = azurerm.delivery
92 | Chapter 3: Getting Security Visibility at Scale

name = "delivery-service-plan"
location = azurerm_resource_group.delivery.location
resource_group_name = azurerm_resource_group.delivery.name
kind = "Linux"
reserved = true
sku {
tier = "Standard"
size = "S1"
}
}
resource "azurerm_app_service" "delivery" {
provider = azurerm.delivery
name = "delivery-${var.delivery_subscription_id}"
site_config {
linux_fx_version = "DOCKER|appsvcsample/static-site:latest"
always_on = true
}
location = azurerm_resource_group.delivery.location
resource_group_name = azurerm_resource_group.delivery.name
app_service_plan_id = azurerm_app_service_plan.delivery.id
}
data "azurerm_monitor_diagnostic_categories" "delivery_app_service" {
provider = azurerm.delivery
resource_id = azurerm_app_service.delivery.id
}
resource "azurerm_monitor_diagnostic_setting" "delivery_central_log_forwarding" {
provider = azurerm.delivery
name = "central_log_forwarding"
target_resource_id = azurerm_app_service.delivery.id
log_analytics_workspace_id = azurerm_log_analytics_workspace.application-logs.id
dynamic "log" {
for_each = data.azurerm_monitor_diagnostic_categories.delivery_app_service.logs
content {
category = log.value
enabled = true
retention_policy {
days = 0
enabled = false
}
}
}
metric {
category = "AllMetrics"
3.6 Centralizing Logs on Azure | 93

enabled = false
retention_policy {
days = 0
enabled = false
}
}
}
Review the resources that are going to be created, and then run terraform apply to
make the changes.
Unlike with subscriptions, for other resources you can use
azurerm_monitor_diagnostic_categories data provider to allow
for the dynamic gathering of all log categories to forward, rather
than having to retrospectively update the Terraform over time.
Summarizing the Recipe
Let’s summarize what you learned and created through this recipe:
• Logs on Azure come in two main varieties: audit logs and resource logs.
• Diagnostic Settings allow for the forwarding of logs to target locations.
• You set up a Log Analytics workspace and Azure Storage Account in a dedicated
subscription to simplify querying and storage.
• Then you set up a Diagnostic Setting to automatically route all audit logs.
• Every resource in Azure has its own log categories.
• You then created a simple container app service that automatically routed logs to
a centralized Log Analytics workspace.
3.7 Log Anomaly Alerting on GCP
Problem
You want to ensure that all the relevant logs are collected and automatically processed
by Google tooling to alert if anomalous or unusual activity is detected.
Solution
If you haven’t already done so, familiarize yourself with Terraform and the different
authentication mechanisms in Chapter 11.
Create a variables.tf file and copy the following contents:
94 | Chapter 3: Getting Security Visibility at Scale

variable "project" {
type = string
description = "The ID of the project to deploy the infrastructure"
}
variable "region" {
type = string
description = "The region to deploy the infrastructure in"
}
variable "organization_domain" {
type = string
description = "The domain of your GCP organization"
}
Then fill out the corresponding terraform.tfvars file:
project_id = ""
region = ""
organization_domain = ""
Create the following provider.tf file and run terraform init:
provider "google" {
project = var.project_id
region = var.region
}
terraform {
required_providers {
google = {
source = "hashicorp/google"
version = "~> 3"
}
}
}
Create the following main.tf file and run terraform plan:
resource "google_compute_network" "this" {
name = "flow-log-example"
}
resource "google_compute_subnetwork" "subnet" {
name = "flow-log-subnet"
ip_cidr_range = "10.0.0.0/24"
network = google_compute_network.this.id
log_config {
aggregation_interval = "INTERVAL_5_SEC"
flow_sampling = 1
metadata = "INCLUDE_ALL_METADATA"
}
}
3.7 Log Anomaly Alerting on GCP | 95

data "google_organization" "this" {
domain = var.organization_domain
}
resource "google_organization_iam_audit_config" "organization" {
org_id = data.google_organization.this.org_id
service = "allServices"
audit_log_config {
log_type = "ADMIN_READ"
}
audit_log_config {
log_type = "DATA_READ"
}
audit_log_config {
log_type = "DATA_WRITE"
}
}
resource "google_dns_policy" "logging" {
name = "logging"
enable_logging = true
networks {
network_url = google_compute_network.this.id
}
}
resource "google_compute_firewall" "rule" {
name = "log-firewall"
network = google_compute_network.this.name
deny {
protocol = "icmp"
}
log_config {
metadata = "INCLUDE_ALL_METADATA"
}
}
resource "google_compute_router" "router" {
name = "router"
network = google_compute_network.this.id
}
resource "google_compute_router_nat" "nat" {
name = "logging-nat"
router = google_compute_router.router.name
nat_ip_allocate_option = "AUTO_ONLY"
source_subnetwork_ip_ranges_to_nat = "ALL_SUBNETWORKS_ALL_IP_RANGES"
96 | Chapter 3: Getting Security Visibility at Scale

log_config {
enable = true
filter = "ALL"
}
}
Review the resources that are going to be created, and then run terraform apply to
make the changes.
Discussion
As the automated collecting and processing of logs is done by Event Threat Detec‐
tion, this recipe focused on how to enable logging on key resource types. By combin‐
ing this recipe with Recipe 6.1, you ensure that the logs are enabled on all infrastruc‐
ture deployed by teams. The following log types were enabled in the recipe:
• Virtual Private Cloud (VPC) flow logs
• Cloud audit logs
— Admin Write and Read Activity logs
— Data Write and Read Access logs
•
Cloud DNS logs
• Firewall rules logs
• Cloud NAT logs
Event Threat Detection comes bundled and fully enabled with Security Command
Center Premium. When it detects a potential threat, Event Threat Detection raises a
finding in Security Command Center and a Cloud Logging Project. The only log
types it analyzes not covered by the solution are host-based secure shell (SSH) logs
and syslog, both of which need to be configured on hosts and are outside the scope of
this recipe.
VPC
ow log considerations
VPC flow logs sample and record the network flows on the VPCs in your organiza‐
tion. To understand more about how VPCs are best architected on GCP, see Recipe
5.1.
In the preceding solution, the sampling rate for logs was set at 100% and at the small‐
est interval. This means that you will not drop any logs; however, it comes with a cost
trade-off, in that this is the most expensive option. Depending on the scale of your
network traffic, you will need to evaluate what cost benefit ratio makes the most sense
for your use case.
3.7 Log Anomaly Alerting on GCP | 97

Cloud audit data logs
Admin Write Activity logs are automatically captured on GCP and cannot be dis‐
abled, so there are three kinds of audit logs you need to enable:
• DATA_WRITE
•
DATA_READ
• ADMIN_READ
Similarly to VPC flow logs, you need to consider the cost implications of enabling
every type of audit log, as enabling all of these will incur significant costs to process
and store.
Summarizing the Recipe
So let’s review what you learned and created as part of this recipe:
• Event Threat Detection automatically registers findings based on anomalous log
activity.
• It is included as part of Security Command Center Premium Edition.
• It ingests and parses logs from six main sources:
—
SSH logs/syslog
— VPC flow logs
— Cloud audit logs
— Cloud DNS logs
— Firewall rules logs
—
Cloud NAT logs
• Apart from Cloud Audit Admin Write logs, none of these logs are enabled by
default.
• You saw how to enable all the types of logs apart from SSH/syslog, which are out
of scope.
•
You learned that there is a trade-off to be made between cost and the amount and
types of logs to capture.
3.8 Log Anomaly Alerting on AWS
Problem
You want to ensure that all the relevant logs are collected and automatically processed
by AWS tooling to alert if anomalous or unusual activity is detected.
98 | Chapter 3: Getting Security Visibility at Scale

Solution
If you haven’t already done so, familiarize yourself with Terraform and the different
authentication mechanisms in Chapter 11.
Create a variables.tf file and copy the following contents:
variable "delegated_admin_account" {
type = string
description = "The target account ID"
}
variable "cross_account_role" {
type = string
description = "The name of the role to assume"
}
Then fill out the corresponding terraform.tfvars file:
delegated_admin_account = ""
cross_account_role = ""
Create the following provider.tf file and run terraform init:
provider "aws" {}
provider "aws" {
alias = "delegated_admin_account"
assume_role {
role_arn = join("", [
"arn:aws:iam::",
var.delegated_admin_account,
":role/",
var.cross_account_role
])
}
}
terraform {
required_providers {
aws = {
source = "hashicorp/aws"
version = "~> 3"
}
}
}
Your aws_organizations_organization resource should only
exist in one location. The following Terraform shows an example of
that resource. You need to add guardduty.amazonaws.com to your
aws_service_access_principals list and create the other
resources outlined in the following file.
3.8 Log Anomaly Alerting on AWS | 99

Create the following main.tf file and run terraform plan:
resource "aws_organizations_organization" "this" {
aws_service_access_principals = [
"cloudtrail.amazonaws.com",
"guardduty.amazonaws.com",
"ram.amazonaws.com",
"config-multiaccountsetup.amazonaws.com",
"config.amazonaws.com",
"member.org.stacksets.cloudformation.amazonaws.com",
"securityhub.amazonaws.com",
"sso.amazonaws.com"
]
enabled_policy_types = [
"SERVICE_CONTROL_POLICY",
"TAG_POLICY",
]
}
resource "aws_guardduty_organization_admin_account" "this" {
admin_account_id = var.delegated_admin_account
}
resource "aws_guardduty_organization_configuration" "delegated_admin" {
provider = aws.delegated_admin_account
auto_enable = true
detector_id = aws_guardduty_detector.delegated_admin.id
datasources {
s3_logs {
auto_enable = true
}
}
depends_on = [
aws_guardduty_organization_admin_account.this,
]
}
resource "aws_guardduty_detector" "delegated_admin" {
provider = aws.delegated_admin_account
enable = true
}
Review the resources that are going to be created, and then run terraform apply to
make the changes.
Discussion
Amazon GuardDuty provides intelligent threat detection, parsing CloudTrail man‐
agement events, CloudTrail S3 data events, VPC flows logs, and Route53 DNS logs to
100 | Chapter 3: Getting Security Visibility at Scale

identify potential issues. It automatically integrates in AWS Security Hub, as covered
in Recipe 3.2. It is consistently updated with the latest trends and data from AWS, giv‐
ing you an ever better view of your security posture.
GuardDuty generates findings, which are then enriched by Amazon Detective, giving
you as much information about the potential breach as possible. Additionally, find‐
ings are classified as high, medium, and low risk, allowing you to focus your efforts
on the more important incidents. You can also optionally enable S3 protection on the
account to alert you when potentially malicious actors are accessing your data.
Unfortunately, the solution automatically enrolls new accounts as they are created but
does not act on existing accounts within the organization. To fill this gap, the follow‐
ing create_members.py file is a Python solution that enables GuardDuty in every
existing account simultaneously. You will need boto3 installed in your local Python
environment (the code was developed against boto3 version 1.17.62).
import sys
import boto3
delegated_admin_account = sys.argv[1]
role_name = sys.argv[2]
organizations = boto3.client("organizations")
credentials = boto3.client("sts").assume_role(
RoleArn=f"arn:aws:iam::{delegated_admin_account}:role/{role_name}",
RoleSessionName="GuardDutyDelegatedAdmin",
)["Credentials"]
guardduty = boto3.Session(
aws_access_key_id=credentials["AccessKeyId"],
aws_secret_access_key=credentials["SecretAccessKey"],
aws_session_token=credentials["SessionToken"],
).client("guardduty")
detector_paginator = guardduty.get_paginator("list_detectors")
detectors = []
for page in detector_paginator.paginate():
detectors.extend(page["DetectorIds"])
detector_id = detectors[0]
account_paginator = organizations.get_paginator("list_accounts")
for page in account_paginator.paginate(PaginationConfig={"MaxItems": 50}):
accounts = page["Accounts"]
guardduty.create_members(
DetectorId=detector_id,
AccountDetails=[
{"AccountId": account["Id"], "Email": account["Email"]}
for account in accounts
],
)
3.8 Log Anomaly Alerting on AWS | 101

To execute the Python, run python create_members.py <delegated_admin_
account_id> <cross_account_role>, filling in the two parameters.
Summarizing the Recipe
Let’s summarize what you learned and created through this recipe:
•
Automated threat detection on AWS is done by GuardDuty.
• As part of best practice, you should assign a delegated administrator for
GuardDuty.
•
By enabling GuardDuty at the organizational level, you can automatically enroll
new accounts.
• You first assigned your delegated administrator for your organization.
• Then you wrote some Python to properly enroll all the existing accounts.
3.9 Log Anomaly Alerting on Azure
Problem
You want to ensure that all the relevant logs are collected and automatically processed
by Azure tooling to alert if anomalous or unusual activity is detected.
Solution
If you haven’t already done so, familiarize yourself with Terraform and the different
authentication mechanisms in Chapter 11.
Create a variables.tf file and copy the following contents:
variable "location" {
type = string
description = "The location in which to deploy the resource"
}
variable "target_management_group_uuid" {
type = string
description = "The UUID of the target management group"
}
Then fill out the corresponding terraform.tfvars file:
location = ""
target_management_group_uuid = ""
Create the following provider.tf file and run terraform init:
102 | Chapter 3: Getting Security Visibility at Scale

terraform {
required_providers {
azurerm = {
source = "hashicorp/azurerm"
version = "~> 2"
}
}
}
provider "azurerm" {
features {}
}
Create the following main.tf file and run terraform plan:
data "azurerm_management_group" "target" {
name = var.target_management_group_uuid
}
data "azurerm_subscription" "current" {}
resource "azurerm_resource_group" "security_center" {
name = "security-center"
location = var.location
}
resource "azurerm_log_analytics_workspace" "security_center" {
name = "security-center"
location = azurerm_resource_group.security_center.location
resource_group_name = azurerm_resource_group.security_center.name
sku = "PerGB2018"
}
resource "azurerm_security_center_workspace" "security_center" {
scope = data.azurerm_subscription.current.id
workspace_id = azurerm_log_analytics_workspace.security_center.id
}
resource "azurerm_security_center_auto_provisioning" "this" {
auto_provision = "On"
}
locals {
resource_types = toset([
"AppServices",
"ContainerRegistry",
"KeyVaults",
"KubernetesService",
"SqlServers",
"SqlServerVirtualMachines",
"StorageAccounts",
"VirtualMachines",
"Arm",
3.9 Log Anomaly Alerting on Azure | 103

"Dns"
])
}
resource "azurerm_security_center_subscription_pricing" "this" {
for_each = local.resource_types
tier = "Standard"
resource_type = each.value
}
resource "azurerm_policy_assignment" "sc_auto_enable" {
name = "security_center"
location = azurerm_resource_group.security_center.location
scope = data.azurerm_management_group.target.id
policy_definition_id = join("", [
"/providers/Microsoft.Authorization/policyDefinitions/",
"ac076320-ddcf-4066-b451-6154267e8ad2"
])
identity {
type = "SystemAssigned"
}
}
resource "azurerm_policy_remediation" "sc_auto_enable" {
name = "security_center"
scope = azurerm_policy_assignment.sc_auto_enable.scope
policy_assignment_id = azurerm_policy_assignment.sc_auto_enable.id
}
Review the resources that are going to be created, and then run terraform apply to
make the changes.
Discussion
On Azure, your centralized log anomaly alerting is Azure Security Center. It provides
a single pane of glass to monitor your security posture in the cloud, as well as cover‐
ing on premise and even infrastructure in other clouds. To enable a robust security
posture, and take advantage of all the tools Azure has to offer, you should enable
Azure Defender across all subscriptions. Azure Defender can be configured to auto‐
matically analyze a list of resource types, including the following:
• App services
•
Container registry
• Key vaults
• Kubernetes service
•
SQL servers
104 | Chapter 3: Getting Security Visibility at Scale

• SQL server virtual machines
• Storage accounts
• Virtual machines
•
ARM templates
• DNS
This list is continually growing, and the resource_types local vari‐
able in the recipe will need updating as new capabilities are added.
In this recipe, you used an Azure Policy to report compliance for where Security Cen‐
ter is currently enabled and then created a remediation task to fix noncompliant sub‐
scriptions. The remediation task for that policy enables Security Center but does not
configure Azure Defender; you should combine this with Recipe 6.12 to ensure that it
is configured exactly to your specifications in every subscription in your Azure
tenant.
With a sufficiently privileged user account, you can bring together the security find‐
ings from across many subscriptions in your tenant. Security Center is centrally
organized, but what a user can see is constrained by their own permissions.
Additionally, Azure Security Center also includes Cloud Connectors, which allow you
to use it to monitor and manage both GCP and AWS environments as well. In a mul‐
ticloud world, bringing threat intelligence to a centralized location becomes critical to
avoid being overwhelmed by different and disparate telemetry.
Summarizing the Recipe
So let’s review what you learned and created as part of this recipe:
• Azure Security Center processes multiple log streams from across Azure to find
anomalous activity.
• Azure Security Center can be enabled at scale through the use of Azure Policy.
• To get the best value out of Azure Security Center, you need to enable Azure
Defender across all subscriptions in your tenant.
• Azure Defender automatically scans and analyzes a variety of resource types on
Azure.
• Azure Defender needs to be configured directly on the subscription.
•
By using Recipe 6.12, you can apply your required configuration at scale.
3.9 Log Anomaly Alerting on Azure | 105

3.10 Building an Infrastructure Registry on GCP
Problem
You need to understand what infrastructure is deployed across your estate so you can
understand where to invest your time to best protect your estate.
Solution
If you haven’t already done so, familiarize yourself with Terraform and the different
authentication mechanisms in Chapter 11.
Create a variables.tf file and copy the following contents:
variable "project_id" {
type = string
description = "The project to create the resources in"
}
variable "region" {
type = string
description = "The region to create the resources in"
}
variable "organization_domain" {
type = string
description = "The organization domain of your Google Cloud estate"
}
Then fill out the corresponding terraform.tfvars file:
project_id = ""
region = ""
organization_domain = ""
Create the following provider.tf file and run terraform init:
provider "google" {
project = var.project_id
region = var.region
}
terraform {
required_providers {
google = {
source = "hashicorp/google"
version = "~> 3"
}
}
}
Create the following main.tf file and run terraform plan:
106 | Chapter 3: Getting Security Visibility at Scale

data "google_organization" "this" {
domain = var.organization_domain
}
data "google_project" "current" {}
resource "null_resource" "create_assets_service_account" {
provisioner "local-exec" {
command = join(" ", [
"gcloud beta services identity create",
"--service=cloudasset.googleapis.com"
])
}
}
resource "google_project_service" "assets_api" {
service = "cloudasset.googleapis.com"
}
resource "google_cloud_asset_organization_feed" "networking_changes" {
billing_project = data.google_project.current.name
org_id = data.google_organization.this.org_id
feed_id = "network-changes"
content_type = "RESOURCE"
asset_types = [
"compute.googleapis.com/Subnetwork",
"compute.googleapis.com/Network",
"compute.googleapis.com/Router",
"compute.googleapis.com/Route",
"compute.googleapis.com/ExternalVpnGateway"
]
feed_output_config {
pubsub_destination {
topic = google_pubsub_topic.network_changes.id
}
}
depends_on = [
google_pubsub_topic_iam_member.cloud_asset_writer,
google_project_service.assets_api
]
}
resource "google_pubsub_topic" "network_changes" {
name = "network-changes"
}
resource "google_pubsub_topic_iam_member" "cloud_asset_writer" {
topic = google_pubsub_topic.network_changes.id
role = "roles/pubsub.publisher"
3.10 Building an Infrastructure Registry on GCP | 107

member = join("",[
"serviceAccount:service-",
data.google_project.current.number,
"@gcp-sa-cloudasset.iam.gserviceaccount.com"
])
depends_on = [
null_resource.create_assets_service_account
]
}
Review the resources that are going to be created, and then run terraform apply to
make the changes.
Discussion
This recipe creates a Pub/Sub topic that gets triggered every time network resources
are changed in your estate. Understanding the changes that occur in your estate is
critical for maintaining a robust security posture and threat hunting. By configuring
Cloud Asset Inventory feeds, you can operate in a trust but verify model.
Users are allowed to make the changes they need to support their system; however,
the security team can review changes they deem pertinent. This is a paradigm shift
from working on premises, where changes often have to pass a series of manual
reviews before they are actioned.
In the solution, you used an organizational feed, but you can also configure both
project- and folder-level feeds, enabling you to set up notifications for segments of
your organization. It may be that you care far more about a certain type of resource
changing in production, but you do not wanted to be notified when it changes in
development or preproduction environments.
This recipe focused on networking resources, as they are generally less volatile, mean‐
ing changes are less expected, and they have a direct impact on your security posture.
Each change can be sorted into one of three mutually exclusive, collectively exhaus‐
tive buckets:
• Required changes required by systems within the estate
•
Accidental changes made in error
• A malicious change made by bad actors within your estate, key data when threat
hunting
With this in mind, how can you improve the signal-to-noise ratio of the events? The
following Terraform shows how to apply conditions to the feeds to be more selective
over the alerts. Specifically, it shows how to filter explicitly for resource creation
events.
108 | Chapter 3: Getting Security Visibility at Scale

locals {
does_not_exist = join(".", [
"google.cloud.asset.v1",
"TemporalAsset.PriorAssetState",
"DOES_NOT_EXIST"
])
}
resource "google_cloud_asset_organization_feed" "networking_changes" {
billing_project = data.google_project.current.name
org_id = data.google_organization.this.org_id
feed_id = "network-changes"
content_type = "RESOURCE"
asset_types = [
"compute.googleapis.com/Subnetwork",
"compute.googleapis.com/Network",
"compute.googleapis.com/Router",
"compute.googleapis.com/Route",
"compute.googleapis.com/ExternalVpnGateway"
]
condition {
expression = <<-CONDITION
!temporal_asset.deleted &&
temporal_asset.prior_asset_state == local.does_not_exist
CONDITION
title = "created"
description = "Filter for created resources only"
}
feed_output_config {
pubsub_destination {
topic = google_pubsub_topic.network_changes.id
}
}
depends_on = [
google_pubsub_topic_iam_member.cloud_asset_writer,
google_project_service.assets_api
]
}
Summarizing the Recipe
So let’s review what you learned and created as part of this recipe:
• Cloud Asset Inventory comes preconfigured in your GCP organization.
• You can create notifications based on particular resource types changing, allow‐
ing you to “trust but verify.”
3.10 Building an Infrastructure Registry on GCP | 109

• “Trust but verify” allows you to enable teams to be empowered to make changes
without compromising your security posture.
• You can use conditions to filter for only particular events, such as creation or
deletion.
3.11 Building an Infrastructure Registry on AWS
Problem
You need to understand what infrastructure is deployed across your estate so you can
understand where to invest your time to best protect your estate.
Solution
If you haven’t already done so, familiarize yourself with Terraform and the different
authentication mechanisms in Chapter 11.
This recipe assumes you are using a privileged role within the organization root
account and have the boto3 library installed and available on your Python path,
which can be done via pip install boto3.
Create a variables.tf file and copy the following contents:
variable "delegated_admin_account" {
type = string
description = "The account ID for the account to be the Config delegated admin"
}
variable "cross_account_role" {
type = string
description = "The cross account role to assume"
}
Then fill out the corresponding terraform.tfvars file:
delegated_admin_account = ""
cross_account_role = ""
Create the following provider.tf file and run terraform init:
provider "aws" {}
provider "aws" {
alias = "delegated_admin_account"
assume_role {
role_arn = join("", [
"arn:aws:iam::",
var.delegated_admin_account,
":role/:",
var.cross_account_role
110 | Chapter 3: Getting Security Visibility at Scale

])
}
}
terraform {
required_providers {
aws = {
source = "hashicorp/aws"
version = "~> 3"
}
}
}
Create the following set_delegated_admin.py file:
import sys
import boto3
delegated_admin_account = sys.argv[1]
organizations = boto3.client("organizations")
for principal in [
"config-multiaccountsetup.amazonaws.com",
"config.amazonaws.com",
]:
delegated_admins = organizations.list_delegated_administrators(
ServicePrincipal=principal,
)["DelegatedAdministrators"]
if len(delegated_admins) == 0:
organizations.register_delegated_administrator(
AccountId=delegated_admin_account,
ServicePrincipal=principal,
)
Your aws_organizations_organization resource should only
exist in one location. The following Terraform shows an example of
that resource. Add config-multiaccountsetup.amazonaws.com
and config.amazonaws.com to your aws_service_access_princi
pals list and create the other resources outlined in the following
file.
Create the following main.tf file and run terraform plan:
resource "aws_organizations_organization" "this" {
aws_service_access_principals = [
"cloudtrail.amazonaws.com",
"guardduty.amazonaws.com",
3.11 Building an Infrastructure Registry on AWS | 111

"ram.amazonaws.com",
"config-multiaccountsetup.amazonaws.com",
"config.amazonaws.com",
"member.org.stacksets.cloudformation.amazonaws.com",
"securityhub.amazonaws.com",
"sso.amazonaws.com"
]
enabled_policy_types = [
"SERVICE_CONTROL_POLICY",
"TAG_POLICY",
]
}
resource "null_resource" "set_delegated_admin" {
provisioner "local-exec" {
command = join(" ",[
"python",
"set_delegated_admin.py",
var.delegated_admin_account
])
}
}
resource "aws_config_configuration_aggregator" "organization" {
provider = aws.delegated_admin_account
depends_on = [
aws_iam_role_policy_attachment.organization,
null_resource.set_delegated_admin
]
name = "org_aggregator"
organization_aggregation_source {
all_regions = true
role_arn = aws_iam_role.organization.arn
}
}
resource "aws_iam_role" "organization" {
provider = aws.delegated_admin_account
name = "org-config-role"
assume_role_policy = <<EOF
{
"Version": "2012-10-17",
"Statement": [
{
"Sid": "",
"Effect": "Allow",
"Principal": {
"Service": "config.amazonaws.com"
112 | Chapter 3: Getting Security Visibility at Scale

},
"Action": "sts:AssumeRole"
}
]
}
EOF
}
resource "aws_iam_role_policy_attachment" "organization" {
provider = aws.delegated_admin_account
role = aws_iam_role.organization.name
policy_arn = join("", [
"arn:aws:iam::aws:policy/service-role/","AWSConfigRoleForOrganizations"
])
}
Review the resources that are going to be created, and then run terraform apply to
make the changes.
Discussion
This recipe configured a delegated administrator account for AWS Config and an
organization-level aggregator which allows for the collation of data from all the enrol‐
led accounts.
AWS Config is a core service not only for resource inventories but also for managing
compliance at scale across your AWS estate. This recipe forms the basis of further rec‐
ipes such as Recipes 7.2, 7.5, and 7.11.
Although the aggregator is configured centrally, the recipe does not handle the con‐
figuration of AWS Config on a per-account basis. The following Terraform, combined
with Recipe 6.11, handles the per-account configuration.
The required variables are as follows:
variable "central_account" {
type = string
description = "The account ID for the centralized Config account"
}
variable "target_account" {
type = string
description = "The account ID to configure the Delivery Channel in"
}
variable "cross_account_role" {
type = string
description = "The cross account role to assume"
}
3.11 Building an Infrastructure Registry on AWS | 113

variable "bucket_name" {
type = string
description = "The name of the bucket to store AWS Config data"
}
It requires the following providers to be configured:
provider "aws" {
alias = "central"
assume_role {
role_arn = join("", [
"arn:aws:iam::",
var.central_account,
":role/",
var.cross_account_role
])
}
}
provider "aws" {
alias = "target"
assume_role {
role_arn = join("", [
"arn:aws:iam::",
var.target_account,
":role/",
var.cross_account_role
])
}
}
terraform {
required_providers {
aws = {
source = "hashicorp/aws"
version = "~> 3"
}
}
}
And the following resources, which handle the per-account configuration, create a
centralized S3 bucket and an SNS topic for data aggregation and triggering workflows
from compliance events:
data "aws_organizations_organization" "this" {}
resource "aws_config_delivery_channel" "this" {
provider = aws.target
name = "delivery_channel"
s3_bucket_name = aws_s3_bucket.central_config.bucket
sns_topic_arn = aws_sns_topic.config.arn
depends_on = [
aws_config_configuration_recorder.this,
114 | Chapter 3: Getting Security Visibility at Scale

aws_s3_bucket_policy.config
]
}
resource "aws_s3_bucket" "central_config" {
provider = aws.central
bucket = var.bucket_name
}
resource "aws_s3_bucket_policy" "config" {
provider = aws.central
bucket = aws_s3_bucket.central_config.id
policy = data.aws_iam_policy_document.bucket_policy.json
}
data "aws_iam_policy_document" "bucket_policy" {
statement {
actions = [
"S3:GetBucketAcl",
"S3:ListBucket",
"S3:PutObject",
]
effect = "Allow"
principals {
type = "AWS"
identifiers = [aws_iam_role.config.arn]
}
resources = [
aws_s3_bucket.central_config.arn,
"${aws_s3_bucket.central_config.arn}/*"
]
}
}
resource "aws_sns_topic" "config" {
name = "central_config"
}
resource "aws_sns_topic_policy" "default" {
arn = aws_sns_topic.config.arn
policy = data.aws_iam_policy_document.allow_config.json
}
data "aws_iam_policy_document" "allow_config" {
statement {
actions = [
"SNS:Publish"
3.11 Building an Infrastructure Registry on AWS | 115

]
effect = "Allow"
principals {
type = "AWS"
identifiers = [aws_iam_role.config.arn]
}
resources = [
aws_sns_topic.config.arn,
]
}
}
resource "aws_config_configuration_recorder" "this" {
provider = aws.target
name = "recorder"
role_arn = aws_iam_role.config.arn
}
resource "aws_iam_role" "config" {
provider = aws.target
name = "config-delivery"
assume_role_policy = data.aws_iam_policy_document.assume_role.json
}
data "aws_iam_policy_document" "assume_role" {
statement {
actions = [
"sts:AssumeRole"
]
effect = "Allow"
principals {
type = "Service"
identifiers = ["config.amazonaws.com"]
}
}
}
resource "aws_iam_role_policy" "config" {
provider = aws.target
name = "config-delivery"
role = aws_iam_role.config.id
policy = data.aws_iam_policy_document.config_role.json
}
data "aws_iam_policy_document" "config_role" {
statement {
116 | Chapter 3: Getting Security Visibility at Scale

actions = [
"SNS:Publish"
]
effect = "Allow"
resources = [
aws_sns_topic.config.arn,
]
}
statement {
actions = [
"S3:GetBucketAcl",
"S3:ListBucket",
"S3:PutObject",
"S3:PutObjectAcl"
]
effect = "Allow"
resources = [
aws_s3_bucket.central_config.arn,
"${aws_s3_bucket.central_config.arn}/*"
]
}
}
Once AWS Config recorders are properly configured in all accounts, you can then use
the advanced query functionality within AWS Config to run ad hoc queries against
the infrastructure across your estate. The delivery channel ensures that a copy of all
configuration data is stored in the S3 bucket, where you can query it with external
tooling or Athena. The SNS topic means you can send notifications, send emails, or
trigger AWS Lambda functions when there are infrastructure changes.
3.11 Building an Infrastructure Registry on AWS | 117

Summarizing the Recipe
So let’s review what you learned and created as part of this recipe:
•
With AWS Config, it is possible to build a centralized asset inventory on AWS.
•
AWS Config should be set up with a delegated administrator account.
• By creating an AWS Config Aggregator, you can easily pull all data centrally.
•
To be able to understand when particular changes are being made, you need to
deploy delivery channels out to every account in your organization.
• By combining this recipe with Recipe 6.11, you can easily manage deployment of
AWS Config at scale.
3.12 Building an Infrastructure Registry on Azure
Problem
You need to understand what infrastructure is deployed across your estate so you can
understand where to invest your time to best protect your estate.
Solution
To achieve this, you’re going to deploy an Azure Monitor workbook that allows you
to dynamically query what resources exist in your estate.
If you haven’t already done so, familiarize yourself with Terraform and the different
authentication mechanisms in Chapter 11.
Create a variables.tf file and copy the following contents:
variable "location" {
type = string
description = "The location to deploy your resource into"
}
Then fill out the corresponding terraform.tfvars file:
location = ""
Create the following provider.tf file and run terraform init:
terraform {
required_providers {
azurerm = {
source = "hashicorp/azurerm"
version = "~> 2"
}
}
118 | Chapter 3: Getting Security Visibility at Scale

}
provider "azurerm" {
features {}
}
Download the workbook_data.json file into your working directory from the book’s
accompanying GitHub repository.
Create the following main.tf file and run terraform plan:
resource "azurerm_resource_group" "resource_inventory" {
name = "resource_inventory"
location = var.location
}
resource "azurerm_resource_group_template_deployment" "resource_inventory" {
name = "resource_inventory"
resource_group_name = azurerm_resource_group.resource_inventory.name
deployment_mode = "Complete"
template_content = <<TEMPLATE
{
"contentVersion": "1.0.0.0",
"parameters": {
"workbookDisplayName": {
"type": "string",
"defaultValue": "Resource Inventory",
"metadata": {
"description": "The friendly name for the workbook."
}
},
"workbookType": {
"type": "string",
"defaultValue": "workbook",
"metadata": {
"description": "The gallery that the workbook will be shown under.""
}
},
"workbookSourceId": {
"type": "string",
"defaultValue": "Azure Monitor",
"metadata": {
"description": "The id of resource instance"
}
},
"workbookId": {
"type": "string",
"defaultValue": "[newGuid()]",
"metadata": {
"description": "The unique guid for this workbook instance"
}
}
},
3.12 Building an Infrastructure Registry on Azure | 119

"resources": [
{
"name": "[parameters('workbookId')]",
"type": "microsoft.insights/workbooks",
"location": "[resourceGroup().location]",
"apiVersion": "2018-06-17-preview",
"dependsOn": [],
"kind": "shared",
"properties": {
"displayName": "[parameters('workbookDisplayName')]",
"serializedData": ${jsonencode(data.local_file.workbook.content)},
"version": "1.0",
"sourceId": "[parameters('workbookSourceId')]",
"category": "[parameters('workbookType')]"
}
}
],
"outputs": {
"workbookId": {
"type": "string",
"value": "[
resourceId('microsoft.insights/workbooks',
parameters('workbookId'))
]"
}
},
"$schema": join("", [
"http://schema.management.azure.com/",
"schemas/2015-01-01/deploymentTemplate.json#"
])
}
TEMPLATE
}
output "workbooks_url" {
value = join("", [
"https://portal.azure.com/#blade/",
"Microsoft_Azure_Monitoring/AzureMonitoringBrowseBlade/",
"workbooks"
])
}
Review the resources that are going to be created, and then run terraform apply to
make the changes.
Discussion
By browsing to the workbooks_url output and selecting the Resource Inventory work‐
book, you will see an interface that allows you to query the resources from across the
tenant. It will also have preconfigured filters, enabling you to easily narrow by
resource type, parent subscription, and resource group.
120 | Chapter 3: Getting Security Visibility at Scale

In this recipe, you used Terraform to deploy an Azure Resource
Manager (ARM) template, as opposed to directly deploying a
resource. ARM templates are Microsoft’s first-class infrastructure-
as-code approach. This book has focused on Terraform as it pro‐
vides a common language, syntax, and interface to all three major
clouds; however, there are resources the providers do not cover. As
of the time of writing, the Azure Terraform provider did not yet
support workbooks.
A common pattern for working around missing resources is to use
ARM templates initially and migrate to the native Terraform
resources once they are supported.
Azure provides the Azure Resource Graph as the engine that drives resource explora‐
tion in your tenant. You can actively query it yourself, and it is the same service that
powers the Azure Portal. It comes with a sophisticated query language that allows you
to ask it almost any question about your resources. For example, the query that gen‐
erates the body of the workbook is relatively simple:
where type in~({ResourceTypes})
| project Resource = id,
Type = type,
Subscription = subscriptionId,
['Resource group'] = strcat(
'/subscriptions/',
subscriptionId,
'/resourceGroups/',
resourceGroup
),
Location = location
This query grabs the resource ID, type, subscription, resource group, and location, fil‐
tering for only the resource types that are specified in the workbook parameters. By
extending this query, you can have the workbook report on any data you wish to see,
including changes in resource properties over time.
Azure Monitor is the centralized observability tool with the Azure ecosystem. Here
are some of the common outcomes it drives:
• Understanding your application health through Application Insights
• Gaining visibility into your infrastructure with VM and Container Insights
•
Performing bespoke reporting and visualizations with workbooks and dash‐
boards
• Centralizing your monitoring with Azure Monitor Metrics
• Creating alerts and automated remediation
3.12 Building an Infrastructure Registry on Azure | 121

Additionally, in recipes such as Recipes 3.3 and 3.6 in this chapter alone, you used
Log Analytics workspaces, which fall under the banner of Azure Monitor.
Summarizing the Recipe
So let’s review what you learned and created as part of this recipe:
• Azure Monitor is your centralized observability solution.
•
Azure Resource Graph allows you to write bespoke queries against all the
resources in your tenant.
• Azure Monitor workbooks allow you to build reports based on Resource Graph
queries.
• Workbooks are not available as a native Terraform resource.
•
By deploying ARM templates with Terraform, you can access unsupported
resource types.
122 | Chapter 3: Getting Security Visibility at Scale

CHAPTER 4
Protecting Your Data
The crown jewel in your cloud estate is the data that you store and process. As craft‐
ing and scaling a data security strategy is at least one book in and of itself, in this
chapter you’ll be seeing how to implement the fundamental building blocks on which
such a strategy would rest. In Chapter 1, you learned that you are only as strong as
your weakest link. By embedding these recipes into the infrastructure fabric of your
cloud estate, you can ensure that insufficient data encryption is not what will cause a
data breach.
When talking of data, it can be in one of two states: at rest or in transit. The first nine
recipes show how you should handle data in both states. The last three recipes are
about data loss prevention, how you find where your valuable data is, and how you
verify it has the level of warranted protection. When you have a cloud estate actively
leveraged by hundreds of teams and thousands of engineers, it is beyond the scope of
any one unaided human to be able to stay on top of what data is where. Instead, you’ll
see how to use tooling as the needed force multiplier to manage data at scale.
Envelope Encryption
Envelope encryption is the process of encrypting keys with other keys. The three major
cloud providers all use envelope encryption and key hierarchies to keep data safe
(Figure 4-1).
At the simplest level, there are two different kinds of keys.
Data encryption keys, DEKs, are used to actually encrypt the data. They are usually
stored near the data they have encrypted and must be encrypted at rest.
Key encryption keys, KEKs, are used to encrypt DEKs or other KEKs. They need to be
stored centrally and rotated regularly.
123
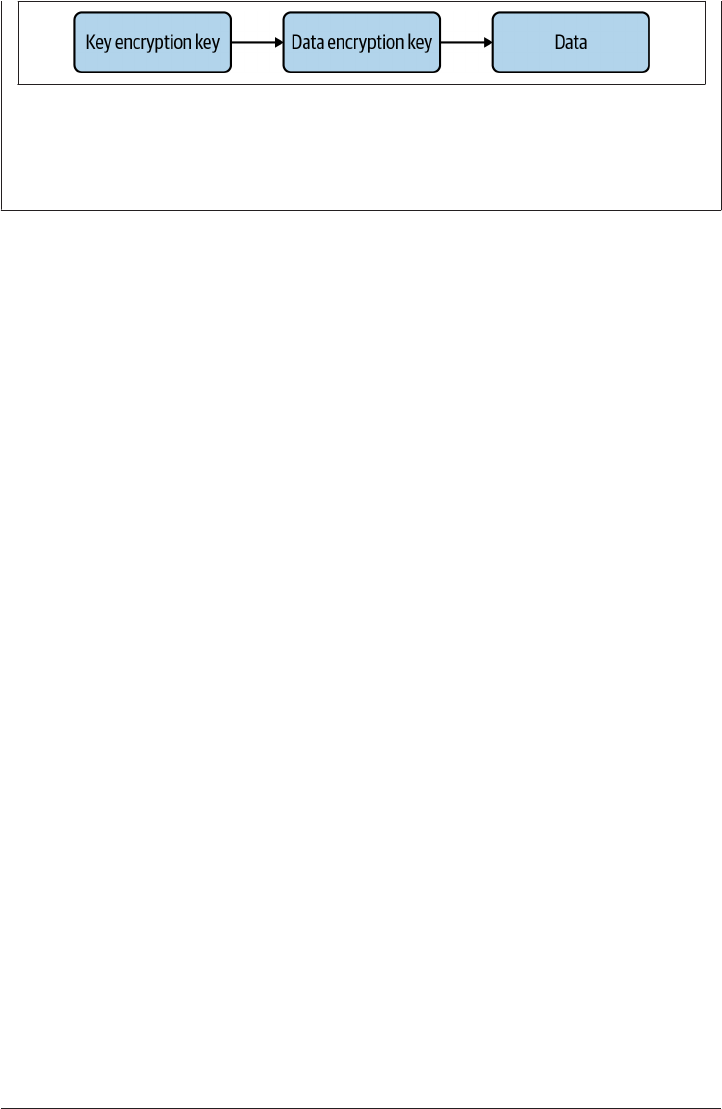
Figure 4-1. Envelope encryption
By using different cryptographic algorithms for the keys, you remove the ability of a
single compromise to unravel all the layers of encryption.
So let’s dive into the wonderful world of encrypting your data in the cloud.
4.1 Encrypting Data at Rest on GCP
Problem
As part of securely hosting data on GCP, you need to be able to encrypt data at rest on
the most common storage options available.
Solution
If you haven’t already done so, familiarize yourself with Terraform and the different
authentication mechanisms in Chapter 11.
Create a variables.tf file and copy the following contents:
variable "project_id" {
type = string
description = "The project to create the resources in"
}
variable "region" {
type = string
description = "The region to create the resources in"
}
Then fill out the corresponding terraform.tfvars file:
project_id = ""
region = ""
Create the following provider.tf file and run terraform init:
provider "google" {
project = var.project_id
region = var.region
}
provider "google-beta" {
project = var.project_id
124 | Chapter 4: Protecting Your Data

region = var.region
}
terraform {
required_providers {
google = {
source = "hashicorp/google"
version = "~> 3"
}
google-beta = {
source = "hashicorp/google-beta"
version = "~> 3"
}
null = {
source = "hashicorp/null"
version = "~> 3"
}
}
}
Create the following main.tf file:
resource "google_project_service" "cloud_kms" {
service = "cloudkms.googleapis.com"
}
resource "google_kms_key_ring" "keyring" {
name = "sensitive-data-keyring"
location = var.region
depends_on = [google_project_service.cloud_kms]
}
resource "google_kms_crypto_key" "key" {
name = "sensitive-data-key"
key_ring = google_kms_key_ring.keyring.id
}
To create an encrypted Cloud Compute Disk, add the following resources to main.tf:
resource "google_service_account" "sensitive" {
account_id = "sensitive-data-service-account"
display_name = "Sensitive Data Handler"
}
resource "google_service_account_iam_policy" "sensitive" {
service_account_id = google_service_account.sensitive.name
policy_data = data.google_iam_policy.sa.policy_data
}
data "google_client_openid_userinfo" "me" {}
data "google_iam_policy" "sa" {
binding {
role = "roles/iam.serviceAccountUser"
4.1 Encrypting Data at Rest on GCP | 125

members = [
"user:${data.google_client_openid_userinfo.me.email}",
]
}
}
resource "google_kms_crypto_key_iam_member" "service_account_use" {
crypto_key_id = google_kms_crypto_key.key.id
role = "roles/cloudkms.cryptoKeyEncrypterDecrypter"
member = "serviceAccount:${google_service_account.sensitive.email}"
}
resource "google_compute_disk" "encrypted" {
name = "encrypted"
size = "10"
type = "pd-standard"
zone = "${var.region}-a"
disk_encryption_key {
kms_key_self_link = google_kms_crypto_key.key.id
kms_key_service_account = google_service_account.sensitive.email
}
depends_on = [google_kms_crypto_key_iam_member.service_account_use]
}
To create an encrypted Cloud SQL database, add the following resources to main.tf:
resource "google_compute_network" "vpc_network" {
name = "vpc-network"
}
resource "google_sql_database_instance" "encrypted" {
provider = google-beta
name = "encrypted-instance"
database_version = "POSTGRES_13"
region = var.region
deletion_protection = false
encryption_key_name = google_kms_crypto_key.key.id
settings {
tier = "db-f1-micro"
ip_configuration {
private_network = google_compute_network.vpc_network.id
}
}
depends_on = [google_kms_crypto_key_iam_member.sql_binding]
}
resource "google_kms_crypto_key_iam_member" "sql_binding" {
crypto_key_id = google_kms_crypto_key.key.id
role = "roles/cloudkms.cryptoKeyEncrypterDecrypter"
member = join("", [
126 | Chapter 4: Protecting Your Data

"serviceAccount:service-",
data.google_project.current.number,
"@gcp-sa-cloud-sql.iam.gserviceaccount.com"
])
depends_on = [null_resource.create_database_service_account]
}
resource "null_resource" "create_database_service_account" {
provisioner "local-exec" {
command = join(" ", [
"gcloud beta services identity create",
"--project=${var.project_id}",
"--service=sqladmin.googleapis.com"
])
}
}
To create an encrypted Cloud Storage bucket, add the following resources to main.tf:
data "google_project" "current" {}
resource "google_storage_bucket" "encrypted" {
name = "${data.google_project.current.project_id}-encrypted"
force_destroy = true
location = var.region
encryption {
default_kms_key_name = google_kms_crypto_key.key.id
}
depends_on = [google_kms_crypto_key_iam_member.storage_binding]
}
data "google_storage_project_service_account" "this" {}
resource "google_kms_crypto_key_iam_member" "storage_binding" {
crypto_key_id = google_kms_crypto_key.key.id
role = "roles/cloudkms.cryptoKeyEncrypterDecrypter"
member = join("",[
"serviceAccount:",
data.google_storage_project_service_account.this.email_address
])
}
Review the resources to be created by running terraform plan, and then run terra
form apply to make the changes.
Discussion
In this recipe, you saw how to deploy the following resources with the data encrypted
at rest:
4.1 Encrypting Data at Rest on GCP | 127

• Cloud compute volumes
• Cloud SQL databases
• Cloud storage buckets
This recipe used a single, shared Cloud KMS key to secure all the
resources deployed. In a normal scenario, you should be using
multiple keys to enable finely grained access control and limit the
blast radius of a breach.
As you can see in the recipe, in order to use a key with a particular resource, you need
to give the correct service account the permissions to leverage the key. You will find
that most resources will automatically leverage a default key for the project to encrypt
resources when you do not specify what key to use. However, it is best to create dis‐
tinct keys so you can segment resources within a project, allowing you to maintain
the principle of least privilege.
When you create a key, the principal you use retains editor writes so you can continue
to administer the key. Additionally, all keys belong to a key ring, which is a logical
group that allows for managing groups of keys simultaneously, which has a distinct
set of permissions compared to the keys. For example, you can allow someone to cre‐
ate new keys that they manage without giving them access to manage preexisting keys
in the ring.
When defining IAM permissions for the keys in Terraform, you are given the follow‐
ing three types of resources:
google_kms_crypto_key_iam_policy
The policy resource allows for the authoritative setting of the IAM access to the
key; by applying this resource all other preexisting assignments are removed. For
example, use this resource if you wish the policies to be the only ones for the key.
google_kms_crypto_key_iam_binding
The binding resource allows for the authoritative setting of IAM access to a key
for a particular role. All other assignments for a given role are removed. For
example, use this resource to give cryptoKeyEncrypterDecrypter access to only
the defined members.
google_kms_crypto_key_iam_member
The member resource allows for nonauthoritative setting of permissions on the
key. In the recipe, you used this resource to allow for setting the required permis‐
sions individually for each use case, without overwriting the previous access.
128 | Chapter 4: Protecting Your Data

Between the three resource types, you saw three different methods for using service
accounts with KMS keys.
To create the Compute Disk, you needed to create a bespoke service account and
assign that when creating the resources.
To create the Cloud SQL database, you needed to use a null_resource to invoke
gcloud beta to create a specific service account not natively supported by Terraform.
To create the Cloud Storage bucket, there is a Terraform data provider that gives you
the details of the project-specific Service Account you need to use.
To know what service account you need for each resource type, refer to the service
documentation. However, by using Recipe 6.1, you make it possible to produce reusa‐
ble artifacts that make it simple for every team to enable encryption at rest.
Summary
Let’s summarize what was learned and deployed in this recipe:
• On GCP, Cloud KMS gives you the ability to encrypt resources at rest.
• Although GCP will encrypt many resources by default with an automatically gen‐
erated key, you should look to create distinct keys that you can control.
•
Keys are created under a key ring, which allows for managing keys by logical
groupings.
• In order for a resource to leverage a key, the cloudkms.cryptoKeyEncrypterDe
crypter role needs to be given to the appropriate service account.
• Depending on the resource type, what service account to use and how to create it
varies.
•
You saw examples of how to encrypt Compute Engine disks, Cloud SQL data‐
bases, and Cloud Storage buckets, which all require different approaches for hav‐
ing the correct service account.
4.2 Encrypting Data at Rest on AWS
Problem
As part of securely hosting data on AWS, you need to be able to encrypt data at rest
on the most common storage options available.
Solution
If you haven’t already done so, familiarize yourself with Terraform and the different
authentication mechanisms in Chapter 11.
4.2 Encrypting Data at Rest on AWS | 129

Create a variables.tf file and copy the following contents:
variable "key_administrator_role" {
type = string
description = "The role used to administer the key"
}
variable "database_subnets_ids" {
type = string
description = "The IDs of the subnets to host the database"
}
Then fill out the corresponding terraform.tfvars file:
key_administrator_role = ""
database_subnets_ids = [""]
Create the following provider.tf file and run terraform init:
provider "aws" {}
terraform {
required_providers {
aws = {
source = "hashicorp/aws"
version = "~> 3"
}
random = {
source = "hashicorp/random"
version = "~> 3"
}
}
}
Create the following main.tf file:
resource "aws_kms_key" "key" {
policy = data.aws_iam_policy_document.key_policy.json
}
data "aws_iam_policy_document" "key_policy" {
statement {
sid = "Allow access for Key Administrators"
actions = [
"kms:Create*",
"kms:Describe*",
"kms:Enable*",
"kms:List*",
"kms:Put*",
"kms:Update*",
"kms:Revoke*",
"kms:Disable*",
"kms:Get*",
"kms:Delete*",
130 | Chapter 4: Protecting Your Data

"kms:TagResource",
"kms:UntagResource",
"kms:ScheduleKeyDeletion",
"kms:CancelKeyDeletion"
]
effect = "Allow"
principals {
type = "AWS"
identifiers = [var.key_administrator_role]
}
resources = ["*"]
}
statement {
sid = "Allow use of the key"
actions = [
"kms:Encrypt",
"kms:Decrypt",
"kms:ReEncrypt*",
"kms:GenerateDataKey*",
"kms:DescribeKey"
]
effect = "Allow"
principals {
type = "AWS"
identifiers = ["*"]
}
resources = ["*"]
}
statement {
sid = "Allow attachment of persistent resources"
effect = "Allow"
principals {
type = "AWS"
identifiers = ["*"]
}
actions = [
"kms:CreateGrant",
"kms:ListGrants",
"kms:RevokeGrant"
]
resources = ["*"]
condition {
test = "Bool"
variable = "kms:GrantIsForAWSResource"
values = [true]
}
}
}
4.2 Encrypting Data at Rest on AWS | 131

To create an encrypted Elastic Block Store (EBS) volume, enable EBS encryption by
default, and set the default EBS encryption key by adding the following resources to
main.tf:
data "aws_region" "current" {}
resource "aws_ebs_default_kms_key" "this" {
key_arn = aws_kms_key.key.arn
}
resource "aws_ebs_encryption_by_default" "this" {
enabled = true
depends_on = [
aws_ebs_default_kms_key.this
]
}
resource "aws_ebs_volume" "this" {
availability_zone = "${data.aws_region.current.name}a"
size = 1
type = "gp3"
depends_on = [
aws_ebs_encryption_by_default.this
]
}
To create an encrypted RDS database, add the following resources to main.tf:
resource "random_password" "database" {
length = 16
special = true
override_special = "_%@"
}
resource "aws_db_instance" "default" {
allocated_storage = 10
db_subnet_group_name = aws_db_subnet_group.default.name
engine = "postgres"
engine_version = "13.2"
instance_class = "db.t3.micro"
name = "encrypteddatabase"
kms_key_id = aws_kms_key.this.arn
username = "postgres"
password = random_password.database.result
parameter_group_name = "default.postgres13"
skip_final_snapshot = true
storage_encrypted = true
vpc_security_group_ids = [aws_security_group.database.id]
}
resource "aws_db_subnet_group" "default" {
subnet_ids = var.database_subnet_ids
132 | Chapter 4: Protecting Your Data

}
resource "aws_security_group" "database" {
vpc_id = var.vpc_id
}
output "database_password" {
value = aws_db_instance.default.password
}
To create an encrypted S3 bucket, add the following resources to main.tf:
resource "aws_s3_bucket" "encrypted_bucket" {
server_side_encryption_configuration {
rule {
apply_server_side_encryption_by_default {
kms_master_key_id = aws_kms_key.this.arn
sse_algorithm = "aws:kms"
}
}
}
}
Review the resources to be created by running terraform plan, and then run terra
form apply to make the changes.
Discussion
In this recipe, you saw how to deploy the following resources with the data encrypted
at rest:
• EBS volumes
• RDS databases
•
S3 buckets
This recipe used a single, shared AWS KMS key to secure all the
resources deployed. In a normal scenario, you should be using
multiple keys to enable finely grained access control and limit the
blast radius of a breach.
The service that lives at the core of AWS encryption is AWS Key Management Service
(KMS). For many services, AWS will provision a KMS key for that service that you
can leverage for encryption, known as an AWS customer managed key (CMK). How‐
ever, although this potentially simplifies things, it now gives a single point of failure
or compromise shared across many resources.
4.2 Encrypting Data at Rest on AWS | 133

Instead, you should create your own KMS keys, known as customer-managed keys,
and apply them explicitly to resources. By doing this, you have the ability to be
explicit about who can use what key where, and control potential privilege escalation.
Three dierent kinds of KMS policies
When looking at KMS policies, there are generally three kinds of users who need to
be able to interact with a key:
•
Administrators, allowing them to control usage of the key but not use the key
• Users, allowing them to use the key but not change how it can be used
• AWS services, allowing them to temporarily leverage the key as required
Setting up the policy to enable administrators and users is relatively trivial. However,
to set up access that AWS services can leverage, you need the permission to create
grants. Grants are a way to give temporary permission to AWS principals to use a
CMK. They only allow the principal to use the minimum subset of required KMS
operations: encrypting and decrypting data, creating grants, and retiring or revoking
grants.
Encrypting data at rest on EBS
With EBS, you need to ensure that both volumes and snapshots are encrypted. When
a volume is encrypted, any snapshots taken from it will be encrypted as well. If you
have unencrypted volumes, you cannot then encrypt them on demand; it can only be
done on creation. To move the data to encrypted storage, you need to take a snapshot
and restore it, which can be done with the following Terraform:
data "aws_ebs_volume" "unencrypted" {
filters {
name = "volume-id"
values = [var.volume_id]
}
}
resource "aws_ebs_snapshot" "conversion" {
volume_id = var.volume_id
}
resource "aws_ebs_volume" "encrypted" {
availability_zone = data.aws_ebs_volume.unencrypted.type.availability_zone
encrypted = true
snapshot_id = aws_ebs_snapshot.conversion.id
type = data.aws_ebs_volume.unencrypted.type
}
If you have unencrypted snapshots, you can copy them to encrypt them, like so:
134 | Chapter 4: Protecting Your Data

data "aws_region" "current" {}
resource "aws_ebs_snapshot_copy" "snapshot" {
source_snapshot_id = var.snapshot_id
source_region = data.aws_region.current.name
encrypted = true
}
Encrypting data at rest on RDS
With databases on RDS, the rules for enabling encryption are similar to EBS. To
encrypt an existing database, you need to take a snapshot and restore it, and to
encrypt an existing snapshot, you need to copy it. The following two code snippets
show how to perform each of these operations.
The following Terraform encrypts an existing database by creating and then restoring
from a snapshot:
resource "aws_db_snapshot" "conversion" {
db_instance_identifier = var.database_id
db_snapshot_identifier = "encryption_conversion"
}
resource "aws_db_instance" "default" {
allocated_storage = 10
db_subnet_group_name = aws_db_subnet_group.default.name
engine = "postgres"
engine_version = "13.2"
instance_class = "db.t3.micro"
name = "encrypteddatabase"
kms_key_id = aws_kms_key.rds.arn
username = var.username
password = var.password
parameter_group_name = "default.postgres13"
skip_final_snapshot = true
snapshot_identifier = aws_db_snapshot.conversion.id
storage_encrypted = true
vpc_security_group_ids = [aws_security_group.database.id]
}
The following Terraform uses a null resource to create an encrypted copy of an exist‐
ing database snapshot:
resource "null_resource" "create_encrypted_copy" {
provisioner "local-exec" {
command = join(" ", [
"aws rds copy-db-snapshot",
"--source-db-snapshot-identifier ${var.snapshot_arn}",
"--target-db-snapshot-identifier encryptedsnapshot",
"--kms-key-id ${aws_kms_key.rds.arn}"
])
4.2 Encrypting Data at Rest on AWS | 135

}
}
Encrypting data at rest on S3
With S3, there are four options for encryption:
•
AWS-managed CMKs
• Customer-managed CMKs
•
S3-managed encryption keys
•
Customer-provided encryption keys
To continue with the theme of using customer-provided CMKs to retain control of
how the keys are used, this recipe focused on the second option. To see the last option
in action, see Recipe 4.5. Depending on your use case, you also need to look into how
objects stored in your bucket are encrypted. Imagine a case where some highly sensi‐
tive objects need to be encrypted with a specific KMS key, not the bucket default. By
using bucket policies, you can force users to conform to certain encryption standards.
Let’s look at two examples, enforcing that KMS is used for the objects, and enforcing
that a specific KMS key is used.
The following bucket policy enforces that a KMS key must be used:
data "aws_iam_policy_document" "kms_enforcement" {
statement {
effect = "Deny"
actions = ["s3:PutObject"]
resources = ["${aws_s3_bucket.kms_enforcement.arn}/*"]
principals {
type = "*"
identifiers = ["*"]
}
condition {
test = "StringNotEquals"
values = ["aws:kms"]
variable = "s3:x-amz-server-side-encryption"
}
}
}
The following bucket policy enforces that a specific KMS key be used:
data "aws_iam_policy_document" "specific_kms_enforcement" {
statement {
effect = "Deny"
136 | Chapter 4: Protecting Your Data

actions = ["s3:PutObject"]
resources = ["${aws_s3_bucket.specific_kms_enforcement.arn}/*"]
principals {
type = "*"
identifiers = ["*"]
}
condition {
test = "StringNotEquals"
values = [aws_kms_key.s3.arn]
variable = "s3:x-amz-server-side-encryption-aws-kms-key-id"
}
}
}
Summary
Let’s summarize what was learned and deployed in this recipe:
• On AWS, your core service for encryption is KMS.
• AWS provides AWS-managed KMS keys that are used for default encryption of
resources.
• KMS allows you to create customer-managed keys.
•
By creating customer-managed CMKs, you can explicitly control and audit
usage.
• Many resources on AWS need to be recreated to enable data-at-rest encryption.
•
Some resources allow you to set specific policies governing how users interact
with them, allowing you to enforce encryption standards.
4.3 Encrypting Data at Rest on Azure
Problem
As part of securely hosting data on Azure, you need to be able to encrypt data at rest
on the most common storage options available.
Solution
If you haven’t already done so, familiarize yourself with Terraform and the different
authentication mechanisms in Chapter 11.
Create a variables.tf file and copy the following contents:
4.3 Encrypting Data at Rest on Azure | 137

variable "location" {
type = string
description = "The location to deploy your resource into"
}
variable "storage_account_name" {
type = string
description = "The name of the storage account"
}
Then fill out the corresponding terraform.tfvars file:
location = ""
storage_account_name = ""
Create the following provider.tf file and run terraform init:
terraform {
required_providers {
azurerm = {
source = "hashicorp/azurerm"
version = "~> 2"
}
random = {
source = "hashicorp/random"
version = "~> 3"
}
}
}
provider "azurerm" {
features {}
}
Create the following main.tf file:
resource "random_string" "key_vault" {
length = 16
special = false
}
data "azurerm_client_config" "current" {}
resource "azurerm_resource_group" "encrypted" {
name = "encrypted"
location = var.location
}
resource "azurerm_key_vault" "keys" {
name = random_string.key_vault.result
location = azurerm_resource_group.encrypted_blobs.location
resource_group_name = azurerm_resource_group.encrypted_blobs.name
tenant_id = data.azurerm_client_config.current.tenant_id
enabled_for_disk_encryption = true
138 | Chapter 4: Protecting Your Data

soft_delete_retention_days = 7
purge_protection_enabled = true
sku_name = "standard"
}
resource "azurerm_key_vault_key" "key" {
name = "key"
key_vault_id = azurerm_key_vault.keys.id
key_type = "RSA"
key_size = 2048
key_opts = ["decrypt", "encrypt", "sign", "unwrapKey", "verify", "wrapKey"]
}
resource "azurerm_key_vault_access_policy" "client" {
key_vault_id = azurerm_key_vault.keys.id
tenant_id = data.azurerm_client_config.current.tenant_id
object_id = data.azurerm_client_config.current.object_id
key_permissions = ["get", "create", "delete"]
secret_permissions = ["get"]
}
To create an encrypted managed disk, add the following resources to main.tf:
resource "azurerm_disk_encryption_set" "des" {
name = "des"
resource_group_name = azurerm_resource_group.encrypted_blobs.name
location = azurerm_resource_group.encrypted_blobs.location
key_vault_key_id = azurerm_key_vault_key.blob.id
identity {
type = "SystemAssigned"
}
}
resource "azurerm_key_vault_access_policy" "disk" {
key_vault_id = azurerm_key_vault.keys.id
tenant_id = azurerm_disk_encryption_set.des.identity.0.tenant_id
object_id = azurerm_disk_encryption_set.des.identity.0.principal_id
key_permissions = [
"Get",
"WrapKey",
"UnwrapKey"
]
}
resource "azurerm_managed_disk" "encrypted" {
name = "encryption-test"
location = azurerm_resource_group.encrypted_blobs.location
resource_group_name = azurerm_resource_group.encrypted_blobs.name
storage_account_type = "Standard_LRS"
4.3 Encrypting Data at Rest on Azure | 139

create_option = "Empty"
disk_size_gb = "1"
disk_encryption_set_id = azurerm_disk_encryption_set.des.id
}
To create an encrypted database, add the following resources to main.tf:
resource "azurerm_postgresql_server" "database" {
name = "encrypted-database"
location = azurerm_resource_group.encrypted_blobs.location
resource_group_name = azurerm_resource_group.encrypted_blobs.name
administrator_login = "postgres"
administrator_login_password = random_password.database.result
sku_name = "GP_Gen5_2"
version = "11"
storage_mb = 5120
ssl_enforcement_enabled = true
threat_detection_policy {
disabled_alerts = []
email_account_admins = false
email_addresses = []
enabled = true
retention_days = 0
}
identity {
type = "SystemAssigned"
}
}
To create an encrypted storage account, add the following resources to main.tf:
resource "azurerm_key_vault_access_policy" "storage" {
key_vault_id = azurerm_key_vault.keys.id
tenant_id = data.azurerm_client_config.current.tenant_id
object_id = azurerm_storage_account.sensitive.identity.0.principal_id
key_permissions = ["get", "unwrapkey", "wrapkey"]
secret_permissions = ["get"]
}
resource "azurerm_storage_account" "sensitive" {
name = var.storage_account_name
resource_group_name = azurerm_resource_group.encrypted_blobs.name
location = azurerm_resource_group.encrypted_blobs.location
account_tier = "Standard"
account_replication_type = "LRS"
identity {
type = "SystemAssigned"
140 | Chapter 4: Protecting Your Data

}
}
resource "azurerm_storage_account_customer_managed_key" "sensitive" {
storage_account_id = azurerm_storage_account.sensitive.id
key_vault_id = azurerm_key_vault.keys.id
key_name = azurerm_key_vault_key.blob.name
}
Review the resources to be created by running terraform plan, and then run terra
form apply to make the changes.
Discussion
In this recipe, you saw how to deploy the following resources with the data encrypted
at rest:
• Managed disks
• PostgreSQL databases
• Storage accounts
This recipe used a single, shared key within the Key Vault to secure
all the resources deployed. In a normal scenario, you should be
using multiple keys to enable finely grained access control and
limit the blast radius of a breach.
This brings us to the topic of how IAM is applied in the context of Key Vaults in
Azure. In this recipe, you defined multiple different access policies which enabled
the specific required usage of the different principals. First was the
0_key_vault_access_policy client resource, ensuring that the principal who cre‐
ated the vault retained the ability to create and delete keys as required.
Then as you created the workload resources, each time in turn you needed to apply a
distinct access policy to allow the managed identity to perform the required opera‐
tions with the key. In all three cases, the identity can only perform the get, unwrap
key, and wrapkey operations, the minimum set of permissions required. As a further
step, you could extend the recipe to not leverage SystemAssigned identities, instead
defining your own to further segment who can leverage what keys. Rather than hav‐
ing a shared system identity between resources, by them having distinct identities
with access to different keys, you can handle different levels of data sensitivity.
It’s one thing to enable encryption on the resources that you own and control. The
next step is understanding where other people are not conforming to the same
approach. How can you know when people are not correctly using CMKs? For that,
4.3 Encrypting Data at Rest on Azure | 141

you need to turn to Azure Policy. Let’s look at how you can apply policies to subscrip‐
tions that hold sensitive data and identify where CMKs have not been used for the
three resources looked at in this recipe.
You can extend this recipe with the following variable:
variable "sensitive_subscription_ids" {
type = list(string)
description = "The IDs of the sensitive data subscriptions"
}
And then add the following data provider and resources to apply the policy to the
selected subscriptions:
data "azurerm_subscription" "subscription" {
for_each = toset(var.sensitive_subscription_ids)
subscription_id = each.value
}
resource "azurerm_policy_assignment" "storage_cmk" {
for_each = toset(var.sensitive_subscription_ids)
name = "storage-cmk-${each.value}"
scope = data.azurerm_subscription.subscription[each.value].id
policy_definition_id = join("", [
"/providers/Microsoft.Authorization/policyDefinitions/",
"b5ec538c-daa0-4006-8596-35468b9148e8"
])
}
resource "azurerm_policy_assignment" "postgres_cmk" {
for_each = toset(var.sensitive_subscription_ids)
name = "postgres-cmk-${each.value}"
scope = data.azurerm_subscription.subscription[each.value].id
policy_definition_id = join("", [
"/providers/Microsoft.Authorization/policyDefinitions/",
"18adea5e-f416-4d0f-8aa8-d24321e3e274"
])
}
resource "azurerm_policy_assignment" "disk_cmk" {
for_each = toset(var.sensitive_subscription_ids)
name = "disk-cmk-${each.value}"
scope = data.azurerm_subscription.subscription[each.value].id
policy_definition_id = join("", [
"/providers/Microsoft.Authorization/policyDefinitions/",
"702dd420-7fcc-42c5-afe8-4026edd20fe0"
])
}
Summary
Let’s summarize what was learned and deployed in this recipe:
142 | Chapter 4: Protecting Your Data

• On Azure, for key management, you create keys within Key Vaults.
• By applying access policies to your vaults, you can control who has access to keys.
• You should have separate identities for managing keys and using keys.
• Giving access to resources to leverage customer-managed keys involves giving
their identity access.
• You can either give access to the SystemAssigned identity or create and manage
identities yourself.
• You created an encrypted storage account, PostgreSQL database, and disk.
• By assigning Azure Policies to subscriptions, you can detect where people are not
leveraging CMKs when required.
4.4 Encrypting Data on GCP with Your Own Keys
Problem
Compliance requirements dictate that particular data on GCP be stored with encryp‐
tion keys created and managed by the internal systems.
Solution
If you haven’t already done so, familiarize yourself with Terraform and the different
authentication mechanisms in Chapter 11.
Create a variables.tf file and copy the following contents:
variable "project_id" {
type = string
description = "The project to create the resources in"
}
variable "region" {
type = string
description = "The region to create the resources in"
}
Then fill out the corresponding terraform.tfvars file:
project_id = ""
region = ""
Create the following provider.tf file and run terraform init:
provider "google" {
project = var.project_id
region = var.region
}
4.4 Encrypting Data on GCP with Your Own Keys | 143

terraform {
required_providers {
google = {
source = "hashicorp/google"
version = "~> 3"
}
}
}
Create the following main.tf file and run terraform plan:
data "google_project" "current" {}
resource "google_storage_bucket" "csek" {
name = "${data.google_project.current.project_id}-csek"
force_destroy = true
location = var.region
}
output "storage_bucket_name" {
value = google_storage_bucket.csek.name
}
Review the resources that are going to be created, and then run terraform apply to
make the changes.
Install the pycryptodomex and google-cloud-storage libraries by running pip
install pycryptodomex google-cloud-storage.
This code is just demonstrative for the recipe. You should use spe‐
cialized software for the creation and management of your keys.
Create the following generate_data_key.py file and run python generate_
data_key.py to create a local key file.
import base64
from Cryptodome.Random import get_random_bytes
key = get_random_bytes(32)
print(key)
with open("key", "w") as file:
file.write(str(base64.b64encode(key), "utf-8"))
Copy a file you wish to store encrypted into your working directory.
Create the following
upload_le.py file:
144 | Chapter 4: Protecting Your Data

import base64
import sys
from subprocess import run
from google.cloud import storage
def upload(file_name):
storage_client = storage.Client()
bucket_name = (
run(
"terraform output storage_bucket_name",
capture_output=True,
check=True,
shell=True,
)
.stdout.decode("utf-8")
.split('"')[1]
)
bucket = storage_client.bucket(bucket_name)
with open("key", "r") as file:
encryption_key = base64.b64decode(file.read())
blob = bucket.blob(file_name, encryption_key=encryption_key)
blob.upload_from_filename(file_name)
if __name__ == "__main__":
upload(sys.argv[1])
To upload your file to the Cloud Storage bucket, run python upload_file.py with
the name of your file. For example, run python upload_file.py message.txt.
Discussion
The following Python
download_le.py file will download your file to your local
directory:
import base64
import sys
from subprocess import run
from google.cloud import storage
def download(file_key, file_name):
storage_client = storage.Client()
bucket_name = (
run(
"terraform output storage_bucket_name",
capture_output=True,
4.4 Encrypting Data on GCP with Your Own Keys | 145

check=True,
shell=True,
)
.stdout.decode("utf-8")
.split('"')[1]
)
bucket = storage_client.bucket(bucket_name)
with open("key", "r") as file:
encryption_key = base64.b64decode(file.read())
blob = bucket.blob(file_key, encryption_key=encryption_key)
blob.download_to_filename(file_name)
if __name__ == "__main__":
download(sys.argv[1], sys.argv[2])
To execute the code, run python download_file.py with the name of the file you
uploaded, and the filename to use for the copy. For example, run python down
load_file.py message.txt message_copy.txt.
Files stored with this encryption mechanism cannot be uploaded
or downloaded through the console.
Managing your own keys quickly becomes a laborious practice. The burden of rotat‐
ing, securing, and providing access to keys is something that should only be shoul‐
dered when explicitly required. For the vast majority of use cases, Cloud KMS should
suffice, or potentially use Cloud Hardware Security Module (HSM), which allows you
to leverage fully managed FIPS 140-2 Level 3 certified HSMs.
If it is required that key material exist outside GCP, then use the Cloud External Key
Manager (Cloud EKM). This allows you to leverage third-party key management
services from vendors such as the following:
• Fortanix
• Ionic
• Thales
• Equinix SmartKey
•
Unbound Tech
146 | Chapter 4: Protecting Your Data

This offering is only supported on a small subset of services, including the following:
• Compute Engine
• Secrets Manager
• Cloud SQL
Summary
Let’s summarize what was learned and deployed in this recipe:
•
On GCP you can create and use your own encryption keys, known as customer-
supplied encryption keys, or CSEKs.
• They can be used with Cloud Storage to encrypt objects, so only those who hold
the key can decrypt them; even GCP cannot do so.
•
You wrote Python for generating a key, and then using the key to upload and
download files securely.
• CSEKs should only be used when absolutely required, as the maintenance burden
is high.
• Other options other than Cloud KMS for encrypting data include Cloud HSM
and Cloud EKM.
4.5 Encrypting Data on AWS with Your Own Keys
Problem
Compliance requirements dictate that particular data on AWS be stored with encryp‐
tion keys created and managed by the business’s internal systems.
Solution
If you haven’t already done so, familiarize yourself with Terraform and the different
authentication mechanisms in Chapter 11.
Create the following provider.tf file and run terraform init:
provider "aws" {}
terraform {
required_providers {
aws = {
source = "hashicorp/aws"
version = "~> 3"
}
4.5 Encrypting Data on AWS with Your Own Keys | 147

}
}
Create the following main.tf file and run terraform plan:
resource "aws_s3_bucket" "bucket" {}
output "bucket_name" {
value = aws_s3_bucket.bucket.bucket
}
Review the resources that are going to be created, and then run terraform apply to
make the changes.
Install the pycryptodomex and boto3 libraries by running pip install pycryptodo
mex boto3.
Create the following generate_data_key.py file and run python generate_
data_key.py to create a local key file.
This code is just demonstrative for the recipe. You should use spe‐
cialized software for the creation and management of your keys.
import base64
from Cryptodome.Random import get_random_bytes
key = get_random_bytes(32)
print(key)
with open("key", "w") as file:
file.write(str(base64.b64encode(key), "utf-8"))
Copy a file you wish to store encrypted into your working directory.
Create the following put_object.py file:
import base64
import subprocess
import sys
import boto3
filename = sys.argv[1]
bucket_name = (
subprocess.run(
"terraform output bucket_name",
shell=True,
check=True,
148 | Chapter 4: Protecting Your Data

capture_output=True,
)
.stdout.decode("utf-8")
.split('"')[1]
)
with open("key", "r") as file:
key = base64.b64decode(file.read())
s3 = boto3.client("s3")
with open(filename, "r") as file:
s3.put_object(
Body=file.read(),
Bucket=bucket_name,
Key=filename,
SSECustomerAlgorithm="AES256",
SSECustomerKey=key,
)
To upload your file to the S3 bucket, run python put_object.py with the name of
your file. For example, run python put_object.py message.txt.
Discussion
The following Python get_object.py file will download your file to your local
directory:
import base64
import subprocess
import sys
import boto3
filename = sys.argv[1]
with open("key", "r") as file:
key = base64.b64decode(file.read())
s3 = boto3.client("s3")
bucket_name = (
subprocess.run(
"terraform output bucket_name",
shell=True,
check=True,
capture_output=True,
)
.stdout.decode("utf-8")
.split('"')[1]
)
print(
s3.get_object(
Bucket=bucket_name,
4.5 Encrypting Data on AWS with Your Own Keys | 149

Key=filename,
SSECustomerAlgorithm="AES256",
SSECustomerKey=key,
)["Body"]
.read()
.decode()
)
To execute the code, run python get_object.py with the name of the file you uploa‐
ded, and the filename to use for the copy. For example, run python get_object.py
message.txt message_copy.txt.
Objects stored with this encryption mechanism cannot be uploa‐
ded or downloaded through the console.
Customer-supplied encryption keys should only be used when it is necessary that the
key material be created, managed, and owned outside of AWS. Where possible, you
should look to leverage AWS KMS to create and manage keys. By creating them your‐
self, you take on a much larger burden of responsibility. The processes of protecting,
serving, and rotating keys all become areas where you need to invest significant time.
In “Encrypting data at rest on S3” on page 136, you saw a bucket policy that enforced
that consumers use a KMS key to encrypt their objects. Following is a Terraform data
provider snippet that configures a similar policy that ensures that users encrypt
objects with an AES256 key:
data "aws_iam_policy_document" "kms_enforcement" {
statement {
effect = "Deny"
actions = ["s3:PutObject"]
resources = ["${aws_s3_bucket.kms_enforcement.arn}/*"]
principals {
type = "*"
identifiers = ["*"]
}
condition {
test = "StringNotEquals"
values = ["AES256"]
variable = "s3:x-amz-server-side-encryption"
}
}
}
150 | Chapter 4: Protecting Your Data

Because AWS does not store any information related to the customer-supplied key,
there is no policy that allows you to enforce that a specific key is used, as there is with
KMS managed keys.
Summary
Let’s summarize what was learned and deployed in this recipe:
•
On AWS, you can supply your own encryption keys to store objects in S3, known
as customer-supplied keys.
• As the keys are not stored on AWS, you prevent anyone without direct access to
the keys from accessing the objects.
• By adopting this technique, you shoulder the large burden of key rotation, access,
and creation.
• In order to use a customer-supplied key, you will need to provide it for both stor‐
ing and retrieving objects.
•
It is possible to enforce the use of encryption keys with bucket policies.
4.6 Encrypting Data on Azure with Your Own Keys
Problem
Compliance requirements dictate that particular data on Azure be stored with
encryption keys created and managed by the businesses internal systems.
Solution
If you haven’t already done so, familiarize yourself with Terraform and the different
authentication mechanisms in Chapter 11.
Create a variables.tf file and copy the following contents:
variable "location" {
type = string
description = "The location to deploy your resource into"
}
variable "storage_account_name" {
type = string
description = "The name of the storage account"
}
Then fill out the corresponding terraform.tfvars file:
location = ""
storage_account_name = ""
4.6 Encrypting Data on Azure with Your Own Keys | 151

Create the following provider.tf file, and run terraform init:
terraform {
required_providers {
azurerm = {
source = "hashicorp/azurerm"
version = "~> 2"
}
}
}
provider "azurerm" {
features {}
}
Create the following main.tf file and run terraform plan:
resource "azurerm_resource_group" "csks" {
name = "csks"
location = var.location
}
resource "azurerm_storage_account" "csk" {
name = var.storage_account_name
resource_group_name = azurerm_resource_group.csks.name
location = azurerm_resource_group.csks.location
account_tier = "Standard"
account_replication_type = "LRS"
}
resource "azurerm_storage_container" "csk" {
name = "csk"
storage_account_name = azurerm_storage_account.csk.name
container_access_type = "private"
}
output "connection_string" {
value = azurerm_storage_account.csk.primary_connection_string
sensitive = true
}
output "container_name" {
value = azurerm_storage_container.csk.name
}
Review the resources that are going to be created, and then run terraform apply to
make the changes.
Install the pycryptodomex, azure-storage-blob, and azure-identity libraries by
running pip install pycryptodomex azure-storage-blob azure-identity.
152 | Chapter 4: Protecting Your Data

This code is just demonstrative for the recipe. You should use spe‐
cialized software for the creation and management of your keys.
Create the following generate_data_key.py file and run python generate_
data_key.py to create a local key file.
import base64
from Cryptodome.Random import get_random_bytes
key = get_random_bytes(32)
print(key)
with open("key", "w") as file:
file.write(str(base64.b64encode(key), "utf-8"))
Copy a file you wish to store encrypted into your working directory.
Create the following upload_blob.py file:
import base64
import sys
from hashlib import sha256
from subprocess import run
from azure.identity import AzureCliCredential
from azure.storage.blob import BlobClient, CustomerProvidedEncryptionKey
conn_str = (
run(
"terraform output connection_string",
shell=True,
check=True,
capture_output=True,
)
.stdout.decode("utf-8")
.split('"')[1]
)
container_name = (
run(
"terraform output container_name",
shell=True,
check=True,
capture_output=True,
)
.stdout.decode("utf-8")
.split('"')[1]
)
credential = AzureCliCredential()
4.6 Encrypting Data on Azure with Your Own Keys | 153

blob = BlobClient.from_connection_string(
conn_str=conn_str, container_name=container_name, blob_name=sys.argv[1]
)
with open("key", "r") as file:
key = file.read()
hash = sha256(base64.b64decode(key))
with open(sys.argv[1], "rb") as file:
blob.upload_blob(
file,
cpk=CustomerProvidedEncryptionKey(
key, str(base64.b64encode(hash.digest()), "utf-8")
),
)
To upload your file to the S3 bucket, run python upload_blob.py with the name of
your file. For example, run python upload_blob.py message.txt.
Discussion
The following Python download_blob.py file will download your file to your local
directory:
import base64
import sys
from hashlib import sha256
from subprocess import run
from azure.identity import AzureCliCredential
from azure.storage.blob import BlobClient, CustomerProvidedEncryptionKey
conn_str = (
run(
"terraform output connection_string",
shell=True,
check=True,
capture_output=True,
)
.stdout.decode("utf-8")
.split('"')[1]
)
container_name = (
run(
"terraform output container_name",
shell=True,
check=True,
capture_output=True,
)
.stdout.decode("utf-8")
.split('"')[1]
154 | Chapter 4: Protecting Your Data

)
credential = AzureCliCredential()
blob = BlobClient.from_connection_string(
conn_str=conn_str, container_name=container_name, blob_name=sys.argv[1]
)
with open("key", "r") as file:
key = file.read()
hash = sha256(base64.b64decode(key))
with open(f"{sys.argv[1]}_copy", "wb") as file:
data = blob.download_blob(
cpk=CustomerProvidedEncryptionKey(
key, str(base64.b64encode(hash.digest()), "utf-8")
)
)
data.readinto(file)
To execute the code, run python download_blog.py with the name of the file you
uploaded and the filename to use for the copy. For example, run python down
load_blog.py message.txt message_copy.txt.
Blobs stored with this encryption mechanism cannot be uploaded
or downloaded through the console.
This recipe is needed due to internal requirements at some businesses. However, if
you do not explicitly need to use keys created and managed outside of Azure, you
should look to leverage customer-managed keys wherever possible. In using
customer-supplied keys, as in this recipe, you take on the nontrivial burden of key
management, security, rotation, and provisioning.
Another option is uploading your externally created keys to Azure, so you can lever‐
age them through the normal Azure APIs the same way you would a customer-
managed key. That allows you to use your own keys with services outside of storage,
as customer-supplied keys as shown in this recipe cannot be used with the majority of
services.
Summary
Let’s summarize what was learned and deployed in this recipe:
• On Azure, you can use what are known as customer-supplied keys for encrypting
data at rest.
4.6 Encrypting Data on Azure with Your Own Keys | 155

• The keys are securely discarded when used through API calls and are never per‐
sisted in Azure.
• The main service that can use these keys is storage.
•
By using customer-supplied keys, you accept a large burden of responsibility and
effort.
•
You should only use this approach when it is explicitly required.
4.7 Enforcing In-Transit Data Encryption on GCP
Problem
As delivery teams are rapidly standing up infrastructure across your estate, you need
to ensure that, wherever possible, data is encrypted in transit.
Solution
If you haven’t already done so, familiarize yourself with Terraform and the different
authentication mechanisms in Chapter 11.
Create a variables.tf file and copy the following contents:
variable "project_id" {
type = string
description = "The project to create the resources in"
}
variable "region" {
type = string
description = "The region to create the resources in"
}
variable "organization_domain" {
type = string
description = "The organization domain of your Google Cloud estate"
}
Then fill out the corresponding terraform.tfvars file:
project_id = ""
region = ""
organization_domain = ""
Create the following provider.tf file and run terraform init:
provider "google" {
project = var.project_id
region = var.region
}
156 | Chapter 4: Protecting Your Data

terraform {
required_providers {
google = {
source = "hashicorp/google"
version = "~> 3"
}
null = {
source = "hashicorp/null"
version = "~> 3"
}
}
}
Create the following main.tf file and run terraform plan:
data "google_organization" "current" {
domain = var.organization_domain
}
data "google_project" "current" {}
resource "google_project_service" "cloud_asset" {
service = "cloudasset.googleapis.com"
}
resource "null_resource" "cloudasset_service_account" {
provisioner "local-exec" {
command = join(" ", [
"gcloud beta services identity create",
"--service=cloudasset.googleapis.com",
"--project=${var.project_id}"
])
}
depends_on = [
google_project_service.cloud_asset
]
}
resource "google_bigquery_dataset" "assets" {
dataset_id = "assets"
delete_contents_on_destroy = true
}
resource "google_project_iam_member" "asset_sa_editor_access" {
role = "roles/bigquery.dataEditor"
member = join("",[
"serviceAccount:service-",
data.google_project.current.number,
"@gcp-sa-cloudasset.iam.gserviceaccount.com"
])
depends_on = [
4.7 Enforcing In-Transit Data Encryption on GCP | 157

null_resource.cloudasset_service_account
]
}
resource "google_project_iam_member" "asset_sa_user_access" {
role = "roles/bigquery.user"
member = join("",[
"serviceAccount:service-",
data.google_project.current.number,
"@gcp-sa-cloudasset.iam.gserviceaccount.com"
])
depends_on = [
null_resource.cloudasset_service_account
]
}
resource "null_resource" "run_export" {
provisioner "local-exec" {
command = join(" ", [
"gcloud asset export --content-type resource",
"--project ${data.google_project.current.project_id},
"--bigquery-table ${google_bigquery_dataset.assets.id}/tables/assets,
"--output-bigquery-force --per-asset-type"
])
}
depends_on = [
google_project_iam_member.asset_sa_editor_access,
google_project_iam_member.asset_sa_user_access
]
}
Review the resources that are going to be created, and then run terraform apply to
make the changes.
Discussion
This recipe created a BigQuery dataset with a table per resource for all the projects in
your organization. With that dataset created, you are now able to query details of
resource configurations to find where unencrypted traffic is possible.
Recipe 3.10 introduced Cloud Asset registry and built out a mechanism for alerting
you when particular resources changed. This recipe extended that to add an ability to
retroactively ask questions about your estate. This allows you to determine non-
compliant resources as your control set grows and matures.
158 | Chapter 4: Protecting Your Data

Finding rewall rules with insecure ports
Following is a BigQuery query which will find all firewall rules that allow access on
the following three unencrypted ports:
• 21, unencrypted FTP traffic
•
80, unencrypted HTTP traffic
• 3306, unencrypted MySQL traffic
SELECT * FROM
(
SELECT name, allowed.ports as ports FROM
`<project-id>.assets.assets_compute_googleapis_com_Firewall`
as firewall
JOIN UNNEST(firewall.resource.data.allowed) as allowed
)
WHERE ARRAY_TO_STRING(ports, "") = "20"
OR ARRAY_TO_STRING(ports, "") = "21"
OR ARRAY_TO_STRING(ports, "") = "3306"
Finding load balancers accepting HTTP
trac
As a general rule, web load balancers should be configured to accept HTTPS traffic,
not HTTP traffic. The following query identifies the load balancer target proxies that
are configured for HTTP traffic:
SELECT resource.data.name, updateTime, resource.parent FROM
`<project-id>.assets.assets_compute_googleapis_com_TargetHttpProxy`
As you can see from these examples, you can write queries to determine what
resources match a particular state and return when they were last modified and what
project they are under. Unfortunately, the export cannot be configured to automati‐
cally run on a schedule, but by using Cloud Functions, as shown in Recipe 6.4, you
can build a simple scheduler to run the export. This, coupled with BigQuery sched‐
uled queries, enables you to determine when resources fall outside of your encryption
requirements.
Summary
Let’s summarize what was learned and deployed in this recipe:
• On GCP, you can use Cloud Asset Inventory and BigQuery to dynamically
understand how resources are configured.
•
This combines with the automated notification component of Recipe 3.10.
• However, it allows you to look at all current resources, as opposed to only acting
when a resource is changed.
4.7 Enforcing In-Transit Data Encryption on GCP | 159

• You created a BigQuery dataset and exported all resources in your estate into dis‐
tinct tables.
• Then you saw some example queries of determining when resources are allowing
insecure traffic.
• By adding scheduled Cloud Functions and scheduled BigQuery queries, you can
build a solution to alert on any configuration you desire.
4.8 Enforcing In-Transit Data Encryption on AWS
Problem
As delivery teams are rapidly standing up infrastructure across your estate, you need
to ensure that, wherever possible, data is encrypted in transit.
Solution
If you haven’t already done so, familiarize yourself with Terraform and the different
authentication mechanisms in Chapter 11.
If you have not previously completed Recipe 3.11, go and do that first so that AWS
Config is enabled in your accounts.
Create the following provider.tf file and run terraform init:
provider "aws" {}
terraform {
required_providers {
aws = {
source = "hashicorp/aws"
version = "~> 3"
}
}
}
Create the following main.tf file and run terraform plan:
locals {
rules_to_deploy = [
"ALB_HTTP_TO_HTTPS_REDIRECTION_CHECK",
"API_GW_SSL_ENABLED",
"ELB_TLS_HTTPS_LISTENERS_ONLY",
"REDSHIFT_REQUIRE_TLS_SSL",
"RESTRICTED_INCOMING_TRAFFIC",
"S3_BUCKET_SSL_REQUESTS_ONLY",
"VPC_SG_OPEN_ONLY_TO_AUTHORIZED_PORTS"
]
}
160 | Chapter 4: Protecting Your Data

resource "aws_config_config_rule" "rule" {
for_each = toset(local.rules_to_deploy)
name = each.value
source {
owner = "AWS"
source_identifier = each.value
}
}
Review the resources that are going to be created, and then run terraform apply to
make the changes.
Discussion
This recipe deployed the following series of Managed AWS Config rules to the
account that detect when resources are configured to allow certain kinds of unen‐
crypted traffic:
ALB_HTTP_TO_HTTPS_REDIRECTION_CHECK
Checks whether Application Load Balancers allow straight HTTP traffic; ideally
they automatically redirect clients to HTTPs.
API_GW_SSL_ENABLED
Checks whether an SSL certificate has been configured for the API Gateway.
Without one, you cannot handle encrypted traffic.
ELB_TLS_HTTPS_LISTENERS_ONLY
Checks whether Elastic Load Balancers have listeners for HTTP traffic.
REDSHIFT_REQUIRE_TLS_SSL
Checks whether your Redshift data warehouse only accepts SSL/TLS-based
traffic.
RESTRICTED_INCOMING_TRAFFIC
Checks whether security groups allow traffic on ports that have secure variants;
by default, they are 20, 21, 3389, 3306, and 4333. But this rule can be configured
to check for specific ports.
S3_BUCKET_SSL_REQUESTS_ONLY
Checks whether S3 buckets allow direct HTTP traffic.
VPC_SG_OPEN_ONLY_TO_AUTHORIZED_PORTS
Checks whether any security groups with inbound traffic from 0.0.0.0/0 have any
ports configured outside an approved list that you control.
4.8 Enforcing In-Transit Data Encryption on AWS | 161

Analyzing VPC flow logs is another way to solve the problem of
detecting unencrypted traffic. However, to automate the process
would require a third-party application or an internal development
effort.
In Recipe 7.8, you’ll see what options exist for actively preventing people from being
able to deploy noncompliant infrastructure, but the strategies are not foolproof. This
necessitates the ability for you to operate in the same “trust but verify” posture that is
a common theme across recipes. In this case, the verification stems from the rules,
creating a feedback loop that allows you to understand when teams are in need of
support and enablement.
Summary
Let’s summarize what was learned and deployed in this recipe:
• AWS provides a selection of managed Config rules that identify when resources
allow for unencrypted traffic.
•
They do not cover all resources; however, they do target common culprits.
• Actively preventing noncompliant infrastructure is never foolproof, but by con‐
figuring AWS Config rules, you have a feedback loop that allows you to under‐
stand when infrastructure doesn’t meet the required controls.
•
By combining this recipe with Recipe 7.8, you’ll be able to deploy these rules
across all accounts in the organization, allowing you to see into every account.
4.9 Enforcing In-Transit Data Encryption on Azure
Problem
As delivery teams are rapidly standing up infrastructure across your estate, you need
to ensure that, wherever possible, data is encrypted in transit.
Solution
If you haven’t already done so, familiarize yourself with Terraform and the different
authentication mechanisms in Chapter 11.
Create the following provider.tf file and run terraform init:
terraform {
required_providers {
azurerm = {
source = "hashicorp/azurerm"
version = "~> 2"
162 | Chapter 4: Protecting Your Data

}
}
}
provider "azurerm" {
features {}
}
Create the following main.tf file and run terraform plan:
data "azurerm_subscription" "current" {}
locals {
policy_ids = [
"b7ddfbdc-1260-477d-91fd-98bd9be789a6",
"e802a67a-daf5-4436-9ea6-f6d821dd0c5d",
"d158790f-bfb0-486c-8631-2dc6b4e8e6af",
"399b2637-a50f-4f95-96f8-3a145476eb15",
"4d24b6d4-5e53-4a4f-a7f4-618fa573ee4b",
"9a1b8c48-453a-4044-86c3-d8bfd823e4f5",
"6d555dd1-86f2-4f1c-8ed7-5abae7c6cbab",
"22bee202-a82f-4305-9a2a-6d7f44d4dedb",
"404c3081-a854-4457-ae30-26a93ef643f9",
"8cb6aa8b-9e41-4f4e-aa25-089a7ac2581e",
"f9d614c5-c173-4d56-95a7-b4437057d193",
"f0e6e85b-9b9f-4a4b-b67b-f730d42f1b0b",
"a4af4a39-4135-47fb-b175-47fbdf85311d",
]
policy_assignments = azurerm_subscription_policy_assignment.transit
}
resource "azurerm_subscription_policy_assignment" "transit" {
count = length(local.policy_ids)
name = "transit${count.index}"
policy_definition_id = join("", [
"/providers/Microsoft.Authorization/policyDefinitions/",
local.policy_ids[count.index]
])
subscription_id = data.azurerm_subscription.current.id
}
resource "azurerm_policy_remediation" "transit" {
count = length(local.policy_ids)
name = "transit${count.index}"
scope = data.azurerm_subscription.current.id
policy_assignment_id = local.policy_assignments[count.index].id
}
Review the resources that are going to be created, and then run terraform apply to
make the changes.
4.9 Enforcing In-Transit Data Encryption on Azure | 163

Discussion
In Security Center, the following list of recommendations specifically target encryp‐
ted data in transit:
• API App should only be accessible over HTTPS.
• Enforce SSL connection should be enabled for MySQL database servers.
•
Enforce SSL connection should be enabled for PostgreSQL database servers.
• FTPS should be required in your API App.
• FTPS should be required in your Functions App.
•
FTPS should be required in your Web App.
• Functions App should only be accessible over HTTPS.
• Only secure connections to your Redis Cache should be enabled.
• Secure transfer to storage accounts should be enabled.
• TLS should be updated to the latest version for your API App.
•
TLS should be updated to the latest version for your Functions App.
• TLS should be updated to the latest version for your Web App.
• Web App should only be accessible over HTTPS.
In this recipe, the local.policy_ids variable contains the IDs for each of these rec‐
ommendations. As Azure Policy is naturally extended over time, this recipe will need
updating to be exhaustive for what policies are available. Additionally, with the auto‐
mated remediation actions here, you can end up in a position where the infrastruc‐
ture as code is no longer reflective of the reality on Azure. Remediating in this way
should be a last resort; instead, by using Recipe 6.3, you will see how to support teams
in deploying infrastructure that encrypts data in transit by default. You also run the
risk of potentially breaking systems by changing active configurations, which can be
politically challenging and erode trust.
By using these policies, you target common misconfigurations for encryption, but
these policies alone are not sufficient for ensuring data encryption across your entire
estate. Performing training sessions with delivery teams, running threat modelling
sessions, and migrating to more cloud native services, such as containers and Recipe
6.6, will make it easier to understand how data moves around your estate, as Azure is
more heavily leveraged to perform the heavy lifting when it comes to encryption.
Summary
Let’s summarize what was learned and deployed in this recipe:
164 | Chapter 4: Protecting Your Data

• Azure Security Center provides a series of recommendations on encryption in
transit.
• By using the Azure Policies that underpin these recommendations, you can iden‐
tify and remediate problematic infrastructure.
• Automated remediation actions, while powerful, can undermine infrastructure-
as-code usage and potentially erode trust.
• These policies are a great starting point, but ensuring encryption in transit across
the entire estate involves the following:
— Training teams in the how and why of encryption in transit
—
Running threat modelling sessions
— Providing teams with secure-by-default infrastructure patterns
• By migrating to more cloud native infrastructure such as Recipe 6.6, you can
make it simpler to understand how encryption is implemented across your estate.
4.10 Preventing Data Loss on GCP
Problem
As more data is stored in your GCP organization, you need to identify where sensi‐
tive and PII data is stored and ensure that the correct controls are applied.
Solution
If you haven’t already done so, familiarize yourself with Terraform and the different
authentication mechanisms in Chapter 11.
You need to create a service account to interact with the Google Workspace APIs.
Create a variables.tf file and copy the following contents:
variable "project_id" {
type = string
description = "The project to create the resources in"
}
variable "region" {
type = string
description = "The region to create the resources in"
}
variable "organization_domain" {
type = string
description = "The organization domain of your Google Cloud estate"
}
4.10 Preventing Data Loss on GCP | 165

Then fill out the corresponding terraform.tfvars file:
project_id = ""
region = ""
organization_domain = ""
Create the following provider.tf file and run terraform init:
provider "google" {
project = var.project_id
region = var.region
}
terraform {
required_providers {
google = {
source = "hashicorp/google"
version = "~> 3"
}
local = {
source = "hashicorp/local"
version = "~> 2"
}
}
}
Create the following main.tf file and run terraform plan:
data "google_organization" "current" {
domain = var.organization_domain
}
resource "google_project_service" "dlp" {
service = "dlp.googleapis.com"
}
resource "google_service_account" "dlp_admin" {
account_id = "dlp-admin"
display_name = "Data Loss Prevention Configuration"
}
resource "google_organization_iam_member" "dlp_access" {
org_id = data.google_organization.current.org_id
role = "roles/dlp.admin"
member = "serviceAccount:${google_service_account.dlp_admin.email}"
}
resource "google_project_iam_member" "viewer" {
role = "roles/viewer"
member = "serviceAccount:${google_service_account.dlp_admin.email}"
}
resource "google_project_iam_member" "dataset_owner" {
role = "roles/bigquery.dataOwner"
166 | Chapter 4: Protecting Your Data

member = "serviceAccount:${google_service_account.dlp_admin.email}"
}
resource "google_service_account_key" "dlp_admin" {
service_account_id = google_service_account.dlp_admin.name
public_key_type = "TYPE_X509_PEM_FILE"
}
resource "local_file" "service_account" {
content = base64decode(google_service_account_key.dlp_admin.private_key)
filename = "service_account.json"
}
Review the resources that are going to be created, and then run terraform apply to
make the changes.
In a new directory, create a variables.tf file and copy the following contents:
variable "service_account_key_path" {
type = string
description = "Path to where the service account key is located"
}
variable "project_id" {
type = string
description = "The project to create the resources in"
}
variable "region" {
type = string
description = "The region to create the resources in"
}
variable "bucket_path" {
type = string
description = "The bucket path to inspect with DLP"
}
Then fill out the corresponding terraform.tfvars file:
service_account_key_path = ""
project_id = ""
region = ""
bucket_path = ""
Create the following provider.tf file and run terraform init:
provider "google" {
project = var.project_id
region = var.region
credentials = var.service_account_key_path
}
terraform {
4.10 Preventing Data Loss on GCP | 167

required_providers {
google = {
source = "hashicorp/google"
version = "~> 3"
}
}
}
Create the following main.tf file and run terraform plan:
data "google_project" "current" {}
resource "google_data_loss_prevention_inspect_template" "basic" {
parent = data.google_project.current.id
}
resource "google_bigquery_dataset" "findings" {
dataset_id = "findings"
delete_contents_on_destroy = true
}
resource "google_data_loss_prevention_job_trigger" "basic" {
parent = data.google_project.current.id
display_name = "Scan ${var.bucket_path}"
triggers {
schedule {
recurrence_period_duration = "86400s"
}
}
inspect_job {
inspect_template_name = google_data_loss_prevention_inspect_template.basic.id
actions {
save_findings {
output_config {
table {
project_id = data.google_project.current.project_id
dataset_id = google_bigquery_dataset.findings.dataset_id
}
}
}
}
storage_config {
cloud_storage_options {
file_set {
url = "gs://${var.bucket_path}/**"
}
}
timespan_config {
enable_auto_population_of_timespan_config = true
168 | Chapter 4: Protecting Your Data

timestamp_field {
name = "timestamp"
}
}
}
}
}
Review the resources that are going to be created, and then run terraform apply to
make the changes.
Discussion
This recipe configured GCP’s Data Loss Prevention (DLP) solution and created a
daily DLP that scans the created Cloud Storage bucket.
DLP on GCP is a multifaceted service that can integrate into a variety of applications
and architectures to ensure that your data is classified and handled appropriately. In
this instance, you have set up a scheduled job that scans a particular storage bucket.
You may wonder why the recipe does not start scanning all the buckets that exist, and
that is because DLP can quickly become an expensive service to operate. This recipe
is a way of dipping your toe in the water without the risk of a scary bill arriving at the
end of the month. Another option to explore when productionizing your DLP con‐
figuration is to sample data. This is where you make determinations on a random
sample of the data, rather than having to process and pay for it all.
For the scanning of static data, DLP can also run jobs directly against BigQuery data‐
sets and Datastore kinds, as well as Cloud Storage buckets, allowing you to under‐
stand where the most valuable data lies. Additionally, by automatically forwarding the
findings into BigQuery, it is possible to dynamically query the output of DLP to
ensure you can find and triage the highest-priority findings.
The service comes with over 140 preconfigured infoType detectors, allowing you to
automatically identify common forms of PII, from Australian Medicare numbers, to
US Social Security numbers, and everything in between. You can also construct your
own detectors to classify data that is unique to your business.
In addition to identifying sensitive data, DLP also provides pseudonymization capa‐
bilities, allowing for the replacement of sensitive data with nonidentifying tokens,
preserving the data utility while minimizing the data risk when it is used. You can
also configure it to do automatic redaction, ensuring the PII is not allowed to cross
security boundaries.
Common solutions in the space, although outside of the remit of the security func‐
tion, are automatic data classifiers, where data is placed into a staging bucket before
being processed and segregated into sensitive and nonsensitive data. Another option
4.10 Preventing Data Loss on GCP | 169

is constructing a Dataflow pipeline that automatically redacts and pseudonymizes
data as it flows through in real time.
Summary
Let’s summarize what was learned and deployed in this recipe:
• Google’s Data Loss Prevention (DLP) service is critical to managing sensitive data
at scale.
• You can leverage DLP to routinely scan storage locations to automatically classify
data and report findings.
• The findings can be automatically forwarded into BigQuery, allowing you to
query your data.
•
DLP can get expensive at scale, so focusing your scans on particularly risky areas,
using sampling and ensuring you only scan modified data, can keep it under con‐
trol.
•
DLP also provides other services, such as pseudonymization and redaction,
allowing you to ensure that data can still be utilized but with significantly
reduced risk.
• You created a DLP inspection template and a job trigger to automatically scan a
Cloud Storage bucket every day.
4.11 Preventing Data Loss on AWS
Problem
As more data is stored in your AWS organization, you need to identify where sensi‐
tive and PII data is stored and ensure that the correct controls are applied.
Solution
If you haven’t already done so, familiarize yourself with Terraform and the different
authentication mechanisms in Chapter 11.
Create a variables.tf file and copy the following contents:
variable "delegated_admin_account" {
type = string
description = "The account ID for the account to be the Config delegated admin"
}
variable "cross_account_role" {
type = string
170 | Chapter 4: Protecting Your Data

description = "The cross account role to assume"
}
Then fill out the corresponding terraform.tfvars file:
delegated_admin_account = ""
cross_account_role = ""
Create the following provider.tf file and run terraform init:
provider "aws" {}
provider "aws" {
alias = "delegated_admin_account"
assume_role {
role_arn = join("", [
"arn:aws:iam::",
var.delegated_admin_account,
":role/",
var.cross_account_role
])
}
}
terraform {
required_providers {
aws = {
source = "hashicorp/aws"
version = "~> 3"
}
}
}
Create the following main.tf file and run terraform plan:
data "aws_organizations_organization" "this" {}
resource "aws_macie2_account" "payer" {}
resource "aws_macie2_organization_admin_account" "this" {
admin_account_id = var.delegated_admin_account
depends_on = [aws_macie2_account.payer]
}
resource "aws_macie2_member" "account" {
provider = aws.delegated_admin_account
for_each = {
for account in data.aws_organizations_organization.this.accounts :
account.id => account if account.id != var.delegated_admin_account
}
account_id = each.value.id
email = each.value.email
depends_on = [aws_macie2_organization_admin_account.this]
}
4.11 Preventing Data Loss on AWS | 171

Review the resources that are going to be created, and then run terraform apply to
make the changes.
Discussion
This recipe configured Amazon Macie, giving you a single view on PII data in S3
buckets across your organization.
Amazon Macie is a service focused on making the mass of objects in S3, in many
cases terabytes to petabytes of data, understandable from a sensitivity perspective.
One of the main features is the evaluation of S3 bucket configuration, looking at the
following:
• Which buckets are publicly accessible for read or write operations
• Whether buckets have default encryption that is enforced by bucket policies
• Where buckets are shared, both within the organization and with external parties
On top of this, Amazon provides a variety of managed data identifiers that detect sensi‐
tive data, such as PII, PHI, and financial. Additionally, you create custom data identifi‐
ers to detect sensitive data that is unique to your organization or business domain. In
doing so, you can cross-reference what is being stored with how it is being stored,
ensuring that appropriate levels of protection are applied to your most sensitive assets.
Whenever Macie detects a potential issue, it raises a
nding. Each finding provides a
severity rating, information about the affected resource, and metadata about when
and how Macie discovered the issue. These findings can be sent directly into AWS
Security Hub, as was configured in Recipe 3.2. They are also automatically loaded on
Amazon EventBridge, which allows you to create and trigger bespoke workflows
upon certain findings being raised.
All this data is brought into a dashboard, giving you a simple visual way of identifying
issues in your environment. By enabling Macie across the entire organization, this
recipe allows you to review findings across all accounts from one central location.
In order for Macie to be able to read the data in buckets, where restrictive bucket pol‐
icies are applied, you will need to ensure that a Macie service role exception is
applied. For example, given a bucket policy that only allows a certain role to access
the bucket, you need to add an extra condition for the Macie service role, like so:
data "aws_caller_identity" "current" {}
data "aws_iam_policy_document" "restricted" {
statement {
effect = "Deny"
actions = ["s3:*"]
172 | Chapter 4: Protecting Your Data

resources = [
"${aws_s3_bucket.bucket.arn}/*",
aws_s3_bucket.bucket.arn
]
principals {
type = "*"
identifiers = ["*"]
}
condition {
test = "StringNotLike"
values = ["aws:PrincipalArn"]
variable = join("", [
"arn:aws:iam::",
data.aws_caller_identity.account_id,
":role/RestrictedBucketAccessRole"
])
}
condition {
test = "StringNotLike"
values = ["aws:PrincipalArn"]
variable = join("", [
"arn:aws:iam::",
data.aws_caller_identity.account_id,
":role/aws-service-role/macie.amazonaws.com/AWSServiceRoleForAmazonMacie"
])
}
}
}
Summary
Let’s summarize what was learned and deployed in this recipe:
• To prevent the loss of sensitive data in your estate, it is critical to know where the
data is.
• Amazon Macie allows for the identification of sensitive data across your estate.
• Macie provides a variety of managed data identifiers that automatically classify
data.
• It also looks at the configuration of the S3 buckets to identify potential issues.
• Issues discovered in configuration or data protection are raised as findings.
• This recipe configured Macie centrally, so all findings can be triaged and actioned
from a single location.
•
To get the best value from Macie, you may need to update bucket policies, allow‐
ing its service role to access the objects in the buckets.
4.11 Preventing Data Loss on AWS | 173

4.12 Preventing Data Loss on Azure
Problem
As more data is stored in your Azure tenant, you need to identify where sensitive and
PII data is stored and ensure that the correct controls are applied.
Solution
If you haven’t already done so, familiarize yourself with Terraform and the different
authentication mechanisms in Chapter 11.
Create a variables.tf file and copy the following contents:
variable "location" {
type = string
description = "The location to deploy your resource into"
}
variable "purview_account_name" {
type = string
description = "The name for the Purview account"
}
variable "storage_account_name" {
type = string
description = "The name for the storage account"
}
Then fill out the corresponding terraform.tfvars file:
location = ""
purview_account_name = ""
storage_account_name = ""
Create the following provider.tf file and run terraform init:
terraform {
required_providers {
azurerm = {
source = "hashicorp/azurerm"
version = "~> 2"
}
local = {
source = "hashicorp/local"
version = "~> 2"
}
null = {
source = "hashicorp/null"
version = "~> 3"
}
}
174 | Chapter 4: Protecting Your Data

}
provider "azurerm" {
features {}
}
Install the purviewcli from the purviewcli GitHub. This recipe was developed
against version 0.1.31, so it may require modification if you install a later version.
Create the following main.tf file and run terraform plan:
data "azurerm_client_config" "current" {}
data "azurerm_subscription" "current" {}
resource "azurerm_resource_group" "purview" {
name = "purview-resources"
location = var.location
}
resource "azurerm_purview_account" "purview" {
name = var.purview_account_name
resource_group_name = azurerm_resource_group.purview.name
location = azurerm_resource_group.purview.location
sku_name = "Standard_4"
}
resource "azurerm_role_assignment" "data_curator" {
scope = azurerm_purview_account.purview.id
role_definition_name = "Purview Data Curator"
principal_id = data.azurerm_client_config.current.object_id
}
resource "azurerm_role_assignment" "data_source_admin" {
scope = azurerm_purview_account.purview.id
role_definition_name = "Purview Data Source Administrator"
principal_id = data.azurerm_client_config.current.object_id
}
resource "azurerm_storage_account" "purview" {
name = var.storage_account_name
resource_group_name = azurerm_resource_group.purview.name
location = azurerm_resource_group.purview.location
account_tier = "Standard"
account_replication_type = "GRS"
identity {
type = "SystemAssigned"
}
}
resource "azurerm_storage_container" "purview" {
name = "purview"
4.12 Preventing Data Loss on Azure | 175

storage_account_name = azurerm_storage_account.purview.name
container_access_type = "private"
}
resource "azurerm_role_assignment" "reader" {
scope = azurerm_storage_account.purview.id
role_definition_name = "Storage Blob Data Reader"
principal_id = azurerm_purview_account.purview.identity[0].principal_id
}
resource "local_file" "storage_account" {
filename = "blob_storage.json"
content = <<CONTENT
{
"id": "datasources/AzureStorage",
"kind": "AzureStorage",
"name": "AzureStorage",
"properties": {
"collection": null,
"endpoint": "${azurerm_storage_account.purview.primary_blob_endpoint}",
"location": "${azurerm_resource_group.purview.location}",
"parentCollection": null,
"resourceGroup": "${azurerm_resource_group.purview.name}",
"resourceName": "${azurerm_storage_account.purview.name}",
"subscriptionId": "${data.azurerm_subscription.current.subscription_id}"
}
}
CONTENT
}
resource "local_file" "scan" {
filename = "scan.json"
content = <<CONTENT
{
"kind": "AzureStorageMsi",
"properties": {
"scanRulesetName": "AzureStorage",
"scanRulesetType": "System"
}
}
CONTENT
}
resource "null_resource" "add_data_source" {
provisioner "local-exec" {
command = join(" ", [
"pv scan putDataSource",
"--dataSourceName=AzureStorage",
"--payload-file=${local_file.storage_account.filename}",
"--purviewName ${azurerm_purview_account.purview.name}"
])
}
176 | Chapter 4: Protecting Your Data

}
resource "null_resource" "create_scan" {
provisioner "local-exec" {
command = join(" ", [
"pv scan putScan",
"--dataSourceName=AzureStorage",
"--scanName=storage",
"--payload-file=${local_file.scan.filename}",
"--purviewName ${azurerm_purview_account.purview.name}"
])
}
depends_on = [
null_resource.add_data_source
]
}
resource "null_resource" "run_scan" {
provisioner "local-exec" {
command = join(" ", [
"pv scan runScan",
"--dataSourceName=AzureStorage",
"--scanName=storage",
"--purviewName ${azurerm_purview_account.purview.name}"
])
}
depends_on = [
null_resource.create_scan
]
}
Review the resources that are going to be created, and then run terraform apply to
make the changes.
Discussion
This recipe created a Purview application and used it to scan a storage account for PII
data.
Azure Purview is a unified data governance service. By leveraging its capabilities, you
are able to classify the data across your estate automatically against a collection of
default rules that Microsoft provides. With the potential scale and sprawl that Azure
allows you to achieve, having the right tools in place to understand where data is and
how it is protected is critical.
4.12 Preventing Data Loss on Azure | 177

The default rules detect many kinds of PII, such as
• US/UK passport numbers
• Australian bank account numbers
• IP addresses
In order for Purview to be able to access the data, you need to give Purview managed
identity access to the resources in your estate, which you did in the recipe through the
creation of the azurerm_role_assignment.reader resource. By giving the identity
the required permissions at high-level scopes, you can have the access filter down
rather than directly applying it to every resource.
Additionally, as your use with Purview matures and scales, use collections to keep
your data map manageable and enable more nuanced and flexible identity and access
management. Here, you simply registered the resource under the default collection,
but a common pattern includes segmenting by business unit. This also allows you to
apply only relevant scans to each collection, ensuring performance and cost-
effectiveness.
In this recipe, you executed an ad hoc scan, but for full production use, you need to
decide how frequently to schedule the scans based on cost, risk, and value. To manage
the cost aspect, it is also possible to run incremental scans so you focus on the new
and the changed rather than redundantly scanning old data. Additionally, it is possi‐
ble to build your own rules to classify data using RegEx and Bloom Filters, so you can
identify the data that is specifically critical to your business.
Azure Purview also provides many integrations that allow it to operate in both a mul‐
ticloud and hybrid cloud environment. Connectors already exist for services such as
• SAP HANA
• On-premise SQL server
•
Amazon S3
• Google BigQuery
By supporting data sources outside of Azure as first-class citizens, Purview has the
potential to be the centralized data governance tooling for any business with an Azure
presence, ensuring that you can have a single pane of glass, a single classification
engine, and no redundant effort when managing a suite of tools for a heterogeneous
environment.
178 | Chapter 4: Protecting Your Data

Summary
Let’s summarize what was learned and deployed in this recipe:
•
At scale, the hardest thing about data is understanding what you have and where
it lives.
• Azure Purview is a centralized data governance platform that allows you to clas‐
sify data.
• You deployed a Purview application and an Azure storage account to hold some
sensitive data.
• By programmatically running scans, you can ensure that your data is classified.
• Scans can be configured to run on a schedule and against collections of
resources.
• Azure Purview has first-class support for resources outside of Azure, allowing it
to become a truly unified data governance tool and approach.
4.12 Preventing Data Loss on Azure | 179

CHAPTER 5
Secure Networking
When designing networks in the cloud, the topologies are defined by software rather
than the physical structure within the data centers. All three cloud providers allow
you to define your own private networks, which you can then share or connect
together to enable connectivity between disparate teams and applications. You can
then subdivide these private networks into subnetworks, often shortened to subnets.
Once the subnets are defined, how the clouds allow you to implement networking
begins to vary, as you will see in the recipes in this chapter.
Building scalable, enterprise-level network topologies is possible on all three CSPs,
and they all provide a variety of on-premises connectivity options. In this chapter,
you will see how to build base networks that enable your traffic flow patterns, allow
engineers to SSH and remote desktop protocol (RDP) onto machines using IAM for
authentication rather than long-lived keys, build estate-wide network topologies to
enable east-west and north-south traffic, build patterns for exposing applications to
the internet, and provide private access to services.
The wider technology industry is currently converging on the idea
of zero-trust networking, which is where identity, not network
address, is the primary currency for determining visibility and
access.
Using IP addresses as the base of your network security is useful as
a coarse-grained, defense-in-depth approach, but you should use
higher-level resources such as service accounts on GCP, security
groups on AWS, or application security groups on Azure as the
basis of your rules where possible.
Using route tables, you can also define different types of subnetworks, nominally
public, private, and internal. Public subnets allow traffic from the outside world,
181
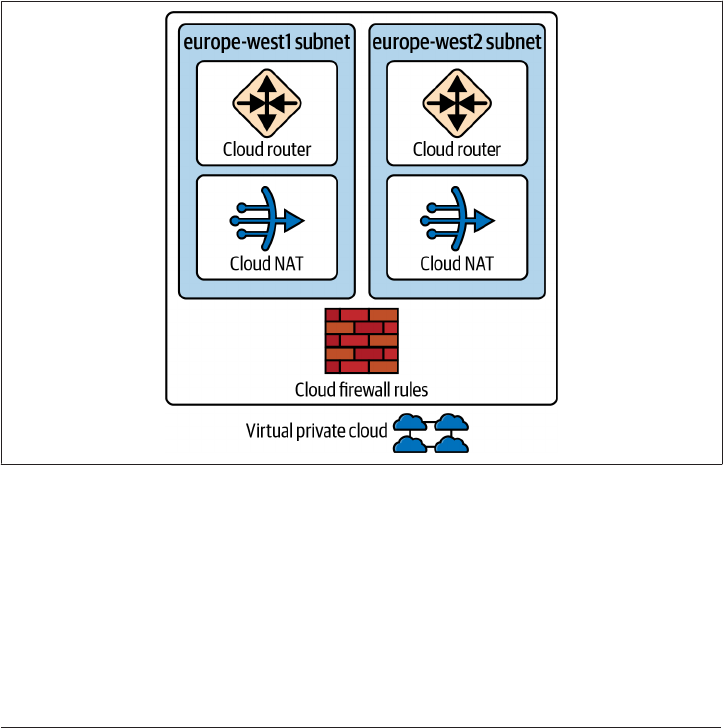
private subnets allow traffic from within the internal network, and internal subnets
allow traffic from within the local network.
5.1 Networking Foundations on GCP
Problem
For teams to be able to securely deploy workloads into GCP, they need to deploy a
secure-by-default Virtual Private Cloud (VPC) for hosting the required resources.
Solution
This recipe creates a VPC that spans multiple regions, with firewall rules that mean
resources are deployed with no access by default. The high-level architecture is
shown in Figure 5-1.
Figure 5-1. VPC architecture
If you haven’t already done so, familiarize yourself with Terraform and the different
authentication mechanisms in Chapter 11.
First, create the following variables.tf file:
variable "project" {
type = string
description = "The project to deploy the resources into"
182 | Chapter 5: Secure Networking

}
variable "region_subnets" {
type = map(any)
description = "A map of region subnet pairings"
}
Then fill out the corresponding terraform.tfvars file:
project = ""
region_subnets = {
"europe-west1": "10.0.0.0/24",
...
}
Create the following provider.tf file and run terraform init:
provider "google" {
project = var.project
}
terraform {
required_providers {
google = {
source = "hashicorp/google"
version = "~> 3"
}
}
}
Create the following main.tf file and run terraform plan:
resource "google_project_service" "compute_api" {
service = "compute.googleapis.com"
}
resource "google_compute_network" "this" {
name = "network"
auto_create_subnetworks = false
delete_default_routes_on_create = true
depends_on = [
google_project_service.compute_api,
]
}
resource "google_compute_subnetwork" "subnet" {
for_each = var.region_subnets
name = each.key
ip_cidr_range = each.value
network = google_compute_network.this.id
region = each.key
}
5.1 Networking Foundations on GCP | 183

resource "google_compute_router" "r" {
for_each = var.region_subnets
name = "router-${each.key}"
network = google_compute_network.this.id
region = each.key
}
resource "google_compute_router_nat" "nat" {
for_each = var.region_subnets
name = "nat-${each.key}"
router = google_compute_router.r[each.key].name
nat_ip_allocate_option = "AUTO_ONLY"
source_subnetwork_ip_ranges_to_nat = "ALL_SUBNETWORKS_ALL_IP_RANGES"
region = each.key
}
resource "google_compute_route" "internet_route" {
name = "internet"
dest_range = "0.0.0.0/0"
network = google_compute_network.this.name
next_hop_gateway = "default-internet-gateway"
}
resource "google_compute_firewall" "default_ingress_deny" {
name = "default-ingress-deny"
network = google_compute_network.this.name
direction = "INGRESS"
priority = 65533
deny {
protocol = "all"
}
}
resource "google_compute_firewall" "default_egress_deny" {
name = "default-egress-deny"
network = google_compute_network.this.name
direction = "EGRESS"
priority = 65533
deny {
protocol = "all"
}
}
resource "google_compute_firewall" "internet_egress" {
name = "allow-internet-egress"
network = google_compute_network.this.name
direction = "EGRESS"
priority = 1000
allow {
protocol = "all"
}
184 | Chapter 5: Secure Networking

target_tags = ["external-egress"]
}
resource "google_compute_firewall" "internet_ingress" {
name = "allow-internet-ingress"
network = google_compute_network.this.name
direction = "INGRESS"
priority = 1000
allow {
protocol = "all"
}
target_tags = ["external-ingress"]
}
Review the resources that are going to be created, and then run terraform apply to
make the changes.
Discussion
With the resources successfully created, you now have a VPC that can scale with your
requirements. The firewall rules make resources inaccessible by default, forcing con‐
sumers to think about how they need to allow access. With the recipe here, you
deployed two firewall rules that allow you to tag resources to enable them to either be
accessed from the internet or access the internet themselves.
For example, the following Terraform resource deploys a Compute Engine instance
that can access the internet but cannot be accessed directly itself:
resource "google_compute_instance" "default" {
name = "test"
machine_type = "f1-micro"
zone = "europe-west1-b"
tags = ["external-egress"]
boot_disk {
initialize_params {
image = "debian-cloud/debian-9"
}
}
network_interface {
subnetwork = google_compute_subnetwork.subnet["europe-west1"].name
access_config {}
}
}
5.1 Networking Foundations on GCP | 185

Compute Engine instances being directly accessible over the inter‐
net should be a last resort. See Recipe 5.10 for how to securely han‐
dle incoming internet traffic on GCP.
Networking on GCP is built on top of zero-trust networking fundamentals. Although
you can deploy multiple subnets within a particular region, preference should be
given to access based on identity, not network address. When looking at firewall rules,
you are given an option of three targets:
•
All instances in the network
•
Specified target tags
• Specified service account
There is no option allowing you to specify all instances within a given subnet.
Wherever possible, using service accounts as the determiner of access should be the
preferred option. Not only does it allow for more cloud native firewall rules, but the
ability to give a particular Service Account to a resource can be locked down as
required. The following are four resources that, when combined, create a firewall rule
that allows specific access between resources over the default PostgreSQL port:
resource "google_service_account" "application" {
account_id = "application"
display_name = "application"
}
resource "google_service_account" "database" {
account_id = "database"
display_name = "database"
}
resource "google_compute_firewall" "service_account_ingress" {
name = join("-", [
"allow",
google_service_account.application.account_id,
"to",
google_service_account.database.account_id,
"ingress"
])
network = google_compute_network.this.name
direction = "INGRESS"
priority = 1000
allow {
protocol = "TCP"
ports = ["5432"]
}
186 | Chapter 5: Secure Networking

source_service_accounts = [google_service_account.application.email]
target_service_accounts = [google_service_account.database.email]
}
resource "google_compute_firewall" "service_account_egress" {
name = join("-", [
"allow-",
google_service_account.application.account_id,
"to",
google_service_account.database.account_id,
"egress"
network = google_compute_network.this.name
direction = "EGRESS"
priority = 1000
allow {
protocol = "TCP"
ports = ["5432"]
}
target_service_accounts = [google_service_account.application.email]
}
In Recipe 5.7, you’ll see how to use Shared VPCs to enable a scalable networking
approach. When using this approach, you can reference service accounts in other
projects to maintain this optimal method of managing your firewall rules.
Summary
Let’s summarize what was learned and deployed in this recipe:
• To build private networks on GCP, you create VPCs.
—
VPCs span globally by design, whereas subnets are region specific.
• You created a VPC that can be extended to cover as many regions as required.
• The default level of network access for any resource should be minimized.
•
By creating tag-based firewall rules, you enable external access as needed.
• When communicating between services within Google Cloud, service accounts
should be used to determine connectivity.
— When using Shared VPCs, as in Recipe 5.7, you can reference service accounts
in other projects.
5.1 Networking Foundations on GCP | 187
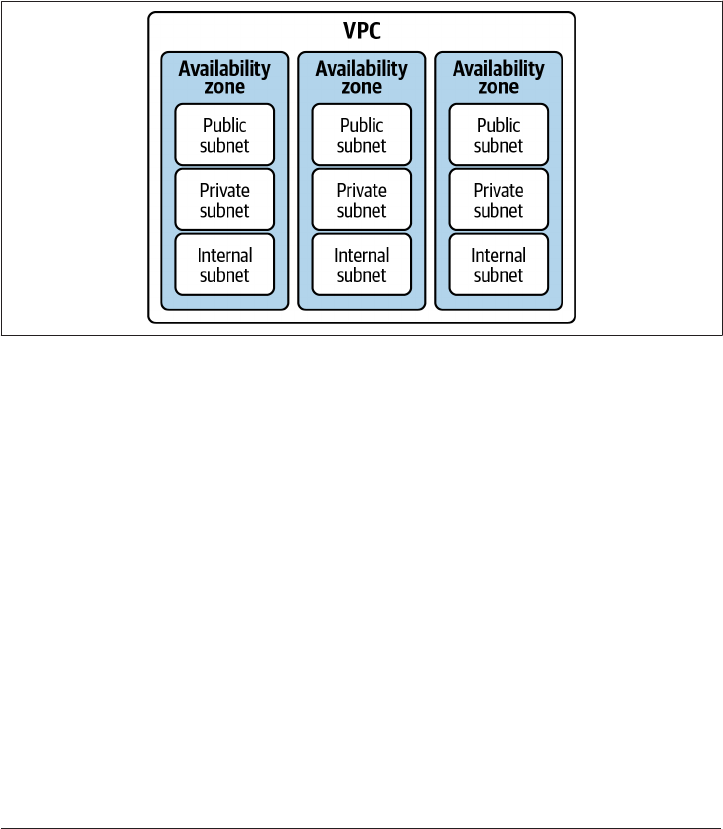
5.2 Networking Foundations on AWS
Problem
For teams to securely deploy workloads into AWS, they need to deploy a secure-by-
default VPC for hosting the required resources.
Solution
This recipe creates a three-tier VPC across multiple availability zones, as shown in
Figure 5-2.
Figure 5-2. ree-tier VPC in AWS
If you haven’t already done so, familiarize yourself with Terraform and the different
authentication mechanisms in Chapter 11.
Create a variables.tf file and copy the following contents:
variable "vpc_cidr" {
type = string
description = "The CIDR range for the entire VPC"
}
variable "public_cidrs" {
type = list(any)
description = "A list of CIDRs for the public subnets"
}
variable "private_cidrs" {
type = list(any)
description = "A list of CIDRs for the private subnets"
}
188 | Chapter 5: Secure Networking

variable "internal_cidrs" {
type = list(any)
description = "A list of CIDRs for the internal subnets"
}
Then fill out the corresponding terraform.tfvars file:
vpc_cidr = ""
public_cidrs = [""]
private_cidrs = [""]
internal_cidrs = [""]
Create the following provider.tf file and run terraform init:
provider "aws" {}
terraform {
required_providers {
aws = {
source = "hashicorp/aws"
version = "~> 3"
}
}
}
Create the following main.tf file and run terraform plan:
data "aws_region" "current" {}
locals {
availability_zones = ["a", "b", "c", "d", "e", "f"]
}
resource "aws_vpc" "this" {
cidr_block = var.vpc_cidr
enable_dns_support = true
enable_dns_hostnames = true
}
resource "aws_subnet" "public" {
count = length(var.public_cidrs)
availability_zone = join("", [
data.aws_region.current.name,
local.availability_zones[count.index]
])
vpc_id = aws_vpc.this.id
cidr_block = var.public_cidrs[count.index]
}
resource "aws_subnet" "private" {
count = length(var.private_cidrs)
availability_zone = join("", [
data.aws_region.current.name,
local.availability_zones[count.index]
5.2 Networking Foundations on AWS | 189

])
vpc_id = aws_vpc.this.id
cidr_block = var.private_cidrs[count.index]
}
resource "aws_subnet" "internal" {
count = length(var.internal_cidrs)
availability_zone = join("", [
data.aws_region.current.name,
local.availability_zones[count.index]
])
vpc_id = aws_vpc.this.id
cidr_block = var.internal_cidrs[count.index]
}
resource "aws_default_security_group" "default" {
vpc_id = aws_vpc.this.id
}
resource "aws_network_acl" "public" {
vpc_id = aws_vpc.this.id
subnet_ids = [for subnet in aws_subnet.public : subnet.id]
}
resource "aws_network_acl_rule" "public_ingress" {
network_acl_id = aws_network_acl.public.id
rule_number = 200
egress = false
protocol = "-1"
rule_action = "allow"
cidr_block = "0.0.0.0/0"
}
resource "aws_network_acl_rule" "public_egress" {
network_acl_id = aws_network_acl.public.id
rule_number = 200
egress = true
protocol = "-1"
rule_action = "allow"
cidr_block = "0.0.0.0/0"
}
resource "aws_network_acl_rule" "local_private_egress" {
count = length(var.private_cidrs)
network_acl_id = aws_network_acl.public.id
rule_number = 100 + count.index
egress = true
protocol = "-1"
rule_action = "allow"
cidr_block = var.private_cidrs[count.index]
}
190 | Chapter 5: Secure Networking

resource "aws_network_acl_rule" "local_private_ingress" {
count = length(var.private_cidrs)
network_acl_id = aws_network_acl.public.id
rule_number = 100 + count.index
egress = false
protocol = "-1"
rule_action = "allow"
cidr_block = var.private_cidrs[count.index]
}
resource "aws_network_acl_rule" "block_private_network_egress" {
network_acl_id = aws_network_acl.public.id
rule_number = 150
egress = true
protocol = "-1"
rule_action = "deny"
cidr_block = "10.0.0.0/8"
}
resource "aws_network_acl_rule" "block_private_network_ingress" {
network_acl_id = aws_network_acl.public.id
rule_number = 150
egress = false
protocol = "-1"
rule_action = "deny"
cidr_block = "10.0.0.0/8"
}
resource "aws_network_acl" "private" {
vpc_id = aws_vpc.this.id
subnet_ids = [for subnet in aws_subnet.private : subnet.id]
}
resource "aws_network_acl_rule" "private_network_ingress" {
network_acl_id = aws_network_acl.private.id
rule_number = 150
egress = false
protocol = "-1"
rule_action = "allow"
cidr_block = "0.0.0.0/0"
}
resource "aws_network_acl_rule" "private_network_egress" {
network_acl_id = aws_network_acl.private.id
rule_number = 150
egress = true
protocol = "-1"
rule_action = "allow"
cidr_block = "0.0.0.0/0"
}
resource "aws_network_acl" "internal" {
5.2 Networking Foundations on AWS | 191

vpc_id = aws_vpc.this.id
subnet_ids = [for subnet in aws_subnet.internal : subnet.id]
}
resource "aws_network_acl_rule" "internal_network_ingress" {
count = length(var.private_cidrs)
network_acl_id = aws_network_acl.internal.id
rule_number = 100 + count.index
egress = true
protocol = "-1"
rule_action = "allow"
cidr_block = var.private_cidrs[count.index]
}
resource "aws_network_acl_rule" "internal_network_egress" {
count = length(var.private_cidrs)
network_acl_id = aws_network_acl.internal.id
rule_number = 100 + count.index
egress = false
protocol = "-1"
rule_action = "allow"
cidr_block = var.private_cidrs[count.index]
}
resource "aws_internet_gateway" "gw" {
vpc_id = aws_vpc.this.id
}
resource "aws_eip" "nat" {
count = length(var.private_cidrs)
}
resource "aws_nat_gateway" "gw" {
count = length(var.private_cidrs)
allocation_id = aws_eip.nat[count.index].id
subnet_id = aws_subnet.private[count.index].id
depends_on = [aws_internet_gateway.gw]
}
resource "aws_default_route_table" "example" {
default_route_table_id = aws_vpc.this.default_route_table_id
route {
cidr_block = "0.0.0.0/0"
gateway_id = aws_internet_gateway.gw.id
}
}
Review the resources that are going to be created, and then run terraform apply to
make the changes.
192 | Chapter 5: Secure Networking

Discussion
The fundamental construct for networking on AWS is the VPC. A VPC is locked to a
region, but can span multiple availability zones. The first line of control for allowing and
denying traffic is the security group. If a security group does not explicitly allow the traf‐
fic, it is implicitly denied. Additionally, it is critical to understand that security groups are
stateful. For example, your internal database will need ingress rules to allow it to be com‐
municated, but it doesn’t need a reciprocal egress rule to allow the traffic back.
When handling network access within a VPC, you should always look first to use secu‐
rity groups as the identity to allow or deny traffic. Your database security group should
allow traffic from your workload security group, not just the entire private IP range.
This is a step along the journey to zero-trust networking, as discussed at the start of this
chapter, where identity, not network location, becomes the source of access.
When you create a new AWS account, it comes with a default VPC. Although this
allows you to get up and running quickly, it shouldn’t be used for production work‐
loads, as they are all deployed with identical Classless Inter-Domain Routing (CIDR)
ranges, and the subnets are not configured correctly to achieve your security objectives.
In this recipe, you built a three-tier VPC based around the need to support a variety
of connectivity and security requirements:
Public subnets
These allow ingress from the internet. Workloads often need to be accessible
externally, but we want only those resources that need to be directly accessible to
be so. This subnet will allow resources such as load balancers and network
address translation (NAT) gateways. For a deeper dive, see Recipe 5.11.
Private subnets
These allow east-west communication across the business. As your estate grows,
there will be requirements to allow systems to connect without traversing the
public internet. Common examples include shared services like Active Directory,
SAP systems, and shared developer tooling.
Internal subnets
These allow for internal resources only accessible from your local network. Data‐
bases and other data storage systems should only be accessible from the local net‐
work. Having a database directly accessible from outside your local network is a
potential threat vector for malicious actors.
5.2 Networking Foundations on AWS | 193

New VPCs in AWS come with a default security group that allows
unrestricted external access and everything with the security group
to communicate—not something you want to allow as a default.
The aws_default_security_group resource automatically re‐
moves the permissions, forcing users to create their own security
groups specific for their purpose.
Enforce the following rules to meet the requirements:
• The public subnets are accessible from the public internet, and can only access
the private subnets.
• The private subnets are accessible from the public subnet, the wider private net‐
work, and can access the internal subnets and the outside world.
•
The internal subnets can only be accessed from the private subnets.
To achieve this level of control, and enact defense in-depth underneath the security
groups, you configured network access control lists (NACLs). These are stateless rules
that define traffic flow between subnets. Through these you can enforce common
rules, such as those outlined previously, that cannot be circumvented with a miscon‐
figured security group.
Let’s quickly discuss routing within the VPC. By default, every route table has a local
route that allows for intra-VPC routing. For each tier of the subnet, in this recipe, you
configured a bespoke route table that handled external routing, the public subnet’s
route to the internet via the internet gateway, and the private subnet’s route via the
NAT gateway. The internal subnets cannot route externally at all. With security
groups, NACLs, and route tables, you can construct a layered defense in-depth
approach that allows you to robustly achieve your security objectives.
This recipe forms the backbone of the following recipes:
• Recipe 5.5
• Recipe 5.8
• Recipe 5.11
Summary
Let’s summarize what was learned and deployed in this recipe:
• Although AWS provides default VPCs in an account, they should be deleted as
standard practice.
• To enable highly available architectures, the VPCs should span multiple availabil‐
ity zones.
194 | Chapter 5: Secure Networking

• To retain flexibility to secure your network, you need the following three tiers of
subnets:
Public
Houses the resources that need to be accessed directly from the internet
Private
Houses the resources that can be accessed from across the business, and the
public subnets
Internal
Houses the resources that can only be accessed from the private subnets
•
You created a VPC with these three tiers.
• NACLs are stateless rules for allowing traffic between subnets.
• Security groups are stateful rules for allowing traffic between network interfaces.
• By defining custom route tables for each tier, as well as adopting security groups
and NACLs, you can build out a defense in-depth approach to network security.
5.3 Networking Foundations on Azure
Problem
For teams to be able to securely deploy workloads into Azure, they need to deploy a
secure-by-default Virtual Network (VNet) for hosting the required resources.
Solution
This recipe creates a three-tier Virtual Network that routes all external-bound traffic
through an Azure Firewall. The high-level architecture is shown in Figure 5-3.
For a production use case, having both Azure Firewall and DDoS
protection enabled is recommended. However, the static running
cost of both is around $4,000 per month.
To prevent bill shock, the recipe by default does not deploy either
but can be toggled via the enable_firewall and enable_ddos_
protection variables.
Azure DDoS protection should be purchased centrally for the ten‐
ant and shared.
Azure Firewall should be centrally managed via Recipe 5.9.
5.3 Networking Foundations on Azure | 195
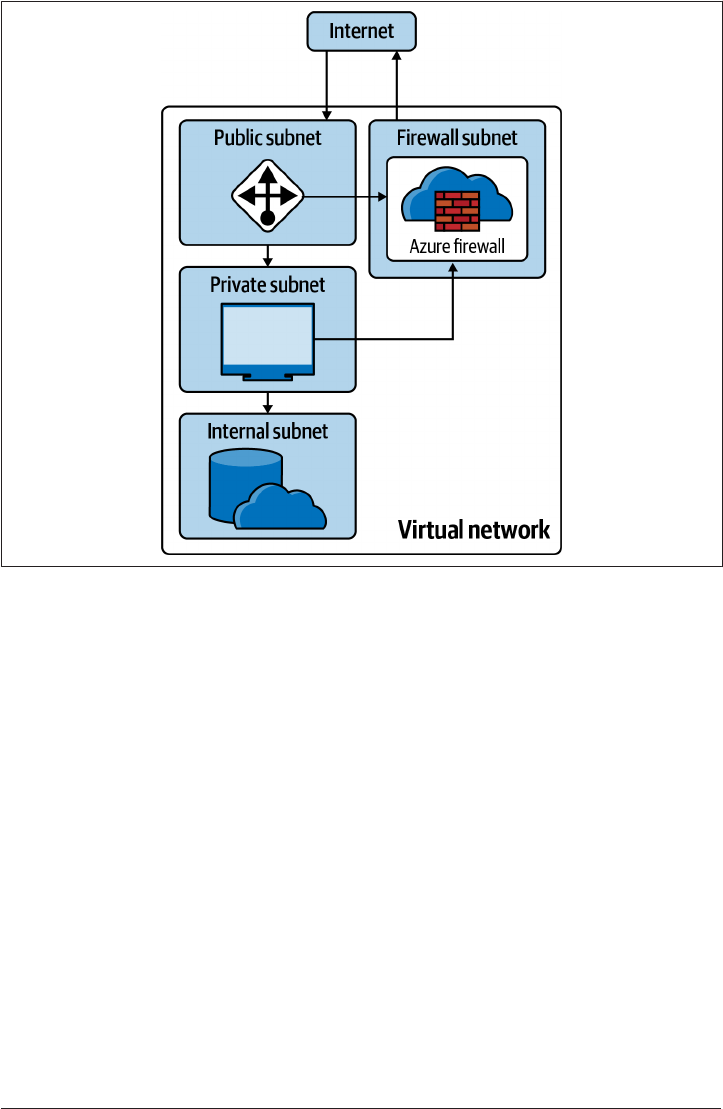
Figure 5-3. Virtual Network architecture
If you haven’t already done so, familiarize yourself with Terraform and the different
authentication mechanisms in Chapter 11.
Create a variables.tf file and copy the following contents:
variable "vnet_cidr" {
type = string
description = "The CIDR range for the Virtual Network"
}
variable "public_cidr" {
type = string
description = "The CIDR range for the Public Subnet"
}
variable "private_cidr" {
type = string
description = "The CIDR range for the Private Subnet"
}
variable "internal_cidr" {
type = string
196 | Chapter 5: Secure Networking

description = "The CIDR range for the Internal Subnet"
}
variable "firewall_cidr" {
type = string
description = "The CIDR range for the Firewall Subnet"
default = ""
}
variable "enable_firewall" {
type = bool
description = "Enable Azure firewall (approx $1k per month)"
default = false
}
variable "enable_ddos_protection" {
type = bool
description = "Enable Azure firewall (approx $3k per month)"
default = false
}
Then fill out the corresponding terraform.tfvars file:
vnet_cidr = ""
public_cidr = ""
private_cidr = ""
internal_cidr = ""
Create the following provider.tf file and run terraform init:
terraform {
required_providers {
azurerm = {
source = "hashicorp/azurerm"
version = "~> 2"
}
}
}
provider "azurerm" {
features {}
}
Create the following main.tf file and run terraform plan:
locals {
fw = azurerm_firewall.this[0]
fw_ip = local.fw.ip_configuration[0].private_ip_address
}
resource "azurerm_resource_group" "n" {
name = "network"
location = var.location
}
5.3 Networking Foundations on Azure | 197

resource "azurerm_public_ip" "nat_gateway" {
name = "nat-gateway"
location = azurerm_resource_group.n.location
resource_group_name = azurerm_resource_group.n.name
allocation_method = "Static"
sku = "Standard"
availability_zone = "1"
}
resource "azurerm_nat_gateway_public_ip_association" "this" {
nat_gateway_id = azurerm_nat_gateway.this.id
public_ip_address_id = azurerm_public_ip.nat_gateway.id
}
resource "azurerm_nat_gateway" "this" {
name = "this"
location = azurerm_resource_group.n.location
resource_group_name = azurerm_resource_group.n.name
sku_name = "Standard"
idle_timeout_in_minutes = 10
}
resource "azurerm_virtual_network" "n" {
name = "this"
address_space = [var.vnet_cidr]
location = azurerm_resource_group.n.location
resource_group_name = azurerm_resource_group.n.name
}
resource "azurerm_subnet" "public" {
name = "public"
resource_group_name = azurerm_resource_group.n.name
virtual_network_name = azurerm_virtual_network.n.name
address_prefixes = [var.public_cidr]
}
resource "azurerm_subnet" "private" {
name = "private"
resource_group_name = azurerm_resource_group.n.name
virtual_network_name = azurerm_virtual_network.n.name
address_prefixes = [var.private_cidr]
}
resource "azurerm_subnet_nat_gateway_association" "private" {
subnet_id = azurerm_subnet.private.id
nat_gateway_id = azurerm_nat_gateway.this.id
}
resource "azurerm_subnet" "internal" {
name = "internal"
resource_group_name = azurerm_resource_group.n.name
virtual_network_name = azurerm_virtual_network.n.name
198 | Chapter 5: Secure Networking

address_prefixes = [var.internal_cidr]
}
resource "azurerm_route_table" "this" {
name = "this"
location = azurerm_resource_group.n.location
resource_group_name = azurerm_resource_group.n.name
}
resource "azurerm_route" "local" {
name = "local"
resource_group_name = azurerm_resource_group.n.name
route_table_name = azurerm_route_table.this.name
address_prefix = var.vnet_cidr
next_hop_type = "VnetLocal"
}
resource "azurerm_route" "internet_via_firewall" {
count = var.enable_firewall ? 1 : 0
name = "internet"
resource_group_name = azurerm_resource_group.n.name
route_table_name = azurerm_route_table.this.name
address_prefix = "0.0.0.0/0"
next_hop_type = "VirtualAppliance"
next_hop_in_ip_address = local.fw_ip
}
resource "azurerm_route" "internet_via_nat" {
count = var.enable_firewall ? 0 : 1
name = "internet"
resource_group_name = azurerm_resource_group.n.name
route_table_name = azurerm_route_table.this.name
address_prefix = "0.0.0.0/0"
next_hop_type = "VirtualNetworkGateway"
}
resource "azurerm_network_ddos_protection_plan" "this" {
count = var.enable_ddos_protection ? 1 : 0
name = "this"
location = azurerm_resource_group.n.location
resource_group_name = azurerm_resource_group.n.name
}
resource "azurerm_subnet" "firewall" {
count = var.enable_firewall ? 1 : 0
name = "AzureFirewallSubnet"
resource_group_name = azurerm_resource_group.n.name
virtual_network_name = azurerm_virtual_network.n.name
address_prefixes = [var.firewall_cidr]
}
resource "azurerm_public_ip" "firewall" {
5.3 Networking Foundations on Azure | 199

count = var.enable_firewall ? 1 : 0
name = "firewall"
location = azurerm_resource_group.n.location
resource_group_name = azurerm_resource_group.n.name
allocation_method = "Static"
sku = "Standard"
}
resource "azurerm_firewall" "this" {
count = var.enable_firewall ? 1 : 0
name = "this"
location = azurerm_resource_group.n.location
resource_group_name = azurerm_resource_group.n.name
ip_configuration {
name = "configuration"
subnet_id = azurerm_subnet.firewall[0].id
public_ip_address_id = azurerm_public_ip.firewall[0].id
}
}
resource "azurerm_network_security_group" "public" {
name = "public"
location = azurerm_resource_group.n.location
resource_group_name = azurerm_resource_group.n.name
}
resource "azurerm_subnet_network_security_group_association" "public" {
subnet_id = azurerm_subnet.public.id
network_security_group_id = azurerm_network_security_group.public.id
}
resource "azurerm_network_security_group" "private" {
name = "private"
location = azurerm_resource_group.n.location
resource_group_name = azurerm_resource_group.n.name
}
resource "azurerm_subnet_network_security_group_association" "private" {
subnet_id = azurerm_subnet.private.id
network_security_group_id = azurerm_network_security_group.private.id
}
resource "azurerm_network_security_group" "internal" {
name = "internal"
location = azurerm_resource_group.n.location
resource_group_name = azurerm_resource_group.n.name
}
resource "azurerm_subnet_network_security_group_association" "internal" {
subnet_id = azurerm_subnet.internal.id
200 | Chapter 5: Secure Networking

network_security_group_id = azurerm_network_security_group.internal.id
}
Review the resources that are going to be created and then run terraform apply to
make the changes.
Discussion
By default, when creating a network security group in Azure, it contains a collection
of default rules. For ingress rules, it allows VNet traffic and load balancer traffic by
default and denies everything else. For egress rules, it allows VNet traffic and internet
traffic by default and denies everything else. In this recipe, you added a specific rule
to the public subnet to allow all traffic, whereas the private and internal subnets will
block public traffic.
Also for the internal subnet, the route table automatically forwards internet-bound
traffic to a black hole, whereas for the public and private subnets, it is routed directly
via the firewall. The firewall is configured with no rules, meaning that in its current
state it blocks all outbound traffic.
In Table 5-1, you can see the three default Azure Policy network compliance checks.
As noted earlier in the recipe, the second and third policies can be toggled on when
required.
Table 5-1. Virtual Network policies
Policy Details
Network Watcher should be enabled. Network Watcher collects data and logs from your networks, allowing for
debugging and understanding of potential security threats.
All internet trac should be routed via
your deployed Azure Firewall.
The route table should be congured to route external trac via the Azure
Firewall.
Azure DDoS Protection Standard should be
enabled.
The base level of Azure DDoS should be enabled on your networks.
Let’s have a look at Network Watcher. Network Watcher is a network monitoring ser‐
vice which captures flow logs and provides guided diagnosis for connectivity issues. It
is your first port of call when looking to debug network issues within your tenant.
It is deployed on a per-region, per-subscription basis, so it should be deployed inde‐
pendently of the virtual network, hence why it’s not included in the recipe. The fol‐
lowing Terraform creates Network Watcher, and a Log Analytics workspace where the
flow logs for each network security group are collected. You will need to update the
name of the storage account to something globally unique.
resource "azurerm_resource_group" "watcher" {
name = "watcher"
location = var.location
5.3 Networking Foundations on Azure | 201

}
resource "azurerm_network_watcher" "this" {
name = "this"
location = azurerm_resource_group.watcher.location
resource_group_name = azurerm_resource_group.watcher.name
}
resource "azurerm_storage_account" "watcher" {
name = ""
resource_group_name = azurerm_resource_group.watcher.name
location = azurerm_resource_group.watcher.location
account_tier = "Standard"
account_kind = "StorageV2"
account_replication_type = "LRS"
enable_https_traffic_only = true
}
resource "azurerm_log_analytics_workspace" "watcher" {
name = "watcher"
location = azurerm_resource_group.watcher.location
resource_group_name = azurerm_resource_group.watcher.name
sku = "PerGB2018"
}
resource "azurerm_network_watcher_flow_log" "this" {
for_each = toset([
azurerm_network_security_group.public.id,
azurerm_network_security_group.private.id,
azurerm_network_security_group.internal.id,
])
network_watcher_name = azurerm_network_watcher.this.name
resource_group_name = azurerm_resource_group.watcher.name
network_security_group_id = each.value
storage_account_id = azurerm_storage_account.watcher.id
enabled = true
retention_policy {
enabled = true
days = 7
}
traffic_analytics {
enabled = true
workspace_id = azurerm_log_analytics_workspace.watcher.workspace_id
workspace_region = azurerm_log_analytics_workspace.watcher.location
workspace_resource_id = azurerm_log_analytics_workspace.watcher.id
}
}
202 | Chapter 5: Secure Networking
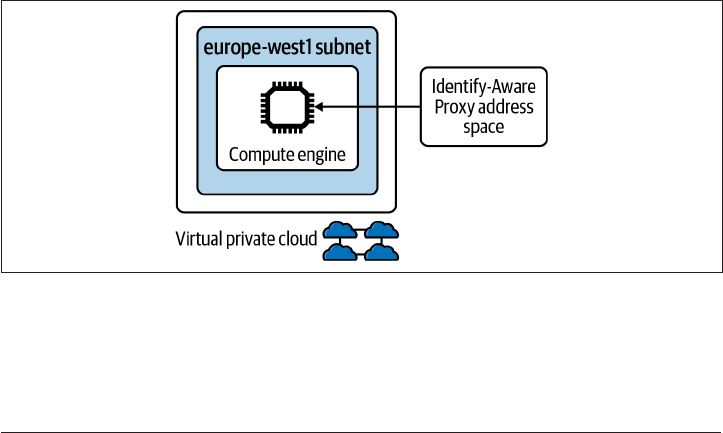
Summary
Let’s summarize what was learned and deployed in this recipe:
•
Virtual Networks (VNets) are the base networking construct in Azure.
• You can divide a VNet into disparate subnetworks.
• Each subnetwork should have its own network security group attached.
•
It should also have a specific route table attached.
• The recipe deploys four subnets: public, private, internal, and firewall.
• All internet-bound traffic is routed via an Azure Firewall.
•
Applications, where possible, should use application security groups.
• To monitor and debug VNet connectivity issues, use Network Watcher.
5.4 Enabling External Access on GCP
Problem
As part of the operation and development of services, engineers need to access
machines within a VPC.
Solution
This recipe deploys a Compute Engine instance, as shown in Figure 5-4, that cannot
access the internet but can be privately accessed using SSH and an Identity-Aware
Proxy (IAP).
Figure 5-4. SSH over IAP
First, complete Recipe 5.1 and open the working directory.
Add the following variable definition to your variables.tf file:
5.4 Enabling External Access on GCP | 203

...
variable "instance_zone" {
type = string
description = "The zone for the Compute Engine instance"
}
And to your terraform.tfvars file:
...
instance_zone = ""
Create the following instance.tf file and run terraform plan:
locals {
compute_region = join("-", [
split("-", var.instance_zone)[0],
split("-", var.instance_zone)[1]
])
}
resource "google_service_account" "ssh" {
account_id = "allow-ssh"
display_name = "allow-ssh"
}
resource "google_compute_firewall" "ssh-ingress" {
name = "ssh-ingress"
network = google_compute_network.this.name
direction = "INGRESS"
priority = 1000
allow {
protocol = "TCP"
ports = ["22"]
}
source_ranges = [
"35.235.240.0/20"
]
target_service_accounts = [
google_service_account.ssh.email
]
}
resource "google_compute_instance" "default" {
name = "test"
machine_type = "f1-micro"
zone = var.instance_zone
boot_disk {
initialize_params {
image = "debian-cloud/debian-9"
204 | Chapter 5: Secure Networking

}
}
network_interface {
subnetwork = google_compute_subnetwork.subnet[local.compute_region].name
}
service_account {
email = google_service_account.ssh.email
scopes = ["cloud-platform"]
}
}
Review the resources that are going to be created, and then run terraform apply to
make the changes.
Discussion
With the instance deployed, if you now run gcloud compute ssh test, you will be
dropped into an SSH session on the instance.
On Google Cloud, that native way to establish SSH or RDP sessions is tunneling via
IAP. This allows you to manage machine access via IAM, rather than having to man‐
age, secure, and rotate keys yourself. Helpfully, the gcloud CLI abstracts the IAP from
you, meaning that you are able to simply connect to a private machine that has a port
open for the IAP address range (35.235.240.0/20).
The instance cannot be accessed from anywhere other than the IAP address range
and cannot, by default, connect to any other resources on the network. Now let’s look
at extending the recipe to be able to tunnel connections to internal resources.
A common request is being able to directly interact with a database from a local
development machine to assist in debugging. The following Terraform creates a Post‐
greSQL instance in the VPC, adds the required firewall rules, and prints out the SSH
tunnel command.
Add the following database.tf file to your working directory:
resource "google_project_service" "service_networking" {
service = "servicenetworking.googleapis.com"
disable_on_destroy = false
}
resource "google_compute_firewall" "service_account_ingress" {
name = join("-", [
"allow"
google_service_account.ssh.account_id,
"to-database-ingress"
])
network = google_compute_network.this.name
5.4 Enabling External Access on GCP | 205

direction = "INGRESS"
priority = 1000
allow {
protocol = "TCP"
ports = ["5432"]
}
source_service_accounts = [google_service_account.ssh.email]
target_service_accounts = [
google_sql_database_instance.postgres.service_account_email_address
]
}
resource "google_compute_global_address" "private_ip_address" {
name = "private-ip-address"
purpose = "VPC_PEERING"
address_type = "INTERNAL"
prefix_length = 16
network = google_compute_network.this.id
}
resource "google_service_networking_connection" "private_vpc_connection" {
network = google_compute_network.this.id
service = "servicenetworking.googleapis.com"
reserved_peering_ranges = [
google_compute_global_address.private_ip_address.name
]
depends_on = [
google_project_service.service_networking
]
}
resource "google_compute_firewall" "service_account_egress" {
name = join("-". [
"allow",
google_service_account.ssh.account_id,
"to-database-egress"
])
network = google_compute_network.this.name
direction = "EGRESS"
priority = 1000
allow {
protocol = "TCP"
ports = ["5432"]
}
destination_ranges = [
google_sql_database_instance.postgres.private_ip_address
]
206 | Chapter 5: Secure Networking

target_service_accounts = [google_service_account.ssh.email]
}
resource "google_sql_database_instance" "postgres" {
name = "postgres"
database_version = "POSTGRES_13"
deletion_protection = false
region = local.compute_region
settings {
tier = "db-f1-micro"
ip_configuration {
ipv4_enabled = false
private_network = google_compute_network.this.id
}
}
depends_on = [
google_project_service.service_networking,
google_service_networking_connection.private_vpc_connection
]
}
output "tunnel" {
value = join("", [
"gcloud compute ssh test ",
"--ssh-flag '-L 5432:",
google_sql_database_instance.postgres.private_ip_address,
":5432'"
])
}
Once you have run terraform apply and created the resources, the tunnel output
will give you the required command to tunnel to the database.
This pattern can be used to access any internal resource. When accessing Cloud SQL
instances, Google provides the Cloud SQL Auth proxy, which is the recommended
way of accessing private databases from applications as it manages the encryption in
transit and enables IAM-based access, as opposed to native database users.
Summary
Let’s summarize what was learned and deployed in this recipe:
•
Opening sessions to instances on Google Cloud should be done via the Identity-
Aware Proxy (IAP):
— By using IAP, you use IAM as the source of your authentication and authori‐
zation.
— This is both more secure and operationally efficient than managing keys and
certificates.
5.4 Enabling External Access on GCP | 207
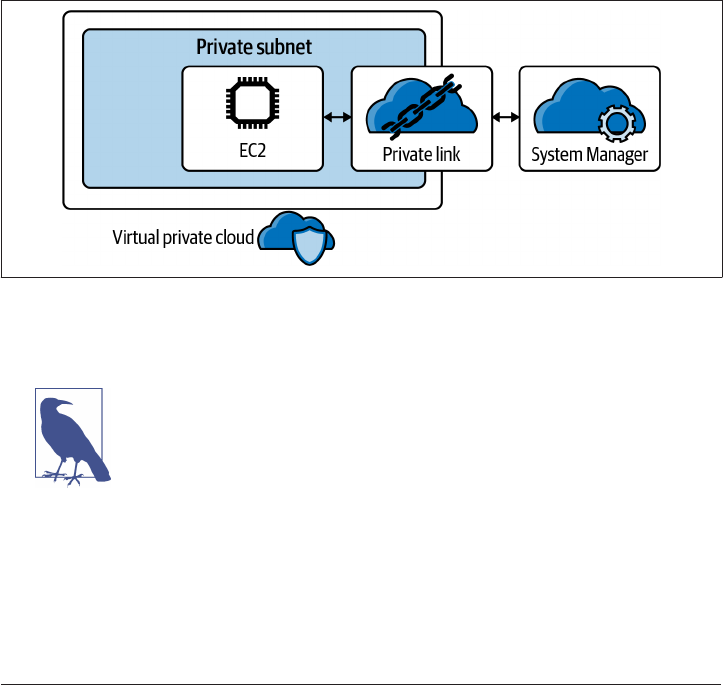
• By opening up instances to purely the IAP address range, you can enable secure
SSH and RDP access.
• The gcloud command line abstracts the configuration of IAP for you.
• You can also use this approach to tunnel to private resources within your VPCs.
5.5 Enabling External Access on AWS
Problem
As part of the operation and development of services, engineers need to access
machines within a VPC.
Solution
This recipe deploys an EC2 instance, as shown in Figure 5-5, that cannot access the
internet but can be privately accessed via SSH and AWS Systems Manager.
Figure 5-5. Private SSH with Systems Manager
First, complete Recipe 5.2 and open the working directory.
Although connecting to the EC2 instance directly doesn’t require
SSH keys, in order to tunnel through the instance, you need an
SSH public key to be uploaded. As this can only be done when the
instance is created, the recipe requires that the keys be specified.
Add the following variable definition to your variables.tf file:
...
variable "public_key_path" {
type = string
208 | Chapter 5: Secure Networking

description = "The absolute path to your public key"
}
variable "private_key_path" {
type = string
description = "The absolute path to your private key"
}
And to your terraform.tfvars file:
...
public_key_path = ""
private_key_path = ""
Update the provider.tf file to contain only the following contents, and run terraform
init:
provider "aws" {}
terraform {
required_providers {
aws = {
source = "hashicorp/aws"
version = "~> 3"
}
random = {
source = "hashicorp/random"
version = "~> 3"
}
local = {
source = "hashicorp/local"
version = "~> 2"
}
}
}
Create the following instance.tf file and run terraform plan:
resource "aws_vpc_endpoint" "ssm" {
vpc_id = aws_vpc.this.id
service_name = "com.amazonaws.eu-west-1.ssm"
vpc_endpoint_type = "Interface"
private_dns_enabled = true
subnet_ids = [for subnet in aws_subnet.private : subnet.id]
security_group_ids = [
aws_security_group.endpoint_sg.id,
]
}
resource "aws_vpc_endpoint" "ssmmessages" {
vpc_id = aws_vpc.this.id
service_name = "com.amazonaws.eu-west-1.ssmmessages"
vpc_endpoint_type = "Interface"
5.5 Enabling External Access on AWS | 209

private_dns_enabled = true
subnet_ids = [for subnet in aws_subnet.private : subnet.id]
security_group_ids = [
aws_security_group.endpoint_sg.id,
]
}
resource "aws_vpc_endpoint" "ec2messages" {
vpc_id = aws_vpc.this.id
service_name = "com.amazonaws.eu-west-1.ec2messages"
vpc_endpoint_type = "Interface"
private_dns_enabled = true
subnet_ids = [for subnet in aws_subnet.private : subnet.id]
security_group_ids = [
aws_security_group.endpoint_sg.id,
]
}
resource "aws_security_group" "endpoint_sg" {
vpc_id = aws_vpc.this.id
ingress {
from_port = 443
to_port = 443
protocol = "tcp"
cidr_blocks = [aws_vpc.this.cidr_block]
}
}
data "aws_ami" "ubuntu" {
most_recent = true
filter {
name = "name"
values = ["ubuntu/images/hvm-ssd/ubuntu-focal-20.04-amd64-server-*"]
}
filter {
name = "virtualization-type"
values = ["hvm"]
}
owners = ["099720109477"] # Canonical
}
data "local_file" "ssh_public" {
filename = var.public_key_path
}
resource "aws_key_pair" "key" {
210 | Chapter 5: Secure Networking

public_key = data.local_file.ssh_public.content
}
resource "aws_instance" "web" {
ami = data.aws_ami.ubuntu.id
instance_type = "t3.micro"
iam_instance_profile = aws_iam_instance_profile.ssm_profile.name
key_name = aws_key_pair.key.key_name
security_groups = [aws_security_group.instance.id]
subnet_id = aws_subnet.private[0].id
}
resource "aws_security_group" "instance" {
vpc_id = aws_vpc.this.id
}
resource "aws_security_group_rule" "ssh_ingress" {
type = "ingress"
from_port = 22
to_port = 22
protocol = "tcp"
source_security_group_id = aws_security_group.endpoint_sg.id
security_group_id = aws_security_group.instance.id
}
resource "aws_security_group_rule" "endpoint_egress" {
type = "egress"
from_port = 443
to_port = 443
protocol = "tcp"
source_security_group_id = aws_security_group.endpoint_sg.id
security_group_id = aws_security_group.instance.id
}
resource "aws_iam_instance_profile" "ssm_profile" {
name = "ssm_profile"
role = aws_iam_role.role.name
}
resource "aws_iam_role" "role" {
name = "ssm_role"
path = "/"
managed_policy_arns = ["arn:aws:iam::aws:policy/AmazonSSMManagedInstanceCore"]
assume_role_policy = <<EOF
{
"Version": "2012-10-17",
"Statement": [
{
"Action": "sts:AssumeRole",
"Principal": {
5.5 Enabling External Access on AWS | 211

"Service": "ec2.amazonaws.com"
},
"Effect": "Allow",
"Sid": ""
}
]
}
EOF
}
output "start_session" {
value = "aws ssm start-session --target ${aws_instance.web.id}"
}
Review the resources that are going to be created and then run terraform apply to
make the changes.
Discussion
When the resources are created, the start_session output will contain the com‐
mand needed to create an SSH on the instance.
As the AWS CLI does not natively support the Session Manager
plug-in, you will need to install it by following the documentation.
In this recipe, you used VPC endpoints to allow access to the AWS APIs through pri‐
vate networking alone. To explore the topic further, see Recipe 5.14.
Although you are now able to SSH onto a private Linux EC2 instance in your VPC,
often engineers need to tunnel through a machine to access a database or similar
resource. Let’s look at the extra steps required to achieve this.
The random_password resource used to generate the password for
the database is a convenience measure. Ideally, database passwords
should be generated out of Terraform to avoid the result being
stored in state.
Let’s create a Postgres database to query directly from your laptop, by creating a data‐
base.tf file with the following contents.
resource "random_password" "database" {
length = 16
special = false
}
212 | Chapter 5: Secure Networking

resource "aws_db_instance" "default" {
allocated_storage = 10
db_subnet_group_name = aws_db_subnet_group.default.name
engine = "postgres"
engine_version = "13.2"
instance_class = "db.t3.micro"
name = "mydb"
username = "postgres"
password = random_password.database.result
parameter_group_name = "default.postgres13"
skip_final_snapshot = true
vpc_security_group_ids = [aws_security_group.database.id]
}
resource "aws_security_group_rule" "database_egress" {
type = "egress"
from_port = 5432
to_port = 5432
protocol = "tcp"
source_security_group_id = aws_security_group.database.id
security_group_id = aws_security_group.instance.id
}
resource "aws_db_subnet_group" "default" {
subnet_ids = [for subnet in aws_subnet.internal : subnet.id]
}
resource "aws_security_group" "database" {
vpc_id = aws_vpc.this.id
ingress {
from_port = 5432
to_port = 5432
protocol = "tcp"
security_groups = [aws_security_group.instance.id]
}
}
output "db_password" {
value = random_password.database.result
sensitive = true
}
output "tunnel_command" {
value = join(" ", [
"ssh",
"-i ${var.private_key_path}",
"ubuntu@${aws_instance.web.id}",
"-L",
"5432:${aws_db_instance.default.address}:5432",
])
}
5.5 Enabling External Access on AWS | 213

Once you have run terraform apply to create the resources, you can run terraform
output db_password to get the administrator password.
To tunnel through the instance to RDS, you will need to configure your SSH client to
leverage Session Manager to handle the connection. To do this, follow the instruc‐
tions in the AWS documentation.
Once your client is configured, you can run the tunnel_command output, which will
start an SSH session that allows you to connect to your database through
127.0.0.1:5432. You can then use your full array of local tooling to interact with the
database.
Summary
Let’s summarize what was learned and deployed in this recipe:
• On AWS, you can leverage AWS Systems Manager to access instances.
• By using VPC Endpoints, you can allow private instances to talk to AWS APIs.
•
After creating the required endpoints, you then created an EC2 that had these
elements:
— The SSM agent preinstalled on the AMI
— An instance profile with the required permissions
—
A security group that allowed for incoming SSH and outgoing connections to
AWS APIs
• Then you added the Session Manager plug-in to your AWS CLI and connected to
the instance.
• Session Manager also enables tunneling to resources.
•
You created a database and used the EC2 instance and Session Manager to create
a connection from your local machine.
5.6 Enabling External Access on Azure
Problem
As part of the operation and development of services, engineers need to access
machines within a VPC.
Solution
This recipe deploys an Azure Bastion host, as shown in Figure 5-6, to enable SSH and
RDP access driven directly through the Azure Portal.
214 | Chapter 5: Secure Networking
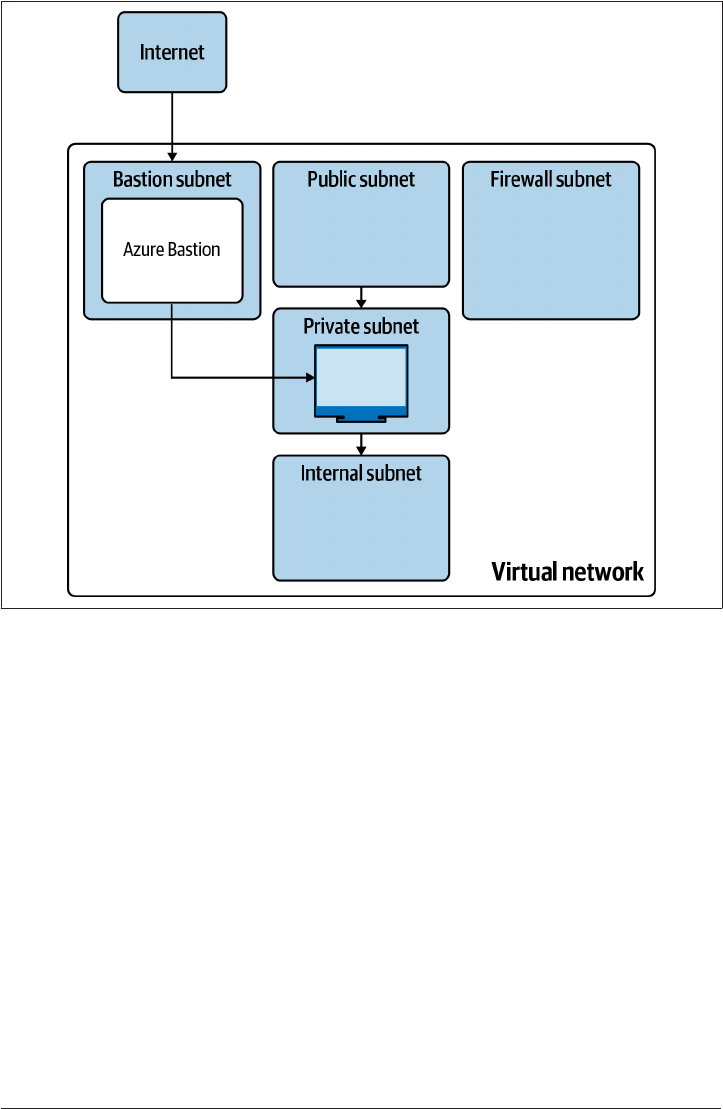
Figure 5-6. Bastion architecture
First, complete Recipe 5.3 and open the working directory.
Add the following variable definition to your variables.tf file:
...
variable "bastion_cidr" {
type = string
description = "The CIDR for the Bastion Subnet"
}
And to your terraform.tfvars file:
...
bastion_cidr = ""
Create the following bastion.tf file and run terraform plan:
resource "azurerm_subnet" "bastion" {
name = "AzureBastionSubnet"
resource_group_name = azurerm_resource_group.network.name
5.6 Enabling External Access on Azure | 215

virtual_network_name = azurerm_virtual_network.this.name
address_prefixes = [var.bastion_cidr]
}
resource "azurerm_public_ip" "bastion" {
name = "bastion"
location = azurerm_resource_group.network.location
resource_group_name = azurerm_resource_group.network.name
allocation_method = "Static"
sku = "Standard"
}
resource "azurerm_bastion_host" "this" {
name = "this"
location = azurerm_resource_group.network.location
resource_group_name = azurerm_resource_group.network.name
ip_configuration {
name = "configuration"
subnet_id = azurerm_subnet.bastion.id
public_ip_address_id = azurerm_public_ip.bastion.id
}
}
resource "azurerm_application_security_group" "s" {
name = "ssh_example"
location = azurerm_resource_group.network.location
resource_group_name = azurerm_resource_group.network.name
}
resource "azurerm_network_security_rule" "bastion_ingress" {
name = "bastion-private-ingress"
priority = 100
direction = "Inbound"
access = "Allow"
protocol = "Tcp"
source_port_range = "*"
destination_port_range = "22"
source_address_prefixes = azurerm_subnet.bastion.address_prefixes
destination_application_security_group_ids = [
azurerm_application_security_group.ssh_example.id
]
resource_group_name = azurerm_resource_group.network.name
network_security_group_name = azurerm_network_security_group.private.name
}
Review the resources that are going to be created and then run terraform apply to
make the changes.
216 | Chapter 5: Secure Networking

Discussion
In this recipe, you created an application security group that remains unattached.
This can then be associated to resources to enable identity-based connectivity. The
following is a Terraform that creates a minimal Linux virtual machine for testing the
bastion host:
resource "azurerm_network_interface_application_security_group_association" "s" {
network_interface_id = azurerm_network_interface.ssh_example.id
application_security_group_id = azurerm_application_security_group.s.id
}
resource "azurerm_linux_virtual_machine" "ssh_example" {
name = "ssh-example"
resource_group_name = azurerm_resource_group.network.name
location = azurerm_resource_group.network.location
size = "Standard_B1s"
admin_username = "adminuser"
network_interface_ids = [
azurerm_network_interface.ssh_example.id,
]
admin_ssh_key {
username = "adminuser"
public_key = file("~/.ssh/id_rsa.pub")
}
os_disk {
caching = "ReadWrite"
storage_account_type = "Standard_LRS"
}
source_image_reference {
publisher = "Canonical"
offer = "UbuntuServer"
sku = "16.04-LTS"
version = "latest"
}
}
resource "azurerm_network_interface" "ssh_example" {
name = "ssh_example"
location = azurerm_resource_group.network.location
resource_group_name = azurerm_resource_group.network.name
ip_configuration {
name = "internal"
subnet_id = azurerm_subnet.private.id
private_ip_address_allocation = "Dynamic"
}
}
5.6 Enabling External Access on Azure | 217

When using Azure Bastion, you need to use key material to con‐
nect over SSH. Although access to Azure Bastion is IAM based, as
it runs agentless on the host, authentication is host OS based.
Rather than host key material locally, Azure Bastion natively supports using private
keys stored in Azure Key Vault. This means that key access is also IAM based, allows
you to rotate keys by updating the secrets, and means that you are no longer machine
bound. To configure a Key Vault in Terraform, see the following resources. You will
need to configure an explicit access_policy on the vault, manage IAM to control
access, and update the vault name to something globally unique:
data "azurerm_client_config" "current" {}
resource "azurerm_key_vault" "ssh_keys" {
name = "ssh-keys"
location = azurerm_resource_group.network.location
resource_group_name = azurerm_resource_group.network.name
sku_name = "standard"
tenant_id = data.azurerm_client_config.current.tenant_id
}
resource "azurerm_key_vault_secret" "id_rsa" {
name = "ssh-private-key"
value = file("~/.ssh/id_rsa")
key_vault_id = azurerm_key_vault.ssh_keys.id
}
At the moment, there is no way to leverage Azure Bastion from outside the Azure
Portal. You cannot augment your SSH configuration to perform tunneling via the
bastion host. To achieve this, you can configure temporary virtual machines to act as
bastions for tunneling purposes, or look at leveraging Azure Virtual Desktops to get
your local tools hosted seamlessly in Azure.
Summary
Let’s summarize what was learned and deployed in this recipe:
• Azure offers Azure Bastion, a fully managed bastion host service.
• It runs in a distinct subnet alongside your virtual network.
•
By using application security groups for controlling traffic, you can make your
firewall identity based.
• As Azure Bastion is agentless, although accessing the bastion host is controlled
via IAM, authentication to the host is with classic methods, such as Lightweight
Directory Access Protocol (LDAP) or SSH keys.
218 | Chapter 5: Secure Networking
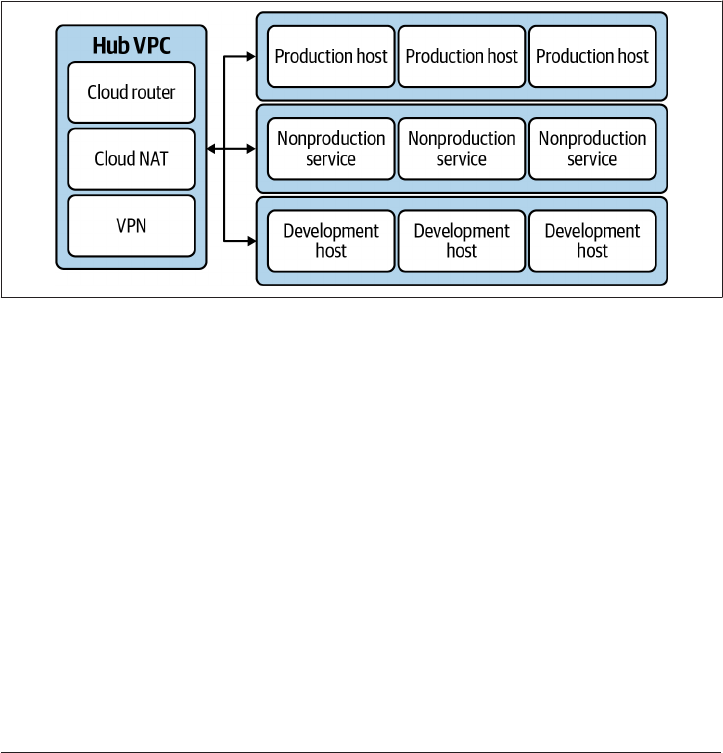
• Rather than rely on SSH keys being locally available, you can store them in Azure
Key Vault; this has numerous security and operational benefits.
5.7 Allowing Access to Internal Resources on GCP
Problem
As your estate has grown, there is now a need to enable traffic to and from disparate
GCP projects in the organization and also to on-premises resources.
Solution
This recipe deploys a Shared VPC, as shown in Figure 5-7, that connects to a central
hub VPC that contains the VPN endpoint for on-premises connectivity.
Figure 5-7. Shared VPC architecture
First, complete Recipe 5.1, and open the working directory.
Add the following variable definition to your variables.tf file:
...
variable "region" {
type = string
description = "The region to deploy the hub subnet into"
}
variable "hub_project" {
type = string
description = "The project ID for the central hub"
}
variable "service_projects" {
type = list(string)
5.7 Allowing Access to Internal Resources on GCP | 219

description = "The projects to have share the VPC"
}
And to your terraform.tfvars file:
...
region = ""
hub_project = ""
service_projects = [""]
Add the following provider definition to provider.tf:
provider "google" {
alias = "hub"
region = var.region
project = var.hub_project
}
Create the following sharing.tf file:
data "google_project" "current" {}
resource "google_compute_shared_vpc_host_project" "host" {
project = data.google_project.current.project_id
depends_on = [
google_project_service.compute_api
]
}
resource "google_compute_shared_vpc_service_project" "service" {
for_each = toset(var.service_projects)
host_project = google_compute_shared_vpc_host_project.host.project
service_project = each.value
}
Create the following hub.tf file and run terraform plan:
resource "google_project_service" "hub_compute_api" {
provider = google.hub
service = "compute.googleapis.com"
disable_on_destroy = false
}
resource "google_compute_network" "hub" {
provider = google.hub
name = "network"
auto_create_subnetworks = false
delete_default_routes_on_create = true
depends_on = [
google_project_service.hub_compute_api,
]
}
220 | Chapter 5: Secure Networking

resource "google_compute_subnetwork" "hub_subnet" {
provider = google.hub
name = var.region
ip_cidr_range = "10.0.255.0/24"
network = google_compute_network.hub.id
}
resource "google_compute_router" "hub_router" {
provider = google.hub
name = "router"
network = google_compute_network.hub.id
}
resource "google_compute_router_nat" "hub_nat" {
provider = google.hub
name = "nat"
router = google_compute_router.hub_router.name
nat_ip_allocate_option = "AUTO_ONLY"
source_subnetwork_ip_ranges_to_nat = "ALL_SUBNETWORKS_ALL_IP_RANGES"
}
resource "google_compute_firewall" "hub_ingress_deny" {
provider = google.hub
name = "default-ingress-deny"
network = google_compute_network.hub.name
direction = "INGRESS"
priority = 65533
deny {
protocol = "all"
}
}
resource "google_compute_firewall" "hub_egress_deny" {
provider = google.hub
name = "default-egress-deny"
network = google_compute_network.hub.name
direction = "EGRESS"
priority = 65533
deny {
protocol = "all"
}
}
resource "google_compute_network_peering" "hub_to_base" {
name = "hub-to-base"
network = google_compute_network.this.id
peer_network = google_compute_network.hub.id
}
resource "google_compute_network_peering" "base_to_hub" {
name = "base-to-hub"
network = google_compute_network.hub.id
5.7 Allowing Access to Internal Resources on GCP | 221

peer_network = google_compute_network.this.id
}
resource "google_compute_ha_vpn_gateway" "on-premises" {
provider = google.hub
name = "on-premises"
network = google_compute_network.hub.id
}
Review the resources that are going to be created, and then run terraform apply to
make the changes.
Discussion
This recipe at first glance seems unnecessarily complicated: you created a hub VPC
with resources that could have easily been placed within the Shared VPC. For full-
scale production usage, having only one Shared VPC is not recommended: at least
three will be required depending on your data sensitivity requirements.
You will notice that you added internet routing directly to the
Shared VPC with its own Cloud NAT and Cloud Router. If you are
looking to route all external traffic first through a centrally hosted
network appliance, then by defining a custom route in the hub, all
external traffic will be routed there, and the Cloud NAT and Router
become redundant. In this recipe, there is no centralized appliance,
so GCP will not allow you to route over the peering connection as
there is no value and indeed an increased cost to do so.
The recommended approach on GCP is to have a Shared VPC for production, non‐
production, and development, all peered into the hub, as shown in Figure 5-7. This
allows them to share the centralized connections, such as on premises and routing via
security network appliances. As transitive routing is not supported across peering
connections, you cannot route from between the VPCs via the hub. Environments are
completely segmented and share centralized resources for ease of management and
cost-effectiveness.
VPC Service Controls allow for the definition and enforcement of
fine-grained perimeter controls. If you need extra controls to com‐
bat data exfiltration threats, control multitenant services, or isolate
environments by levels of trust, then VPC Service Controls will
enable you to do that.
When using Shared VPCs, the power to create firewall rules exists only in the host
project. Users in the service projects cannot create their own firewall rules. As such, a
lean and efficient lifecycle should be built around firewall rules to enable users to
222 | Chapter 5: Secure Networking

rapidly develop their application. If the friction of the process becomes too great,
users will be driven to create wider and more permissive rules to avoid the process,
resulting in a worse security posture. In Chapter 6, the recipes show approaches to
enable this rapid feedback.
When using Shared VPCs on Google Cloud, there are three organization policies that
allow you to control the administration of Shared VPCs. The first policy restricts
what projects are allowed to act as Shared VPC hosts. The second policy restricts the
removal of liens from projects by users who do not have the permission at an organi‐
zational level. A lien is a special lock that prevents the project from being deleted. The
last policy restricts a service project to only using certain subnetworks from the
Shared VPC. The following Terraform configures these three policies:
data "google_organization" "current" {
domain = var.organization_domain
}
resource "google_organization_policy" "shared_vpc_projects" {
org_id = data.google_organization.current.org_id
constraint = "constraints/compute.restrictSharedVpcHostProjects"
list_policy {
allow {
values = ["projects/${var.hub_project}"]
}
}
}
resource "google_organization_policy" "shared_vpc_lien_removal" {
org_id = data.google_organization.current.org_id
constraint = "constraints/compute.restrictXpnProjectLienRemoval"
boolean_policy {
enforced = true
}
}
resource "google_organization_policy" "shared_vpc_subnetworks" {
org_id = data.google_organization.current.org_id
constraint = "constraints/compute.restrictSharedVpcSubnetworks"
list_policy {
allow {
values = [
for subnet in google_compute_subnetwork.subnet : subnet.id
]
}
}
}
5.7 Allowing Access to Internal Resources on GCP | 223

In this recipe, you created a VPN gateway to enable connecting on premises. The
recipe was left without all the resources defined, as VPN configuration is highly con‐
textual.
When using highly available VPN configurations, if you configure
Active/Active routing, you will get higher bandwidth, but the
impact of losing an endpoint will be a sudden bandwidth drop of
50%. By using Active/Passive routing, you will get a stable through‐
put after a failover.
If a VPN will not be performant enough either in bandwidth or latency, then GCP
offers two options of Cloud Interconnect. Dedicated Interconnect is a direct physical
connection between your on-premises data center and a Google Cloud location, and
Partner Interconnect is routing via a supported service provider. Dedicated Intercon‐
nect provides higher potential speeds but requires integrating directly into the Google
data center, whereas service providers are available in a much larger number of loca‐
tions. Both offer significantly improved bandwidth options over VPNs: 10 Gbps for
Partner Interconnect and up to 200 Gbps for Dedicated Interconnect.
Summary
Let’s summarize what was learned and deployed in this recipe:
• To provide a scalable networking approach on GCP, you should use Shared
VPCs.
• You should look to create a Shared VPC per environment, i.e., production, non‐
production, and development.
•
With Shared VPCs, firewall rule management is centralized, so care should be
taken to ensure it doesn’t become a bottleneck.
• Shared VPCs should be peered into a hub VPC where you can deploy centralized
networking resources.
• To begin communicating on premises, a VPN provides a lower-cost option.
• You should look to use either Dedicated or Partner Interconnect if
— the VPN bandwidth or latency is insufficient
— you want your traffic to only traverse private networking between on premises
and Google Cloud
224 | Chapter 5: Secure Networking
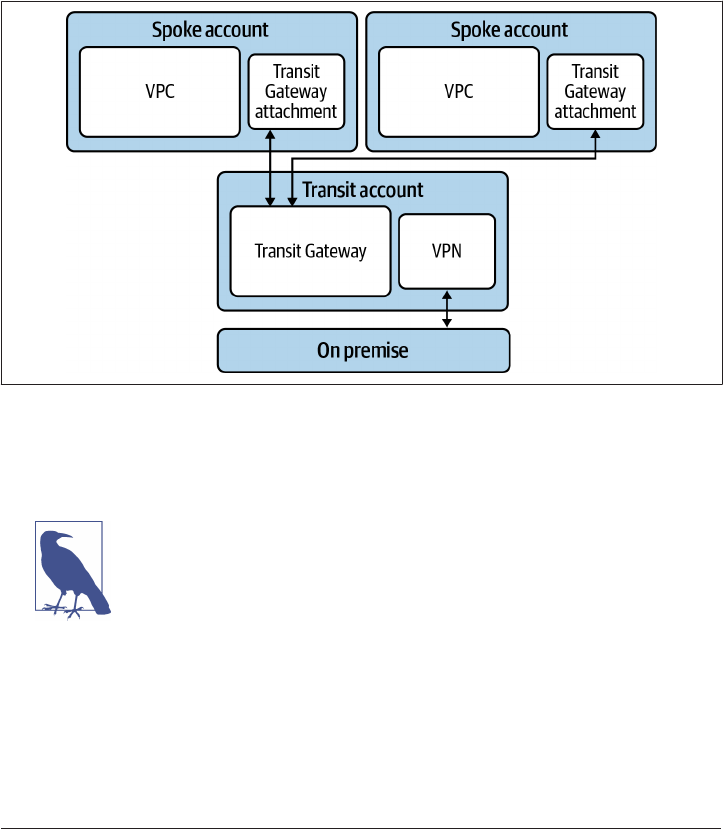
5.8 Allowing Access to Internal Resources on AWS
Problem
As your estate has grown, there is now a need to enable traffic to and from disparate
AWS accounts in the organization and also to on-premises resources.
Solution
This recipe configures an AWS Transit Gateway as a central networking hub and ena‐
bles centralized on-premises connectivity, as shown in Figure 5-8.
Figure 5-8. Transit Gateway architecture
This recipe should be run from the account where you are deploying the Transit
Gateway itself.
The recipe deploys minimal spoke VPCs for illustrative purposes.
This approach would not scale as the number of VPCs grows. The
important aspects are the creation of the route and the
aws_ec2_transit_gateway_vpc_attachment resource.
If you haven’t already done so, familiarize yourself with Terraform and the different
authentication mechanisms in Chapter 11.
Create a variables.tf file and copy the following contents:
variable "spoke1_account_id" {
type = string
5.8 Allowing Access to Internal Resources on AWS | 225

description = "The Account ID of the first spoke account"
}
variable "spoke2_account_id" {
type = string
description = "The Account ID of the second spoke account"
}
variable "cross_account_role" {
type = string
description = "The role that can be assumed in each spoke"
}
variable "vpn_asn" {
type = number
description = "The ASN you wish the VPN to use"
}
variable "vpn_ip_address" {
type = string
description = "The IP address of the on-premises VPN endpoint"
}
Then fill out the corresponding terraform.tfvars file:
spoke1_account_id = ""
spoke2_account_id = ""
cross_account_role = ""
vpn_asn = ""
vpn_ip_address = ""
Create the following provider.tf file and run terraform init:
provider "aws" {
alias = "transit"
}
provider "aws" {
alias = "spoke1"
assume_role {
role_arn = join("", [
"arn:aws:iam::",
var.spoke1_account_id,
":role/",
var.cross_account_role
])
}
}
provider "aws" {
alias = "spoke2"
assume_role {
role_arn = join("", [
226 | Chapter 5: Secure Networking

"arn:aws:iam::",
var.spoke2_account_id,
":role/",
var.cross_account_role
])
}
}
terraform {
required_providers {
aws = {
source = "hashicorp/aws"
version = "~> 3"
}
}
}
Create the following main.tf file:
data "aws_organizations_organization" "current" {}
resource "aws_ec2_transit_gateway" "this" {
provider = aws.transit
}
resource "aws_ram_resource_share" "transit_gateway" {
provider = aws.transit
name = "transit_gateway"
}
resource "aws_ram_resource_association" "transit_gateway" {
provider = aws.transit
resource_arn = aws_ec2_transit_gateway.this.arn
resource_share_arn = aws_ram_resource_share.transit_gateway.arn
}
resource "aws_ram_principal_association" "org_share" {
provider = aws.transit
principal = data.aws_organizations_organization.current.arn
resource_share_arn = aws_ram_resource_share.transit_gateway.arn
}
resource "aws_ec2_transit_gateway_vpc_attachment_accepter" "spoke1" {
provider = aws.transit
transit_gateway_attachment_id = aws_ec2_transit_gateway_vpc_attachment.s1.id
}
resource "aws_ec2_transit_gateway_vpc_attachment_accepter" "spoke2" {
provider = aws.transit
transit_gateway_attachment_id = aws_ec2_transit_gateway_vpc_attachment.s2.id
}
resource "aws_customer_gateway" "this" {
5.8 Allowing Access to Internal Resources on AWS | 227

provider = aws.transit
bgp_asn = var.vpn_asn
ip_address = var.vpn_ip_address
type = "ipsec.1"
}
resource "aws_vpn_connection" "this" {
provider = aws.transit
customer_gateway_id = aws_customer_gateway.this.id
transit_gateway_id = aws_ec2_transit_gateway.this.id
type = aws_customer_gateway.this.type
}
Create the following spoke1.tf file:
resource "aws_vpc" "spoke1" {
provider = aws.spoke1
cidr_block = "10.0.0.0/24"
enable_dns_support = true
enable_dns_hostnames = true
}
resource "aws_subnet" "spoke1_private" {
provider = aws.spoke1
availability_zone = "eu-west-1a"
vpc_id = aws_vpc.spoke1.id
cidr_block = aws_vpc.spoke1.cidr_block
}
resource "aws_default_route_table" "spoke1" {
provider = aws.spoke1
default_route_table_id = aws_vpc.spoke1.default_route_table_id
route {
cidr_block = "10.0.0.0/8"
transit_gateway_id = aws_ec2_transit_gateway.this.id
}
}
resource "aws_ec2_transit_gateway_vpc_attachment" "s1" {
provider = aws.spoke1
subnet_ids = [aws_subnet.spoke1_private.id]
transit_gateway_id = aws_ec2_transit_gateway.this.id
vpc_id = aws_vpc.spoke1.id
depends_on = [
aws_ram_resource_association.transit_gateway,
aws_ram_principal_association.org_share
]
}
Create the following spoke2.tf file and run terraform plan:
228 | Chapter 5: Secure Networking

resource "aws_vpc" "spoke2" {
provider = aws.spoke2
cidr_block = "10.0.1.0/24"
enable_dns_support = true
enable_dns_hostnames = true
}
resource "aws_subnet" "spoke2_private" {
provider = aws.spoke2
availability_zone = "eu-west-1b"
vpc_id = aws_vpc.spoke2.id
cidr_block = aws_vpc.spoke2.cidr_block
}
resource "aws_default_route_table" "spoke2" {
provider = aws.spoke2
default_route_table_id = aws_vpc.spoke2.default_route_table_id
route {
cidr_block = "10.0.0.0/8"
transit_gateway_id = aws_ec2_transit_gateway.this.id
}
}
resource "aws_ec2_transit_gateway_vpc_attachment" "s2" {
provider = aws.spoke2
subnet_ids = [aws_subnet.spoke2_private.id]
transit_gateway_id = aws_ec2_transit_gateway.this.id
vpc_id = aws_vpc.spoke2.id
depends_on = [
aws_ram_resource_association.transit_gateway,
aws_ram_principal_association.org_share
]
}
Review the resources that are going to be created, and then run terraform apply to
make the changes.
Discussion
By centralizing all traffic through Transit Gateway, you unlock a variety of options for
securing your network. East-west routing happens purely at your discretion, as dispa‐
rate accounts have no direct knowledge of each other’s networking; they can talk over
the private network only because the routes exist in the Transit Gateway. Effectively,
all the spoke VPCs know is that the rest of the private network exists over the Transit
Gateway attachment, putting the onus on Transit Gateway to make sure the traffic
ends up in the right place.
5.8 Allowing Access to Internal Resources on AWS | 229

The recipe expects that routes from on premises will be advertised
over Border Gateway Protocol (BGP), but if needed, you can
extend it to explicitly create static routes.
To make the Transit Gateway available across the organization, you used Resource
Access Manager (RAM), which allows the sharing of specific types of resources across
accounts and organizations. You can use this to onboard accounts and VPCs outside
of your organization onto a Transit Gateway located within your organization.
You can also have all traffic, when onboarding to the Transit Gateway, be passed
through a network appliance, such as a firewall, an IDS, or an IPS system. This saves
you the effort of deploying these appliances in multiple locations throughout the
estate. The Gateway Load Balancer service is specifically designed to facilitate this
pattern with third-party network appliances, and AWS Network Firewall is a first-
party offering in this space.
In this example, you provisioned a VPN tunnel to handle traffic destined for on-
premises. Although VPNs are often how people get started with bringing their cloud
and on-premises estates together, at significant scale, AWS Direct Connect is used for
significantly higher bandwidth and a much higher service-level agreement (SLA). It
comes at a cost premium and is not something that can be easily experimented with
as it involves negotiating with third parties and Amazon.
There are other options for allowing VPCs in different AWS accounts to communi‐
cate with each other; the two that are most notable are VPC peering and VPC shar‐
ing. Peering connections build direct networking pathways between VPCs. While
useful in smaller-scale scenarios, they rapidly become unmanageable at scale due to
the sheer number that need provisioning as routing is not transitive, and you lose the
centralized location to apply networking controls. Shared VPCs are a more recent
offering on AWS and can make sense when the application suite is used to fairly open
and permissive networking. However, as your estate matures and becomes cloud
native first, the hub-and-spoke model of Transit Gateway is more scalable and puts
more power in the hands of the delivery teams.
Summary
Let’s summarize what was learned and deployed in this recipe:
• On AWS, to allow on-premises connectivity, use a centralized Transit Gateway.
• The Transit Gateway also operates as a hub allowing traffic between VPCs.
• To connect on premises, you can use either a VPN or Direct Connect.
—
VPNs are simple to configure but have bandwidth and uptime limitations.
230 | Chapter 5: Secure Networking
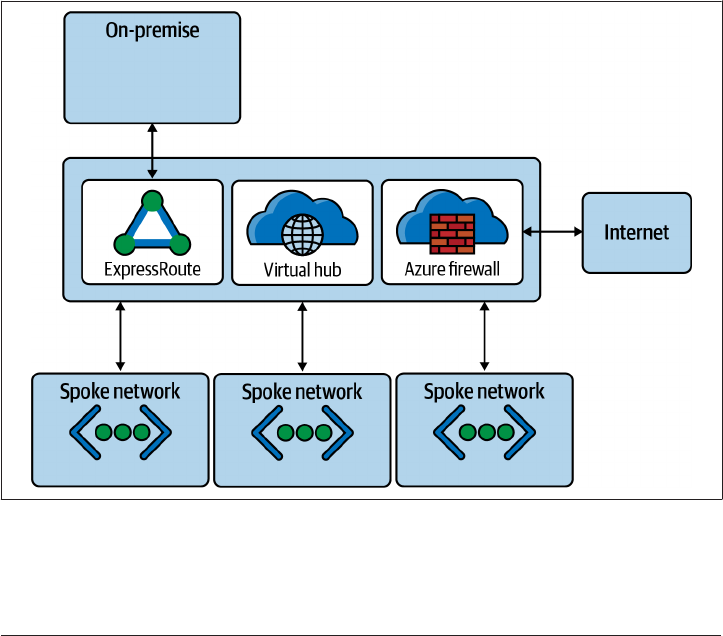
— Direct Connect is more scalable than VPN connections but is significantly
more expensive.
• In the recipe, you created
—
a centralized Transit Gateway with a VPN endpoint
— two VPCs in two spoke accounts that were connected back the Transit
Gateway
5.9 Allowing Access to Internal Resources on Azure
Problem
As your estate has grown, there is now a need to enable traffic to and from disparate
Azure subscriptions in the tenant and also to on-premises resources.
Solution
This recipe deploys a hub-and-spoke network topology, as shown in Figure 5-9, with
an ExpressRoute for on-premises connectivity.
Figure 5-9. Hub-and-spoke architecture
First, complete Recipe 5.3 and open the working directory.
5.9 Allowing Access to Internal Resources on Azure | 231

Add the following variable definition to your variables.tf file:
...
variable "hub_subscription_id" {
type = string
description = "The subscription for the Hub Network"
}
variable "hub_cidr" {
type = string
description = "The CIDR range for the Hub Network"
}
And to your terraform.tfvars file:
...
hub_subscription_id = ""
hub_cidr = ""
Add the following provider definition to provider.tf:
...
provider "azurerm" {
alias = "hub"
subscription_id = var.hub_subscription_id
features {}
}
Create the following hub.tf file and run terraform plan:
resource "azurerm_resource_group" "hub" {
provider = azurerm.hub
name = "hub"
location = var.location
}
resource "azurerm_virtual_wan" "this" {
provider = azurerm.hub
name = "this"
resource_group_name = azurerm_resource_group.hub.name
location = azurerm_resource_group.hub.location
}
resource "azurerm_virtual_hub" "this" {
provider = azurerm.hub
name = "this"
resource_group_name = azurerm_resource_group.hub.name
location = azurerm_resource_group.hub.location
virtual_wan_id = azurerm_virtual_wan.this.id
sku = "Standard"
address_prefix = var.hub_cidr
232 | Chapter 5: Secure Networking

}
resource "azurerm_virtual_hub_connection" "spoke" {
provider = azurerm.hub
name = "spoke"
virtual_hub_id = azurerm_virtual_hub.this.id
remote_virtual_network_id = azurerm_virtual_network.this.id
}
resource "azurerm_express_route_gateway" "this" {
name = "this"
resource_group_name = azurerm_resource_group.hub.name
location = azurerm_resource_group.hub.location
virtual_hub_id = azurerm_virtual_hub.this.id
scale_units = 1
}
resource "azurerm_firewall" "hub" {
name = "hub"
resource_group_name = azurerm_resource_group.hub.name
location = azurerm_resource_group.hub.location
sku_name = "AZFW_Hub"
threat_intel_mode = ""
virtual_hub {
virtual_hub_id = azurerm_virtual_hub.this.id
public_ip_count = 1
}
}
The creation of the ExpressRoute gateway can take significant time
to provision; 20 minutes is not unusual. Do not be worried if Terra‐
form seems to be taking a while to create these resources.
Review the resources that are going to be created, and then run terraform apply to
make the changes.
Discussion
Through the configuration of the Virtual Hub, you bring together a centralized point
to manage your network security posture at scale. With the Border Gateway Protocol
(BGP) propagating routes throughout your infrastructure, you can have a robust,
highly resilient network topology that moves with you. With the transitive routing,
you now have the ability to facilitate east-west traffic across your tenant. Speaking of
routing, let’s look at a few common patterns and how you can implement them.
5.9 Allowing Access to Internal Resources on Azure | 233

This recipe configures the ExpressRoute gateway but not the
ExpressRoute circuits. This is to maintain some brevity, especially
as the configuration of ExpressRoutes can be highly contextual.
You can also utilize VPN Gateways if ExpressRoute is too expen‐
sive or over-engineering. This trade-off is covered in more depth in
the following discussion.
First, let’s look at the concept of isolated virtual networks. Often you will be hosting
sensitive workloads, and need to manage data exfiltration risks. In that case, you need
the ability to lock down particular virtual networks, from both ingress and egress per‐
spectives. When creating Virtual Hub connections, it is possible to assign custom
route tables to the connection to ensure that once traffic is onboarded onto the hub, it
is treated appropriately.
The way to design your Virtual Hub routing is to draw up a table containing the dif‐
ferent connections and create a route table for each row in the table. This is easiest
shown with an example, as in Table 5-2. Let’s assume you have a virtual network that
needs to communicate on premises but should not be accessible from anywhere
within your Azure tenancy; you also have shared service VNets that should be acces‐
sible from everywhere. Connections such as ExpressRoute and VPNs are known as
branches on Azure, to distinguish them from VNets.
Table 5-2. Isolated virtual network connection table
From To Standard VNets Shared VNets Branches
Standard VNet Direct Direct
Shared VNet Direct Direct Direct
Branches Direct Direct Direct
What you can see from the table is that branches and Shared VNets are treated the
same, whereas standard VNets have a different connection profile. This shows that
you will need two route tables to implement the required routing. Let’s look at the
Terraform that would allow you to configure this. Note that this only uses the connec
tion resources and doesn’t include a full ExpressRoute configuration. You will also
see that this does not leverage the default route table that is provisioned with the hub.
The default routes configured in most cases do not cater to the principle of least priv‐
ilege and are instead focused on getting traffic flowing as soon as possible:
resource "azurerm_virtual_network" "isolated" {
name = "isolated"
address_space = ["10.2.0.0/24"]
location = azurerm_resource_group.network.location
resource_group_name = azurerm_resource_group.network.name
}
234 | Chapter 5: Secure Networking

resource "azurerm_virtual_network" "shared" {
name = "shared"
address_space = ["10.3.0.0/24"]
location = azurerm_resource_group.network.location
resource_group_name = azurerm_resource_group.network.name
}
resource "azurerm_virtual_hub_route_table" "isolation" {
provider = azurerm.hub
name = "isolation"
virtual_hub_id = azurerm_virtual_hub.this.id
}
resource "azurerm_virtual_hub_route_table" "shared" {
provider = azurerm.hub
name = "shared"
virtual_hub_id = azurerm_virtual_hub.this.id
}
resource "azurerm_virtual_hub_connection" "isolated" {
provider = azurerm.hub
name = "isolated"
virtual_hub_id = azurerm_virtual_hub.this.id
remote_virtual_network_id = azurerm_virtual_network.isolated.id
routing {
associated_route_table_id = azurerm_virtual_hub_route_table.isolation.id
propagated_route_table {
route_table_ids = [
azurerm_virtual_hub_route_table.shared.id
]
}
}
}
resource "azurerm_virtual_hub_connection" "shared" {
provider = azurerm.hub
name = "shared"
virtual_hub_id = azurerm_virtual_hub.this.id
remote_virtual_network_id = azurerm_virtual_network.shared.id
routing {
associated_route_table_id = azurerm_virtual_hub_route_table.shared.id
propagated_route_table {
route_table_ids = [
azurerm_virtual_hub_route_table.isolation.id,
azurerm_virtual_hub_route_table.shared.id
]
}
}
5.9 Allowing Access to Internal Resources on Azure | 235

}
resource "azurerm_express_route_connection" "this" {
name = "this"
express_route_gateway_id = azurerm_express_route_gateway.this.id
express_route_circuit_peering_id = azurerm_express_route_circuit_peering.t.id
routing {
associated_route_table_id = azurerm_virtual_hub_route_table.shared.id
propagated_route_table {
route_table_ids = [
azurerm_virtual_hub_route_table.isolation.id,
azurerm_virtual_hub_route_table.shared.id
]
}
}
}
Summary
Let’s summarize what was learned and deployed in this recipe:
• By using an Azure Virtual Hub, you can create a hub-and-spoke networking
topology.
•
With a central location to provision shared networking resources, you can more
readily manage and scale your networking infrastructure.
• To connect with on-premises resources, you can use VPNs or ExpressRoutes.
— VPNs are lower cost, with lower bandwidth.
— ExpressRoutes allow for low-latency, ultra-high bandwidth but at a significant
ongoing cost.
— Generally, start with VPNs and upgrade to ExpressRoute when required.
• By mindfully planning out your transit connectivity requirements, you can
implement any number of different routing patterns.
• You saw an example of creating the resources required for isolated and shared
virtual networks.
5.10 Controlling External Network Connectivity on GCP
Problem
Delivery teams are asking for secure patterns to expose applications to the internet.
236 | Chapter 5: Secure Networking
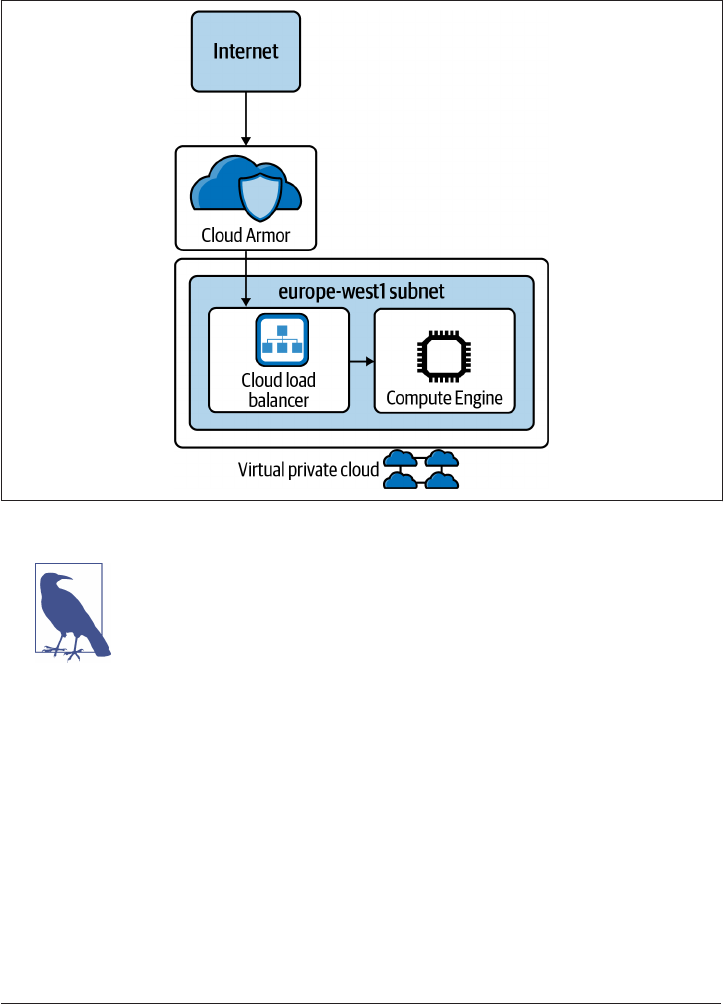
Solution
This recipe deploys the architecture shown in Figure 5-10, an NGINX container
exposed to the internet over HTTPS.
Figure 5-10. Public applications on GCP
This recipe requires a public DNS zone on GCP to be available to
create the DNS record and provision the SSL certificate.
First, complete Recipe 5.1 and open the working directory.
Add the following variable definition to your variables.tf file:
...
variable "application_region" {
type = string
description = "The region to deploy the application"
}
variable "application_zone" {
type = string
description = "The zone to deploy into, e.g., a, b or c"
5.10 Controlling External Network Connectivity on GCP | 237

}
variable "hosted_zone_domain" {
type = string
description = "The name of your hosted zone resource"
}
variable "dns_record" {
type = string
description = "The DNS record for your application"
}
And to your terraform.tfvars file:
...
application_region = ""
application_zone = ""
hosted_zone_domain = ""
dns_record = ""
Create the following application.tf file and run terraform plan:
data "google_dns_managed_zone" "target" {
name = var.hosted_zone_domain
}
resource "google_dns_record_set" "set" {
name = var.dns_record
type = "A"
ttl = 3600
managed_zone = data.google_dns_managed_zone.target.name
rrdatas = [
google_compute_global_forwarding_rule.default.ip_address
]
}
resource "google_compute_managed_ssl_certificate" "prod" {
name = "production"
managed {
domains = [
var.dns_record
]
}
}
resource "google_compute_global_forwarding_rule" "default" {
name = "global-rule"
target = google_compute_target_https_proxy.nginx.id
port_range = "443"
}
resource "google_compute_target_https_proxy" "nginx" {
238 | Chapter 5: Secure Networking

name = "nginx"
url_map = google_compute_url_map.nginx.id
ssl_certificates = [
google_compute_managed_ssl_certificate.prod.id
]
}
resource "google_compute_url_map" "nginx" {
name = "url-map-target-proxy"
description = "a description"
default_service = google_compute_backend_service.nginx.id
host_rule {
hosts = [var.dns_record]
path_matcher = "allpaths"
}
path_matcher {
name = "allpaths"
default_service = google_compute_backend_service.nginx.id
path_rule {
paths = ["/*"]
service = google_compute_backend_service.nginx.id
}
}
}
resource "google_service_account" "nginx" {
account_id = "nginx-workers"
display_name = "nginx-workers"
}
resource "google_compute_backend_service" "nginx" {
name = "backend"
port_name = "http"
protocol = "HTTP"
timeout_sec = 10
backend {
group = google_compute_instance_group.nginx.id
}
health_checks = [google_compute_http_health_check.nginx.id]
}
resource "google_compute_http_health_check" "nginx" {
name = "check-backend"
request_path = "/"
check_interval_sec = 1
timeout_sec = 1
}
5.10 Controlling External Network Connectivity on GCP | 239

resource "google_compute_instance_group" "nginx" {
name = "nginx"
instances = [
google_compute_instance.nginx.id,
]
named_port {
name = "http"
port = "80"
}
zone = "europe-west1-b"
}
resource "google_compute_firewall" "http-ingress" {
name = "http-ingress"
network = google_compute_network.this.name
direction = "INGRESS"
priority = 1000
allow {
protocol = "TCP"
ports = ["80"]
}
source_ranges = [
"130.211.0.0/22",
"35.191.0.0/16"
]
target_service_accounts = [
google_service_account.nginx.email
]
}
resource "google_compute_firewall" "internet_egress" {
name = "allow-internet-egress"
network = google_compute_network.this.name
direction = "EGRESS"
priority = 1000
allow {
protocol = "all"
}
target_service_accounts = [
google_service_account.nginx.email
]
}
resource "google_compute_instance" "nginx" {
name = "nginx"
240 | Chapter 5: Secure Networking

machine_type = "f1-micro"
zone = join("-", [
var.application_region,
var.application_zone
])
allow_stopping_for_update = true
boot_disk {
initialize_params {
image = "cos-cloud/cos-stable-89-16108-470-25"
}
}
metadata_startup_script = "docker run -p 80:80 nginx"
network_interface {
subnetwork = google_compute_subnetwork.subnet[var.application_region].name
}
service_account {
email = google_service_account.nginx.email
scopes = ["cloud-platform"]
}
}
Review the resources that are going to be created, and then run terraform apply to
make the changes.
The google_compute_managed_ssl_certificate resource will
return once Google accepts the request to vend the certificate. But
the certificate can take up to 24 hours to provision. If you try and
browse to the application before this has finished, you will get
errors such as SSL_ERROR_NO_CYPHER_OVERLAP.
Discussion
This recipe created an architecture that does SSL offloading, which would normally
mean that traffic behind the load balancer is unencrypted. On GCP, depending on the
load balancer chosen, Google provides automatic network-level encryption, which
encrypts your data in transit within the VPC.
Currently, automatic network-level encryption is enabled for
• global external HTTP(S) load balancers
• TCP proxy load balancers
•
SSL proxy load balancers
5.10 Controlling External Network Connectivity on GCP | 241

It is not enabled for
• regional external HTTP(S) load balancers
• internal HTTP(S) load balancers
• Traffic Director
To handle other types of traffic, you will need to replace the google_compute_tar
get_https_proxy resource. If you are looking to handle non-HTTP TCP traffic with
SSL offloading, use the google_compute_target_ssl_proxy resource. If you do not
wish to SSL offload, use the google_compute_target_tcp_proxy resource.
Having properly managed SSL certificates is only one piece of the puzzle for keeping
your applications safe and secure. For protecting from DDoS attacks and adding a
web application firewall (WAF), Google provides the Cloud Armor service. It comes
in two flavors: Standard and Managed Protection Plus. Standard, as the name implies,
comes built-in to your Google environment and is automatically enabled for work‐
loads. After completing this recipe, the google_compute_backend_service resource
is already covered. With this you get preconfigured WAF rules that are targeted pre‐
dominantly against the OWASP top 10, such as SQL injection, cross-site scripting,
and remote code execution.
With Managed Protection Plus, you can get support from Google during DDoS
attacks and additionally enable Adaptive Protection. Adaptive Protection automati‐
cally builds custom machine learning models for each of your applications, allowing
each to understand the difference between normal and anomalous traffic. It then uses
the traffic signatures to generate WAF rules to automatically block the traffic. As
Cloud Armor acts at the network edge, before traffic hits the load balancer, it reduces
the traffic volume in your VPCs and your resource usage.
A common pattern on public clouds is to configure a static site using object storage.
In this case, you will need to update the recipe, replacing the google_compute_back
end_service, and the references to it, with a google_compute_backend_bucket
resource. Following is an example of setting up the required resources for the Cloud
Storage bucket:
resource "google_compute_backend_bucket" "static" {
name = "${var.project}-static"
bucket_name = google_storage_bucket.static_site.name
enable_cdn = true
}
resource "google_storage_bucket" "static_site" {
name = "${var.project}-static"
location = var.application_region
}
242 | Chapter 5: Secure Networking

Summary
Let’s summarize what was learned and deployed in this recipe:
•
On GCP, the most common entry pathway for external traffic is via a load
balancer.
• Load balancers come in a variety of types:
—
HTTP(s) for web traffic
— SSL for TCP traffic that needs SSL offloading
— TCP for TCP traffic that does not need SSL offloading
•
You created a simple load-balanced application hosting NGINX served over
HTTPS.
• Cloud Armor is DDoS protection and a WAF rolled into one.
— Cloud Armor is automatically enabled across your estate but comes with a
more expensive version, Managed Protection Plus.
—
Managed Protection Plus unlocks Google support for DDoS attacks and
Adaptive Protection, where custom machine learning models protect your
application.
• To host static sites on GCP, you can use Cloud Storage, but it needs to be routed
through a load balancer to serve it over HTTPS.
5.11 Controlling External Network Connectivity on AWS
Problem
Delivery teams are asking for secure patterns to expose applications to the internet.
Solution
This recipe deploys the architecture shown in Figure 5-11. An NGINX container is
exposed to the internet over HTTPS.
5.11 Controlling External Network Connectivity on AWS | 243
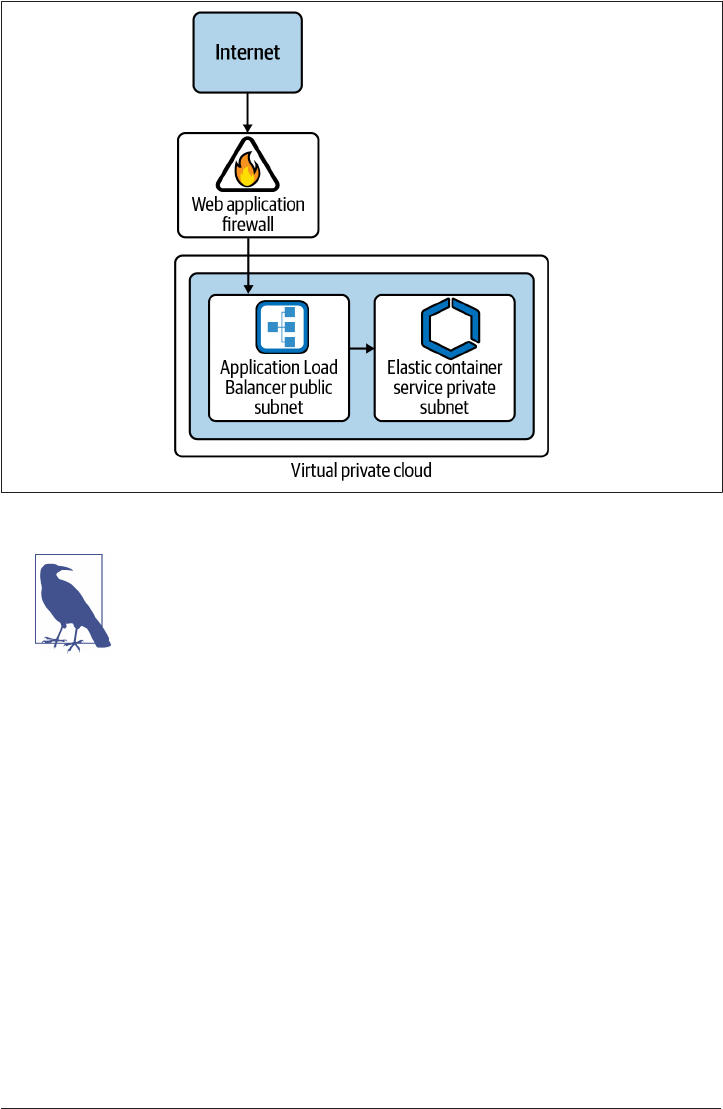
Figure 5-11. Public applications on AWS
This recipe requires a public Route53-hosted zone in the account
to be available to create the DNS record and provision the SSL cer‐
tificate.
First, complete Recipe 5.2 and open the working directory.
Add the following variable definition to your variables.tf file:
...
variable "hosted_zone_domain" {
type = string
description = "The name of your hosted zone domain"
}
And to your terraform.tfvars file:
...
hosted_zone_domain = ""
Create the following ecs.tf file:
resource "aws_ecs_cluster" "this" {
name = "load_balanced_cluster"
244 | Chapter 5: Secure Networking

}
resource "aws_ecs_service" "this" {
name = "application"
cluster = aws_ecs_cluster.this.id
task_definition = aws_ecs_task_definition.this.arn
desired_count = 1
launch_type = "FARGATE"
load_balancer {
target_group_arn = aws_lb_target_group.application.arn
container_name = "nginx"
container_port = 80
}
network_configuration {
subnets = [for subnet in aws_subnet.private : subnet.id]
security_groups = [aws_security_group.application.id]
}
}
resource "aws_security_group" "application" {
name = "ecs-task-sg"
vpc_id = aws_vpc.this.id
}
resource "aws_security_group_rule" "alb_ingress" {
type = "ingress"
from_port = 80
to_port = 80
protocol = "tcp"
source_security_group_id = aws_security_group.alb.id
security_group_id = aws_security_group.application.id
}
resource "aws_security_group_rule" "application_public_egress" {
type = "egress"
from_port = 0
to_port = 0
protocol = "-1"
cidr_blocks = ["0.0.0.0/0"]
security_group_id = aws_security_group.application.id
}
resource "aws_ecs_task_definition" "this" {
family = "service"
cpu = "256"
memory = "512"
container_definitions = jsonencode([
{
name = "nginx"
image = "nginx"
5.11 Controlling External Network Connectivity on AWS | 245

essential = true
portMappings = [
{
containerPort = 80
hostPort = 80
}
]
}
])
network_mode = "awsvpc"
requires_compatibilities = ["FARGATE"]
}
Create the following alb.tf file and run terraform plan:
resource "aws_lb" "application" {
name = "application-load-balanced-ecs"
internal = false
load_balancer_type = "application"
security_groups = [aws_security_group.alb.id]
subnets = [for subnet in aws_subnet.public : subnet.id]
}
resource "aws_lb_listener" "application" {
load_balancer_arn = aws_lb.application.arn
port = "443"
protocol = "HTTPS"
ssl_policy = "ELBSecurityPolicy-2016-08"
certificate_arn = aws_acm_certificate.nginx.arn
default_action {
type = "forward"
target_group_arn = aws_lb_target_group.application.arn
}
}
resource "aws_security_group" "alb" {
vpc_id = aws_vpc.this.id
}
resource "aws_security_group_rule" "public_ingress" {
type = "ingress"
from_port = 443
to_port = 443
protocol = "tcp"
cidr_blocks = ["0.0.0.0/0"]
security_group_id = aws_security_group.alb.id
}
resource "aws_security_group_rule" "alb_to_ecs" {
type = "egress"
from_port = 80
to_port = 80
246 | Chapter 5: Secure Networking

protocol = "tcp"
source_security_group_id = aws_security_group.application.id
security_group_id = aws_security_group.alb.id
}
resource "aws_lb_target_group" "application" {
port = 80
protocol = "HTTP"
target_type = "ip"
vpc_id = aws_vpc.this.id
}
resource "aws_route53_record" "application" {
name = "application.${var.hosted_zone_domain}"
type = "A"
zone_id = data.aws_route53_zone.this.zone_id
alias {
name = aws_lb.application.dns_name
zone_id = aws_lb.application.zone_id
evaluate_target_health = true
}
}
data "aws_route53_zone" "this" {
name = var.hosted_zone_domain
}
resource "aws_acm_certificate" "nginx" {
domain_name = "*.${var.hosted_zone_domain}"
validation_method = "DNS"
lifecycle {
create_before_destroy = true
}
}
resource "aws_route53_record" "certificate_validation" {
for_each = {
for dvo in aws_acm_certificate.nginx.domain_validation_options :
dvo.domain_name => {
name = dvo.resource_record_name
record = dvo.resource_record_value
type = dvo.resource_record_type
}
}
allow_overwrite = true
name = each.value.name
records = [each.value.record]
ttl = 60
type = each.value.type
5.11 Controlling External Network Connectivity on AWS | 247

zone_id = data.aws_route53_zone.this.zone_id
}
resource "aws_wafv2_web_acl" "firewall" {
name = "load-balancer-firewall"
scope = "REGIONAL"
default_action {
allow {}
}
rule {
name = "AWSManagedRulesCommonRuleSet"
priority = 1
override_action {
count {}
}
statement {
managed_rule_group_statement {
name = "AWSManagedRulesCommonRuleSet"
vendor_name = "AWS"
}
}
visibility_config {
cloudwatch_metrics_enabled = false
metric_name = "AWSManagedRulesAdminProtectionRuleSet"
sampled_requests_enabled = false
}
}
visibility_config {
cloudwatch_metrics_enabled = false
metric_name = "base-firewall"
sampled_requests_enabled = false
}
}
resource "aws_wafv2_web_acl_association" "load_balancer" {
resource_arn = aws_lb.application.arn
web_acl_arn = aws_wafv2_web_acl.firewall.arn
}
output "alb_url" {
value = "https://${aws_route53_record.application.name}"
}
Review the resources that are going to be created, and then run terraform apply to
make the changes.
248 | Chapter 5: Secure Networking

Discussion
Once Terraform has successfully created the resources, you should be able to browse
to the URL in the alb_url output and see the NGINX default home page.
This recipe focused on application load balancers with TLS offloading, as they are the
most common load balancer type used for applications on AWS. Other options for
exposing services to the internet include the following:
• Network load balancers
• CloudFront
• API Gateway
• AppSync
In this section, you will see the Terraform required to stand up both network load
balancers and static sites in S3 fronted by CloudFront. But first, let’s discuss the pur‐
pose and capabilities of Amazon Web Application Firewall (WAF).
What does WAF do?
WAF allows you to use rules to control HTTP and HTTPS traffic before it reaches
your applications. You pick from one of three following behaviors:
• Allow all requests except the ones specified in the rules.
•
Block all requests except the ones specified in the rules.
• Count the requests that match your specification.
By using WAF, you protect your applications from a variety of web-based threats and
filter based on information such as the following:
• The IP addresses the traffic originated from
• The country the traffic originated from
• Request headers
• Filter based on string matching and regexes
•
The length of requests
• The presence of SQL statements indicating potential SQL injection attacks
• The presence of potential cross-site scripting attacks
For constructing the rule groups that are applied to your WAF, you can consume
groups managed by AWS and groups from the AWS marketplace, and you can create
your own as required.
5.11 Controlling External Network Connectivity on AWS | 249

Network Load Balancer
If you’re handling traffic that is not HTTP based, or you are operating at a scale
beyond what an Application Load Balancer (ALB) can provide, then Network Load
Balancer (NLB) might just be the tool you need. Additionally, to maintain encryption
through to your application servers, for example, you need the traffic to stay at
HTTPS until it hits your application; then you will need to use an NLB, not an ALB.
Following is the Terraform required to stand up an NLB that does TLS offloading.
You would need to modify the ECS service to use its target group in the load balancer
configuration:
resource "aws_lb" "nlb" {
name = "network-load-balanced-ecs"
internal = false
load_balancer_type = "network"
subnets = [for subnet in aws_subnet.public : subnet.id]
}
resource "aws_lb_listener" "nlb" {
load_balancer_arn = aws_lb.nlb.arn
port = "80"
protocol = "TCP"
default_action {
type = "forward"
target_group_arn = aws_lb_target_group.network.arn
}
}
resource "aws_lb_target_group" "network" {
port = 80
protocol = "TCP"
target_type = "ip"
vpc_id = aws_vpc.this.id
}
output "nlb_url" {
value = "http://${aws_lb.nlb.dns_name}"
}
Static sites on AWS
One of the most commonly misconfigured resources in an AWS estate is an S3
bucket. You’re going to see now how to host a static site in an S3 bucket securely,
using CloudFront to expose it to the internet, and protect it with WAF. Although you
can host a site directly from S3, this is less secure and more expensive, and it makes it
harder to determine accidental from intentional public buckets.
250 | Chapter 5: Secure Networking

To allow CloudFront to access the files in your S3 buckets, it uses
an IAM concept unique to CloudFront, an origin access identity.
By giving that explicit access to the files in your bucket through a
bucket policy, you can retain secure buckets while still retaining the
ability to serve static sites from them.
For a fully worked example of hosting a static site on S3, refer to the companion Git‐
Hub repository.
Summary
Let’s summarize what was learned and deployed in this recipe:
•
On AWS, there are many ways of enabling external connectivity to applications
in your estate.
• You learned how to deploy load balanced applications, using a simple NGINX
container.
— You saw the differences between Application Load Balancers (ALBs) and Net‐
work Load Balancers (NLBs).
— ALBs operate at Layer 7 and are for HTTP/HTTPS-based traffic.
— NLBs operate at Layer 4 and are for all traffic types.
—
You then saw how to do TLS offloading at the load balancers to ensure only
secure traffic is allowed.
• Next, you deployed a static site fronted by a Content Delivery Network (CDN),
i.e., CloudFront.
• By using Web Application Firewall, you can protect your applications from com‐
mon threats.
5.12 Controlling External Network Connectivity on Azure
Problem
Delivery teams are asking for secure patterns to expose applications to the internet.
Solution
This recipe deploys the architecture shown in Figure 5-12.
5.12 Controlling External Network Connectivity on Azure | 251
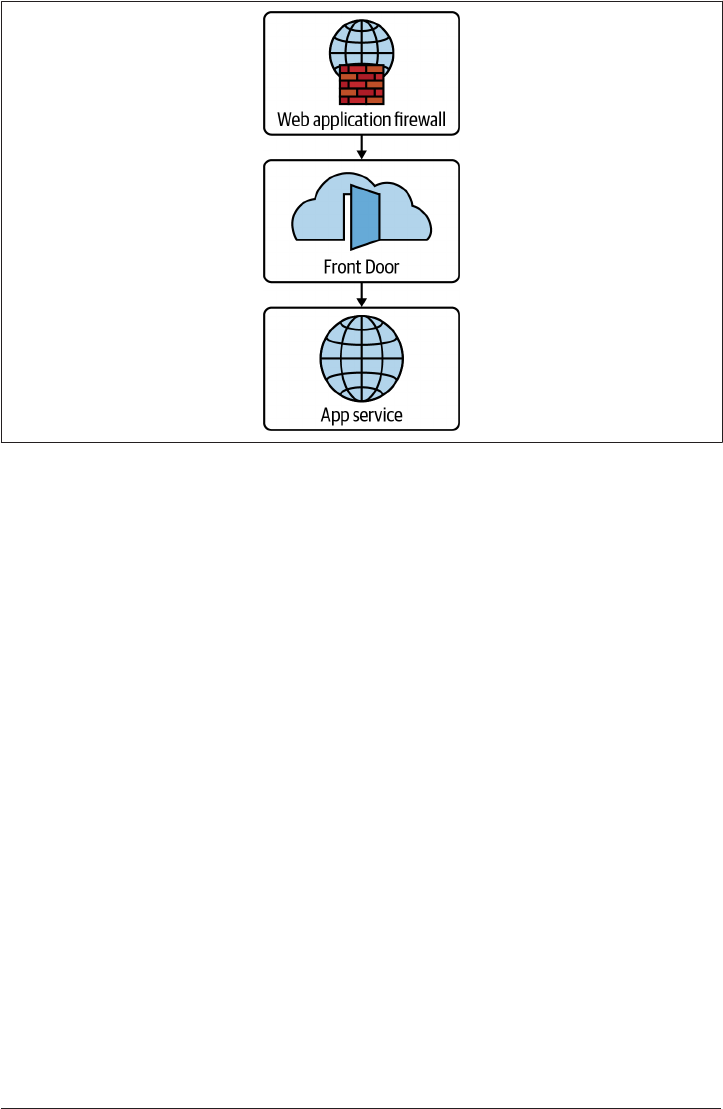
Figure 5-12. Public applications with Azure Front Door
If you haven’t already done so, familiarize yourself with Terraform and the different
authentication mechanisms in Chapter 11.
Create a variables.tf file and copy the following contents:
variable "location" {
type = string
description = "The Azure location for resources"
}
variable "application_name" {
type = string
description = "The application name to use as part of the url"
}
Then fill out the corresponding terraform.tfvars file:
location = ""
application_name = ""
Create the following provider.tf file and run terraform init:
terraform {
required_providers {
azurerm = {
source = "hashicorp/azurerm"
version = "~> 2"
}
}
252 | Chapter 5: Secure Networking

}
provider "azurerm" {
features {}
}
Create the following main.tf file and run terraform plan:
data "azurerm_subscription" "current" {}
resource "azurerm_resource_group" "a" {
name = "application"
location = var.location
}
locals {
application_url = join("-", [
"application",
data.azurerm_subscription.current.subscription_id
])
}
resource "azurerm_frontdoor" "application" {
name = var.application_name
friendly_name = var.application_name
resource_group_name = azurerm_resource_group.a.name
enforce_backend_pools_certificate_name_check = false
backend_pool {
name = "backend"
backend {
host_header = "${local.application_url}.azurewebsites.net"
address = "${local.application_url}.azurewebsites.net"
http_port = 80
https_port = 443
}
load_balancing_name = "application"
health_probe_name = "application"
}
routing_rule {
name = "default"
accepted_protocols = ["Https"]
patterns_to_match = ["/*"]
frontend_endpoints = ["frontend"]
forwarding_configuration {
forwarding_protocol = "HttpsOnly"
backend_pool_name = "backend"
}
}
frontend_endpoint {
5.12 Controlling External Network Connectivity on Azure | 253

name = "frontend"
host_name = "${var.application_name}.azurefd.net"
}
backend_pool_health_probe {
name = "application"
}
backend_pool_load_balancing {
name = "application"
}
}
resource "azurerm_app_service_plan" "application" {
name = "application-service-plan"
location = azurerm_resource_group.a.location
resource_group_name = azurerm_resource_group.a.name
kind = "Linux"
reserved = true
sku {
tier = "Standard"
size = "S1"
}
}
resource "azurerm_app_service" "application" {
name = local.application_url
https_only = true
site_config {
linux_fx_version = "DOCKER|appsvcsample/static-site:latest"
always_on = true
ip_restriction {
service_tag = "AzureFrontDoor.Backend"
headers {
x_azure_fdid = [
azurerm_frontdoor.application.header_frontdoor_id
]
}
}
}
location = azurerm_resource_group.a.location
resource_group_name = azurerm_resource_group.a.name
app_service_plan_id = azurerm_app_service_plan.application.id
}
resource "azurerm_frontdoor_firewall_policy" "application" {
name = "application"
254 | Chapter 5: Secure Networking

resource_group_name = azurerm_resource_group.a.name
enabled = true
mode = "Prevention"
managed_rule {
type = "DefaultRuleSet"
version = "1.0"
}
}
output "application_url" {
value = "https://${var.application_name}.azurefd.net"
}
Review the resources that are going to be created, and then run terraform apply to
make the changes.
Discussion
This recipe configured Azure Front Door as a CDN and WAF to globally distribute
and protect your application.
In this recipe, with the web application firewall, you configured a base Azure-
provided rule set. It is worth evaluating the full suite of Azure-provided rules to
understand how you can protect your applications before you embark on a journey of
building your own custom rules. At a high level, Azure default rules target the follow‐
ing list of threat vectors, modeled closely around the OWASP Top 10:
• Cross-site scripting
• Java attacks
•
Local file inclusion
• PHP injection attacks
• Remote command execution
•
Remote file inclusion
• Session fixation
• SQL injection protection
• Protocol attackers
Custom rules are evaluated before any default rules, and if they determine the traffic
is legitimate, the traffic is sent on without being appraised by any other rules, custom
or default.
The firewall can be configured in either prevention or detection mode. When intro‐
ducing new rules, by first enabling them in detection mode, you can assess what the
impact of the rule will be: are you going to be incidentally preventing legitimate
5.12 Controlling External Network Connectivity on Azure | 255
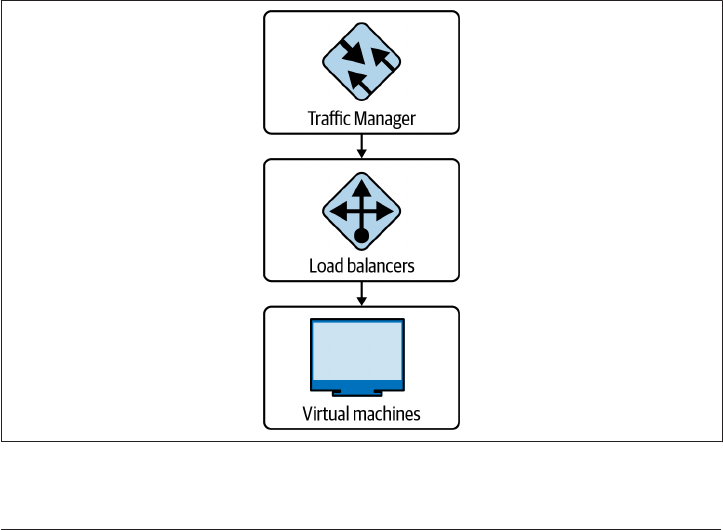
traffic? Rules also possess an exception facility, allowing you to craft omission rules to
allow known legitimate traffic to circumnavigate troublesome rules.
Additionally, when looking at OWASP rules, traditionally they operated on a basis
where any rule failure meant the traffic was blocked. More modern configurations
operate in an anomaly score mode, where depending on the criticality of the rule,
ranging from critical to notice, traffic is scored, and that score determines whether
traffic is allowed or blocked. The traditional mode is simpler to reason about but
lacks the fidelity to enable more nuanced traffic management, often being overly
aggressive and blocking legitimate traffic.
In this recipe, although the App Service itself exposes a public URL, through the
usage of service tag and header filtering, you will notice that if you browse to the URL
directly you are rejected, whereas accessing through Front Door works as expected. It
is critical that the only access path that functions properly is the path that contains
your firewall rules, so they cannot be circumnavigated. As Azure Front Door is a
globally shared service, only through the combination of a service tag, which restricts
to traffic originating from the known Front Door address space, and the
x_azure_fdid header, which uniquely identifies your personal Front Door instance,
can you be sure that only legitimate traffic reaches your App Service.
To handle external non-HTTP traffic and still retain the global load balancing features of
Front Door, use a combination of Azure Traffic Manager and Azure Load Balancers. You
can see in Figure 5-13 that the traffic flow is similar to Figure 5-12.
Figure 5-13. Globally load balanced TCP applications with Azure Trac Manager
256 | Chapter 5: Secure Networking
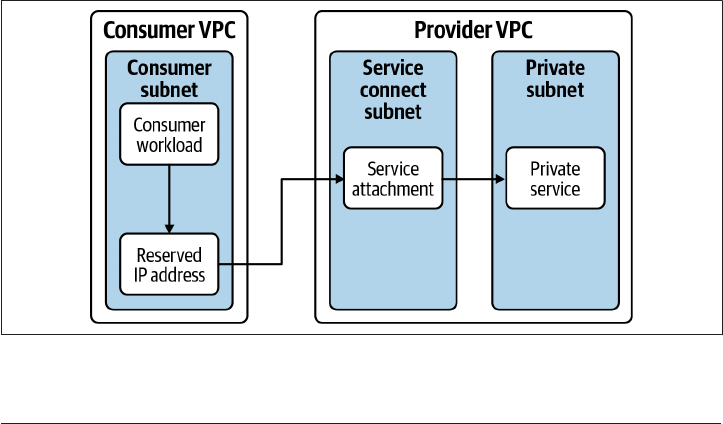
Summary
Let’s summarize what was learned and deployed in this recipe:
•
Azure Front Door handles global HTTP load balancing for your applications.
• Azure Front Door also provides built-in WAF services:
— Azure provides a variety of WAF rules, predominantly focused on the OWASP
top 10.
— You are able to design and implement custom rules for your applications.
• Additionally, Azure Front Door acts as a CDN, globally caching your website
content.
• By using IP and header filtering on your App Services, you can ensure that Front
Door cannot be circumnavigated.
• To handle non-HTTP traffic, you can build a similar architecture using Traffic
Manager and load balancers.
5.13 Private Application Access on GCP
Problem
You have an internal application you wish to make available directly to GCP projects
in your organization without them having to traverse the public internet.
Solution
This recipe deploys the architecture shown in Figure 5-14.
Figure 5-14. Service attachments in GCP
5.13 Private Application Access on GCP | 257

First, complete Recipe 5.1, and open the working directory.
Add the following variable definition to your variables.tf file:
...
variable "provider_project" {
type = string
description = "The project to deploy the private workload into"
}
variable "region" {
type = string
description = "The region to deploy the application into"
}
variable "application_subnet" {
type = string
description = "The CIDR range for the application"
}
variable "attachment_subnet" {
type = string
description = "The CIDR range for the service attachment"
}
And to your terraform.tfvars file:
...
provider_project = ""
region = ""
application_subnet = ""
attachment_subnet = ""
Update provider.tf to have the following contents:
provider "google" {
project = var.project
}
terraform {
required_providers {
google = {
source = "hashicorp/google"
version = "~> 3"
}
null = {
source = "hashicorp/null"
version = "~> 3"
}
}
}
Create the following service.tf file:
258 | Chapter 5: Secure Networking

resource "google_compute_service_attachment" "nginx" {
provider = google.provider
name = "nginx"
region = var.region
enable_proxy_protocol = true
connection_preference = "ACCEPT_AUTOMATIC"
nat_subnets = [google_compute_subnetwork.nat.id]
target_service = google_compute_forwarding_rule.nginx.id
}
resource "google_compute_forwarding_rule" "nginx" {
provider = google.provider
name = "producer-forwarding-rule"
region = var.region
load_balancing_scheme = "INTERNAL"
backend_service = google_compute_region_backend_service.nginx.id
all_ports = true
network = google_compute_network.provider.name
subnetwork = google_compute_subnetwork.nginx.name
}
resource "google_compute_region_backend_service" "nginx" {
provider = google.provider
name = "nginx"
protocol = "TCP"
timeout_sec = 10
region = var.region
backend {
group = google_compute_instance_group.nginx.id
}
health_checks = [google_compute_health_check.nginx.id]
}
resource "google_compute_instance_group" "nginx" {
provider = google.provider
name = "nginx"
instances = [
google_compute_instance.nginx.id,
]
named_port {
name = "http"
port = "80"
}
zone = "europe-west1-b"
}
5.13 Private Application Access on GCP | 259

resource "google_compute_health_check" "nginx" {
provider = google.provider
name = "nginx"
check_interval_sec = 1
timeout_sec = 1
tcp_health_check {
port = "80"
}
}
resource "google_compute_instance" "nginx" {
provider = google.provider
name = "nginx"
machine_type = "f1-micro"
zone = "europe-west1-b"
allow_stopping_for_update = true
boot_disk {
initialize_params {
image = "cos-cloud/cos-stable-89-16108-470-25"
}
}
metadata_startup_script = "docker run -p 80:80 nginx"
network_interface {
subnetwork = google_compute_subnetwork.nginx.name
}
service_account {
email = google_service_account.nginx.email
scopes = ["cloud-platform"]
}
}
resource "google_compute_network" "provider" {
provider = google.provider
name = "provider"
auto_create_subnetworks = false
delete_default_routes_on_create = true
}
resource "google_compute_subnetwork" "nginx" {
provider = google.provider
name = "nginx"
region = var.region
network = google_compute_network.provider.id
ip_cidr_range = var.application_subnet
}
260 | Chapter 5: Secure Networking

resource "google_compute_subnetwork" "nat" {
provider = google.provider
name = "nat"
region = var.region
network = google_compute_network.provider.id
purpose = "PRIVATE_SERVICE_CONNECT"
ip_cidr_range = var.attachment_subnet
}
resource "google_service_account" "nginx" {
provider = google.provider
account_id = "nginx-workers"
display_name = "nginx-workers"
}
resource "google_compute_firewall" "http-provider" {
provider = google.provider
name = "http-ingress"
network = google_compute_network.provider.name
direction = "INGRESS"
priority = 1000
allow {
protocol = "TCP"
ports = ["80"]
}
source_ranges = [
google_compute_subnetwork.nat.ip_cidr_range
]
target_service_accounts = [
google_service_account.nginx.email
]
}
resource "google_compute_address" "service_attachment" {
name = "service-attachment"
address_type = "INTERNAL"
subnetwork = google_compute_subnetwork.subnet[var.region].id
region = var.region
}
resource "null_resource" "create_forwarding_rule" {
provisioner "local-exec" {
command = join(" ", [
"gcloud compute forwarding-rules create nginx-service",
"--region ${var.region}",
"--network ${google_compute_network.this.id}",
"--address ${google_compute_address.service_attachment.name}",
"--target-service-attachment ${google_compute_service_attachment.nginx.id}",
5.13 Private Application Access on GCP | 261

"--project ${var.project}"
])
}
}
output "ip_address" {
value = google_compute_address.service_attachment.address
}
As the NGINX container is hosted publicly on Docker Hub, you will need to add
resources to allow the compute instance to reach the internet. Add the following
resource to main.tf, and run terraform plan:
resource "google_compute_router" "provider" {
provider = google.provider
name = "router"
network = google_compute_network.provider.id
region = var.region
}
resource "google_compute_router_nat" "provider" {
provider = google.provider
name = "nat"
router = google_compute_router.provider.name
nat_ip_allocate_option = "AUTO_ONLY"
source_subnetwork_ip_ranges_to_nat = "ALL_SUBNETWORKS_ALL_IP_RANGES"
region = var.region
}
resource "google_compute_route" "provider_internet" {
provider = google.provider
name = "provider-internet"
dest_range = "0.0.0.0/0"
network = google_compute_network.provider.name
next_hop_gateway = "default-internet-gateway"
}
resource "google_compute_firewall" "public-egress" {
provider = google.provider
name = "public-egress"
network = google_compute_network.provider.name
direction = "EGRESS"
priority = 1000
allow {
protocol = "all"
}
target_service_accounts = [
google_service_account.nginx.email
]
}
262 | Chapter 5: Secure Networking

Review the resources that are going to be created, and then run terraform apply to
make the changes.
Discussion
To test the recipe was successful, you can deploy an instance into your consumer
VPC to curl the IP address. To do so, create the following resources, and then ssh
onto the box by calling gcloud compute ssh bastion:
resource "google_service_account" "bastion" {
account_id = "bastion"
display_name = "bastion"
}
resource "google_compute_firewall" "ssh-target" {
name = "ssh-ingress-target"
network = google_compute_network.this.name
direction = "INGRESS"
priority = 1000
allow {
protocol = "TCP"
ports = ["22"]
}
source_ranges = [
"35.235.240.0/20"
]
target_service_accounts = [
google_service_account.bastion.email
]
}
resource "google_compute_firewall" "http-target" {
name = "http-egress"
network = google_compute_network.this.name
direction = "EGRESS"
priority = 1000
allow {
protocol = "TCP"
ports = ["80"]
}
destination_ranges = [
google_compute_subnetwork.subnet[var.region].ip_cidr_range
]
target_service_accounts = [
google_service_account.bastion.email
]
}
5.13 Private Application Access on GCP | 263

resource "google_compute_instance" "bastion" {
name = "bastion"
machine_type = "f1-micro"
zone = "europe-west1-b"
allow_stopping_for_update = true
boot_disk {
initialize_params {
image = "cos-cloud/cos-stable-89-16108-470-25"
}
}
network_interface {
subnetwork = google_compute_subnetwork.subnet[var.region].name
}
service_account {
email = google_service_account.bastion.email
scopes = ["cloud-platform"]
}
}
From an accessibility point of view, having an explicit IP address to connect to is not
very user friendly. By assigning the service connect endpoint a human-friendly pri‐
vate DNS name, you can more readily operate the connection, as it allows for migrat‐
ing IP addresses as required.
Although in this instance you created an NGINX container, service attachments can
be used to allow any traffic to travel between disparate VPCs, not just HTTP based.
For the sake of brevity and simplicity, this recipe does not include the creation and
configuration of private certificates, but just because the network traverses only pri‐
vate Google networking, encryption in transit is not something to be forgotten.
When combining this with Recipe 5.7, you can configure the service attachment indi‐
vidually in each Shared VPC. Unfortunately, they cannot be traversed over peered
connections, so it is not possible to configure them centrally in the hub at this point
in time.
Additionally, they cannot be leveraged directly over VPNs or interconnect attach‐
ments, so if you are using this recipe and attempting to access the systems from on
premises, you will need to evaluate options for deploying forwarding network devi‐
ces. In these cases, the simplest option may be to deploy the application directly into
the hub VPC. Or you can deploy a proxy to route traffic to the application.
264 | Chapter 5: Secure Networking
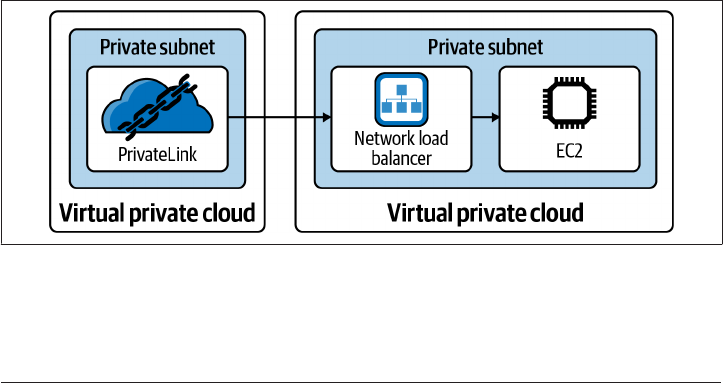
Summary
Let’s summarize what was learned and deployed in this recipe:
•
Service attachments let you allow access privately hosted systems.
•
When using a service attachment, traffic routes purely over private GCP
networking.
—
This does not mean that encryption in transit shouldn’t be used as
appropriate.
• In this recipe, you made an NGINX container accessible between two VPCs in
separate projects.
• In the consuming VPC, a local IP address is provisioned that automatically for‐
wards traffic.
• Service attachments do not work over peered connections, so by using Shared
VPCs, you can configure a centralized access point.
5.14 Private Application Access on AWS
Problem
You have an internal application you wish to make available directly to AWS accounts
in your organization without them having to traverse the public internet.
Solution
This recipe deploys the architecture shown in Figure 5-15. An NGINX container is
exposed to the internet over HTTPS.
Figure 5-15. AWS PrivateLink
First, complete Recipe 5.2, and open the working directory.
5.14 Private Application Access on AWS | 265

Add the following variable definition to your variables.tf file:
...
variable "consumer_account_id" {
type = string
description = "The account that wishes to consume the service"
}
variable "cross_account_role" {
type = string
description = "The role to assume in the consumer account"
}
And to your terraform.tfvars file:
...
consumer_account_id = ""
cross_account_role = ""
Create the following nginx.tf file and run terraform plan:
resource "aws_vpc_endpoint_service" "nginx" {
acceptance_required = false
network_load_balancer_arns = [aws_lb.nlb.arn]
}
resource "aws_vpc_endpoint_service_allowed_principal" "consumer" {
vpc_endpoint_service_id = aws_vpc_endpoint_service.nginx.id
principal_arn = "arn:aws:iam::${var.consumer_account_id}:root"
}
resource "aws_lb" "nlb" {
name = "network-load-balanced-ecs"
internal = false
load_balancer_type = "network"
subnets = [for subnet in aws_subnet.public : subnet.id]
}
resource "aws_lb_listener" "nlb" {
load_balancer_arn = aws_lb.nlb.arn
port = "80"
protocol = "TCP"
default_action {
type = "forward"
target_group_arn = aws_lb_target_group.network.arn
}
}
resource "aws_lb_target_group" "network" {
port = 80
protocol = "TCP"
target_type = "ip"
266 | Chapter 5: Secure Networking

vpc_id = aws_vpc.this.id
}
resource "aws_ecs_cluster" "this" {
name = "load_balanced_cluster"
}
resource "aws_ecs_service" "network" {
name = "network"
cluster = aws_ecs_cluster.this.id
task_definition = aws_ecs_task_definition.this.arn
desired_count = 1
launch_type = "FARGATE"
load_balancer {
target_group_arn = aws_lb_target_group.network.arn
container_name = "nginx"
container_port = 80
}
network_configuration {
subnets = [for subnet in aws_subnet.private : subnet.id]
security_groups = [aws_security_group.network.id]
}
}
resource "aws_ecs_task_definition" "this" {
family = "service"
cpu = "256"
memory = "512"
container_definitions = jsonencode([
{
name = "nginx"
image = "nginx"
essential = true
portMappings = [
{
containerPort = 80
hostPort = 80
}
]
}
])
network_mode = "awsvpc"
requires_compatibilities = ["FARGATE"]
}
resource "aws_security_group" "network" {
name = "nlb-ecs-task-sg"
vpc_id = aws_vpc.this.id
}
5.14 Private Application Access on AWS | 267

resource "aws_security_group_rule" "network_public_egress" {
type = "egress"
from_port = 0
to_port = 0
protocol = "-1"
cidr_blocks = ["0.0.0.0/0"]
security_group_id = aws_security_group.network.id
}
resource "aws_security_group_rule" "nlb_ingress" {
type = "ingress"
from_port = 80
to_port = 80
protocol = "tcp"
cidr_blocks = ["10.0.0.0/8"]
security_group_id = aws_security_group.network.id
}
output "service_name" {
value = aws_vpc_endpoint_service.nginx.service_name
}
Review the resources that are going to be created, and then run terraform apply to
make the changes.
Discussion
With this created, you now need to add a VPC endpoint in the consumer VPC. Add
the following Terraform resources to the VPC definition in the consumer account,
updating the <service_name> token with the service_name output from the recipe:
resource "aws_security_group" "endpoint" {
vpc_id = aws_vpc.this.id
}
resource "aws_vpc_endpoint" "nginx" {
vpc_id = aws_vpc.this.id
service_name = "<service_name>"
vpc_endpoint_type = "Interface"
private_dns_enabled = false
security_group_ids = [
aws_security_group.endpoint.id
]
subnet_ids = [
for subnet in aws_subnet.private : subnet.id
]
}
output "endpoint" {
268 | Chapter 5: Secure Networking

value = aws_vpc_endpoint.nginx.dns_entry[0]["dns_name"]
}
From a resource in the private subnets of your consumer VPC, if you now curl the
endpoint output, you will receive the default NGINX homepage.
Now, although this recipe exposed an application over HTTP to the consumer
account, VPC service endpoints can be used to allow access to a wide variety of serv‐
ices using a wide variety of protocols. Commonly, software-as-a-service solutions on
the AWS Marketplace use VPC endpoints as their access mechanism, allowing you to
more securely communicate with your vendor’s tooling.
You may have noticed that in this case, the traffic is operating over an insecure proto‐
col. This choice was made for the sake of recipe brevity. Through the configuration of
a private hosted zone and a private certificate authority, you can either do TLS off‐
loading on the NLB, or handle TLS directly within the application itself to enable
encryption in transit. The following Terraform configures a two-tier certificate
authority using AWS Private Certificate Authority; you will just need to fill out the
domain_name parameter on the aws_acm_certificate resource.
Running a Private CA on AWS costs $400 per month pro rata. To
avoid bill shock, when experimenting, ensure you delete the Private
CA when you are finished. If you restore a deleted CA, you will be
charged for the intervening time.
locals {
ca_root = aws_acmpca_certificate_authority.root
ca_sub = aws_acmpca_certificate_authority.subordinate
}
resource "aws_acmpca_certificate_authority" "root" {
certificate_authority_configuration {
key_algorithm = "RSA_4096"
signing_algorithm = "SHA512WITHRSA"
subject {
common_name = var.common_name
}
}
type = "ROOT"
}
resource "aws_acmpca_certificate_authority_certificate" "root" {
certificate_authority_arn = local.ca_root.arn
certificate = aws_acmpca_certificate.root.certificate
certificate_chain = aws_acmpca_certificate.root.certificate_chain
}
5.14 Private Application Access on AWS | 269

resource "aws_acmpca_certificate" "root" {
certificate_authority_arn = local.ca_root.arn
certificate_signing_request = local.ca_root.certificate_signing_request
signing_algorithm = "SHA512WITHRSA"
template_arn = "arn:aws:acm-pca:::template/RootCACertificate/V1"
validity {
type = "YEARS"
value = 10
}
}
resource "aws_acmpca_certificate_authority" "subordinate" {
certificate_authority_configuration {
key_algorithm = "RSA_4096"
signing_algorithm = "SHA512WITHRSA"
subject {
common_name = "sub.${var.common_name}"
}
}
type = "SUBORDINATE"
}
resource "aws_acmpca_certificate_authority_certificate" "subordinate" {
certificate_authority_arn = local.ca_sub.arn
certificate = aws_acmpca_certificate.subordinate.certificate
certificate_chain = aws_acmpca_certificate.subordinate.certificate_chain
}
resource "aws_acmpca_certificate" "subordinate" {
certificate_authority_arn = local.ca_root.arn
certificate_signing_request = local.ca_sub.certificate_signing_request
signing_algorithm = "SHA512WITHRSA"
template_arn = "arn:aws:acm-pca:::template/SubordinateCACertificate_PathLen0/V1"
validity {
type = "YEARS"
value = 5
}
}
data "aws_caller_identity" "c" {}
resource "aws_s3_bucket" "ca_bucket" {
bucket = "${data.aws_caller_identity.c.account_id}-ca-bucket"
policy = <<POLICY
270 | Chapter 5: Secure Networking

{
"Version":"2012-10-17",
"Statement":[
{
"Effect":"Allow",
"Principal":{
"Service":"acm-pca.amazonaws.com"
},
"Action":[
"s3:PutObject",
"s3:PutObjectAcl",
"s3:GetBucketAcl",
"s3:GetBucketLocation"
],
"Resource":[
"arn:aws:s3:::${data.aws_caller_identity.c.account_id}-ca-bucket/*",
"arn:aws:s3:::${data.aws_caller_identity.c.account_id}-ca-bucket"
]
}
]
}
POLICY
}
resource "aws_acm_certificate" "nginx" {
domain_name = ""
certificate_authority_arn = aws_acmpca_certificate_authority.subordinate.arn
}
In Recipe 5.5, you used VPC endpoints to allow private network access to AWS serv‐
ices as well. This allows for private resources to still function within AWS and drasti‐
cally minimizes the amount of resources that need to be able to route to the public
internet.
As endpoints come with an enduring cost, by combining this approach with Recipe
5.8, you can centralize the configuration. All VPCs within the hub-and-spoke Transit
Gateway topology can utilize endpoints within the transit VPC itself, thereby signifi‐
cantly reducing cost. Additionally, other interconnectivity approaches on AWS, such
as peering, require that the VPC CIDR ranges cannot overlap; with VPC endpoints
that restriction does not apply.
If access to an application needs to be restricted, such as an exter‐
nally hosted Kafka cluster, then deploy endpoints in the VPCs that
require access, as opposed to centrally, to simplify access control.
5.14 Private Application Access on AWS | 271
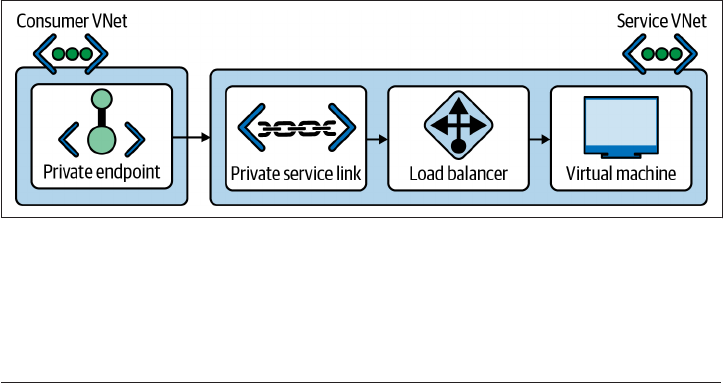
Summary
Let’s summarize what was learned and deployed in this recipe:
•
VPC endpoints allow you to deploy private applications that can be accessed over
private AWS networking.
• By utilizing AWS private networking, you can enable private resources to utilize
services without giving them wider routing.
• In this recipe, an NGINX container was made accessible across accounts.
— When creating a service endpoint, you define the IAM principals, such as
AWS accounts, that are allowed to access it.
• Endpoints should also be used to access AWS services privately.
—
In Recipe 5.5, they are used to allow access to Systems Manager.
• If using a centralized Transit Gateway, endpoints should be configured centrally
to reduce cost.
5.15 Private Application Access on Azure
Problem
You have an internal application you wish to make available directly to Azure sub‐
scriptions in your tenant without them having to traverse the public internet.
Solution
This recipe deploys the architecture shown in Figure 5-16. An NGINX container is
exposed to the internet over HTTPS.
Figure 5-16. Azure Private Link
First, complete Recipe 5.3, and open the working directory.
Add the following variable definition to your variables.tf file:
272 | Chapter 5: Secure Networking

...
variable "service_cidr" {
type = string
description = "The CIDR for the Service Network"
}
And to your terraform.tfvars file:
...
service_cidr = ""
Create the following service.tf file and run terraform plan:
resource "azurerm_resource_group" "s" {
name = "service"
location = var.location
}
resource "azurerm_virtual_network" "s" {
name = "service"
resource_group_name = azurerm_resource_group.s.name
location = azurerm_resource_group.s.location
address_space = [var.service_cidr]
}
resource "azurerm_subnet" "service" {
name = "service"
resource_group_name = azurerm_resource_group.s.name
virtual_network_name = azurerm_virtual_network.s.name
address_prefixes = [var.service_cidr]
enforce_private_link_service_network_policies = true
enforce_private_link_endpoint_network_policies = true
}
resource "azurerm_lb" "service" {
name = "service"
sku = "Standard"
location = azurerm_resource_group.s.location
resource_group_name = azurerm_resource_group.s.name
frontend_ip_configuration {
name = "frontend"
subnet_id = azurerm_subnet.service.id
}
}
resource "azurerm_private_link_service" "service" {
name = "service"
resource_group_name = azurerm_resource_group.s.name
location = azurerm_resource_group.s.location
load_balancer_frontend_ip_configuration_ids = [
5.15 Private Application Access on Azure | 273

azurerm_lb.service.frontend_ip_configuration.0.id
]
nat_ip_configuration {
name = "primary"
subnet_id = azurerm_subnet.service.id
primary = true
}
}
Review the resources that are going to be created, and then run terraform apply to
make the changes.
Discussion
To enable access to the service from other networks, you will need to add the follow‐
ing resources. It expects resources to be named as per Recipe 5.3.
locals {
service = azurerm_private_endpoint.service
psc = local.service.private_service_connection[0]
}
resource "azurerm_private_endpoint" "service" {
name = "service"
location = azurerm_resource_group.network.location
resource_group_name = azurerm_resource_group.network.name
subnet_id = azurerm_subnet.private.id
private_service_connection {
name = "service"
private_connection_resource_id = azurerm_private_link_service.service.id
is_manual_connection = false
}
}
resource "azurerm_network_security_rule" "endpoint_egress" {
name = "endpoint-egress"
priority = 101
direction = "Outbound"
access = "Allow"
protocol = "Tcp"
source_port_range = "*"
destination_port_range = "80"
source_application_security_group_ids = [
azurerm_application_security_group.application.id
]
destination_address_prefixes = [
local.psc.private_ip_address
]
resource_group_name = azurerm_resource_group.network.name
network_security_group_name = azurerm_network_security_group.private.name
274 | Chapter 5: Secure Networking

}
resource "azurerm_network_security_rule" "endpoint_ingress" {
name = "endpoint-ingress"
priority = 101
direction = "Inbound"
access = "Allow"
protocol = "Tcp"
source_port_range = "*"
destination_port_range = "80"
source_application_security_group_ids = [
azurerm_application_security_group.application.id
]
destination_address_prefixes = [
local.psc.private_ip_address
]
resource_group_name = azurerm_resource_group.network.name
network_security_group_name = azurerm_network_security_group.private.name
}
Once these resources are created, you will be able to reach the service over the private
endpoint.
By combining this recipe with Recipe 5.9, you can use private endpoints to make
services available to all VNets and over ExpressRoute or VPNs. This allows you to
deploy isolated applications that can only be accessed over specific paths, making the
network security significantly easier to reason about. Additionally, it is possible to
link endpoints to services in other regions, allowing for simple cross-region routing
to specific services.
In this recipe, the Private Link service was configured to automatically accept con‐
nections from subscriptions within the tenancy. It is also possible to operate with a
whitelist of subscriptions that are allowed to see that the Private Link service exists,
and a separate whitelist for subscriptions that can automatically connect without
manual approval.
Private Link is also the basis by which you can expose Azure APIs privately to virtual
networks without configuring NAT or allowing public access. However, this is done
by using the service_endpoints parameter in the subnet resource definition itself.
Additionally, you can use endpoints with other Azure services, such as Azure Web
Apps, to allow private access to applications hosted in higher-level managed services.
5.15 Private Application Access on Azure | 275

Summary
Let’s summarize what was learned and deployed in this recipe:
•
Azure private endpoints and service link allow you to deploy services that can
only be accessed over private networking.
• As you can deploy the services into sandboxed network environments, you can
protect against data leakage risks.
• By deploying a service link in one VNet, and an endpoint in another, you can
expose services across subscriptions.
• Service endpoints are traversable from ExpressRoute and other connections,
allowing you to centrally provision access.
•
As Azure services are onboarded onto Private Link, it is possible to access appli‐
cations hosted in managed services purely over private networking.
— For example, applications hosted in Azure Web App can be made available
privately.
• You can add service_endpoints to your subnet definitions to allow private
access to Azure APIs.
276 | Chapter 5: Secure Networking

CHAPTER 6
Infrastructure as Code
Infrastructure as code, or IAC, is a fundamental tool for cloud native environments. It
should be the primary way resources are created, updated, and deleted across your
estate. This book focuses on bringing a Terraform-first approach to fulfilling your
security requirements, as that is how you drive impact at scale.
A common method for the initial management of cloud estates is to do everything
through the console. This is inherently unrepeatable and difficult to audit, and it
makes ensuring that changes don’t result in insecure infrastructure effectively impos‐
sible. In Recipes 7.7 through 7.9, the book explores the options you have to prevent
people from misconfiguring resources.
With the rapid pace of change in cloud environments, the previous methods of
reviewing architecture diagrams on a regular cadence do not work. As the platform
underneath the team matures, they need to be enabled to change their architecture on
demand. Especially as teams encroach on serverless or Kubernetes-based architec‐
tures, the dynamic and elastic nature of cloud native services necessitates a different
approach.
IAC enables you to create patterns that are secure by default. First, by producing
infrastructure modules that are secure by default, you simplify the secure adoption of
cloud for delivery teams. Second, by deploying your own serverless code, you can
automate common tasks and dynamically react to changes in the environment. Third,
by using CI/CD pipelines, you can embed DevSecOps tool chains that review every
proposed change, ensuring that your security controls are not being bypassed or cir‐
cumvented. Last, you can use IAC to rapidly deploy your security resources out
across the entire estate, ensuring that all your systems and controls are in place and
that as your estate scales, new accounts, projects, and subscriptions are automatically
enrolled into your security posture.
277

6.1 Building Secure Infrastructure Defaults on GCP
Problem
You need to give delivery teams security-approved infrastructure patterns.
Solution
This recipe creates a Terraform module that deploys a Compute Engine instance with
all disks encrypted by default.
If you haven’t already done so, familiarize yourself with Terraform and the different
authentication mechanisms in Chapter 11.
Create and enter an instance folder, and create a variables.tf file with the following
contents:
variable "instance_name" {
type = string
description = "The name of the instance"
}
Create a main.tf file with the following contents:
locals {
required_apis = [
"cloudkms.googleapis.com",
"compute.googleapis.com",
]
}
resource "google_project_service" "api" {
for_each = toset(local.required_api)
service = each.value
disable_on_destroy = false
}
resource "google_kms_key_ring" "keyring" {
name = "${var.instance_name}-keyring"
location = "global"
depends_on = [google_project_service.api]
}
resource "google_kms_crypto_key" "key" {
name = "${var.instance_name}-key"
key_ring = google_kms_key_ring.keyring.id
}
resource "google_compute_instance" "this" {
name = var.instance_name
machine_type = "f1-micro"
278 | Chapter 6: Infrastructure as Code

allow_stopping_for_update = true
boot_disk {
initialize_params {
image = "cos-cloud/cos-stable-89-16108-470-25"
}
}
network_interface {
network = "default"
access_config {
}
}
attached_disk {
source = google_compute_disk.encrypted.id
kms_key_self_link = google_kms_crypto_key.key.id
}
depends_on = [google_project_service.api]
}
resource "google_service_account" "sensitive" {
account_id = "${var.instance_name}-sa"
display_name = "Sensitive Data Handler"
}
resource "google_kms_crypto_key_iam_member" "service_account_use" {
crypto_key_id = google_kms_crypto_key.key.id
role = "roles/cloudkms.cryptoKeyEncrypterDecrypter"
member = "serviceAccount:${google_service_account.sensitive.email}"
}
resource "google_compute_disk" "encrypted" {
name = "${var.instance_name}-1"
size = "10"
type = "pd-standard"
disk_encryption_key {
kms_key_self_link = google_kms_crypto_key.key.id
kms_key_service_account = google_service_account.sensitive.email
}
depends_on = [
google_project_service.api,
google_kms_crypto_key_iam_member.service_account_use
]
}
Move up to the parent folder and create the following variables.tf file:
variable "project" {
type = string
description = "The project to deploy the resources into"
}
6.1 Building Secure Infrastructure Defaults on GCP | 279

variable "region" {
type = string
description = "The region to deploy the resources into"
}
variable "zone" {
type = string
description = "The zone to deploy the resources into"
}
variable "instance_name" {
type = string
description = "The name of the instance"
}
Then fill out the corresponding terraform.tfvars file:
project = ""
region = ""
zone = ""
instance_name = ""
Create the following provider.tf file and run terraform init:
provider "google" {
project = var.project
region = var.region
zone = "${var.region}-${var.zone}"
}
terraform {
required_providers {
google = {
source = "hashicorp/google"
version = "~> 4"
}
}
}
Create the following main.tf file and run terraform plan:
module "encrypted_instance" {
source = "./instance"
instance_name = var.instance_name
}
Review the resources that are going to be created, and then run terraform apply to
make the changes.
280 | Chapter 6: Infrastructure as Code

Discussion
In this recipe you created an instance module that created an encrypted Compute
Engine instance. You then used the module to create an instance in your project.
With Terraform modules, you can encapsulate the complexity and the mechanics of
how the resources are secured, taking the cognitive load off the delivery teams. You
write the module once, and it is deployed many times, saving significant time and
effort. This is key to ensure secure infrastructure at scale by making the secure option
the simplest and easiest.
Be wary of opening up too many options on modules. When a
module is adopted within the business, it becomes very hard to
make breaking changes. Breaking changes include updates which
force resource recreation, and the removal or modification of vari‐
ables. It is significantly easier to add new variables than to change
how an existing variable operates. Therefore, only add variables for
today’s requirements; don’t try to predict what people will want
tomorrow, as you will create more work in the future.
This module for a Compute Engine instance lacks variables that would be needed to
use it across a business, for example, adding variables that allow for changing the
instance size, boot disk image, or number of disks. As you understand the require‐
ments of the business, you can iterate on modules selectively, opening up required
options, while still preserving the secure defaults such as ensuring all disks are
encrypted with distinct keys or that only certain boot disk images are allowed.
Next, let’s look at how you can distribute modules. In the recipe, you locally sourced
the module, which works for developing the module itself, but you need to be able to
allow others to leverage the module in a secure way. Terraform provides a variety of
module source options, the most common of which in GCP environments are using
Cloud Storage buckets and Git repositories. For creating Git repositories on Google
Cloud, see Recipe 6.7.
For a module hosted in a bucket, you can reference it as follows, filling in the vari‐
ables as appropriate:
module "encrypted_instance" {
source = join("", [
"gcs::https://www.googleapis.com/storage/v1/",
var.bucket_name,
"/",
var.module_name,
".zip"
])
}
6.1 Building Secure Infrastructure Defaults on GCP | 281

For a module hosted in a Git repository, you can reference it as follows, filling in the
variables as appropriate:
module "encrypted_instance" {
source = "git::https://{var.git_url}/${var.repository_name}.git//{module_path}"
}
Modules work amazingly well for modern DevOps teams that are familiar with and
are leveraging infrastructure as code-based workflows.
For teams within the business that are looking for a lower barrier to entry and pre‐
packaged solutions, you can set up Private Catalog. It enables you to load Terraform
modules into catalogs that can be deployed with the Google Cloud console into user
projects. However, the trade-off is that extending and building on top of these mod‐
ules becomes significantly more challenging as they operate outside of the normal
Terraform workflows, as elaborated on in Recipe 6.7.
Understanding the differences between these options—modules shared via buckets
and Git versus modules deployed from Private Catalog—allows you to make an
informed decision when faced with a business requirement. If a user needs a simpli‐
fied experience where they need a fully prepackaged solution, then Private Catalog is
more than likely the correct solution. If they are looking for a secure-by-default col‐
lection of resources to build on top of, then modules sourced from a central registry
would be appropriate.
Summary
Let’s summarize what was learned and deployed in this recipe:
• Terraform modules enable the encapsulation of complexity.
• You can build modules that enforce standard security practices.
• By building easy-to-use modules that reduce the cognitive load on teams, you
will have a better security posture.
• To share modules on GCP, you can use buckets and Git repositories.
• If users are looking for a fully prepackaged solution, then Private Catalog gives a
console-driven option.
6.2 Building Secure Infrastructure Defaults on AWS
Problem
You need to give delivery teams security-approved infrastructure patterns.
282 | Chapter 6: Infrastructure as Code

Solution
This recipe creates a Terraform module that deploys a Compute Engine instance with
all disks encrypted by default.
If you haven’t already done so, familiarize yourself with Terraform and the different
authentication mechanisms in Chapter 11.
Create and enter an instance folder, and create a variables.tf file with the following
contents:
variable "instance_name" {
type = string
description = "The name for the instance"
}
variable "subnet_id" {
type = string
description = "The subnet to place the instance into"
}
Create a main.tf file with the following contents:
data "aws_ami" "ubuntu" {
most_recent = true
filter {
name = "name"
values = ["ubuntu/images/hvm-ssd/ubuntu-focal-20.04-amd64-server-*"]
}
filter {
name = "virtualization-type"
values = ["hvm"]
}
owners = ["099720109477"] # Canonical
}
data "aws_caller_identity" "current" {}
resource "aws_instance" "this" {
ami = data.aws_ami.ubuntu.id
instance_type = "t2.micro"
iam_instance_profile = aws_iam_instance_profile.ssm_profile.name
security_groups = [aws_security_group.instance.id]
subnet_id = var.subnet_id
root_block_device {
delete_on_termination = true
encrypted = true
kms_key_id = aws_kms_key.this.arn
}
6.2 Building Secure Infrastructure Defaults on AWS | 283

}
data "aws_subnet" "target" {
id = var.subnet_id
}
resource "aws_security_group" "instance" {
vpc_id = data.aws_subnet.target.vpc_id
}
resource "aws_iam_instance_profile" "ssm_profile" {
name = var.instance_name
role = aws_iam_role.role.name
}
resource "aws_iam_role" "role" {
name = var.instance_name
managed_policy_arns = [
"arn:aws:iam::aws:policy/AmazonSSMManagedInstanceCore"
]
assume_role_policy = data.aws_iam_policy_document.assume.json
}
data "aws_iam_policy_document" "assume" {
statement {
actions = [
"sts:AssumeRole",
]
principals {
type = "Service"
identifiers = [
"ec2.amazonaws.com"
]
}
}
}
Create a key.tf file with the following contents:
resource "aws_kms_key" "this" {
policy = data.aws_iam_policy_document.key_policy.json
}
data "aws_iam_role" "current_principal" {
name = split("/", data.aws_caller_identity.current.arn)[1]
}
data "aws_iam_policy_document" "key_policy" {
statement {
sid = "Allow access for Key Administrators"
284 | Chapter 6: Infrastructure as Code

actions = [
"kms:Create*",
"kms:Describe*",
"kms:Enable*",
"kms:List*",
"kms:Put*",
"kms:Update*",
"kms:Revoke*",
"kms:Disable*",
"kms:Get*",
"kms:Delete*",
"kms:TagResource",
"kms:UntagResource",
"kms:ScheduleKeyDeletion",
"kms:CancelKeyDeletion"
]
effect = "Allow"
principals {
type = "AWS"
identifiers = [data.aws_iam_role.current_principal.arn]
}
resources = ["*"]
}
statement {
sid = "Allow use of the key"
actions = [
"kms:Encrypt",
"kms:Decrypt",
"kms:ReEncrypt*",
"kms:GenerateDataKey*",
"kms:DescribeKey"
]
effect = "Allow"
principals {
type = "AWS"
identifiers = ["*"]
}
resources = ["*"]
}
statement {
sid = "Allow attachment of persistent resources"
effect = "Allow"
principals {
type = "AWS"
identifiers = ["*"]
}
actions = [
"kms:CreateGrant",
"kms:ListGrants",
"kms:RevokeGrant"
6.2 Building Secure Infrastructure Defaults on AWS | 285

]
resources = ["*"]
condition {
test = "Bool"
variable = "kms:GrantIsForAWSResource"
values = [true]
}
}
}
Move up to the parent folder and create the following variables.tf file:
variable "instance_name" {
type = string
description = "The name for the instance"
}
variable "subnet_id" {
type = string
description = "The subnet to place the instance into"
}
Then fill out the corresponding terraform.tfvars file:
instance_name = ""
subnet_id = ""
Create the following provider.tf file and run terraform init:
provider "aws" {}
terraform {
required_providers {
aws = {
source = "hashicorp/aws"
version = "~> 3"
}
}
}
Create the following main.tf file and run terraform plan:
module "encrypted_instance" {
source = "./instance"
instance_name = var.instance_name
subnet_id = var.subnet_id
}
Review the resources that are going to be created, and then run terraform apply to
make the changes.
286 | Chapter 6: Infrastructure as Code

Discussion
This recipe created a module that enforces several best practices into the EC2 instan‐
ces created with it. For example, the volumes were encrypted with KMS keys, and the
instance profile contained the base SSM permission set. Having modules such as
these as the building blocks enables you to bake these core practices into the infra‐
structure without passing the burden on to development teams.
Looking at this module, you will see missing variables that would be needed to make
use of it across a number of teams. Rather than locking to the most recent Ubuntu
20-04 server image, users will most likely need a choice of operating system, and a
t2.micro instance size is too small for the majority of use cases.
Although making modules with many possible configurations may
sound appealing as users will be able to do more with them, the
trade-off you make is one of value, stability, and maintainability.
With more options come more possible configurations, some of
which may be broken. If you produce modules that break consis‐
tently, you erode the trust that is key to getting teams to leverage
them in the first place. A module is an abstraction; you’re hiding
complexity from the consumer. The wider the array of options, the
weaker that abstraction becomes, negating the value you’re trying
to provide.
Authoring the module is only step one of the process; step two is making the module
readily available to other teams and users across the business. To distribute modules
across teams in AWS, there are two predominant options: hosting them in S3 buckets
and hosting them in Git repositories. To see how to create Git repositories in AWS,
see Recipe 6.8.
For a module hosted in a bucket, you can reference it as follows, filling in the vari‐
ables as appropriate:
module "encrypted_instance" {
source = join("", [
"s3::https://s3-",
var.region,
".amazonaws.com/",
var.bucket_name,
"/",
var.module_name,
".zip"
])
}
For a module hosted in a Git repository, you can reference it as follows, filling in the
variables as appropriate:
6.2 Building Secure Infrastructure Defaults on AWS | 287

module "encrypted_instance" {
source = "git::https://{var.git_url}/${var.repository_name}.git//{module_path}"
}
While modules are the right vehicle for delivery teams actively leveraging infrastruc‐
ture as code, businesses often want a point-and-click option for deploying prepack‐
aged solutions. Currently, Service Catalog on AWS is CloudFormation only, although
the functionality exists within HashiCorp’s Terraform Cloud for Business or Terra‐
form Enterprise offerings.
Summary
Let’s summarize what was learned and deployed in this recipe:
• Modules allow you to abstract away complexity from consuming teams.
• You can author modules to enforce security best practices, such as encryption
configurations and instance profiles.
• As modules are adopted, the security posture of your estate increases.
• Producing well-written modules is key to their success.
•
You can share modules using S3 buckets or Git repositories.
• The first-party Service Catalog offering on AWS does not support Terraform at
this time.
• HashiCorp provides the functionality within its third-party offerings.
6.3 Building Secure Infrastructure Defaults on Azure
Problem
You need to give delivery teams security-approved infrastructure patterns.
Solution
This recipe creates a Terraform module that deploys a Compute Engine instance with
all disks encrypted by default.
If you haven’t already done so, familiarize yourself with Terraform and the different
authentication mechanisms in Chapter 11.
Create and enter an instance folder and create a variables.tf file with the following
contents:
variable "resource_group_name" {
type = string
description = "The name of the resource group to use"
}
288 | Chapter 6: Infrastructure as Code

variable "instance_name" {
type = string
description = "The name for the instance"
}
variable "subnet_id" {
type = string
description = "The subnet to place the instance into"
}
variable "ssh_key_path" {
type = string
description = "The path to the SSH key to upload"
}
Create a provider.tf file with the following contents:
terraform {
required_providers {
random = {
source = "hashicorp/random"
version = "~> 3"
}
}
}
Create a main.tf file with the following contents:
data "azurerm_client_config" "current" {}
data "azurerm_resource_group" "this" {
name = var.resource_group_name
}
resource "azurerm_network_interface" "primary" {
name = "${var.instance_name}-primary"
location = data.azurerm_resource_group.this.location
resource_group_name = data.azurerm_resource_group.this.name
ip_configuration {
name = "internal"
subnet_id = var.subnet_id
private_ip_address_allocation = "Dynamic"
}
}
resource "azurerm_linux_virtual_machine" "this" {
name = var.instance_name
resource_group_name = data.azurerm_resource_group.this.name
location = data.azurerm_resource_group.this.location
size = "Standard_F2"
admin_username = "adminuser"
network_interface_ids = [
6.3 Building Secure Infrastructure Defaults on Azure | 289

azurerm_network_interface.primary.id,
]
os_disk {
caching = "ReadWrite"
storage_account_type = "Standard_LRS"
disk_encryption_set_id = azurerm_disk_encryption_set.des.id
}
admin_ssh_key {
username = "adminuser"
public_key = file(var.ssh_key_path)
}
source_image_reference {
publisher = "Canonical"
offer = "UbuntuServer"
sku = "16.04-LTS"
version = "latest"
}
depends_on = [
azurerm_role_assignment.crypto_access
]
}
resource "random_string" "key_vault" {
length = 16
number = false
special = false
}
resource "azurerm_key_vault" "keys" {
name = random_string.key_vault.result
location = data.azurerm_resource_group.this.location
resource_group_name = data.azurerm_resource_group.this.name
tenant_id = data.azurerm_client_config.current.tenant_id
enable_rbac_authorization = true
enabled_for_disk_encryption = true
soft_delete_retention_days = 7
purge_protection_enabled = true
sku_name = "standard"
}
resource "azurerm_disk_encryption_set" "des" {
name = "des"
resource_group_name = data.azurerm_resource_group.this.name
location = data.azurerm_resource_group.this.location
key_vault_key_id = azurerm_key_vault_key.disk.id
identity {
290 | Chapter 6: Infrastructure as Code

type = "SystemAssigned"
}
}
resource "azurerm_role_assignment" "crypto_officer" {
scope = azurerm_key_vault.keys.id
role_definition_name = "Key Vault Crypto Officer"
principal_id = data.azurerm_client_config.current.object_id
}
resource "azurerm_role_assignment" "user_reader" {
scope = azurerm_key_vault.keys.id
role_definition_name = "Reader"
principal_id = data.azurerm_client_config.current.object_id
}
resource "azurerm_role_assignment" "des_reader" {
scope = azurerm_key_vault.keys.id
role_definition_name = "Reader"
principal_id = azurerm_disk_encryption_set.des.identity.0.principal_id
}
resource "azurerm_role_assignment" "crypto_access" {
scope = azurerm_key_vault.keys.id
role_definition_name = "Key Vault Crypto User"
principal_id = azurerm_disk_encryption_set.des.identity.0.principal_id
}
resource "azurerm_key_vault_key" "disk" {
name = "disk"
key_vault_id = azurerm_key_vault.keys.id
key_type = "RSA"
key_size = 2048
key_opts = ["decrypt", "encrypt", "sign", "unwrapKey", "verify", "wrapKey"]
}
resource "azurerm_managed_disk" "encrypted" {
name = "${var.instance_name}-1"
location = data.azurerm_resource_group.this.location
resource_group_name = data.azurerm_resource_group.this.name
storage_account_type = "Standard_LRS"
create_option = "Empty"
disk_size_gb = "1"
disk_encryption_set_id = azurerm_disk_encryption_set.des.id
}
resource "azurerm_virtual_machine_data_disk_attachment" "attachment" {
managed_disk_id = azurerm_managed_disk.encrypted.id
virtual_machine_id = azurerm_linux_virtual_machine.this.id
lun = "10"
caching = "ReadWrite"
}
6.3 Building Secure Infrastructure Defaults on Azure | 291

Move up to the parent folder and create the following variables.tf file:
variable "location" {
type = string
description = "The Azure location for resources"
}
variable "instance_name" {
type = string
description = "The name for the instance"
}
variable "ssh_key_path" {
type = string
description = "The path to the SSH key to upload"
}
Then fill out the corresponding terraform.tfvars file:
location = ""
instance_name = ""
ssh_key_path = ""
Create the following provider.tf file and run terraform init:
terraform {
required_providers {
azurerm = {
source = "hashicorp/azurerm"
version = "~> 2"
}
}
}
provider "azurerm" {
features {}
}
Create the following main.tf file and run terraform plan:
resource "azurerm_resource_group" "workload" {
name = "workload"
location = var.location
}
resource "azurerm_virtual_network" "this" {
name = "example"
address_space = ["10.0.0.0/16"]
location = azurerm_resource_group.workload.location
resource_group_name = azurerm_resource_group.workload.name
}
resource "azurerm_subnet" "this" {
name = "internal"
292 | Chapter 6: Infrastructure as Code

resource_group_name = azurerm_resource_group.workload.name
virtual_network_name = azurerm_virtual_network.this.name
address_prefixes = ["10.0.2.0/24"]
}
module "encrypted_instance" {
source = "./instance"
instance_name = var.instance_name
resource_group_name = azurerm_resource_group.workload.name
ssh_key_path = var.ssh_key_path
subnet_id = azurerm_subnet.this.id
depends_on = [
azurerm_resource_group.workload
]
}
Due to the time delay in Key Vault RBAC permissions being prop‐
erly propagated, if the first apply fails due to permission issues on
the key, wait a couple of minutes and run terraform apply again.
Currently there is no way in Terraform to explicitly wait on the
propagation to occur.
Review the resources that are going to be created, and then run terraform apply to
make the changes.
Discussion
In this recipe, you created a module that deployed a virtual machine with all disks
encrypted by default. You also created an example VNet, workload subnet, and
resource group to house the instance. Modules like this allow you to ensure that your
security controls are not only being observed but are the default state for resources in
the cloud. Chapter 7 covers how prevention of security issues is fundamental to hav‐
ing highly secure infrastructure.
A well-written module abstracts away complexity from the consumers. In this recipe,
by invoking the module, you get the instance that you need. The other resources such
as the Key Vault are created invisible to you as the consumer, thereby reducing the
cognitive load. Modules are powerful because they encapsulate learning and practices,
which are then applied en masse across your estate.
Authoring well-written abstractions has proved to be one of the
perennial challenges in IT. With modules, focus on having small
interfaces, the smallest number of possible options. By only adding
the variables that teams need today, you push design decisions into
the future, where you will better understand how the module has
been used and what the emerging requirements are.
6.3 Building Secure Infrastructure Defaults on Azure | 293

Once you have a module, the next step is to share it across teams. Unlike with AWS
and GCP buckets, Terraform doesn’t provide support for hosting modules directly in
Azure storage accounts. This leaves us with one preferred option of module hosting:
Git repositories. For setting up repositories, see Recipe 6.9.
For a module hosted in a Git repository, you can reference it as follows, filling in the
variables as appropriate:
module "encrypted_instance" {
source = "git::https://{var.git_url}/${var.repository_name}.git//{module_path}"
}
For delivery teams that are actively using infrastructure as code, consuming modules
in this way provides the lowest friction and highest velocity. For parts of the business
that are looking for prepackaged, turnkey solutions, there is Azure Managed Applica‐
tions. Unfortunately, as of the time of writing, it only supports ARM templates and
not Terraform. For equivalent functionality, HashiCorp’s Terraform Cloud for Busi‐
ness or Terraform Enterprise offerings both provide a similar service.
Summary
Let’s summarize what was learned and deployed in this recipe:
• Modules are a key part of security at scale.
• A well-authored module enables you to embed best practices at the foundation.
• The recipe created a module that ensured disks were encrypted with keys from
Key Vault.
• To share modules on Azure, use git repositories.
• For console-driven deployment of solutions, look at HashiCorp’s offerings, as
Azure Managed Applications does not support Terraform-based applications.
6.4 Functions as a Service on GCP
Problem
You need to deploy some code that needs to run every day, and be alerted via email
when failures occur.
Solution
If you haven’t already done so, familiarize yourself with Terraform and the different
authentication mechanisms in Chapter 11.
Create the following variables.tf file:
294 | Chapter 6: Infrastructure as Code

variable "project" {
type = string
description = "The project to deploy the resources into"
}
variable "region" {
type = string
description = "The region to deploy the resources into"
}
variable "function_name" {
type = string
description = "The name of the function"
}
variable "email_address" {
type = string
description = "The email address to send alerts to"
}
Then fill out the corresponding terraform.tfvars file:
project = ""
region = ""
function_name = ""
email_address = ""
Create the following provider.tf file and run terraform init:
provider "google" {
project = var.project
region = var.region
}
terraform {
required_providers {
google = {
source = "hashicorp/google"
version = "~> 4"
}
archive = {
source = "hashicorp/archive"
version = "~> 2"
}
}
}
Create a src folder and the following main.py file:
import base64
from logging import getLogger, INFO
from google.cloud import error_reporting, logging
6.4 Functions as a Service on GCP | 295

logging.Client().setup_logging()
logger = getLogger()
logger.setLevel(INFO)
error_client = error_reporting.Client()
def handle(event, _):
try:
logger.info(event)
data = base64.b64decode(event["data"]).decode("utf-8")
logger.info(data)
except Exception as e:
logger.error(e)
error_client.report_exception()
And the following requirements.txt file:
google-cloud-logging
google-cloud-error-reporting
Last, in the parent folder, create the following main.tf file and run terraform plan:
locals {
required_apis = [
"cloudbuild.googleapis.com",
"clouderrorreporting.googleapis.com",
"cloudfunctions.googleapis.com",
"logging.googleapis.com",
"storage.googleapis.com",
]
}
resource "google_project_service" "api" {
for_each = toset(local.required_apis)
service = each.value
disable_on_destroy = false
}
resource "google_storage_bucket" "bucket" {
name = "${var.function_name}-artifacts"
location = var.region
}
data "archive_file" "code" {
type = "zip"
source_dir = "${path.module}/src"
output_path = "${path.module}/main.zip"
}
resource "google_storage_bucket_object" "code" {
name = "${data.archive_file.code.output_md5}.zip"
bucket = google_storage_bucket.bucket.name
source = data.archive_file.code.output_path
296 | Chapter 6: Infrastructure as Code

}
resource "google_cloudfunctions_function" "function" {
name = var.function_name
runtime = "python39"
available_memory_mb = 128
source_archive_bucket = google_storage_bucket.bucket.name
source_archive_object = google_storage_bucket_object.code.name
entry_point = "handle"
event_trigger {
event_type = "google.pubsub.topic.publish"
resource = google_pubsub_topic.trigger.name
}
depends_on = [
google_project_service.api
]
}
resource "google_project_iam_member" "log_writer" {
project = var.project
role = "roles/logging.logWriter"
member = join(":", [
"serviceAccount",
google_cloudfunctions_function.function.service_account_email
])
}
resource "google_cloud_scheduler_job" "daily" {
name = var.function_name
schedule = "* 9 * * *"
pubsub_target {
topic_name = google_pubsub_topic.trigger.id
}
}
resource "google_pubsub_topic" "trigger" {
name = var.function_name
}
resource "google_monitoring_alert_policy" "errors" {
display_name = "${var.function_name} Errors"
combiner = "OR"
conditions {
display_name = "Errors"
condition_threshold {
filter = join("", [
"resource.type = \"cloud_function\" AND ",
"resource.labels.function_name = \"",
6.4 Functions as a Service on GCP | 297

var.function_name,
"\" AND ",
"metric.type = \"logging.googleapis.com/log_entry_count\" AND ",
"metric.labels.severity = \"ERROR\""
]
)
duration = "0s"
comparison = "COMPARISON_GT"
aggregations {
alignment_period = "60s"
per_series_aligner = "ALIGN_COUNT"
}
trigger {
count = 1
}
}
}
notification_channels = [
google_monitoring_notification_channel.email.id
]
}
resource "google_monitoring_notification_channel" "email" {
display_name = "${var.function_name} Error Emails"
type = "email"
labels = {
email_address = var.email
}
}
Review the resources that are going to be created, and then run terraform apply to
make the changes.
Discussion
Cloud Functions are a low total-cost-of-ownership method of running code on GCP.
Given a particular trigger, they allow you to perform any action you wish. For exam‐
ple, they are used in Recipe 7.10 to fix public buckets automatically, and in Recipe 3.1
to allow for automated actions on SCC findings. While this recipe uses Python, there
are many more languages with first-class support.
This recipe shows how to deploy a timed dummy function triggered via Cloud Sched‐
uler and also how to monitor and debug functions. The function is given explicit per‐
missions to be able to write logs to Cloud Operations Suite and also to dispatch errors
when they occur. This is then observed via a monitoring alert policy that sends emails
when errors are detected. As you scale the amount of systems and services under the
management of the security team, it is key that robust monitoring and alerting is
wrapped around everything you support.
298 | Chapter 6: Infrastructure as Code

For serverless event-driven architectures on GCP, one option is Cloud Functions and
the other is Cloud Run, which is container based. By adopting Cloud Functions, you
have a shallower learning curve than with containers, and you will be able to more
rapidly build out code to fulfill your needs on day one.
Eventarc is a managed service which looks to provide a unified event-driven
approach to GCP and beyond. It automatically produces events from many GCP
services by trailing audit logs and can handle events from third-party SaaS vendors,
and even your own custom events. This gives you a wide range of triggers to execute
your code, from every time a query is run on BigQuery to whenever a new network is
created. Unfortunately, Cloud Run is the only service that can consume Eventarc
messages at the current time, which comes with the aforementioned container learn‐
ing curve.
Summary
Let’s summarize what was learned and deployed in this recipe:
•
Cloud Functions allow for the simple running of code from a variety of triggers.
• You should ensure that your functions are operable, with logging, monitoring,
and alerting enabled by default.
• Cloud Functions support many languages, such as TypeScript, Python, and Java.
•
There is also the Cloud Run service, which is container based but can also be
triggered off of events.
• On day one, Cloud Functions provide a more managed service compared to
container-based options.
• Eventarc, which is GCP’s unified event platform, currently only interoperates
with Cloud Run.
6.5 Functions as a Service on AWS
Problem
You need to deploy some code that needs to run every day, and be alerted via email
when failures occur.
Solution
If you haven’t already done so, familiarize yourself with Terraform and the different
authentication mechanisms in Chapter 11.
Create the following variables.tf file:
6.5 Functions as a Service on AWS | 299

variable "function_name" {
type = string
description = "The name for the function"
}
variable "email" {
type = string
description = "The email address to send alarm notifications"
}
Then fill out the corresponding terraform.tfvars file:
function_name = ""
email_address = ""
Create the following provider.tf file and run terraform init:
provider "aws" {}
terraform {
required_providers {
aws = {
source = "hashicorp/aws"
version = "~> 3"
}
archive = {
source = "hashicorp/archive"
version = "~> 2"
}
}
}
Next, create a src folder and the following main.py file:
from logging import getLogger, INFO
logger = getLogger()
logger.setLevel(INFO)
def handle(event, _):
try:
logger.info(event)
except Exception as e:
logger.error(e)
raise e
Create the following main.tf file and run terraform plan:
resource "aws_lambda_function" "this" {
filename = data.archive_file.code.output_path
function_name = var.function_name
role = aws_iam_role.lambda.arn
handler = "main.handle"
source_code_hash = filebase64sha256(data.archive_file.code.output_path)
300 | Chapter 6: Infrastructure as Code

runtime = "python3.9"
depends_on = [
data.archive_file.code
]
}
data "archive_file" "code" {
type = "zip"
source_dir = "${path.module}/src"
output_path = "${path.module}/main.zip"
}
resource "aws_cloudwatch_event_rule" "daily" {
name = "run-daily"
schedule_expression = "cron(* 9 ? * * *)"
}
resource "aws_cloudwatch_event_target" "daily" {
rule = aws_cloudwatch_event_rule.daily.name
arn = aws_lambda_function.this.arn
}
resource "aws_lambda_permission" "allow_cloudwatch" {
statement_id = "AllowExecutionFromEventBridge"
action = "lambda:InvokeFunction"
function_name = aws_lambda_function.this.function_name
principal = "events.amazonaws.com"
source_arn = aws_cloudwatch_event_rule.daily.arn
}
resource "aws_iam_role" "lambda" {
name = var.function_name
assume_role_policy = data.aws_iam_policy_document.assume.json
managed_policy_arns = [
"arn:aws:iam::aws:policy/service-role/AWSLambdaBasicExecutionRole",
]
}
data "aws_iam_policy_document" "assume" {
statement {
effect = "Allow"
actions = ["sts:AssumeRole"]
principals {
type = "Service"
identifiers = [
"lambda.amazonaws.com"
]
}
}
6.5 Functions as a Service on AWS | 301

}
resource "aws_cloudwatch_metric_alarm" "foobar" {
alarm_actions = [
aws_sns_topic.alarm.arn
]
alarm_name = "${var.function_name}-failures"
comparison_operator = "GreaterThanOrEqualToThreshold"
evaluation_periods = "1"
insufficient_data_actions = []
metric_name = "Errors"
namespace = "AWS/Lambda"
period = "60"
statistic = "Sum"
threshold = "1"
treat_missing_data = "notBreaching"
}
resource "aws_sns_topic" "alarm" {
name = "${var.function_name}-failures"
}
resource "aws_sns_topic_subscription" "email" {
topic_arn = aws_sns_topic.alarm.arn
protocol = "email"
endpoint = var.email
}
Review the resources that are going to be created, and then run terraform apply to
make the changes.
Discussion
AWS Lambda functions are a fully serverless way of deploying code. They can be trig‐
gered from a wide array of events and allow you to easily extend AWS services with
custom functionality. In this recipe, you deployed a function which is triggered at a
particular time every day, often used for turning on and off resources to save money
or for running daily reports.
Recipe 7.11 uses AWS-provided remediation actions, but where the action does not
already exist, the easiest way to extend is with a Lambda function. You can trigger
functions off almost everything in AWS using AWS EventBridge, as discussed in Rec‐
ipes 4.11 and 7.5. Most AWS services natively publish events to EventBridge, and it is
also possible to build rules to trail CloudTrail logs, or publish your own custom
events.
The key to having success with functions is ensuring they are operable. In this recipe,
you ensured that the function had enough permissions to write logs to CloudWatch
and that an alert was configured to fire off an email whenever the function failed.
302 | Chapter 6: Infrastructure as Code

When looking to build more complex architectures with Lambda functions, AWS
X-Ray provides a fully managed tracing solution which allows you to follow a partic‐
ular request through all the services that make up your application.
AWS Lambda also possesses the capability to run containers. This can be a simple
way to run certain tools within your AWS environment, as long as the 15-minute exe‐
cution time is sufficient. Lambda functions, as used in this recipe, provide a lower
total-cost-of-ownership approach to executing code, as the environment manage‐
ment is provided by AWS. In building custom containers, you bring much of that
burden back on yourself, and you must have a container strategy and the supporting
infrastructure.
Summary
Let’s summarize what was learned and deployed in this recipe:
• AWS Lambda functions are a fully serverless way of running code.
• You need to ensure they are operable to derive value.
•
By using CloudWatch, you can capture logs and errors, and alert as required.
• EventBridge allows for triggering functions off almost any event.
• These triggers allow you to easily extend AWS services with custom functionality.
• You can run containers directly on Lambda, but that introduces a container
learning curve.
6.6 Functions as a Service on Azure
Problem
You need to deploy some code that needs to run every day, and be alerted via email
when failures occur.
Solution
To complete this recipe, you will need the Azure Functions Core Tools installed,
which you can find instructions for at Azure Functions Core Tools GitHub.
If you haven’t already done so, familiarize yourself with Terraform and the different
authentication mechanisms in Chapter 11.
Create the following variables.tf file:
variable "location" {
type = string
description = "The Azure location for resources"
6.6 Functions as a Service on Azure | 303

}
variable "function_name" {
type = string
description = "The name for the Azure function"
}
variable "email" {
type = string
description = "The email address to notify on errors"
}
Then fill out the corresponding terraform.tfvars file:
location = ""
function_name = ""
email_address = ""
Create the following provider.tf file and run terraform init:
terraform {
required_providers {
azurerm = {
source = "hashicorp/azurerm"
version = "~> 2"
}
null = {
source = "hashicorp/null"
version = "~> 3"
}
random = {
source = "hashicorp/random"
version = "~> 3"
}
archive = {
source = "hashicorp/archive"
version = "~> 2"
}
}
}
provider "azurerm" {
features {}
}
Create the following host.json file:
{
"version": "2.0",
"logging": {
"applicationInsights": {
"samplingSettings": {
"isEnabled": true,
"excludedTypes": "Request"
304 | Chapter 6: Infrastructure as Code

}
}
},
"extensionBundle": {
"id": "Microsoft.Azure.Functions.ExtensionBundle",
"version": "[2.*, 3.0.0)"
}
}
And the following local.setting.json file:
{
"IsEncrypted": false,
"Values": {
"FUNCTIONS_WORKER_RUNTIME": "python",
"AzureWebJobsStorage": ""
}
}
And the following requirements.txt file:
azure-functions==1.7.2
Create and enter a folder called function_name from terraform.tfvars, and create the
following main.py file:
import logging
import azure.functions as func
logger = logging.getLogger(__name__)
logger.setLevel(logging.INFO)
def main(daily: func.TimerRequest):
logger.info(daily)
And the following function.json:
{
"scriptFile": "main.py",
"bindings": [
{
"type": "timerTrigger",
"name": "daily",
"direction": "in",
"schedule": "* * 9 * * *"
}
]
}
Move back up to the parent folder and create the following main.tf file, and run
terraform plan:
6.6 Functions as a Service on Azure | 305

locals {
function = azurerm_application_insights.function
}
data "azurerm_subscription" "current" {}
data "azurerm_client_config" "current" {}
resource "azurerm_resource_group" "function" {
name = var.function_name
location = var.location
}
resource "random_string" "sa_name" {
length = 16
number = false
}
resource "azurerm_storage_account" "f" {
name = random_string.sa_name.result
resource_group_name = azurerm_resource_group.function.name
location = azurerm_resource_group.function.location
account_tier = "Standard"
account_replication_type = "LRS"
}
resource "azurerm_app_service_plan" "function" {
name = var.function_name
location = azurerm_resource_group.function.location
resource_group_name = azurerm_resource_group.function.name
kind = "functionapp"
reserved = true
sku {
tier = "Dynamic"
size = "Y1"
}
}
resource "azurerm_function_app" "function" {
name = var.function_name
location = azurerm_resource_group.function.location
resource_group_name = azurerm_resource_group.function.name
app_service_plan_id = azurerm_app_service_plan.function.id
storage_account_name = azurerm_storage_account.f.name
storage_account_access_key = azurerm_storage_account.f.primary_access_key
os_type = "linux"
version = "~3"
app_settings = {
APPINSIGHTS_INSTRUMENTATIONKEY = local.function.instrumentation_key
APPLICATIONINSIGHTS_CONNECTION_STRING = local.function.connection_string
306 | Chapter 6: Infrastructure as Code

FUNCTIONS_WORKER_RUNTIME = "python"
}
site_config {
linux_fx_version = "PYTHON|3.9"
}
identity {
type = "SystemAssigned"
}
}
data "archive_file" "code" {
type = "zip"
source_dir = "${path.module}/${var.function_name}"
output_path = "${path.module}/main.zip"
}
resource "null_resource" "deploy" {
triggers = {
checksum = filebase64sha256(
data.archive_file.code.output_path
)
}
provisioner "local-exec" {
command = "func azure functionapp publish ${var.function_name}"
}
depends_on = [
azurerm_function_app.function
]
}
resource "azurerm_application_insights" "function" {
name = var.function_name
location = azurerm_resource_group.function.location
resource_group_name = azurerm_resource_group.function.name
workspace_id = azurerm_log_analytics_workspace.insights.id
application_type = "other"
}
resource "azurerm_log_analytics_workspace" "insights" {
name = var.function_name
location = azurerm_resource_group.function.location
resource_group_name = azurerm_resource_group.function.name
sku = "PerGB2018"
retention_in_days = 30
}
resource "azurerm_monitor_metric_alert" "exceptions" {
name = "exceptions"
resource_group_name = azurerm_resource_group.function.name
6.6 Functions as a Service on Azure | 307

scopes = [
azurerm_application_insights.function.id
]
criteria {
metric_namespace = "Microsoft.Insights/components"
metric_name = "exceptions/count"
aggregation = "Count"
operator = "GreaterThan"
threshold = 0
}
action {
action_group_id = azurerm_monitor_action_group.email.id
}
}
resource "azurerm_monitor_action_group" "email" {
name = var.function_name
resource_group_name = azurerm_resource_group.function.name
short_name = var.function_name
email_receiver {
name = "ops"
email_address = var.email
}
}
Review the resources that are going to be created, and then run terraform apply to
make the changes.
Discussion
Azure Functions are a cheap and simple way of running code on Azure. In this
recipe, you configured the timer trigger to run the function daily, a pattern which is
often used for scheduling resources and running regular reporting. They’re used in
both Recipes 7.6 and 7.12 to notify and take action when compliance issues are dis‐
covered.
You need to ensure that the functions you deploy are operable, so you can understand
when and what failures occur. To this end, the recipe configures Application Insights,
which provides a holistic set of monitoring around the function, including a wide
variety of metrics. One of those metrics, the amount of thrown exceptions, was used
to configure an automatic failure alert. This automatically dispatches emails when‐
ever there is a failure via an action group.
A key part of building out a suite of security solutions with Azure Functions is Event
Grid, as seen in Recipes 7.6 and 7.12. As Event Grid natively produces a wide variety
of Azure events, you can trigger a wide variety of automation tags, such as automati‐
308 | Chapter 6: Infrastructure as Code

cally putting virtual machine data into a configuration management database on cre‐
ation or logging when a privileged role is leveraged in a production or sensitive sub‐
scription.
Summary
Let’s summarize what was learned and deployed in this recipe:
•
Azure Functions are a simple way of running code in the cloud.
• They are triggered by events.
• The recipe configured a timer trigger to run the function every day at a set time.
• By integrating the Event Grid, you can trigger functions off almost any event in
Azure.
•
By ensuring that the functions are configured with App Insights, you can simply
manage functions.
6.7 Robust Deployment on GCP
Problem
You want to use version control and CI/CD pipelines to deploy your code.
Solution
If you haven’t already done so, familiarize yourself with Terraform and the different
authentication mechanisms in Chapter 11.
Create a variables.tf file and copy the following contents:
variable "project" {
type = string
description = "The project to deploy the resources into"
}
variable "region" {
type = string
description = "The region to deploy the resources into"
}
variable "repository_name" {
type = string
description = "The name of the repository"
}
Then fill out the corresponding terraform.tfvars file:
6.7 Robust Deployment on GCP | 309

project = ""
region = ""
repository_name = ""
Create the following provider.tf file and run terraform init:
provider "google" {
project = var.project
region = var.region
}
terraform {
required_providers {
google = {
source = "hashicorp/google"
version = "~> 4"
}
}
}
Define the following cloudbuild.yaml file:
steps:
- id: 'tf plan'
name: 'hashicorp/terraform:1.0.0'
entrypoint: 'sh'
args:
- '-c'
- |
echo $BRANCH_NAME
terraform init
terraform plan -no-color
- id: 'tf apply'
name: 'hashicorp/terraform:1.0.0'
entrypoint: 'sh'
args:
- '-c'
- |
echo $BRANCH_NAME
if [ $BRANCH_NAME == "main" ]; then
terraform init
terraform apply -no-color -auto-approve
fi
options:
logging: CLOUD_LOGGING_ONLY
Create the following main.tf file and run terraform plan:
data "google_project" "project" {}
locals {
required_apis = [
"cloudbuild.googleapis.com",
"sourcerepo.googleapis.com",
310 | Chapter 6: Infrastructure as Code

"storage.googleapis.com",
]
}
resource "google_project_service" "api" {
for_each = toset(local.required_apis)
service = each.value
disable_on_destroy = false
}
resource "google_storage_bucket" "state" {
name = "${var.repository_name}-state"
location = var.region
versioning {
enabled = true
}
}
resource "google_sourcerepo_repository" "this" {
name = var.repository_name
depends_on = [
google_project_service.api
]
}
resource "google_cloudbuild_trigger" "main" {
trigger_template {
branch_name = "main"
repo_name = google_sourcerepo_repository.this.name
}
service_account = google_service_account.cloudbuild.id
filename = "cloudbuild.yaml"
depends_on = [
google_project_service.api
]
}
resource "google_cloudbuild_trigger" "branches" {
trigger_template {
branch_name = "main"
invert_regex = true
repo_name = google_sourcerepo_repository.this.name
}
service_account = google_service_account.cloudbuild.id
filename = "cloudbuild.yaml"
6.7 Robust Deployment on GCP | 311

depends_on = [
google_project_service.api
]
}
resource "google_service_account" "cloudbuild" {
account_id = "${var.repository_name}-cloudbuild"
}
resource "google_project_iam_member" "act_as" {
project = data.google_project.project.project_id
role = "roles/iam.serviceAccountUser"
member = join(":", [
"serviceAccount",
google_service_account.cloudbuild.email
])
}
resource "google_project_iam_member" "editor" {
project = data.google_project.project.project_id
role = "roles/editor"
member = join(":", [
"serviceAccount",
google_service_account.cloudbuild.email
])
}
output "git_credential_command" {
value = join(" ", [
"git config --global",
"credential.https://source.developers.google.com.helper gcloud.sh"
])
}
output "add_remote_command" {
value = join(" ", [
"git remote add origin",
google_sourcerepo_repository.this.url
])
}
output "backend" {
value = <<BACKEND
backend "gcs" {
bucket = "${google_storage_bucket.state.name}"
}
BACKEND
}
Review the resources that are going to be created, and then run terraform apply to
make the changes.
312 | Chapter 6: Infrastructure as Code

Discussion
By completing the recipe, you now have a git repository and the CloudBuild jobs
required to perform CI and CD operations. In order to work with Terraform in
CI/CD, you need to upload state to the bucket that was created. Update your pro‐
vider.tf file with the backend output in the terraform apply execution so it looks like
the following:
provider "google" {
project = var.project
region = var.region
}
terraform {
required_providers {
google = {
source = "hashicorp/google"
version = "~> 4"
}
}
backend "gcs" {
bucket = "..."
}
}
Keeping secure access to Terraform state is crucial. It can contain
sensitive information, and also if corrupted or lost, it can be
incredibly time consuming to recover. All buckets containing state
should, at the very least, have versioning enabled, allowing you to
recover from incidents.
Next, run terraform init to copy the state up into the bucket. After that, initialize
Git by running git init, and add the remote origin by running the command from
the add_remote_command output. Now run git config --global credential
.https://source.developers.google.com.helper gcloud.sh to allow you to use
your Cloud SDK credentials to authenticate against Git. Last, to get your code into
the repository, run git push -u origin main. This will trigger the CloudBuild job,
which will apply any changes pushed to that branch.
Unfortunately, at the current time, source repositories do not support pull requests,
although the recipe includes an example CloudBuild trigger for a continuous integra‐
tion job that runs a Terraform plan with the changes on the branch. In reality, to get
the most out of version control and CloudBuild, you will want to explore software as
a service options such as GitHub.
6.7 Robust Deployment on GCP | 313

As seen in Recipe 7.7, there are tools which you should look to build into your CI/CD
pipelines. For example, you can add a Checkov task by extending cloudbuild.yaml
with a new task like the following:
steps:
- id: 'checkov'
name: 'bridgecrew/checkov'
With your CI jobs, you want to build as much confidence as you can that your change
is of the highest quality and presents minimal risk. The following are common items
to check as part of CI:
•
Terraform files are formatted correctly.
• Python code passes all its tests.
• Static application security testing (SAST) tools such as semgrep find no new
issues.
Using CI/CD as the primary mechanism of driving change in environments is key to
achieving a true least-privilege identity posture. By pushing all change via auditable
pipelines, you can remove the ability of end users to make changes in projects
through the console or other mechanisms. Then as you bring tools into place, you
can enforce standards across the entire organization.
Summary
Let’s summarize what was learned and deployed in this recipe:
• CloudBuild is a fully managed platform for running CI and CD tasks.
• It allows you to pull in containers to perform a variety of tasks on the code in a
repository.
•
Cloud Source Repositories is a managed version control system on GCP.
• It is recommended to explore other version control options such as GitHub.
• To work with Terraform in a team, or via automation, state needs uploading to a
Cloud Storage bucket.
• CI is about building confidence that the proposed change is of sufficient quality.
6.8 Robust Deployment on AWS
Problem
You want to use version control and CI/CD pipelines to deploy your code.
314 | Chapter 6: Infrastructure as Code

Solution
If you haven’t already done so, familiarize yourself with Terraform and the different
authentication mechanisms in Chapter 11.
Create a variables.tf file and copy the following contents:
variable "repository_name" {
type = string
description = "The name for the repository"
}
variable "profile_name" {
type = string
description = "The name of the AWS profile to use for codecommit auth"
default = "default"
}
Then fill out the corresponding terraform.tfvars file:
repository_name = ""
profile_name = ""
Create the following provider.tf file and run terraform init:
provider "aws" {}
terraform {
required_providers {
aws = {
source = "hashicorp/aws"
version = "~> 3"
}
}
}
Define the following buildspec.yaml file:
version: 0.2
phases:
build:
commands:
- |
if [ $CODEBUILD_SOURCE_VERSION != "main" ]; then
terraform init
terraform plan -no-color
fi
- |
if [ $CODEBUILD_SOURCE_VERSION == "main" ]; then
terraform init
terraform apply -no-color -auto-approve
fi
6.8 Robust Deployment on AWS | 315

Create the following main.tf file and run terraform plan:
resource "aws_s3_bucket" "state" {
bucket = "${var.repository_name}-state"
force_destroy = true
versioning {
enabled = true
}
}
resource "aws_codecommit_repository" "this" {
repository_name = var.repository_name
default_branch = "main"
}
resource "aws_iam_role" "codebuild" {
name = "${var.repository_name}-codebuild"
assume_role_policy = data.aws_iam_policy_document.cb_assume.json
managed_policy_arns = [
"arn:aws:iam::aws:policy/AdministratorAccess"
]
}
data "aws_iam_policy_document" "cb_assume" {
statement {
actions = [
"sts:AssumeRole"
]
principals {
type = "Service"
identifiers = [
"codebuild.amazonaws.com"
]
}
}
}
resource "aws_codebuild_project" "main" {
name = "${var.repository_name}-main"
service_role = aws_iam_role.codebuild.arn
artifacts {
type = "NO_ARTIFACTS"
}
environment {
compute_type = "BUILD_GENERAL1_SMALL"
316 | Chapter 6: Infrastructure as Code

image = "hashicorp/terraform:1.0.0"
type = "LINUX_CONTAINER"
}
source {
type = "CODECOMMIT"
location = aws_codecommit_repository.this.clone_url_http
}
}
resource "aws_codebuild_project" "pull_requests" {
name = "${var.repository_name}-pull-requests"
service_role = aws_iam_role.codebuild.arn
artifacts {
type = "NO_ARTIFACTS"
}
environment {
compute_type = "BUILD_GENERAL1_SMALL"
image = "hashicorp/terraform:1.0.0"
type = "LINUX_CONTAINER"
}
source {
type = "CODECOMMIT"
location = aws_codecommit_repository.this.clone_url_http
}
}
resource "aws_cloudwatch_event_rule" "pull_requests" {
name = "${var.repository_name}-pull-requests"
event_pattern = <<PATTERN
{
"detail": {
"event": [
"pullRequestCreated",
"pullRequestSourceBranchUpdated"
]
},
"detail-type": ["CodeCommit Pull Request State Change"],
"resources": ["${aws_codecommit_repository.this.arn}"],
"source": ["aws.codecommit"]
}
PATTERN
}
resource "aws_cloudwatch_event_rule" "main" {
name = "${var.repository_name}-main"
event_pattern = <<PATTERN
{
6.8 Robust Deployment on AWS | 317

"detail": {
"event": [
"referenceUpdated"
],
"referenceName": [
"${aws_codecommit_repository.this.default_branch}"
]
},
"detail-type": ["CodeCommit Repository State Change"],
"resources": ["${aws_codecommit_repository.this.arn}"],
"source": ["aws.codecommit"]
}
PATTERN
}
resource "aws_cloudwatch_event_target" "main" {
arn = aws_codebuild_project.main.arn
input = <<TEMPLATE
{
"sourceVersion": "${aws_codecommit_repository.this.default_branch}"
}
TEMPLATE
role_arn = aws_iam_role.events.arn
rule = aws_cloudwatch_event_rule.main.name
target_id = "Main"
}
resource "aws_cloudwatch_event_target" "pull_requests" {
arn = aws_codebuild_project.pull_requests.arn
role_arn = aws_iam_role.events.arn
rule = aws_cloudwatch_event_rule.pull_requests.name
target_id = "PullRequests"
input_transformer {
input_paths = {
sourceVersion : "$.detail.sourceCommit"
}
input_template = <<TEMPLATE
{
"sourceVersion": <sourceVersion>
}
TEMPLATE
}
}
resource "aws_iam_role" "events" {
name = "${var.repository_name}-events"
assume_role_policy = data.aws_iam_policy_document.events_assume.json
inline_policy {
318 | Chapter 6: Infrastructure as Code

name = "execution"
policy = data.aws_iam_policy_document.events_execution.json
}
}
data "aws_iam_policy_document" "events_assume" {
statement {
actions = [
"sts:AssumeRole"
]
principals {
type = "Service"
identifiers = [
"events.amazonaws.com"
]
}
}
}
data "aws_iam_policy_document" "events_execution" {
statement {
actions = [
"codebuild:StartBuild"
]
resources = [
aws_codebuild_project.main.arn,
aws_codebuild_project.pull_requests.arn,
]
}
}
output "add_remote_command" {
value = join("", [
"git remote add origin ",
"codecommit://",
var.profile_name,
"@",
aws_codecommit_repository.this.repository_name
])
}
output "backend" {
value = <<BACKEND
backend "s3" {
bucket = "${aws_s3_bucket.state.bucket}"
key = "terraform.tfstate"
}
BACKEND
}
6.8 Robust Deployment on AWS | 319

Review the resources that are going to be created, and then run terraform apply to
make the changes.
Discussion
By completing the recipe, you now have a Git repository and the CodeBuild jobs
required to perform CI and CD operations. In order to work with Terraform in
CI/CD, you need to upload state for the bucket that was created. Update your pro‐
vider.tf file with the backend output in the terraform apply execution so it looks like
the following:
provider "aws" {}
terraform {
required_providers {
aws = {
source = "hashicorp/aws"
version = "~> 3"
}
}
backend "s3" {
bucket = "..."
key = "terraform.tfstate"
}
}
It is imperative you keep the Terraform state files secure. First, they
often contain sensitive information such as passwords and API
keys. Second, if the state is lost or corrupted, it often takes a signifi‐
cant amount of time to recover. In this recipe, the S3 bucket was
configured with versioning to allow previous state files to be recov‐
ered when a failure potentially occurs.
Next, run terraform init to copy the state up into the bucket. After that, initialize
git by running git init, and add the remote origin by running the command from
the add_remote_command output. Now follow the instructions found in the AWS
CodeCommit documentation to enable you to authenticate against the repository in
CodeCommit. Lastly, to get your code into the repository, run git push -u origin
main. This will trigger the CodeBuild job, which will apply any changes pushed to that
branch.
If you were to push another branch and raise a pull request, then the corresponding
CodeBuild job will execute and log out the planned changes. This allows you to
understand before merging the pull request what the expected changes are so you can
make an informed decision on whether to merge the change. There are examples
320 | Chapter 6: Infrastructure as Code

online of people extending this pattern to automatically decorate the pull request with
the details of the plan using Lambda functions.
By leveraging automation to verify and action your changes, you unlock the ability to
bring tooling to bear to prevent changes that are of insufficient quality. In Recipe 7.8,
Checkov is explored as a tool for preventing noncompliant infrastructure from being
deployed. To add Checkov scanning to your CI/CD infrastructure, add and apply the
following Terraform:
resource "aws_cloudwatch_event_target" "checkov" {
arn = aws_codebuild_project.checkov.arn
role_arn = aws_iam_role.events.arn
rule = aws_cloudwatch_event_rule.pull_requests.name
target_id = "Checkov"
input_transformer {
input_paths = {
sourceVersion : "$.detail.sourceCommit"
}
input_template = <<TEMPLATE
{
"sourceVersion": <sourceVersion>
}
TEMPLATE
}
}
resource "aws_codebuild_project" "checkov" {
name = "${var.repository_name}-checkov"
service_role = aws_iam_role.codebuild.arn
artifacts {
type = "NO_ARTIFACTS"
}
environment {
compute_type = "BUILD_GENERAL1_SMALL"
image = "bridgecrew/checkov"
type = "LINUX_CONTAINER"
}
source {
type = "CODECOMMIT"
location = aws_codecommit_repository.this.clone_url_http
}
}
CI jobs are fundamentally about building confidence in the quality of the change, that
it will provide value that far outstrips the potential risk. Based on what code is in the
6.8 Robust Deployment on AWS | 321

repository, there are a variety of checks that should be done, such as linting, format‐
ting, and security scanning.
With auditable pipelines as the primary mechanism for delivering change, you can
significantly reduce the permissions available to users. Rather than users being able to
assume highly privileged roles, you can reduce their permissions to read only and
have only the pipelines with the permission to create, update, and delete resources.
With the path of change both automated and known, you can embed a toolchain into
the workflows of every team to bring consistency to your estate.
Summary
Let’s summarize what was learned and deployed in this recipe:
• CodeBuild is a fully managed build platform on AWS.
• CodeCommit is a managed version control system.
• You can use CodeBuild to automatically run builds on pull requests, or when a
branch is pushed to.
•
Terraform state should be uploaded to secure S3 buckets to allow multiple people
to work on the same infrastructure.
• State files should be kept securely with versioning as they often contain sensitive
information and are time consuming to reconstruct.
•
By making CI/CD the way change happens, you can enforce security standards
before changes occur.
• By embedding a toolchain into every pipeline, you bring standardization and
consistency.
6.9 Robust Deployment on Azure
Problem
You want to use version control and CI/CD pipelines to deploy your code.
Solution
This recipe requires a preexisting Azure DevOps organization, with an owner-level
personal access token locally available.
If you haven’t already done so, familiarize yourself with Terraform and the different
authentication mechanisms in Chapter 11.
Create a variables.tf file and copy the following contents:
322 | Chapter 6: Infrastructure as Code

variable "org_service_url" {
type = string
description = "The Azure DevOps Organization URL"
}
variable "token" {
type = string
description = "A personal access token with owner privileges"
}
variable "project_name" {
type = string
description = "The name of the project to create"
}
variable "subscription_id" {
type = string
description = "The ID of the subscription to deploy into"
}
variable "subscription_name" {
type = string
description = "The name of the subscription to deploy into"
}
variable "location" {
type = string
description = "The location to deploy resources into"
}
Then fill out the corresponding terraform.tfvars file:
org_service_url = ""
token = ""
project_name = ""
location = ""
subscription_id = ""
subscription_name = ""
Create the following provider.tf file and run terraform init:
terraform {
required_providers {
azuredevops = {
source = "microsoft/azuredevops"
version = "0.1.7"
}
azurerm = {
source = "hashicorp/azurerm"
version = "~> 2"
}
}
}
6.9 Robust Deployment on Azure | 323

provider "azuredevops" {
org_service_url = var.org_service_url
personal_access_token = var.token
}
provider "azurerm" {
features {}
}
Define the following azure-pipelines.yaml file:
trigger:
- main
pool: Hosted Ubuntu 1604
steps:
- script: |
OPTIONS="deb [arch=$(dpkg --print-architecture)]"
URL="https://apt.releases.hashicorp.com"
SUFFIX="$(lsb_release -cs) main"
curl -fsSL https://apt.releases.hashicorp.com/gpg | sudo apt-key add -
sudo apt-add-repository "$OPTIONS $URL $SUFFIX"
sudo apt install terraform=1.0.0
displayName: Install Terraform
- script: |
if [ ${Build.SourceBranchName} != "main" ]; then
terraform init
terraform plan -no-color
fi
displayName: Plan
- script: |
pip3 install checkov
checkov --directory .
displayName: Checkov
- script: |
if [ ${Build.SourceBranchName} == "main" ]; then
terraform init
terraform apply -auto-approve
fi
displayName: Apply
Create the following main.tf file and run terraform plan:
data "azuredevops_git_repository" "repo" {
project_id = azuredevops_project.project.id
name = var.project_name
}
resource "azuredevops_project" "project" {
name = var.project_name
}
324 | Chapter 6: Infrastructure as Code

resource "azuredevops_git_repository" "infra" {
project_id = azuredevops_project.project.id
name = "infra"
initialization {
init_type = "Uninitialized"
}
}
resource "azuredevops_build_definition" "main" {
project_id = azuredevops_project.project.id
name = "main"
ci_trigger {
use_yaml = true
}
repository {
repo_type = "TfsGit"
repo_id = data.azuredevops_git_repository.repo.id
yml_path = "azure-pipelines.yml"
}
}
data "azurerm_client_config" "current" {}
resource "azuredevops_serviceendpoint_azurerm" "endpointazure" {
project_id = azuredevops_project.project.id
service_endpoint_name = "Azure"
azurerm_spn_tenantid = data.azurerm_client_config.current.tenant_id
azurerm_subscription_id = var.subscription_id
azurerm_subscription_name = var.subscription_name
}
resource "azurerm_resource_group" "terraform" {
name = var.project_name
location = var.location
}
resource "azurerm_storage_account" "state" {
name = "${var.project_name}state"
resource_group_name = azurerm_resource_group.terraform.name
location = azurerm_resource_group.terraform.location
account_tier = "Standard"
account_replication_type = "LRS"
blob_properties {
versioning_enabled = true
}
}
resource "azurerm_storage_container" "state" {
6.9 Robust Deployment on Azure | 325

name = "state"
storage_account_name = azurerm_storage_account.state.name
container_access_type = "private"
}
output "add_remote_command" {
value = join("", [
"git remote add origin ",
azuredevops_git_repository.infra.remote_url
])
}
output "backend" {
value = <<BACKEND
backend "azurerm" {
resource_group_name = "${azurerm_resource_group.terraform.name}"
storage_account_name = "${azurerm_storage_account.state.name}"
container_name = "state"
key = "terraform.tfstate"
}
BACKEND
}
Review the resources that are going to be created, and then run terraform apply to
make the changes.
Discussion
By completing the recipe, you now have a Git repository and the Azure DevOps build
definitions required to perform CI and CD operations. In order to work with Terra‐
form in CI/CD, you need to upload state to the storage account that was created.
Update your provider.tf file with the backend output in the terraform apply execu‐
tion so it looks like the following:
terraform {
required_providers {
azuredevops = {
source = "microsoft/azuredevops"
version = "0.1.7"
}
azurerm = {
source = "hashicorp/azurerm"
version = "~> 2"
}
}
backend "azurerm" {
resource_group_name = "..."
storage_account_name = "..."
container_name = "state"
key = "terraform.tfstate"
}
326 | Chapter 6: Infrastructure as Code

}
provider "azuredevops" {
org_service_url = var.org_service_url
personal_access_token = var.token
}
provider "azurerm" {
features {}
}
The storage accounts you store state in should have versioning
enabled so that errors can be easily and quickly recoverable. Addi‐
tionally, as state files often contain sensitive information, such as
passwords and API keys, it is critical that access to the accounts is
tightly controlled.
Next, run terraform init to copy the state up into the bucket. After that, initialize
Git by running git init, and add the remote origin by running the command from
the add_remote_command output. To get your code into the repository, run git push
-u origin main. This will trigger the pipeline, which will apply any changes pushed
to that branch.
When working with Git, a fundamental concept is a pull request, or PR. A PR is
where you request to make changes to a shared branch. When someone raises a PR,
you should run a Continuous Integration job to execute tests, or in this case, a Terra‐
form plan. To set up automated PR building, and also prevent people from pushing
directly to the main branch, add and apply the following resources:
resource "azuredevops_build_definition" "prs" {
project_id = azuredevops_project.project.id
name = "prs"
repository {
repo_type = "TfsGit"
repo_id = data.azuredevops_git_repository.repo.id
yml_path = "azure-pipelines.yml"
}
}
resource "azuredevops_branch_policy_build_validation" "prs" {
project_id = azuredevops_project.project.id
settings {
build_definition_id = azuredevops_build_definition.prs.id
display_name = "Require clean build"
valid_duration = 720
scope {
6.9 Robust Deployment on Azure | 327

repository_id = azuredevops_git_repository.infra.id
repository_ref = azuredevops_git_repository.infra.default_branch
match_type = "Exact"
}
}
}
As shown in Recipe 7.9, there are tools which you should look to build into your
CI/CD pipelines. For example, you can add a Checkov task by extending azure-
pipelines.yaml with a new step like the following:
- script: |
pip3 install checkov
checkov --directory .
displayName: Checkov
Embedding tools like Checkov into every change that happens in your estate is one of
the fundamental ways to scale the impact of the security team. Delivery teams should
also be following a CI/CD-driven approach and will naturally want to run a variety of
tests, checks, and tools as part of their own workflows. By being able to make it as
simple as possible to embed the security tools, you can enable teams to identify and
potentially fix their own issues independently.
Having the organization be CI/CD first is critical to removing highly privileged access
from users. If they can make all the changes they need to via code, then their console
access can be reduced to read-only. The principle of least privilege is reliant on high
levels of automation to be truly embraced.
Summary
Let’s summarize what was learned and deployed in this recipe:
• Azure DevOps provides CI/CD capabilities on Azure.
•
You can set up Git repositories and build definitions to store your code.
• By delivering change via automation, you can embed tooling into the workflow.
• In order to work with state across users and systems, you need to upload it to a
storage account.
• These storage accounts should be closely guarded, as state contains sensitive
information and is very time consuming to reconstruct if it’s lost or corrupted.
• Becoming familiar with CI/CD is critical for being able to reduce the permissions
of end users, as it allows them to make change in an audited, automated fashion.
328 | Chapter 6: Infrastructure as Code

6.10 Deployment at Scale on GCP
Problem
You wish to be able to deploy a set of baseline resources across a number of projects.
Solution
This recipe enables a base set of APIs across all projects in the organization and a spe‐
cific set of APIs for serverless development under a particular folder.
If you haven’t already done so, familiarize yourself with Terraform and the different
authentication mechanisms in Chapter 11.
Create the following variables.tf file:
variable "folder_id" {
type = string
description = "The folder ID containing serverless projects"
}
Then fill out the corresponding terraform.tfvars file:
folder_id = ""
Create the following provider.tf file and run terraform init:
provider "google" {}
terraform {
required_providers {
google = {
source = "hashicorp/google"
version = "~> 4"
}
}
}
Create the following main.tf file and run terraform plan:
data "google_projects" "all_active" {
filter = "lifecycleState:ACTIVE"
}
data "google_projects" "under_folder" {
filter = "parent.id:${var.folder_id}"
}
locals {
required_apis = [
"logging.googleapis.com",
"storage.googleapis.com",
]
6.10 Deployment at Scale on GCP | 329

serverless_apis = [
"cloudbuild.googleapis.com",
"cloudfunctions.googleapis.com",
]
all_project_ids = [
for project in data.google_projects.all_active.projects :
project.project_id
]
required = setproduct(
local.required_apis,
local.all_project_ids
)
folder_project_ids = [
for project in data.google_projects.under_folder.projects :
project.project_id
]
serverless = setproduct(
local.serverless_apis,
local.folder_project_ids
)
}
resource "google_project_service" "all" {
for_each = {
for req in local.required : index(local.required, req) => req
}
service = each.value[0]
project = each.value[1]
disable_on_destroy = false
}
resource "google_project_service" "serverless" {
for_each = {
for req in local.serverless : index(local.serverless, req) => req
}
service = each.value[0]
project = each.value[1]
disable_on_destroy = false
}
Review the resources that are going to be created, and then run terraform apply to
make the changes.
Discussion
As every resource in the Google Terraform provider accepts an explicit project
parameter, deploying across multiple projects can be done with a single provider defi‐
nition. In Azure and AWS, it is complicated by the fact that iterating over accounts or
subscriptions must be done outside of Terraform.
330 | Chapter 6: Infrastructure as Code

In this recipe, you used the setproduct function to build out a list of project and API
tuples. By combining this with a for_each definition, you can easily create a distinct
resource for each project and API pairing.
Due to the generally permissible boundaries between projects, commonly services in
GCP are deployed centrally and reach out into the clients’ projects. However, there
are cases when having this as a pattern is useful. One is the recipe itself, where you
wish to enable a set of default APIs automatically within a project. Another is grant‐
ing a service account granular IAM access within a set of projects.
The filter option used in the recipe accepts a variety of different fields. In addition to
filtering by state and parent, you can also filter by labels and names, allowing you to
list only the projects you require. This avoids having to complicate the code by doing
dynamic filtering within the Terraform itself.
Summary
Let’s summarize what was learned and deployed in this recipe:
•
All GCP resources in Terraform support a project parameter.
• This parameter allows you to dynamically deploy the same resource into multiple
projects.
•
By using the google_projects data provider, you can get a list of projects based
on a filter.
• The setproduct function in Terraform allows you to build out a list of pairs to
iterate over.
6.11 Deployment at Scale on AWS
Problem
You wish to able to deploy a set of baseline resources across a number of accounts.
Solution
This recipe requires boto3 be available on the current Python path, which can be
done by running pip install boto3 and needs to be run from the organization root
account.
If you haven’t already done so, familiarize yourself with Terraform and the different
authentication mechanisms in Chapter 11.
Create the following variables.tf file:
6.11 Deployment at Scale on AWS | 331

variable "target_account_id" {
type = string
description = "The account to deploy into"
}
variable "cross_account_role" {
type = string
description = "The account to deploy into"
}
variable "region" {
type = string
description = "The region to deploy into"
}
Then fill out the corresponding terraform.tfvars file, without defining a target_
account_id:
cross_account_role = ""
region = ""
Create the following provider.tf file and run terraform init:
provider "aws" {
region = var.region
}
provider "aws" {
alias = "target"
region = var.region
assume_role {
role_arn = join("", [
"arn:aws:iam::",
var.target_account_id,
":role/",
var.cross_account_role
])
}
}
terraform {
required_providers {
aws = {
source = "hashicorp/aws"
version = "~> 3"
}
}
}
Then create an account_iterator.py file:
import subprocess
import boto3
332 | Chapter 6: Infrastructure as Code

def init():
subprocess.run(f"terraform init", check=True, shell=True)
def get_accounts():
organizations = boto3.client('organizations')
paginator = organizations.get_paginator("list_accounts")
return [
account["Id"]
for page in paginator.paginate()
for account in page["Accounts"]
if account["Status"] != "SUSPENDED"
]
def workspace_exists(account):
returncode = subprocess.run(
f"terraform workspace list | grep {account}",
shell=True
).returncode
return returncode == 0
def create_workspace(account):
subprocess.run(
f"terraform workspace new {account}",
check=True,
shell=True
)
def switch_to_workspace(account):
subprocess.run(
f"terraform workspace select {account}",
check=True,
shell=True
)
def plan(account):
subprocess.run(
f"terraform plan -var target_account_id={account}",
check=True,
shell=True
)
def apply(account):
subprocess.run(
f"terraform apply -var target_account_id={account} -auto-approve",
check=True,
shell=True
)
def run(is_apply=False):
init()
6.11 Deployment at Scale on AWS | 333

for account in get_accounts():
if not workspace_exists(account):
create_workspace(account)
switch_to_workspace(account)
plan(account)
if is_apply:
apply(account)
if __name__ == "__main__":
if len(sys.argv) == 2 and sys.argv[1] == "apply":
run(True)
else:
run()
Discussion
Now, if you define any Terraform resources within the folder and run python
account_iterator.py, it will output a plan against every active account in the organi‐
zation. By running python account_iterator.py apply, you will apply the changes to
every account in the organization. The code uses Terraform workspaces to create state
files for each account, ensuring that each account is sandboxed from the others.
Due to the hard boundaries between accounts, this pattern is used for many tasks
with an AWS estate. In Recipe 7.5, you need an AWS Config recorder configured in
every account, in order to be able to deploy organization rules successfully. To do this,
create the following main.tf file and run python account_iterator.py apply:
data "aws_caller_identity" "current" {
provider = aws.target
}
resource "aws_config_delivery_channel" "this" {
provider = aws.target
name = "delivery_channel"
s3_bucket_name = aws_s3_bucket.bucket.bucket
depends_on = [
aws_config_configuration_recorder.this,
aws_s3_bucket_policy.config
]
}
resource "aws_s3_bucket" "bucket" {
provider = aws.target
bucket = join("-", [
"config",
data.aws_caller_identity.current.account_id
])
}
resource "aws_config_configuration_recorder" "this" {
provider = aws.target
334 | Chapter 6: Infrastructure as Code

name = "recorder"
role_arn = aws_iam_role.config.arn
}
resource "aws_iam_role" "config" {
provider = aws.target
name = "config-delivery"
assume_role_policy = data.aws_iam_policy_document.assume_role.json
}
data "aws_iam_policy_document" "assume_role" {
statement {
actions = [
"sts:AssumeRole"
]
effect = "Allow"
principals {
type = "Service"
identifiers = ["config.amazonaws.com"]
}
}
}
resource "aws_iam_role_policy_attachment" "a" {
provider = aws.target
role = aws_iam_role.config.name
policy_arn = "arn:aws:iam::aws:policy/service-role/AWSConfigRole"
}
resource "aws_iam_role_policy" "config" {
provider = aws.target
name = "config-delivery"
role = aws_iam_role.config.id
policy = data.aws_iam_policy_document.config_role.json
}
data "aws_iam_policy_document" "config_role" {
statement {
actions = [
"s3:*"
]
effect = "Allow"
resources = [
aws_s3_bucket.bucket.arn,
"${aws_s3_bucket.bucket.arn}/*"
]
6.11 Deployment at Scale on AWS | 335

}
}
Other common use cases include bootstrapping a set of base roles into every account,
deploying transit gateways attachments, and deploying log forwarding architectures.
Summary
Let’s summarize what was learned and deployed in this recipe:
• To deploy into multiple accounts, you need multiple provider definitions.
• The Python code in the recipe collects a list of all active accounts in the
organization.
• By using Terraform workspaces, you keep state sandboxed and distinct from
other accounts.
• A common use case for this is configuring the AWS Config recorder in every
account.
6.12 Deployment at Scale on Azure
Problem
You wish to able to deploy a set of baseline resources across a number of subscriptions.
Solution
This recipe requires azure-mgmt-resource and azure-identity to be available on
the current Python path, which can be done by running pip install azure-mgmt-
resource azure-identity.
If you haven’t already done so, familiarize yourself with Terraform and the different
authentication mechanisms in Chapter 11.
Create the following variables.tf file:
variable "location" {
type = string
description = "The Azure location for resources"
}
variable "subscription_id" {
type = string
description = "The subscription to deploy into"
}
Then fill out the corresponding terraform.tfvars file without defining a subscrip
tion_id value:
336 | Chapter 6: Infrastructure as Code

location = ""
Define the following provider.tf file and run terraform init:
terraform {
required_providers {
azurerm = {
source = "hashicorp/azurerm"
version = "~> 2"
}
}
}
provider "azurerm" {
features {}
subscription_id = var.subscription_id
}
Then create a subscription_iterator.py file:
import subprocess
import sys
from azure.identity import AzureCliCredential
from azure.mgmt.resource import SubscriptionClient
def init():
subprocess.run(
f"terraform init",
check=True,
shell=True
)
def get_subscriptions():
credential = AzureCliCredential()
client = SubscriptionClient(credential)
return [
return [
subscription.subscription_id for
subscription in client.subscriptions.list()
]
]
def workspace_exists(subscription):
completed_process = subprocess.run(
f"terraform workspace list | grep {subscription}",
shell=True
)
return completed_process.returncode == 0
6.12 Deployment at Scale on Azure | 337

def create_workspace(subscription):
subprocess.run(
f"terraform workspace new {subscription}",
check=True,
shell=True
)
def switch_to_workspace(subscription):
subprocess.run(
f"terraform workspace select {subscription}",
check=True,
shell=True
)
def plan(subscription):
subprocess.run(
f"terraform plan -var subscription_id={subscription}",
check=True,
shell=True,
)
def apply(subscription):
subprocess.run(
f"terraform apply -var subscription_id={subscription} -auto-approve",
check=True,
shell=True,
)
def run(run_plan=True):
init()
for subscription in get_subscriptions():
if not workspace_exists(subscription):
create_workspace(subscription)
switch_to_workspace(subscription)
if run_plan:
plan(subscription)
else:
apply(subscription)
if __name__ == "__main__":
if len(sys.argv) == 2:
run(sys.argv[1] != "apply")
else:
run()
338 | Chapter 6: Infrastructure as Code

Discussion
Now, if you define any Terraform resources within the folder and run python sub
scription_iterator.py, it will output a plan against every subscription in the tenant.
By running python subscription_iterator.py apply, you will apply the changes to
every subscription in the tenant. The code uses Terraform workspaces to create state
files for each subscription, ensuring that each account is sandboxed from the others.
There are a variety of use cases in Azure, where you need to enable, deploy, or config‐
ure resources across an array of subscriptions. For example, to configure Security
Center across all subscriptions within the organization, add the following main.tf file
and run python subscription_iterator.py apply:
resource "azurerm_security_center_auto_provisioning" "this" {
auto_provision = "On"
}
locals {
resource_types = toset([
"AppServices",
"ContainerRegistry",
"KeyVaults",
"KubernetesService",
"SqlServers",
"SqlServerVirtualMachines",
"StorageAccounts",
"VirtualMachines",
"Arm",
"Dns"
])
}
resource "azurerm_security_center_subscription_pricing" "this" {
for_each = local.resource_types
tier = "Free"
resource_type = each.value
}
Summary
Let’s summarize what was learned and deployed in this recipe:
•
To deploy into multiple subscriptions, you need multiple provider definitions.
• The Python code in the recipe iterates over every subscription in the tenant.
• By using Terraform workspaces, you keep state sandboxed and distinct from
other subscriptions.
• A common use case for this is configuring the Azure Security Center across the
entire organization.
6.12 Deployment at Scale on Azure | 339

CHAPTER 7
Compliance as Code
Compliance is a key concern for security functions across the world, as businesses
need to operate within certain regulatory frameworks or are looking to enforce
industry best practices as a standard.
With the speed of modern technical delivery, and the possibilities the cloud unlocks,
compliance has become both harder and easier at the same time. This is the paradox
at the heart of cloud native security. The velocity of change presents new challenges,
which drive a transformation that leads to a new continuous reality. Rather than
auditing applications and systems on a rolling schedule, instead you build a continu‐
ous understanding of compliance that moves at the speed of cloud. This new speed
also allows compliance gaps to be resolved within unprecedented time frames.
With compliance, to make significant, enduring progress, you need to be equipped
for the following three key activities:
• You need to be able to detect noncompliant infrastructure. If you cannot see the
scope and scale of the problem, you cannot hope to make progress in the right
direction.
•
You need to be able to prevent noncompliant infrastructure. The ability to stop
the rot is critical, otherwise all the effort invested merely gets eroded over time.
• You need to be able to remediate noncompliant infrastructure. This last step is
the most complex of the three, as you will often need to transparently communi‐
cate and plan changes with business users, as all change comes with a potential
risk to negatively impact systems.
A useful mental model for understanding the categories of compliance changes is
shown in Figure 7-1. It is something I built through handling cloud compliance at
some of the world’s biggest regulated enterprises.
341
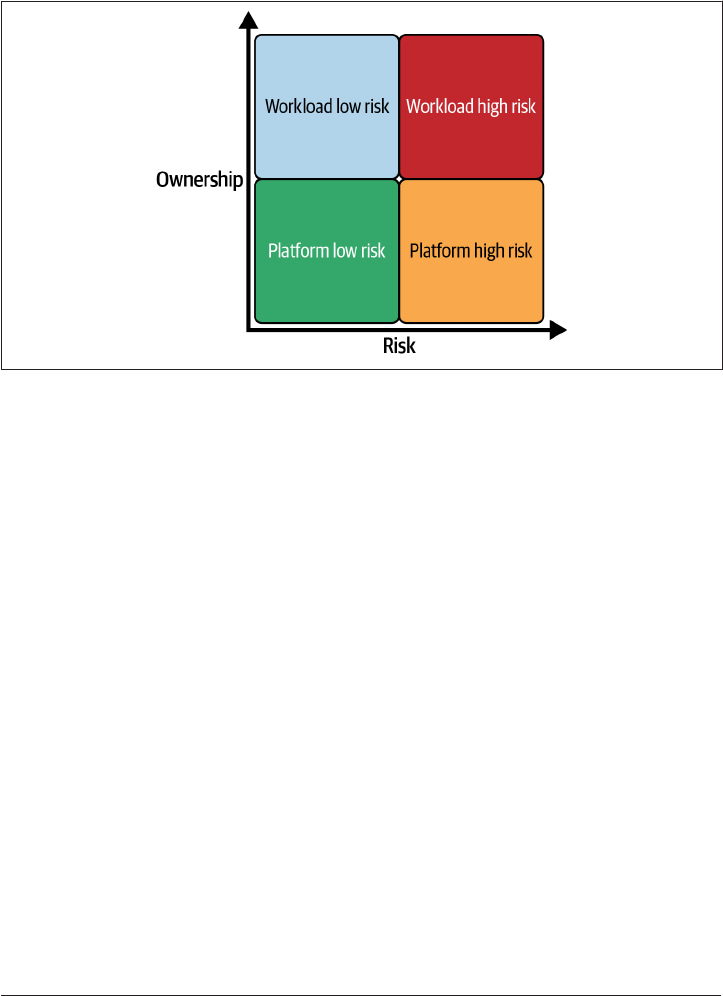
By moving from green changes to red changes, you build trust with the workload
teams, and establish a shared responsibility model. This shared responsibility model
will outline who is responsible for which compliance issues and ensures that a process
for remediation is established and actioned.
Figure 7-1. Classifying compliance changes
In this chapter, you will see how to assign metadata to resources to allow users and
systems to make informed choices. Next, you will learn how to build detection mech‐
anisms that allow you to be alerted the moment a resource becomes noncompliant
and to build an aggregated view that allows you to see how your entire estate is fair‐
ing. Third, you will look at what options are available for preventing users from creat‐
ing noncompliant infrastructure. Last, you will explore the options for automatic
remediation that are available on each of the CSPs.
7.1 Labeling Resources on GCP
Problem
You need to add metadata to a resource so that cost allocation is accurate and the
expected data classification of the objects is known.
Solution
This recipe creates a Cloud Storage bucket that has a cost_center and a data_classi
fication label.
If you haven’t already done so, familiarize yourself with Terraform and the different
authentication mechanisms in Chapter 11.
342 | Chapter 7: Compliance as Code

Create a variables.tf file and copy the following contents:
variable "project_id" {
type = string
description = "The project to deploy the resources into"
}
variable "region" {
type = string
description = "The region to deploy the resources into"
}
variable "bucket_name" {
type = string
description = "The name of the bucket"
}
variable "cost_center" {
type = string
description = "The cost center to charge for the bucket"
}
variable "data_classification" {
type = string
description = "The data classification of the bucket"
}
Then fill out the corresponding terraform.tfvars file:
project = ""
region = ""
bucket_name = ""
cost_center = ""
data_classification = ""
Create the following provider.tf file and run terraform init:
provider "google" {
project = var.project
region = var.region
}
terraform {
required_providers {
google = {
source = "hashicorp/google"
version = "~> 3"
}
}
}
Last, create the following main.tf file and run terraform apply:
7.1 Labeling Resources on GCP | 343

locals {
labels = {
"cost_center" = var.cost_center
"data_classification" = var.data_classification
}
}
resource "google_storage_bucket" "pii_bucket" {
name = var.bucket_name
location = var.region
force_destroy = true
labels = local.labels
}
In this recipe, I have extracted the labels into a local variable. This
allows you to set the labels in one location and readily apply them
to all the resources defined in your code. You can override them on
specific resources with the Terraform merge function, such as
labels = merge(local.labels,{ data_classification =
"Standard" }).
Discussion
Common security-related labels applied to resources in GCP include the following:
• Environment—for example, production
• Owner
•
Data classification
In GCP, there are multiple mechanisms for annotating resources. Labels are for
enriching resources with metadata, allowing you to group them across projects and
folders. They are leveraged for ownership identification and environment classifica‐
tion and can be used to group and filter in Google Cloud’s operations suite.
From a compliance perspective, Security Command Center (SCC), from Recipe 3.1,
has the concept of security marks. These marks are only viewable from SCC and
enable a security-centric view of resources. They are editable and viewable on
resources even when the user does not have direct access to the resource itself. Marks
exist purely within the sphere of control of the security team and as such are a much
more stable basis around which to build monitoring and automation. To view the
current marks assigned to assets, view the asset panel of the SCC web console. To
mark assets, you can use the same asset panel, the gcloud scc assets update-marks
command, or set them programmatically with languages such as Python.
344 | Chapter 7: Compliance as Code

As marks are defined independently of the resources, they work
more effectively on static resources, such as production databases,
rather than on highly dynamic and elastic resources, such as Cloud
Functions.
There are two types of tags in GCP. First are network tags, which are assigned to
Compute Engine virtual machines and are used to control network flows and fire‐
walls, as seen in Recipe 5.1. Second are resource tags, which are only assigned to
organizations, folders, and projects and are automatically inherited down the organi‐
zation structure, i.e., a project will automatically be tagged the same as its parent
folder unless explicitly tagged. They are used to implement conditional policies to
manage access. Imagine a serverless-first organization that will want to by default
lock users out of consuming the compute API. Following is the Terraform required to
use tags to instantiate that policy.
The organization policy API requires that you use service account
credentials to access it. If you are using end user credentials, you
will need to create an appropriately privileged service account to be
able to create all the necessary resources.
First, you need to define two variables in variables.tf:
variable "organization_domain" {
type = string
description = "The domain of the organization"
}
variable "target_projects" {
type = list(string)
description = "The projects to have compute access"
}
And input their corresponding values in terraform.tfvars:
organization_domain = ""
target_projects = []
Then you will need to define the following resources in a main.tf file:
data "google_organization" "current" {
domain = var.organization_domain
}
resource "google_org_policy_policy" "compute" {
name = join("/", [
data.google_organization.current.name,
"policies/serviceuser.services"
])
7.1 Labeling Resources on GCP | 345

parent = data.google_organization.current.name
spec {
rules {
condition {
expression = join("", [
"resource.matchTags('",
data.google_organization.current.org_id,
"/compute'",
", ",
"'enabled')"
])
}
}
rules {
condition {
expression = join("", [
"resource.matchTags('",
data.google_organization.current.org_id,
"/compute'",
", ",
"'disabled')"
])
}
values {
denied_values = ["compute.googleapis.com"]
}
}
}
}
resource "google_tags_tag_key" "compute" {
parent = data.google_organization.current.id
short_name = "compute"
}
resource "google_tags_tag_value" "disabled" {
parent = "tagKeys/${google_tags_tag_key.compute.name}"
short_name = "disabled"
}
resource "google_tags_tag_value" "enabled" {
parent = "tagKeys/${google_tags_tag_key.compute.name}"
short_name = "enabled"
}
resource "google_tags_tag_binding" "org_compute_disabled" {
parent = join("/", [
"//cloudresourcemanager.googleapis.com/",
data.google_organization.current.name
346 | Chapter 7: Compliance as Code

])
tag_value = "tagValues/${google_tags_tag_value.disabled.name}"
}
resource "google_tags_tag_binding" "project_compute_enabled" {
for_each = toset(var.target_projects)
parent = "//cloudresourcemanager.googleapis.com/projects/${each.value}"
tag_value = "tagValues/${google_tags_tag_value.enabled.name}"
}
After you run terraform apply on those resources, only those projects that you
identified in the variables will be able to make any successful calls against the com‐
pute API.
Summary
Let’s summarize what was learned and deployed in this recipe:
•
Labels allow you to enrich resources with metadata.
• From a security point of view, you can mark resources through SCC.
• When looking to build security automation around resources, you should choose
marks over labels.
— They are within the security team sphere of control.
—
They are a more stable base to build around.
• Network tags can only be applied to Compute Engine instances and are purely
for allowing and preventing traffic through firewalls.
•
Resource tags are only applied at the organization, folder, and project levels.
— You can use resource tags to create conditional policies at a per-project or
higher level.
7.2 Tagging Resources on AWS
Problem
You need to add metadata to resources so that cost allocation is accurate and the
expected data classification of the objects is known.
Solution
This recipe creates an S3 bucket that has a cost_center and a data_classification
tag.
If you haven’t already done so, familiarize yourself with Terraform and the different
authentication mechanisms in Chapter 11.
7.2 Tagging Resources on AWS | 347

Create a variables.tf file and copy the following contents:
variable "region" {
type = string
description = "The region to deploy resources into"
}
variable "bucket_name" {
type = string
description = "The name of the bucket"
}
variable "cost_center" {
type = string
description = "The cost center to charge for the bucket"
}
variable "data_classification" {
type = string
description = "The data classification of the bucket"
}
Then fill out the corresponding terraform.tfvars file:
region = ""
bucket_name = ""
cost_center = ""
data_classification = ""
Create the following provider.tf file and run terraform init:
provider "aws" {
region = var.region
default_tags {
tags = {
cost_center = var.cost_center
data_classification = var.data_classification
}
}
}
terraform {
required_providers {
aws = {
source = "hashicorp/aws"
version = "~> 3"
}
}
}
Last, create the following main.tf file and run terraform apply:
348 | Chapter 7: Compliance as Code

resource "aws_s3_bucket" "pii_bucket" {
bucket = var.bucket_name
force_destroy = true
}
In this recipe, you used the default_tags block in the provider
definition to automatically apply tags to all taggable resources. This
removes the burden of individually applying tags to every resource.
You can override particular tags at the resource level by explicitly
setting them in the resource definition. Terraform automatically
merges the default tags with the explicit tags, with the latter taking
precedence.
Discussion
Common security-related tags applied to resources in AWS include the following:
•
Environment—for example, production
• Owner
• Data classification
Tagging unlocks the concept of Attribute Based Access Control (ABAC), which is
explored in depth in Recipe 9.2. One of the perennial challenges in an AWS estate is
ensuring resources are tagged according to your internal standards.
To support you in high levels of tagging compliance, AWS provides tag policies and
resource groups. Tag policies are about setting, reporting on, and enforcing tag stand‐
ardization across your organization. For example, let’s look at a policy that outlines
the cost center tag and its allowed values. First, you need to enable tag policies for
your organization. You can do this by updating your aws_organizations_organiza
tion resource to include the following line and applying the change:
resource "aws_organizations_organization" "this" {
...
enabled_policy_types = [
...
"TAG_POLICY",
]
...
}
With that done, you can create the policy and attach it to the entire organization with
the following Terraform:
resource "aws_organizations_policy" "cost_center_tags" {
name = "cost_center_tags"
type = "TAG_POLICY"
7.2 Tagging Resources on AWS | 349

content = <<CONTENT
{
"tags": {
"Cost_Center": {
"tag_key": {
"@@assign": "Cost_Center",
"@@operators_allowed_for_child_policies": ["@@none"]
},
"tag_value": {
"@@assign": [
"BU1",
"BU2",
"BU3",
"BU4",
"BU5"
]
}
}
}
}
CONTENT
}
data "aws_organizations_organization" "current" {}
resource "aws_organizations_policy_attachment" "root" {
policy_id = aws_organizations_policy.cost_center_tags.id
target_id = data.aws_organizations_organization.current.roots[0].id
}
With that in place, you can review each account in turn, seeing the compliance level.
When satisfied with a particular account’s compliance, or when starting with a fresh
account, you can modify the policy to have it enforce tagging for particular resource
types. To enforce for EC2 instances, update the policy content to the following:
{
"tags": {
"Cost_Center": {
"tag_key": {
"@@assign": "Cost_Center",
"@@operators_allowed_for_child_policies": ["@@none"]
},
"tag_value": {
"@@assign": [
"BU1",
"BU2",
"BU3",
"BU4",
"BU5"
]
},
"enforced_for": {
350 | Chapter 7: Compliance as Code

"@@assign": [
"ec2:instance"
]
}
}
}
}
Tag policies currently do not show untagged resources within their
compliance results. So an account can appear to be significantly
more compliant than is the case.
Resource groups allow you to create arbitrary collections within a region in an
account. You build them by specifying a tag-based query, such as the following Terra‐
form which collects all resources with a particular cost center tag:
resource "aws_resourcegroups_group" "BU1" {
name = "cost-center-BU1"
resource_query {
query = <<JSON
{
"ResourceTypeFilters": [
"AWS::AllSupported"
],
"TagFilters": [
{
"Key": "CostCenter",
"Values": ["BU1"]
}
]
}
JSON
}
}
You can then use the tag editor service in the console to update tags on the resources
contained within the group. This, combined with tag policies, gives us a general flow
for bringing compliance up in an account. First, you create and assign the tag policy
to an account. Then, you use resource groups and the tag editor to bring compliance
up. Last, you update the tag policy to enforcement mode to ensure that tagging com‐
pliance does not drop.
7.2 Tagging Resources on AWS | 351

Summary
Let’s summarize what was learned and deployed in this recipe:
•
Tags are a way of attaching metadata to resources within AWS.
•
Terraform provides a default_tags configuration to simplify tagging resources.
• Tag policies allow you to implement reporting and enforcement against your tag‐
ging standards.
•
Resource groups can be created by writing tag-based queries.
• Once a resource group is created, you can rapidly modify tags on all included
resources.
7.3 Tagging Resources on Azure
Problem
You need to add metadata to a resource so that cost allocation is accurate and the
expected data classification of the objects is known.
Solution
This recipe creates a storage account that has a cost_center and a data_classifica
tion tag.
If you haven’t already done so, familiarize yourself with Terraform and the different
authentication mechanisms in Chapter 11.
Create a variables.tf file and copy the following contents:
variable "location" {
type = string
description = "The location to deploy the resources into"
}
variable "storage_account_name" {
type = string
description = "The name of the storage account"
}
variable "cost_center" {
type = string
description = "The cost center to charge for the bucket"
}
variable "data_classification" {
type = string
352 | Chapter 7: Compliance as Code

description = "The data classification of the bucket"
}
Then fill out the corresponding terraform.tfvars file:
location = ""
storage_account_name = ""
cost_center = ""
data_classification = ""
Create the following provider.tf file and run terraform init:
terraform {
required_providers {
azurerm = {
source = "hashicorp/azurerm"
version = "~> 2"
}
}
}
provider "azurerm" {
features {}
}
Last, create the following main.tf file and run terraform apply:
locals {
tags = {
cost_center = var.cost_center
data_classification = var.data_classification
}
}
resource "azurerm_resource_group" "this" {
name = "tagging-rg"
location = var.location
tags = local.tags
}
resource "azurerm_storage_account" "this" {
name = var.storage_account_name
resource_group_name = azurerm_resource_group.this.name
location = azurerm_resource_group.this.location
account_tier = "Standard"
account_replication_type = "GRS"
tags = local.tags
}
7.3 Tagging Resources on Azure | 353

In this recipe, I have extracted the tags into a local variable. This
allows you to set the tags in one location and readily apply them to
all the resources defined in your code. You can override them on
specific resources with the Terraform merge function, such as
labels = merge(local.tags,{ data_classification = "Stan
dard" }).
Discussion
Common security-related tags applied to resources in Azure include the following:
•
Environment—for example, production
• Owner
• Data classification
Azure is currently experimenting with Attribute Based Access Control (ABAC),
which is discussed in Recipe 9.3. However, Azure Policy has a variety of built-in poli‐
cies that allow you to build an understanding of tagging compliance, enforce the set‐
ting of tags, and remediate incorrectly tagged resources.
An effective built-in policy to assign is inheriting tags from resource groups. Let’s
look at the code required to assign the policy and automatically create remediation
actions against every active subscription within the tenant.
In Azure, it is important to remember that resource groups are
very malleable. It is possible to migrate resources between groups.
When looking to inherit tags, it is worth ensuring that resources
are correctly aligned to resource groups and that moving resources
is done first so that they only inherit the correct tags.
First, you’ll need to define the following variables in a variables.tf file:
variable "location" {
type = string
description = "The location to deploy the resources into"
}
variable "root_management_group_uuid" {
type = string
description = "The UUID of the root management group"
}
variable "tags_to_inherit" {
type = list(string)
description = "The tags to inherit from the resource group"
}
354 | Chapter 7: Compliance as Code

And input their values in a corresponding terraform.tfvars file:
location = ""
root_management_group_uuid = ""
tags_to_inherit = []
Next, define the following resources in a main.tf file:
data "azurerm_management_group" "root" {
name = var.root_management_group_uuid
}
data "azurerm_policy_definition" "tag_inherit" {
display_name = "Inherit a tag from the resource group if missing"
}
data "azurerm_subscriptions" "available" {}
resource "azurerm_policy_assignment" "tag_inherit" {
for_each = toset(var.tags_to_inherit)
name = "tag-${each.value}"
scope = data.azurerm_management_group.root.id
policy_definition_id = data.azurerm_policy_definition.tag_inherit.id
location = var.location
identity {
type = "SystemAssigned"
}
parameters = <<PARAMETERS
{
"tagName": {
"value": "${each.value}"
}
}
PARAMETERS
}
locals {
remediation_data = toset(flatten([
for tag in var.tags_to_inherit : [
for subscription in data.azurerm_subscriptions.available.subscriptions : {
tag = tag,
scope_id = subscription.id
subscription_id = subscription.subscription_id
}
]
]))
}
resource "azurerm_policy_remediation" "inheritance" {
for_each = {
7.3 Tagging Resources on Azure | 355

for datum in local.remediation_data :
"${datum.tag}.${datum.subscription_id}" => datum
}
name = "${each.value.tag}_${each.value.subscription_id}"
scope = each.value.scope_id
policy_assignment_id = azurerm_policy_assignment.tag_inherit[each.value.tag].id
location_filters = [var.location]
}
When you apply these resource definitions, all the resources will inherit the specified
tags from their resource groups if not explicitly set. Running this is made safer due to
the fact that it will not override preexisting tags.
Azure Policy, as mentioned, can be used for enforcement as well. Let’s quickly look at
code that will configure the enforcement of particular tags on resource groups:
data "azurerm_policy_definition" "tag_enforcement" {
display_name = "Require a tag on resource groups"
}
resource "azurerm_policy_assignment" "tag_enforcement" {
for_each = toset(var.tags_to_inherit)
name = "enf-${each.value}"
scope = data.azurerm_management_group.root.id
policy_definition_id = data.azurerm_policy_definition.tag_enforcement.id
location = var.location
identity {
type = "SystemAssigned"
}
parameters = <<PARAMETERS
{
"tagName": {
"value": "${each.value}"
}
}
PARAMETERS
}
Now whenever a user attempts to create a resource group without either of the tags
specified in the variables, they will be denied.
Summary
Let’s summarize what was learned and deployed in this recipe:
• Tags on Azure are resource-attached metadata.
• Their most common use case is cost attribution.
356 | Chapter 7: Compliance as Code

• Azure is currently exploring ABAC, but it is very limited in support.
• Azure Policy has a variety of built-in policies to support tagging standards.
• You can configure the inheritance of tags from resource groups to rapidly imple‐
ment best-effort tagging.
• Azure Policy also allows you to configure tag enforcement.
7.4 Detecting Noncompliant Infrastructure on GCP
Problem
You wish to be notified when a noncompliant piece of infrastructure is deployed any‐
where in your organization.
Solution
This recipe involves building a Cloud Asset Organization Feed that triggers a Cloud
Function which posts to a Slack channel.
If you haven’t already done so, familiarize yourself with Terraform and the different
authentication mechanisms in Chapter 11.
As this recipe has a dependency-on-service account authentication, first create and
enter an auth folder.
Create the following variables.tf file:
variable "project" {
type = string
description = "The project to deploy the resources into"
}
variable "organization_domain" {
type = string
description = "The organization domain of your Google Cloud estate"
}
And input your values into the following terraform.tfvars file:
project = ""
organization_domain = ""
Define the following provider.tf file and run terraform init:
provider "google" {
project = var.project
}
terraform {
required_providers {
7.4 Detecting Noncompliant Infrastructure on GCP | 357

google = {
source = "hashicorp/google"
version = "~> 3"
}
}
}
Create the following main.tf file and run terraform plan:
data "google_organization" "current" {
domain = var.organization_domain
}
resource "google_service_account" "cloud_assets" {
account_id = "cloud-assets"
display_name = "Cloud Assets"
}
resource "google_service_account_key" "cloud_assets" {
service_account_id = google_service_account.cloud_assets.name
public_key_type = "TYPE_X509_PEM_FILE"
}
resource "local_file" "cloud_assets" {
content = base64decode(google_service_account_key.cloud_assets.private_key)
filename = "cloud_assets.json"
}
resource "google_organization_iam_member" "cloud_assets" {
org_id = data.google_organization.current.org_id
role = "roles/cloudasset.owner"
member = "serviceAccount:${google_service_account.cloud_assets.email}"
}
resource "google_project_iam_member" "cloud_assets" {
role = "roles/serviceusage.serviceUsageConsumer"
member = "serviceAccount:${google_service_account.cloud_assets.email}"
}
Review the resources that are going to be created, and then run terraform apply to
make the changes.
Move up one directory into the parent folder and create the following variables.tf file:
variable "project_id" {
type = string
description = "The project to create the resources in"
}
variable "region" {
type = string
358 | Chapter 7: Compliance as Code

description = "The region to create the resources in"
}
variable "organization_domain" {
type = string
description = "The organization domain of your Google Cloud estate"
}
variable "channel" {
type = string
description = "The Slack channel to post alerts into"
}
Then fill out the corresponding terraform.tfvars file:
project_id = ""
region = ""
organization_domain = ""
channel = ""
Then create the following provider.tf file and run terraform init:
provider "google" {
project = var.project_id
region = var.region
}
provider "google" {
alias = "cloud_assets"
project = var.project_id
region = var.region
credentials = "./auth/cloud_assets.json"
}
terraform {
required_providers {
google = {
source = "hashicorp/google"
version = "~> 3"
}
}
}
And create the following main.tf file:
data "google_organization" "this" {
domain = var.organization_domain
}
data "google_project" "current" {}
locals {
required_apis = [
"cloudasset.googleapis.com",
7.4 Detecting Noncompliant Infrastructure on GCP | 359

"cloudbuild.googleapis.com",
"cloudfunctions.googleapis.com",
"secretmanager.googleapis.com"
]
}
resource "null_resource" "create_assets_service_account" {
provisioner "local-exec" {
command = join(" ", [
"gcloud beta services identity create",
"--service=cloudasset.googleapis.com"
])
}
}
resource "google_project_service" "api" {
for_each = toset(local.required_apis)
service = each.value
}
resource "google_cloud_asset_organization_feed" "networking_changes" {
provider = google.cloud_assets
billing_project = data.google_project.current.name
org_id = data.google_organization.this.org_id
feed_id = "network-changes"
content_type = "RESOURCE"
asset_types = [
"compute.googleapis.com/Network",
]
feed_output_config {
pubsub_destination {
topic = google_pubsub_topic.network_changes.id
}
}
condition {
expression = <<EXP
!temporal_asset.deleted
EXP
title = "created_or_updated"
description = "Notify on create or update"
}
depends_on = [
google_pubsub_topic_iam_member.cloud_asset_writer,
google_project_service.api
]
}
resource "google_pubsub_topic" "network_changes" {
360 | Chapter 7: Compliance as Code

name = "network-changes"
}
resource "google_pubsub_topic_iam_member" "cloud_asset_writer" {
topic = google_pubsub_topic.network_changes.id
role = "roles/pubsub.publisher"
member = join("", [
"serviceAccount:service-",
data.google_project.current.number,
"@gcp-sa-cloudasset.iam.gserviceaccount.com"
])
depends_on = [
null_resource.create_assets_service_account
]
}
resource "google_storage_bucket" "bucket" {
name = "${split(".", var.organization_domain)[0]}-asset-notifications"
}
data "archive_file" "code" {
type = "zip"
source_dir = "${path.module}/src"
output_path = "${path.module}/main.zip"
}
resource "google_storage_bucket_object" "code" {
name = "${data.archive_file.code.output_md5}.zip"
bucket = google_storage_bucket.bucket.name
source = data.archive_file.code.output_path
}
resource "google_cloudfunctions_function" "function" {
name = name = "asset-change-notifier"
runtime = "python39"
available_memory_mb = 128
source_archive_bucket = google_storage_bucket.bucket.name
source_archive_object = google_storage_bucket_object.code.name
entry_point = "handle"
environment_variables = {
"CHANNEL" = var.channel
"SECRET_ID" = google_secret_manager_secret.slack_token.secret_id
}
event_trigger {
event_type = "google.pubsub.topic.publish"
resource = google_pubsub_topic.network_changes.id
failure_policy {
7.4 Detecting Noncompliant Infrastructure on GCP | 361

retry = false
}
}
depends_on = [
google_project_service.api
]
}
resource "google_secret_manager_secret" "slack_token" {
secret_id = "slack-token"
replication {
automatic = true
}
depends_on = [
google_project_service.api
]
}
resource "google_secret_manager_secret_iam_member" "function" {
secret_id = google_secret_manager_secret.slack_token.secret_id
role = "roles/secretmanager.secretAccessor"
member = join("", [
"serviceAccount:",
google_cloudfunctions_function.function.service_account_email
])
}
output "update_secret_command" {
value = join(" ", [
"echo -n TOKEN |",
"gcloud secrets versions add",
google_secret_manager_secret.slack_token.secret_id,
"--data-file=-"
])
}
Create a src folder, and add the following main.py file:
import base64
import json
import os
import requests
from google.cloud import secretmanager
client = secretmanager.SecretManagerServiceClient()
def run(asset):
response = client.access_secret_version(
362 | Chapter 7: Compliance as Code

request={"name": f"{os.environ['SECRET_ID']}/versions/latest"}
)
token = response.payload.data.decode("utf-8")
if asset["resource"]["data"]["autoCreateSubnetworks"]:
requests.post(
"https://slack.com/api/chat.postMessage",
data={
"token": token,
"channel": f"#{os.environ['CHANNEL']}",
"text": "".join(
[
"The following resource ",
asset["name"],
" is noncompliant, expected no automatic subnetworks",
]
),
},
)
def handle(event, _):
if "data" in event:
run(json.loads(base64.b64decode(event["data"]).decode("utf-8"))["asset"])
And add the following requirements.txt file:
requests==2.26.0
google-cloud-secret-manager==2.7.2
Run terraform plan to review the resources that are going to be created, and then
run terraform apply to make the changes.
Run the command in the update_secret_command output, replacing TOKEN with
your Slack API key.
Discussion
In GCP, SCC Premium runs compliance detection for many industry-standard
benchmarks, such as CIS, PCI/DSS, NIST, and ISO 27001. In Recipe 3.1, the recipe
builds a similar architecture which reacts based on SCC findings. This recipe enables
building customized compliance rules and a fleet of functions that specifically handle
particular resource types.
In this recipe, the only asset type that is configured is compute.googleapis.com/
Network, and the function sends a notification if the network is configured with auto‐
matic subnets. As explored in Recipe 5.1, explicitly configuring subnets is required at
scale; otherwise, CIDR range overlaps can derail any attempts to allow private net‐
work traffic in the future.
7.4 Detecting Noncompliant Infrastructure on GCP | 363

Where possible, you should rely on industry-standard compliance benchmarks. As
you can see, building your own comes with a large maintenance burden, but this
approach is also the underpinning of automatic remediation, which you can see in
more detail in Recipe 7.10. Recipe 3.10 also similarly makes use of Cloud Assets to
build a queryable asset registry on BigQuery. When developing these custom compli‐
ance policies, it is critical that you not only create the notification and remediation
functions but also craft a BigQuery query that allows you to understand how many
noncompliant resources currently exist within your organization. The nature of this
architecture is that it captures compliance when change happens but cannot retroac‐
tively investigate preexisting noncompliant infrastructure.
Summary
Let’s summarize what was learned and deployed in this recipe:
• To notify users when noncompliant infrastructure is provisioned, you have two
options:
—
If the compliance control is from an SCC-supported benchmark, use the
architecture in Recipe 3.1.
— If it is a custom control, then use this recipe.
• This recipe notifies users when a network is created or updated, and is config‐
ured to use the automatic subnets.
• You can trigger Cloud Functions on infrastructure changes and use that to deter‐
mine compliance.
• In Recipe 3.10, the recipe builds a BigQuery table of all assets, allowing you to
determine overall compliance against your custom controls.
7.5 Detecting Noncompliant Infrastructure on AWS
Problem
You wish to deploy a set of compliance controls across your entire organization and
view the aggregated data.
Solution
This recipe builds on top of Recipe 6.11, assumes an AWS Config recorder is config‐
ured in every account, and needs to be run from the organization management
account.
If you haven’t already done so, familiarize yourself with Terraform and the different
authentication mechanisms in Chapter 11.
364 | Chapter 7: Compliance as Code

Update your aws_organizations_organization resource to include the config-
multiaccountsetup.amazonaws.com service access principal.
Create a variables.tf file and copy the following contents:
variable "cross_account_role" {
type = string
description = "The cross account role to assume"
}
variable "delegated_admin_account_id" {
type = string
description = "The account ID to configure as the delegated admin"
}
variable "managed_config_rules" {
type = list(string)
description = "The config rules to apply in all accounts"
}
Then fill out the corresponding terraform.tfvars file:
cross_account_role = ""
delegated_admin_account_id = ""
managed_config_rules = []
Create the following provider.tf file and run terraform init:
provider "aws" {}
provider "aws" {
alias = "delegated_admin"
assume_role {
role_arn = join("", [
"arn:aws:iam::",
var.delegated_admin_account_id,
":role/",
var.cross_account_role
])
}
}
terraform {
required_providers {
aws = {
source = "hashicorp/aws"
version = "~> 3"
}
}
}
Create the following main.tf file and run terraform plan:
7.5 Detecting Noncompliant Infrastructure on AWS | 365

resource "aws_organizations_delegated_administrator" "config-multiaccount" {
account_id = var.delegated_admin_account_id
service_principal = "config-multiaccountsetup.amazonaws.com"
}
resource "aws_config_organization_managed_rule" "rule" {
provider = aws.delegated_admin
for_each = toset(var.managed_config_rules)
name = each.value
rule_identifier = each.value
depends_on = [
aws_organizations_delegated_administrator.config-multiaccount
]
}
resource "aws_config_configuration_aggregator" "organization" {
provider = aws.delegated_admin
name = "organization-aggregator"
organization_aggregation_source {
all_regions = true
role_arn = aws_iam_role.config_aggregator.arn
}
}
resource "aws_iam_role" "config_aggregator" {
provider = aws.delegated_admin
name = "config_aggregator"
assume_role_policy = data.aws_iam_policy_document.assume.json
managed_policy_arns = [
"arn:aws:iam::aws:policy/service-role/AWSConfigRoleForOrganizations"
]
}
data "aws_iam_policy_document" "assume" {
statement {
actions = [
"sts:AssumeRole"
]
principals {
type = "Service"
identifiers = [
"config.amazonaws.com"
]
}
}
}
366 | Chapter 7: Compliance as Code

Review the resources that are going to be created, and then run terraform apply to
make the changes.
Discussion
Because of the hard boundaries between accounts in AWS, the configuration of AWS
Config requires the deployment of rules into each disparate account. The combina‐
tion of organization rules and aggregators abstracts some of that complexity away
from the end user. It is also possible to create your own rules, which integrate seam‐
lessly into AWS Config. For example, the following Python shows the general flow of
how to create your own rule:
def handler(event, context):
config = boto3.client("config")
LOGGER.info(event)
invoking_event = json.loads(event.get("invokingEvent"))
evaluations = check_compliance()
for e in evaluations:
response = config.put_evaluations(
Evaluations=[
{
"ComplianceResourceType": e["compliance_resource_type"],
"ComplianceResourceId": e["compliance_resource_id"],
"ComplianceType": e["compliance_type"],
"Annotation": e["annotation"],
"OrderingTimestamp": invoking_event["notificationCreationTime"],
},
],
ResultToken=event["resultToken"],
)
LOGGER.info(response)
To build a centralized notification function, you need to use AWS EventBridge to fun‐
nel events centrally. The following Terraform creates a rule that captures compliance
change events and forwards them to the delegated administrator account defined in
the recipe. You will need to combine this with Recipe 6.11 to deploy into each
account.
resource "aws_cloudwatch_event_rule" "compliance" {
name = "capture-compliance-changes"
description = "Capture compliance changes"
event_pattern = <<EOF
{
"source": ["aws.config"],
"detail-type": ["Config Rules Compliance Change"]
7.5 Detecting Noncompliant Infrastructure on AWS | 367

}
EOF
}
resource "aws_cloudwatch_event_target" "compliance" {
rule = aws_cloudwatch_event_rule.compliance.name
arn = join(":", [
"arn:aws:events",
var.region,
var.delegated_admin_account_id,
"event-bus/default"
])
role_arn = aws_iam_role.event_forwarder.arn
}
resource "aws_iam_role" "event_forwarder" {
name = "event_forwarder"
assume_role_policy = data.aws_iam_policy_document.assume.json
managed_policy_arns = [
aws_iam_policy.execution.arn
]
}
data "aws_iam_policy_document" "assume" {
statement {
effect = "Allow"
actions = ["sts:AssumeRole"]
principals {
type = "Service"
identifiers = [
"events.amazonaws.com"
]
}
}
}
resource "aws_iam_policy" "execution" {
name = "event_forwarder"
policy = data.aws_iam_policy_document.execution.json
}
data "aws_iam_policy_document" "execution" {
statement {
effect = "Allow"
actions = ["events:PutEvents"]
resources = [
join(":", [
"arn:aws:events",
var.region,
var.delegated_admin_account_id,
"event-bus/default"
368 | Chapter 7: Compliance as Code

])
]
}
}
You can then use the same rule deployed into the delegated administrator account,
with a lambda function as the target to fire off notifications.
To see the compliance adherence across all accounts, the organization aggregator pro‐
vides a centralized per-account, per-rule breakdown. This allows you to rapidly iden‐
tify which rules and which accounts have the greatest number of compliance issues,
allowing you to build a data-driven approach to tackling the problem.
Summary
Let’s summarize what was learned and deployed in this recipe:
• AWS Config allows you to rapidly deploy rules to every account in the
organization.
• The organization-managed rule resources rely on the recorders being already
configured in each account.
• The aggregator resource allows you to combine data from all accounts centrally.
• To centralize notifications, you need to deploy EventBridge rules to all accounts
that forward their compliance status events.
•
It is possible to develop and deploy custom rules which seamlessly integrate with
AWS Config.
7.6 Detecting Noncompliant Infrastructure on Azure
Problem
You wish to be notified when a noncompliant piece of infrastructure is deployed any‐
where in your tenant.
Solution
This recipe involves configuring an Azure Event Grid system topic that triggers an
Azure Function which posts to a Slack channel.
To complete this recipe, you will need the Azure Functions Core Tools installed,
which you can find instructions for in the Azure Functions Core Tools GitHub repos‐
itory.
If you haven’t already done so, familiarize yourself with Terraform and the different
authentication mechanisms in Chapter 11.
7.6 Detecting Noncompliant Infrastructure on Azure | 369

Create a variables.tf file and copy the following contents:
variable "location" {
type = string
description = "The Azure location for resources"
}
variable "channel" {
type = string
description = "The Slack channel to post notifications to"
}
Then fill out the corresponding terraform.tfvars file:
location = ""
channel = ""
Create the following provider.tf file and run terraform init:
terraform {
required_providers {
azurerm = {
source = "hashicorp/azurerm"
version = "~> 2"
}
null = {
source = "hashicorp/null"
version = "~> 3"
}
random = {
source = "hashicorp/random"
version = "~> 3"
}
}
}
provider "azurerm" {
features {}
}
Create the following host.json file:
{
"version": "2.0",
"logging": {
"applicationInsights": {
"samplingSettings": {
"isEnabled": true,
"excludedTypes": "Request"
}
}
},
"extensionBundle": {
"id": "Microsoft.Azure.Functions.ExtensionBundle",
370 | Chapter 7: Compliance as Code

"version": "[2.*, 3.0.0)"
}
}
Create the following local.setting.json file:
{
"IsEncrypted": false,
"Values": {
"FUNCTIONS_WORKER_RUNTIME": "python",
"AzureWebJobsStorage": ""
}
}
Create the following requirements.txt file:
azure-functions==1.7.2
requests==2.26.0
azure-keyvault-secrets==4.3.0
Create a ComplianceAlerting folder and in it create two files. First, create an
__init__.py file:
import json
import logging
import os
import azure.functions as func
import requests
from azure.identity import DefaultAzureCredential
from azure.keyvault.secrets import SecretClient
def main(event: func.EventGridEvent):
result = json.dumps(
{
"id": event.id,
"data": event.get_json(),
"topic": event.topic,
"subject": event.subject,
"event_type": event.event_type,
}
)
logging.info(result)
credential = DefaultAzureCredential()
secret_client = SecretClient(
vault_url=os.environ["KEY_VAULT_URI"], credential=credential
)
token = secret_client.get_secret("token")
requests.post(
7.6 Detecting Noncompliant Infrastructure on Azure | 371

"https://slack.com/api/chat.postMessage",
data={
"token": token,
"channel": f"#{os.environ['CHANNEL']}",
"text": f"{result['data']}",
},
)
And second, create a function.json file:
{
"scriptFile": "__init__.py",
"bindings": [
{
"type": "eventGridTrigger",
"name": "event",
"direction": "in"
}
]
}
Move back to the parent directory, create the following main.tf file, and run
terraform plan:
data "azurerm_subscription" "current" {}
data "azurerm_client_config" "current" {}
resource "azurerm_resource_group" "compliance_alerting" {
name = "compliance_alerting"
location = var.location
}
resource "azurerm_eventgrid_system_topic" "policy_state_changes" {
name = "PolicyStateChanges"
resource_group_name = azurerm_resource_group.compliance_alerting.name
location = "global"
source_arm_resource_id = data.azurerm_subscription.current.id
topic_type = "Microsoft.PolicyInsights.PolicyStates"
}
resource "azurerm_eventgrid_system_topic_event_subscription" "alerting" {
name = "policy-state-changes-alerting"
system_topic = azurerm_eventgrid_system_topic.policy_state_changes.name
resource_group_name = azurerm_resource_group.compliance_alerting.name
azure_function_endpoint {
function_id = join("/", [
azurerm_function_app.compliance_alerting.id,
"functions",
"ComplianceAlerting"
])
max_events_per_batch = 1
372 | Chapter 7: Compliance as Code

preferred_batch_size_in_kilobytes = 64
}
depends_on = [
null_resource.deploy
]
}
resource "azurerm_storage_account" "alerting" {
name = "compliance_alerting"
resource_group_name = azurerm_resource_group.compliance_alerting.name
location = azurerm_resource_group.compliance_alerting.location
account_tier = "Standard"
account_replication_type = "LRS"
}
resource "azurerm_app_service_plan" "compliance_alerting" {
name = "compliance_alerting"
location = azurerm_resource_group.compliance_alerting.location
resource_group_name = azurerm_resource_group.compliance_alerting.name
kind = "functionapp"
reserved = true
sku {
tier = "Dynamic"
size = "Y1"
}
}
resource "azurerm_function_app" "alerting" {
name = "compliance_alerting"
location = azurerm_resource_group.compliance_alerting.location
resource_group_name = azurerm_resource_group.compliance_alerting.name
app_service_plan_id = azurerm_app_service_plan.compliance_alerting.id
storage_account_name = azurerm_storage_account.alerting.name
storage_account_access_key = azurerm_storage_account.alerting.primary_access_key
os_type = "linux"
version = "~3"
app_settings = {
FUNCTIONS_WORKER_RUNTIME = "python"
KEY_VAULT_URI = azurerm_key_vault.slack.vault_uri
CHANNEL = var.channel
}
site_config {
linux_fx_version = "Python|3.9"
}
identity {
type = "SystemAssigned"
}
7.6 Detecting Noncompliant Infrastructure on Azure | 373

}
resource "null_resource" "deploy" {
provisioner "local-exec" {
command = "func azure functionapp publish compliance_alerting"
}
depends_on = [
azurerm_function_app.alerting
]
}
resource "random_string" "key_vault" {
length = 16
special = false
}
resource "azurerm_key_vault" "slack" {
name = random_string.key_vault.result
location = azurerm_resource_group.compliance_alerting.location
resource_group_name = azurerm_resource_group.compliance_alerting.name
enable_rbac_authorization = true
sku_name = "standard"
tenant_id = data.azurerm_client_config.current.tenant_id
}
resource "azurerm_role_assignment" "secret_officer" {
scope = azurerm_key_vault.slack.id
role_definition_name = "Key Vault Secrets Officer"
principal_id = data.azurerm_client_config.current.object_id
}
resource "azurerm_function_app" "alerting" {
scope = azurerm_key_vault.slack.id
role_definition_name = "Key Vault Secrets User"
principal_id = azurerm_function_app.alerting.identity.0.principal_id
}
output "update_secret_command" {
value = join(" ", [
"az keyvault secret set -n token --vault-name",
azurerm_key_vault.slack.name,
"--value"
])
}
Review the resources that are going to be created, and then run terraform apply to
make the changes.
Copy the command from the update_secret_command output, append your Slack
token to the end, and run the command.
374 | Chapter 7: Compliance as Code

Discussion
Azure Policy gives you an aggregated view of the state of compliance across your ten‐
ant. What this recipe adds is an ability to notify users in real time as compliance
changes occur. The Python code can be extended to filter for events of particular
interest or criticality.
The recipe uses the Microsoft.PolicyInsights.PolicyStates topic type, which
means that three different types of policy events will be routed: Microsoft.Policy
Insights.PolicyStateCreated when a compliance state is first created, Microsoft
.PolicyInsights.PolicyStateChanged when a compliance state changes, and Micro
soft.PolicyInsights.PolicyStateDeleted when a compliance state is deleted. By
tracking hot resources, those with many frequent changes, that consistently swap
between compliance and noncompliance, you can diagnose situations where two dif‐
ferent automation systems are in conflict. This becomes critical when looking at auto‐
mated remediation activities, as in Recipe 7.12.
It is possible to create your own Azure Policies to detect compliance against custom
controls. In Recipe 7.9, you’ll create a custom policy to enforce a compliance require‐
ment. Custom policies are treated by Azure Policy as first-class citizens, meaning they
are automatically integrated into this recipe.
Summary
Let’s summarize what was learned and deployed in this recipe:
•
Azure Policy state changes can be automatically published to Azure Event Grid.
• Event Grid can invoke Azure Functions, which allow us to send notifications to
users when events of interest occur.
• By collecting and looking for patterns in the events, you can see infrastructure
that is caught between automation systems.
•
You can craft custom policies for your custom compliance controls.
• Custom policies are treated no differently than built-in policies.
7.7 Preventing Noncompliant Infrastructure on GCP
Problem
You want to prevent users from creating noncompliant infrastructure through the
console or APIs.
7.7 Preventing Noncompliant Infrastructure on GCP | 375

Solution
This recipe configures organization policies to prevent certain types of infrastructure
configuration.
If you haven’t already done so, familiarize yourself with Terraform and the different
authentication mechanisms in Chapter 11.
Create a variables.tf file and copy the following contents:
variable "organization_domain" {
type = string
description = "The organization domain of your Google Cloud estate"
}
variable "target_folder_id" {
type = string
description = "The folder that requires only VPC connected functions"
}
variable "target_project_id" {
type = string
description = "The project that requires restricted function ingresses"
}
Then fill out the corresponding terraform.tfvars file:
organization_domain = ""
target_folder_id = ""
target_project_id = ""
Create the following provider.tf file and run terraform init:
provider "google" {
project = var.project
region = var.region
}
terraform {
required_providers {
google = {
source = "hashicorp/google"
version = "~> 3"
}
}
}
Create the following main.tf file and run terraform plan:
data "google_organization" "current" {
domain = var.organization_domain
}
resource "google_organization_policy" "vm_external_ips" {
376 | Chapter 7: Compliance as Code

org_id = data.google_organization.current.org_id
constraint = "constraints/compute.vmExternalIpAccess"
list_policy {
deny {
all = true
}
}
}
resource "google_folder_organization_policy" "vpc_connected_functions" {
folder = var.target_folder_id
constraint = "constraints/cloudfunctions.requireVPCConnector"
boolean_policy {
enforced = true
}
}
resource "google_project_organization_policy" "restricted_function_ingress" {
project = var.target_project_id
constraint = "constraints/cloudfunctions.allowedIngressSettings"
list_policy {
allow {
values = [
"ALLOW_INTERNAL_ONLY"
]
}
}
}
Review the resources that are going to be created, and then run terraform apply to
make the changes.
Discussion
In this recipe, you applied organization policies at the organization, folder, and
project level. Where the policy exists for your requirement, enforcement through this
mechanism should be your first choice. It affects every user, cannot be circumnaviga‐
ted via identity and access management (IAM), and works the same whether you’re
making changes through the console or via automation.
As was discussed in Chapter 6, infrastructure as code should be the primary driver of
change in your environment. Among the host of benefits you get, you can adopt tools
to enforce compliance. A common tool in the space is Checkov. Let’s take a look at
how it handles noncompliant Terraform resource definitions. First, install Checkov,
following the instructions at the Checkov home page.
7.7 Preventing Noncompliant Infrastructure on GCP | 377

Define a simple Cloud Storage bucket in a file called bucket.tf:
resource "google_storage_bucket" "test" {
name = "checkov-test"
}
Now run checkov -f bucket.tf. It will fail with output that looks like the following:
Passed checks: 0, Failed checks: 2, Skipped checks: 0
Check: CKV_GCP_62: "Bucket should log access"
FAILED for resource: google_storage_bucket.test
File: /bucket.tf:1-3
Guide: https://docs.bridgecrew.io/docs/bc_gcp_logging_2
1 | resource "google_storage_bucket" "test" {
2 | name = "checkov-test"
3 | }
Check: CKV_GCP_29: "Ensure that Cloud Storage buckets have uniform bucket-level
access enabled"
FAILED for resource: google_storage_bucket.test
File: /bucket.tf:1-3
Guide: https://docs.bridgecrew.io/docs/bc_gcp_gcs_2
1 | resource "google_storage_bucket" "test" {
2 | name = "checkov-test"
3 | }
By working through the guides Checkov provides, you should end up with a bucket
definition that looks like the following:
resource "google_storage_bucket" "test" {
name = "checkov-test"
uniform_bucket_level_access = true
logging {
log_bucket = "access_logs"
}
}
Now, when running checkov -f bucket.tf again, you will get a clean bill of health.
A tool like this is a fundamental part of shifting security left when combined with
Recipe 6.7.
Summary
Let’s summarize what was learned and deployed in this recipe:
• Organization policies allow enforcement of certain compliance guardrails.
•
When an organization policy exists that fulfils your requirement, you should use
it over other options.
378 | Chapter 7: Compliance as Code

• The recipe had examples of applying the policies to the entire organization, spe‐
cific folders, and particular projects.
• Organization policies cannot be easily circumvented and are not flexible.
•
When using infrastructure as code, you unlock the ability to use other tools to
prevent noncompliant infrastructure.
•
Checkov is a common, open source option.
• Given noncompliant infrastructure, it will provide guides that show you how to
resolve the issues.
7.8 Preventing Noncompliant Infrastructure on AWS
Problem
You want to prevent users from creating noncompliant infrastructure through the
console or APIs.
Solution
This recipe configures Service Control Policies (SCPs) to restrict access. It needs to
run from your organization management account.
If you haven’t already done so, familiarize yourself with Terraform and the different
authentication mechanisms in Chapter 11.
Create the following provider.tf file and run terraform init:
provider "aws" {}
terraform {
required_providers {
aws = {
source = "hashicorp/aws"
version = "~> 3"
}
}
}
Create the following main.tf file and run terraform plan:
data "aws_caller_identity" "current" {}
data "aws_organizations_organization" "current" {}
resource "aws_organizations_policy" "compliance" {
name = "compliance_guardrails"
content = data.aws_iam_policy_document.compliance.json
7.8 Preventing Noncompliant Infrastructure on AWS | 379

}
data "aws_iam_policy_document" "compliance" {
statement {
effect = "Deny"
actions = [
"ec2:DeleteFlowLogs",
"logs:DeleteLogStream",
"logs:DeleteLogGroup"
]
resources = [
"*"
]
}
}
resource "aws_organizations_policy_attachment" "root" {
policy_id = aws_organizations_policy.compliance.id
target_id = data.aws_organizations_organization.current.roots[0].id
}
Review the resources that are going to be created, and then run terraform apply to
make the changes.
Discussion
This recipe restricts any principal within the account from disabling VPC flow logs or
deleting the historical logs in CloudWatch. As flow logs are a critical piece of evidence
for forensic analysis, they are a good candidate for locking with an SCP. By putting
IAM restrictions in the SCP, you establish guardrails that cannot be circumvented
from within the account, as the SCP is applied outside of the account boundary. It is
possible to build exceptions into SCPs to deny users access by default but allow cer‐
tain privileged individuals access.
The following are a few situations where SCPs do not apply:
•
Actions taken in the organization root account
•
Service-linked roles
• AWS principals from outside the organization, such as cross-
account bucket access
For example, the following policy prevents any user from modifying a protected IAM
role within the account, except a single exempted role:
{
"Version": "2012-10-17",
"Statement": [
{
380 | Chapter 7: Compliance as Code

"Sid": "ProtectRoleWithException",
"Effect": "Deny",
"Action": [
"iam:AttachRolePolicy",
"iam:DeleteRole",
"iam:DeleteRolePermissionsBoundary",
"iam:DeleteRolePolicy",
"iam:DetachRolePolicy",
"iam:PutRolePermissionsBoundary",
"iam:PutRolePolicy",
"iam:UpdateAssumeRolePolicy",
"iam:UpdateRole",
"iam:UpdateRoleDescription"
],
"Resource": [
"arn:aws:iam::*:role/protected-role"
],
"Condition": {
"StringNotLike": {
"aws:PrincipalARN":"arn:aws:iam::*:role/privileged-role"
}
}
}
]
}
As long as you can write IAM policy that expresses your compliance requirement,
you can prevent users from being able to create resources, whether they’re using the
console or APIs. However, as was discussed in Chapter 6, infrastructure as code
should be the default way of enacting change, with the console reserved for read-only
activities and break-glass operations. Let’s look at how the open source tool Checkov
can support us in our compliance journey. Install Checkov by following the instruc‐
tions at the Checkov home page.
Define a simple S3 bucket in a file called bucket.tf:
resource "aws_s3_bucket" "test" {
bucket = "test"
}
Now, run checkov -f bucket.tf. It will fail with output that looks like the following:
Check: CKV_AWS_19: "Ensure all data stored in the S3 bucket is securely encrypted
at rest"
FAILED for resource: aws_s3_bucket.test
File: /bucket.tf:1-3
Guide: https://docs.bridgecrew.io/docs/s3_14-data-encrypted-at-rest
1 | resource "aws_s3_bucket" "test" {
2 | bucket = "test"
3 | }
7.8 Preventing Noncompliant Infrastructure on AWS | 381

Check: CKV_AWS_18: "Ensure the S3 bucket has access logging enabled"
FAILED for resource: aws_s3_bucket.test
File: /bucket.tf:1-3
Guide: https://docs.bridgecrew.io/docs/s3_13-enable-logging
1 | resource "aws_s3_bucket" "test" {
2 | bucket = "test"
3 | }
...
By working through the guides Checkov provides, you should end up with a bucket
definition that looks like the following. In this example, the check for cross-region
replication is skipped:
resource "aws_s3_bucket" "test" {
// checkov:skip=CKV_AWS_144
bucket = "test"
server_side_encryption_configuration {
rule {
apply_server_side_encryption_by_default {
sse_algorithm = "aws:kms"
}
}
}
versioning {
enabled = true
}
logging {
target_bucket = "access_logging"
target_prefix = "log/test"
}
}
resource "aws_s3_bucket_public_access_block" "test" {
bucket = aws_s3_bucket.test.id
block_public_acls = true
block_public_policy = true
restrict_public_buckets = true
ignore_public_acls = true
}
Now, when running checkov -f bucket.tf again, you will get a clean bill of health.
A tool like this is a fundamental part of shifting security left when combined with
Recipe 6.8.
382 | Chapter 7: Compliance as Code

Summary
Let’s summarize what was learned and deployed in this recipe:
•
SCPs allow for the enforcement of certain compliance guardrails.
• SCPs are limited by what is expressible through IAM policies.
• You saw an example of building escape hatches into policies.
•
Crafting complicated SCPs is difficult and error prone; having two organizations,
as recommended in Recipe 2.2, helps with the testing of SCPs.
• By adopting infrastructure as code, you enable other tools to be used in addition
to SCPs.
• Checkov is a common, open source option.
• Given noncompliant infrastructure, you can iteratively work to make the infra‐
structure compliant.
7.9 Preventing Noncompliant Infrastructure on Azure
Problem
You want to prevent users from creating noncompliant infrastructure through the
console or APIs.
Solution
This recipe configures a custom Azure Policy in enforce mode to prevent users from
creating resources.
If you haven’t already done so, familiarize yourself with Terraform and the different
authentication mechanisms in Chapter 11.
Create the following provider.tf file and run terraform init:
terraform {
required_providers {
azurerm = {
source = "hashicorp/azurerm"
version = "~> 2"
}
}
}
provider "azurerm" {
features {}
}
Create the following main.tf file and run terraform plan:
7.9 Preventing Noncompliant Infrastructure on Azure | 383

data "azurerm_subscription" "current" {}
resource "azurerm_policy_definition" "g_series_prevent" {
name = "Prevent G Series Virtual Machines"
policy_type = "Custom"
mode = "All"
display_name = "Prevent G Series Virtual Machines"
policy_rule = <<POLICY_RULE
{
"if": {
"allOf": [{
"field": "type",
"equals": "Microsoft.Compute/virtualMachines"
},
{
"field": "Microsoft.Compute/virtualMachines/sku.name",
"like": "Standard_G*"
}
]
},
"then": {
"effect": "deny"
}
}
POLICY_RULE
}
resource "azurerm_subscription_policy_assignment" "g_series_prevent" {
name = "g_series_prevent"
policy_definition_id = azurerm_policy_definition.g_series_prevent.id
subscription_id = data.azurerm_subscription.current.id
}
Review the resources that are going to be created, and then run terraform apply to
make the changes.
Discussion
After assigning this policy with the preceding Terraform, all users will be prevented
from creating G-series virtual machines in the subscription. This will hold whether
they use the portal or APIs to try to create the resources. When using Azure Policy, it
is important to understand the variety of effects that it can enact:
Append
Adds additional fields to a resource
Audit
Creates a warning when a noncompliant resource is found but does not stop the
request
384 | Chapter 7: Compliance as Code

AuditIfNotExists
Creates a warning when a related resource does not exist
Deny
Stops the request if noncompliant
DeployIfNotExists
Deploys resources if missing
Disabled
Stops the policy from doing anything
Modify
Adds, updates, or removes properties or tags on a resource
When looking to prevent noncompliant infrastructure, audit, deny, and modify are
the most interesting. When first creating a new policy, it is often best to initially
deploy with an audit effect where you can review the accuracy and potential impact of
the policy. Depending on whether you wish to stop users, or modify their requests in
flight, you can then redeploy with the more invasive effects. The modify effect comes
with some of the same downsides as automated remediation activities, as explored in
Recipe 7.12. With deny policies, it can sometimes be hard to enable your users to fix
their requests in a fully self-service manner. It can also present challenges to automa‐
ted deployments, where the planned changes are successful, but they break when
being applied.
Infrastructure as code, covered in depth in Chapter 6, is not only fundamental to
truly leveraging the cloud but is also a requirement for a highly compliant environ‐
ment. By using it, you have the option to embrace tools to support you on your com‐
pliance journey. Checkov can tell you, prior to deployment, that your infrastructure
will be noncompliant; and for the built-in checks, it provides fully documented self-
service guides for users.
Let’s explore how it can ensure you deploy compliant storage accounts. First, install
Checkov by following the instructions at the Checkov home page.
Define a simple storage account in an sa.tf file:
resource "azurerm_resource_group" "test" {
name = "test"
location = "us"
}
resource "azurerm_storage_account" "test" {
resource_group_name = azurerm_resource_group.test.name
location = azurerm_resource_group.test.location
name = "test"
account_tier = "Standard"
7.9 Preventing Noncompliant Infrastructure on Azure | 385

account_replication_type = "GRS"
}
Now, run checkov -f sa.tf. It will fail with output that looks like the following:
Check: CKV2_AZURE_18: "Ensure that Storage Accounts use customer-managed key for
encryption"
FAILED for resource: azurerm_storage_account.test
File: /sa.tf:6-12
Guide: https://docs.bridgecrew.io/docs/ensure-that-storage-accounts-use-
customer-managed-key-for-encryption
6 | resource "azurerm_storage_account" "test" {
7 | resource_group_name = azurerm_resource_group.test.name
8 | location = azurerm_resource_group.test.location
9 | name = "test"
10 | account_tier = "Standard"
11 | account_replication_type = "GRS"
12 | }
Check: CKV2_AZURE_8: "Ensure the storage container storing the activity logs is
not publicly accessible"
FAILED for resource: azurerm_storage_account.test
File: /sa.tf:6-12
Guide: https://docs.bridgecrew.io/docs/ensure-the-storage-
container-storing-the-activity-logs-is-not-publicly-accessible
6 | resource "azurerm_storage_account" "test" {
7 | resource_group_name = azurerm_resource_group.test.name
8 | location = azurerm_resource_group.test.location
9 | name = "test"
10 | account_tier = "Standard"
11 | account_replication_type = "GRS"
12 | }
...
By working through the guides Checkov provides, you should end up with a storage
account definition that looks like the following. In this example, two rules were skip‐
ped: CKV2_AZURE_8 and CKV_AZURE_112.
resource "azurerm_resource_group" "test" {
name = "test"
location = "us"
}
resource "azurerm_storage_account" "test" {
// checkov:skip=CKV2_AZURE_8
resource_group_name = azurerm_resource_group.test.name
location = azurerm_resource_group.test.location
name = "test"
account_tier = "Standard"
386 | Chapter 7: Compliance as Code

account_replication_type = "GRS"
min_tls_version = "TLS1_2"
enable_https_traffic_only = true
queue_properties {
logging {
delete = true
read = true
write = true
version = "1.0"
retention_policy_days = 10
}
}
network_rules {
default_action = "Deny"
}
}
resource "azurerm_key_vault" "example" {
name = "examplekv"
location = "location"
resource_group_name = "group"
tenant_id = data.azurerm_client_config.current.tenant_id
sku_name = "standard"
purge_protection_enabled = true
network_acls {
default_action = "Deny"
bypass = "AzureServices"
}
}
resource "azurerm_key_vault_key" "example" {
// checkov:skip=CKV_AZURE_112
name = "tfex-key"
key_vault_id = azurerm_key_vault.example.id
key_type = "RSA"
key_size = 2048
key_opts = [
"decrypt",
"encrypt",
"sign",
"unwrapKey",
"verify",
"wrapKey"
]
expiration_date = "2022-12-30T20:00:00Z"
}
7.9 Preventing Noncompliant Infrastructure on Azure | 387

resource "azurerm_storage_account_customer_managed_key" "key" {
storage_account_id = azurerm_storage_account.test.id
key_vault_id = azurerm_key_vault.example.id
key_name = azurerm_key_vault_key.example.name
key_version = "1"
}
Now, if you run checkov -f bucket.tf again, you will get a clean bill of health.
Combining this with Recipe 6.9 is one of the first steps in building out a cloud native
DevSecOps pipeline.
Summary
Let’s summarize what was learned and deployed in this recipe:
• Azure Policy has a variety of effects it can enact when finding a noncompliant
resource.
• You can define custom policies to enforce particular compliance controls.
•
By assigning a policy with a deny effect, you prevent users from being able to
breach that control.
• Azure Policy, while effective, is not the best at supporting self-service fixing.
• Checkov is an open source tool that can identify noncompliant infrastructure
from the Terraform resource definitions.
• It automatically provides self-service documentation for each finding.
7.10 Remediating Noncompliant Infrastructure on GCP
Problem
You wish to automatically fix high-risk infrastructure as soon as it is discovered.
Solution
This recipe involves building a Cloud Asset Organization Feed that triggers a Cloud
Function which prevents public Cloud Storage buckets.
If you haven’t already done so, familiarize yourself with Terraform and the different
authentication mechanisms in Chapter 11.
As this recipe has a dependency-on-service account authentication, first create and
enter an auth folder.
Create the following variables.tf file:
variable "project" {
type = string
388 | Chapter 7: Compliance as Code

description = "The project to deploy the resources into"
}
variable "organization_domain" {
type = string
description = "The organization domain of your Google Cloud estate"
}
variable "target_projects" {
type = list(string)
description = "The project to enable the remediator for"
}
Then fill out the corresponding terraform.tfvars file:
project = ""
organization_domain = ""
target_projects = [""]
Create the following provider.tf file and run terraform init:
provider "google" {
project = var.project
}
terraform {
required_providers {
google = {
source = "hashicorp/google"
version = "~> 3"
}
}
}
Create the following main.tf file and run terraform plan:
data "google_organization" "current" {
domain = var.organization_domain
}
resource "google_service_account" "cloud_assets" {
account_id = "cloud-assets"
display_name = "Cloud Assets"
}
resource "google_service_account_key" "cloud_assets" {
service_account_id = google_service_account.cloud_assets.name
public_key_type = "TYPE_X509_PEM_FILE"
}
resource "local_file" "cloud_assets" {
content = base64decode(google_service_account_key.cloud_assets.private_key)
filename = "cloud_assets.json"
}
7.10 Remediating Noncompliant Infrastructure on GCP | 389

resource "google_organization_iam_member" "cloud_assets" {
org_id = data.google_organization.current.org_id
role = "roles/cloudasset.owner"
member = "serviceAccount:${google_service_account.cloud_assets.email}"
}
resource "google_project_iam_member" "cloud_assets" {
for_each = toset(var.target_projects)
project = each.value
role = "roles/serviceusage.serviceUsageConsumer"
member = "serviceAccount:${google_service_account.cloud_assets.email}"
}
Review the resources that are going to be created, and then run terraform apply to
make the changes.
Move up to the parent folder and create the following variables.tf file:
variable "project_id" {
type = string
description = "The project to create the resources in"
}
variable "region" {
type = string
description = "The region to create the resources in"
}
variable "organization_domain" {
type = string
description = "The organization domain of your Google Cloud estate"
}
variable "target_projects" {
type = list(string)
description = "The project to enable the remediator for"
}
Then fill out the corresponding terraform.tfvars file:
project = ""
region = ""
organization_domain = ""
target_projects = [""]
Create the following provider.tf file and run terraform init:
provider "google" {
project = var.project_id
region = var.region
}
390 | Chapter 7: Compliance as Code

provider "google" {
alias = "cloud_assets"
project = var.project_id
region = var.region
credentials = "./auth/cloud_assets.json"
}
terraform {
required_providers {
google = {
source = "hashicorp/google"
version = "~> 3"
}
}
}
Create the following main.tf file:
data "google_project" "current" {}
locals {
required_apis = [
"cloudasset.googleapis.com",
"cloudbuild.googleapis.com",
"cloudfunctions.googleapis.com",
"storage.googleapis.com",
]
}
resource "null_resource" "create_assets_service_account" {
for_each = toset(var.target_projects)
provisioner "local-exec" {
command = join(" ", [
"gcloud beta services identity create",
"--service=cloudasset.googleapis.com",
"--project=${each.value}"
])
}
}
resource "google_project_service" "api" {
for_each = toset(local.required_apis)
service = each.value
disable_on_destroy = false
}
resource "google_project_service" "assets" {
for_each = toset(var.target_projects)
project = each.value
service = "cloudasset.googleapis.com"
disable_on_destroy = false
}
7.10 Remediating Noncompliant Infrastructure on GCP | 391

resource "google_cloud_asset_project_feed" "bucket_changes" {
provider = google.cloud_assets
for_each = toset(var.target_projects)
project = each.value
feed_id = "bucket-changes"
content_type = "RESOURCE"
asset_types = [
"storage.googleapis.com/Bucket",
]
feed_output_config {
pubsub_destination {
topic = google_pubsub_topic.bucket_changes.id
}
}
condition {
expression = <<EXP
!temporal_asset.deleted
EXP
title = "created_or_updated"
description = "Notify on create or update"
}
depends_on = [
google_pubsub_topic_iam_member.cloud_asset_writer,
google_project_service.api,
google_project_service.assets,
]
}
resource "google_pubsub_topic" "bucket_changes" {
name = "bucket-changes"
}
data "google_project" "targets" {
for_each = toset(var.target_projects)
project_id = each.value
}
resource "google_pubsub_topic_iam_member" "cloud_asset_writer" {
for_each = toset(var.target_projects)
topic = google_pubsub_topic.bucket_changes.id
role = "roles/pubsub.publisher"
member = join("", [
"serviceAccount:service-",
data.google_project.targets[each.value].number,
"@gcp-sa-cloudasset.iam.gserviceaccount.com"
])
392 | Chapter 7: Compliance as Code

depends_on = [
null_resource.create_assets_service_account
]
}
resource "google_storage_bucket" "bucket" {
name = "${split(".", var.organization_domain)[0]}-bucket-remediator"
}
data "archive_file" "code" {
type = "zip"
source_dir = "${path.module}/src"
output_path = "${path.module}/main.zip"
}
resource "google_storage_bucket_object" "code" {
name = "${data.archive_file.code.output_md5}.zip"
bucket = google_storage_bucket.bucket.name
source = data.archive_file.code.output_path
}
resource "google_cloudfunctions_function" "function" {
name = "public-bucket-remediation"
runtime = "python39"
available_memory_mb = 128
source_archive_bucket = google_storage_bucket.bucket.name
source_archive_object = google_storage_bucket_object.code.name
entry_point = "handle"
event_trigger {
event_type = "google.pubsub.topic.publish"
resource = google_pubsub_topic.bucket_changes.id
failure_policy {
retry = false
}
}
depends_on = [
google_project_service.api
]
}
resource "google_project_iam_member" "function" {
for_each = toset(var.target_projects)
project = each.value
role = google_project_iam_custom_role.bucket-remediator[each.key].id
member = join("", [
"serviceAccount:",
google_cloudfunctions_function.function.service_account_email
])
7.10 Remediating Noncompliant Infrastructure on GCP | 393

}
resource "google_project_iam_custom_role" "bucket-remediator" {
for_each = toset(var.target_projects)
project = each.value
role_id = "bucketRemediator"
title = "Role used to remediate noncompliant bucket configurations"
permissions = [
"storage.buckets.get",
"storage.buckets.setIamPolicy",
"storage.buckets.update"
]
}
Last, create a src folder, and create two files in it. First, create a main.py file:
import base64
import json
from google.cloud.storage import Client
from google.cloud.storage.constants import PUBLIC_ACCESS_PREVENTION_ENFORCED
client = Client()
def public_access_allowed(iam_configuration):
return (
"publicAccessPrevention" in iam_configuration
and iam_configuration["publicAccessPrevention"] != "enforced"
) or ("publicAccessPrevention" not in iam_configuration)
def run(asset):
if public_access_allowed(asset["resource"]["data"]["iamConfiguration"]):
bucket_name = asset["resource"]["data"]["name"]
bucket = client.get_bucket(bucket_name)
bucket.iam_configuration.public_access_prevention = (
PUBLIC_ACCESS_PREVENTION_ENFORCED
)
bucket.patch()
def handle(event, _):
if "data" in event:
run(json.loads(base64.b64decode(event["data"]).decode("utf-8"))["asset"])
And second, create a requirements.txt file:
google-cloud-storage==1.42.3
Run terraform plan, review the resources that are going to be created, and then run
terraform apply to make the changes.
394 | Chapter 7: Compliance as Code

Discussion
Unintentional public data storage has been in the newspapers with frightening regu‐
larity since cloud usage has accelerated. It is one of those critical compliance controls
that needs rectifying as it happens. This recipe is architecturally similar to Recipe 7.4,
although in this instance the Cloud Function is privileged in specific projects to
actively fix noncompliant buckets.
Although great in theory, automated remediation of this sort has potential issues.
First, it undermines the approach in Chapter 6, by making the infrastructure drift
from what the code has defined. In these instances, adopting an approach more like
Checkov in Recipe 7.7 is more appropriate, as it forces the change to happen through
infrastructure as code.
Second, you run the risk of system impacts. In Figure 7-1, I showed how you can seg‐
ment changes based on ownership and risk. Automated remediation is fantastic for
low-risk changes, especially those that are workload owned. Not all workload teams
may be using infrastructure as code, which means that other options aren’t available.
Third, often the end user doesn’t learn how to do it correctly next time. Depending
on the specific compliance finding, this may or may not be important. For public
buckets, it is critical that people understand how to configure them properly; for not
deleting a user who hasn’t logged in for 90 days, letting automation clear that up is
probably OK.
As you saw in this recipe, building automated remediation is not trivial; it requires a
level of coding ability and is its own maintenance burden. By investing in prevention,
you reduce the need for mass remediation. Focus on the highest-value remediation
targets, but if it’s a case of something that once fixed will stay fixed, a more manual fix
is the correct way to go.
For critical compliance issues, automated remediation is the last line of defense, as the
impact of the issue far outweighs any other impacts. For small, dynamic resources,
you’ll end up in a loop of always fixing the symptom and never the cause.
Summary
Let’s summarize what was learned and deployed in this recipe:
• By triggering Cloud Functions of Cloud Assets, you can automatically remediate
identified compliance issues.
• To build out an automated remediation framework, you accept an ongoing main‐
tenance burden.
• Beware the conflict between automated remediation and infrastructure as code.
7.10 Remediating Noncompliant Infrastructure on GCP | 395

• If teams are using infrastructure as code, determine how best to prevent non‐
compliant infrastructure in the first place.
• Automated remediation works best for low-operational-risk, high-security-risk
changes.
• Remediating resources automatically stops end users from learning; for high-risk
items, it is better they learn how to configure the resource properly in the future.
7.11 Remediating Noncompliant Infrastructure on AWS
Problem
You wish to automatically fix high-risk infrastructure as soon as it is discovered.
Solution
This recipe involves configuring an AWS Config remediation action to automatically
close off public S3 buckets. It also requires a Python environment with boto3
available.
If you haven’t already done so, familiarize yourself with Terraform and the different
authentication mechanisms in Chapter 11.
Create the following provider.tf file and run terraform init:
provider "aws" {}
terraform {
required_providers {
aws = {
source = "hashicorp/aws"
version = "~> 3"
}
null = {
source = "hashicorp/null"
version = "~> 3"
}
}
}
Create the following main.py file:
from sys import argv
from boto3 import client
def update_configuration(configuration):
config = configuration.copy()
config["Automatic"] = True
config["MaximumAutomaticAttempts"] = 1
396 | Chapter 7: Compliance as Code

config["RetryAttemptSeconds"] = 60
return config
def run(rule_name):
config = client("config")
configurations = config.describe_remediation_configurations(
ConfigRuleNames=[
rule_name,
]
)["RemediationConfigurations"]
auto_configurations = [
update_configuration(configuration) for configuration in configurations
]
config.put_remediation_configurations(
RemediationConfigurations=auto_configurations
)
if __name__ == "__main__":
run(argv[1])
Create the following main.tf file and run terraform plan:
resource "aws_config_config_rule" "s3_public" {
name = "S3_BUCKET_LEVEL_PUBLIC_ACCESS_PROHIBITED"
source {
owner = "AWS"
source_identifier = "S3_BUCKET_LEVEL_PUBLIC_ACCESS_PROHIBITED"
}
}
resource "aws_config_remediation_configuration" "s3_public" {
config_rule_name = aws_config_config_rule.s3_public.name
target_type = "SSM_DOCUMENT"
target_id = "AWSConfigRemediation-ConfigureS3BucketPublicAccessBlock"
parameter {
name = "AutomationAssumeRole"
static_value = aws_iam_role.remediator.arn
}
parameter {
name = "BucketName"
resource_value = "RESOURCE_ID"
}
}
resource "null_resource" "turn_on_auto_remediate" {
provisioner "local-exec" {
command = "python main.py ${aws_config_config_rule.s3_public.name}"
}
7.11 Remediating Noncompliant Infrastructure on AWS | 397

depends_on = [
aws_config_remediation_configuration.s3_public
]
}
resource "aws_iam_role" "remediator" {
name = "s3_public_bucket_remediator"
assume_role_policy = data.aws_iam_policy_document.assume.json
managed_policy_arns = [
aws_iam_policy.s3_public_bucket_remediator.arn
]
}
data "aws_iam_policy_document" "assume" {
statement {
actions = [
"sts:AssumeRole"
]
principals {
type = "Service"
identifiers = [
"ssm.amazonaws.com"
]
}
}
}
resource "aws_iam_policy" "s3_public_bucket_remediator" {
name = "s3_public_bucket_remediator"
policy = data.aws_iam_policy_document.remediation.json
}
data "aws_iam_policy_document" "remediation" {
statement {
effect = "Allow"
actions = [
"s3:GetBucketPublicAccessBlock",
"s3:PutBucketPublicAccessBlock"
]
resources = ["*"]
}
}
Review the resources that are going to be created, and then run terraform apply to
make the changes.
Discussion
Public S3 buckets are the source of most data breaches in company AWS environ‐
ments. Being able to shut them off automatically is a key capability to have as part of
398 | Chapter 7: Compliance as Code

your compliance suite. In this recipe, you configured an AWS-provided remediation
action to automatically fire if the S3_BUCKET_LEVEL_PUBLIC_ACCESS_PROHIBITED rule
found any noncompliant S3 buckets. Unfortunately, there is no remediation equiva‐
lent of the aws_config_organization_managed_rule resources from Recipe 7.5. To
get around this, you can either use AWS Config conformance packs, which break
away from Terraform by using CloudFormation to deploy resources across accounts,
or combine this recipe with Recipe 6.11 to use Terraform.
Automatic remediation comes into conflict with the concept of infrastructure as code,
as explored fully in Chapter 6. The remediation action causes drift between reality
and what is defined in the code, which can cause resources to continually flip between
compliant and noncompliant states. In Recipe 7.8, you saw Checkov act as a strong
compliance prevention tool when using infrastructure as code. This should be the
primary method of compliance enforcement of teams.
Another potential issue in a highly automated compliance world is that end users
stop learning how to configure infrastructure properly and instead learn to lean more
heavily on security to clean up after them. Back in Chapter 1, I wrote about how secu‐
rity in a modern organization is an enablement function—you are looking to scale
through upskilling and enabling teams. Automated remediation should be focused on
where the risk is too great to allow the learning feedback loop to occur. Public S3
buckets are a classic example of exactly that.
It is possible to roll your own remediation actions. The same AWS EventBridge rule
from Recipe 7.5 can be used to trigger AWS SSM runbooks, the same mechanism
used for the recipe’s AWS Config remediation, or AWS Lambda functions to perform
any necessary actions. With the Lambda function approach, you can either combine
with Recipe 6.11 to deploy the function to all accounts and trigger locally, or central‐
ize the events and have the function assume a role in the other accounts. The advan‐
tage to a centralized function is that the role it assumes can be more readily shaped to
fit the end user’s requirements, as they can deploy it themselves.
Summary
Let’s summarize what was learned and deployed in this recipe:
• AWS Config provides a variety of pre-canned remediation tasks.
• They are deployed in an account targeting a particular rule.
• To deploy across an organization, use Recipe 6.11.
• You can configure them to automatically remediate noncompliant infrastructure.
•
Automated remediation and infrastructure as code come into conflict.
— The remediation action induces drift from the code.
7.11 Remediating Noncompliant Infrastructure on AWS | 399

• For teams adopting infrastructure as code, you should look to ideally leverage
tools like Checkov from Recipe 7.8.
• For custom remediation actions, you can use EventBridge rules with SSM run‐
books or Lambda functions.
7.12 Remediating Noncompliant Infrastructure on Azure
You wish to automatically fix high-risk infrastructure as soon as it is discovered.
Solution
This recipe involves configuring an Azure Event Grid system topic that triggers an
Azure Function which automatically remediates the noncompliant resource.
If you haven’t already done so, familiarize yourself with Terraform and the different
authentication mechanisms in Chapter 11.
Create a variables.tf file and copy the following contents:
variable "location" {
type = string
description = "The Azure location for resources"
}
Then fill out the corresponding terraform.tfvars file:
location = ""
Create the following provider.tf file and run terraform init:
terraform {
required_providers {
azurerm = {
source = "hashicorp/azurerm"
version = "~> 2"
}
null = {
source = "hashicorp/null"
version = "~> 3"
}
random = {
source = "hashicorp/random"
version = "~> 3"
}
}
}
provider "azurerm" {
features {}
}
400 | Chapter 7: Compliance as Code

Next, create the following host.json file:
{
"version": "2.0",
"logging": {
"applicationInsights": {
"samplingSettings": {
"isEnabled": true,
"excludedTypes": "Request"
}
}
},
"extensionBundle": {
"id": "Microsoft.Azure.Functions.ExtensionBundle",
"version": "[2.*, 3.0.0)"
}
}
Create the following local.setting.json file:
{
"IsEncrypted": false,
"Values": {
"FUNCTIONS_WORKER_RUNTIME": "python",
"AzureWebJobsStorage": ""
}
}
And create the following requirements.txt file:
azure-functions==1.7.2
azure-mgmt-policyinsights==1.0.0
azure-identity==1.7.0
azure-mgmt-resource==20.0.0
Create a Remediation folder, and in it create two files. First, create an __init__.py file:
import logging
import azure.functions as func
from azure.identity import DefaultAzureCredential
from azure.mgmt.policyinsights import PolicyInsightsClient
from azure.mgmt.policyinsights.models import Remediation
from azure.mgmt.resource.policy import PolicyClient
credential = DefaultAzureCredential()
def main(event: func.EventGridEvent):
logging.info(event)
compliance_state = event.get_json()["complianceState"]
if compliance_state == "NonCompliant":
7.12 Remediating Noncompliant Infrastructure on Azure | 401

policyAssignmentId = event.get_json()["policyAssignmentId"]
policyDefinitionId = event.get_json()["policyDefinitionId"]
policy_insights = PolicyInsightsClient(credential=credential)
policy = PolicyClient(credential=credential)
definition = policy.policy_definitions.get(
policy_definition_name=policyDefinitionId
)
if definition.policy_rule:
effect = definition.policy_rule["then"]["effect"]
if (
"append" == effect or
"modify" == effect
):
parameters = Remediation(policy_assignment_id=policyAssignmentId)
result = policy_insights.remediations.create_or_update_at_subscription(
remediation_name="AutomatedRemediation", parameters=parameters
)
logging.info(result)
else:
logging.info("Policy definition had no remediation action available")
else:
logging.info("Resource is compliant, taking no action")
And second, create a function.json file:
{
"scriptFile": "__init__.py",
"bindings": [
{
"type": "eventGridTrigger",
"name": "event",
"direction": "in"
}
]
}
Now, move back to the parent directory, create the following main.tf file, and run
terraform plan:
data "azurerm_subscription" "current" {}
resource "azurerm_resource_group" "remediation" {
name = "remediation"
location = var.location
}
resource "azurerm_eventgrid_system_topic" "policy_state_changes" {
name = "PolicyStateChanges"
resource_group_name = azurerm_resource_group.remediation.name
402 | Chapter 7: Compliance as Code

location = "global"
source_arm_resource_id = data.azurerm_subscription.current.id
topic_type = "Microsoft.PolicyInsights.PolicyStates"
}
resource "azurerm_eventgrid_system_topic_event_subscription" "remediation" {
name = "policy-state-changes-alerting"
system_topic = azurerm_eventgrid_system_topic.policy_state_changes.name
resource_group_name = azurerm_resource_group.remediation.name
azure_function_endpoint {
function_id = join("/", [
azurerm_function_app.remediation.id,
"functions",
"Remediation"
])
max_events_per_batch = 1
preferred_batch_size_in_kilobytes = 64
}
depends_on = [
null_resource.deploy
]
}
resource "random_string" "storage_account" {
length = 16
special = false
upper = false
}
resource "azurerm_storage_account" "r" {
name = random_string.storage_account.result
resource_group_name = azurerm_resource_group.remediation.name
location = azurerm_resource_group.remediation.location
account_tier = "Standard"
account_replication_type = "LRS"
}
resource "azurerm_app_service_plan" "remediation" {
name = "remediation"
location = azurerm_resource_group.remediation.location
resource_group_name = azurerm_resource_group.remediation.name
kind = "functionapp"
reserved = true
sku {
tier = "Dynamic"
size = "Y1"
}
}
7.12 Remediating Noncompliant Infrastructure on Azure | 403

resource "random_string" "functionapp" {
length = 16
special = false
upper = false
}
resource "azurerm_storage_account" "r" {
name = random_string.functionapp.result
location = azurerm_resource_group.remediation.location
resource_group_name = azurerm_resource_group.remediation.name
app_service_plan_id = azurerm_app_service_plan.remediation.id
storage_account_name = azurerm_storage.r.name
storage_account_access_key = azurerm_storage.r.primary_access_key
os_type = "linux"
version = "~3"
app_settings = {
FUNCTIONS_WORKER_RUNTIME = "python"
}
site_config {
linux_fx_version = "Python|3.9"
}
identity {
type = "SystemAssigned"
}
}
resource "null_resource" "deploy" {
provisioner "local-exec" {
command = join(" ", [
"func azure functionapp publish",
azurerm_function_app.remediation.name
])
}
depends_on = [
azurerm_function_app.remediation
]
}
resource "azurerm_role_assignment" "remediation" {
scope = data.azurerm_subscription.current.id
role_definition_name = azurerm_role_definition.remediation.name
principal_id = azurerm_function_app.remediation.identity.0.principal_id
}
resource "azurerm_role_definition" "remediation" {
name = "automated-remediation"
scope = data.azurerm_subscription.current.id
404 | Chapter 7: Compliance as Code

permissions {
actions = ["Microsoft.PolicyInsights/remediations/write"]
not_actions = []
}
assignable_scopes = [
data.azurerm_subscription.current.id
]
}
Review the resources that are going to be created, and then run terraform apply to
make the changes.
Discussion
Unlike the AWS and GCP equivalent recipes, this Azure recipe uses the library of
remediation actions in Azure Policy to handle a large amount of noncompliant
resources.
Azure Policy gives a robust remediation mechanism for policies that have either an
append or modify effect. Unfortunately, there is no built-in mechanism for automati‐
cally remediating resources within Azure Policy. Hence the recipe here, which is
architecturally similar to Recipe 7.6. Rather than sending Slack notifications, the
function app is given the privilege to execute remediations against Azure Policy.
It is possible to extend the function to perform any action against Azure in response
to the compliance status event. Rather than create a remediation task against Azure
Policy, you could directly modify the resource. However, by going through Azure Pol‐
icy, you retain the history of the remediation tasks that have been attempted during
the life of your subscription.
Remediating in this way works amazingly well for resources that are not managed via
infrastructure as code and carry low operational risk. With modern ways of working,
as explored in Chapter 6, the focus should be more on building the toolchain around
the infrastructure as code, rather than applying fixes around it. It actively undermines
the power of the code as it drifts further from reality. This is why evaluating tools
such as Checkov, from Recipe 7.9, is fundamental to DevSecOps. If possible, prevent
the noncompliant infrastructure in the first place; idiomatically, “an ounce of preven‐
tion is worth a pound of cure.”
Summary
Let’s summarize what was learned and deployed in this recipe:
• Azure Policy provides remediation tasks for many policies.
•
They can be created ad hoc, but no built-in functionality allows them to be
automated.
7.12 Remediating Noncompliant Infrastructure on Azure | 405

• This recipe used Event Grid to trigger an Azure Function to create the remedia‐
tions on demand.
• Be careful when applying remediations to an environment with high levels of
infrastructure as code.
— The remediations cause drift, which undermines the value.
•
An ounce of prevention is worth a pound of remediation.
406 | Chapter 7: Compliance as Code

CHAPTER 8
Providing Internal Security Services
As part of managing a growing cloud estate, a security function needs to be able to
provide scalable services. These services provide a secure baseline that ensures that
known vulnerable resources are automatically rectified and that recovery is possible
during a potential incident.
First, you must be able to control your identity perimeter. Delivery teams will require
the ability to self-manage identity in order to be able to move at speed. As their archi‐
tectures evolve, to maintain the principle of least privilege, they need to create roles
without the delay of going through a centralized team. As the ability to create roles is
decentralized, it is key that they are not able to accidentally or intentionally escalate
their privilege and start to compromise the guardrails in the cloud estate.
Second, being able to manage the virtual machine fleet becomes critical. The highly
volatile nature of resources in a cloud environment needs modern tooling built for
that reality. Each cloud service provider has services dedicated to giving overviews of
the active machines while also enabling drilling down to specifics such as inventory.
As new machines emerge continuously, your tooling needs to build a real-time lens
onto the vulnerabilities that exist.
Third, running scheduled patches and updates is mandatory for proactively handling
vulnerabilities and operating a healthy fleet. All three providers again provide a man‐
aged service that allows for the deployment and management of scheduled updates
across your estate.
Last, having robust backup processes is key to restoring service due to malicious or
accidental incidents. As ransomware and similar attacks become more prevalent,
business continuity is dependent on modern backup strategies that allow for recovery.
407

8.1 Protecting Security Assets and Controls on GCP
Problem
You need to prevent people from escalating their own permissions within a project.
Solution
This recipe gives a specific user the ability to only grant certain roles to other IAM
principals.
If you haven’t already done so, familiarize yourself with Terraform and the different
authentication mechanisms in Chapter 11.
Create a variables.tf file and copy the following contents:
variable "project" {
type = string
description = "The project to deploy the resources into"
}
variable "customer_id" {
type = string
description = <<DESCRIPTION
Customer ID for your Google Workspace account
Can be found at https://admin.google.com/ac/accountsettings
DESCRIPTION
}
variable "organization_domain" {
type = string
description = "The domain of your organization"
}
variable "user_email" {
type = string
description = "The email of the user to give IAM admin"
}
Then fill out the corresponding terraform.tfvars file:
project = ""
customer_id = ""
organization_domain = ""
user_email = ""
Create the following provider.tf file and run terraform init:
provider "google" {
project = var.project
billing_project = var.project
user_project_override = true
408 | Chapter 8: Providing Internal Security Services

}
terraform {
required_providers {
google = {
source = "hashicorp/google"
version = "~> 3"
}
}
}
Create the following main.tf file and run terraform plan:
resource "google_project_service" "resource_manager" {
service = "cloudresourcemanager.googleapis.com"
disable_on_destroy = false
}
resource "google_project_iam_member" "compute_admin" {
role = "roles/resourcemanager.projectIamAdmin"
member = "user:${var.user_email}"
condition {
title = "only_compute_engine"
description = "Only allows granting compute engine roles"
expression = join("", [
"api.getAttribute('iam.googleapis.com/modifiedGrantsByRole', [])",
".hasOnly([",
"'roles/computeAdmin'",
"])"
])
}
depends_on = [
google_project_service.resource_manager
]
}
Review the resources that are going to be created, and then run terraform apply to
make the changes.
Discussion
To protect security assets in GCP, the critical aspect is controlling how IAM privileges
are assigned. For teams to operate autonomously, they need to be able to assign their
own permissions. However, it is best practice to prevent a user assigning more privi‐
leges than they currently possess. This recipe allows the specified user to grant and
revoke only the computeAdmin role on any user within the project. By matching the
list of roles in the condition expression with the roles assigned to the user, you block
this variant of privilege escalation.
8.1 Protecting Security Assets and Controls on GCP | 409

Now imagine that the user needs to be able to give other users the power to grant and
revoke the set of roles. In theory, you could give the user the roles/resourceman
ager.projectIamAdmin role, but this would allow them to modify their own condi‐
tion and escalate their privileges. Instead, to achieve this, you need to create a group,
assign the permissions to the group, and make the original user the manager of the
group. Then, by toggling group membership, they can give other users the privilege
to grant those roles. The following Terraform implements this pattern:
resource "google_cloud_identity_group" "iam_admins" {
display_name = "${var.project} IAM Admins"
parent = "customers/${var.customer_id}"
group_key {
id = "${var.project}-iam-admins@${var.organization_domain}"
}
labels = {
"cloudidentity.googleapis.com/groups.discussion_forum" = ""
}
}
resource "google_cloud_identity_group_membership" "manager" {
group = google_cloud_identity_group.iam_admins.id
preferred_member_key {
id = var.user_email
}
roles {
name = "MEMBER"
}
roles {
name = "MANAGER"
}
}
resource "google_project_iam_member" "compute_admin_group" {
role = "roles/resourcemanager.projectIamAdmin"
member = "group:${google_cloud_identity_group.iam_admins.group_key[0].id}"
condition {
title = "only_compute_engine"
description = "Only allows granting compute engine roles"
expression = join("", [
"api.getAttribute('iam.googleapis.com/modifiedGrantsByRole', [])",
".hasOnly([",
"'roles/computeAdmin'",
"])"
410 | Chapter 8: Providing Internal Security Services

])
}
depends_on = [
google_project_service.resource_manager
]
}
When creating and managing service accounts in your estate, care should be taken to
not allow users to assume more highly privileged service accounts unless explicitly
required. When a user assumes a service account, they gain equivalent privilege, and
it is therefore a vector for privilege escalation. The following is a nonexhaustive list of
permissions that enable service account assumption:
• iam.serviceAccounts.getAccessToken
• iam.serviceAccounts.getOpenIdToken
• iam.serviceAccounts.actAs
•
iam.serviceAccounts.implicitDelegation
• iam.serviceAccountKeys.create
• iam.serviceAccountKeys.get
• deploymentmanager.deployments.create
• cloudbuild.builds.create
A service account’s IAM policy dictates who can assume it. Therefore, any user with
the iam.serviceAccounts.setIamPolicy permission on the service account can
modify who can assume that role. This permission should be granted sparingly and
only when explicitly required to stop lateral movement between principals.
To prevent rogue access to service accounts, the Disable service account key cre
ation and Disable service account key upload organization policy constraints
should be applied in all projects where service account keys are not explicitly
required. Service account keys that are compromised or leaked become persistent,
direct attack vectors into your estate. As such, their creation should be when
required, not a default enabled option.
Google Cloud Recommender provides three kinds of insights into how your identity
and access management are configured. First are lateral movement insights, where
Recommender determines opportunities for service accounts to assume a different
service account in another project. These are a primary vector for a security incident
to break out of a project and spread across the state. Second are policy insights, where
Recommender identifies excess permissions assigned to users. Third are service
account insights, which finds potentially redundant service accounts to delete.
8.1 Protecting Security Assets and Controls on GCP | 411

Summary
Let’s summarize what was learned and deployed in this recipe:
• By using conditions on the roles/resourcemanager.projectIamAdmin role, you
can prevent users from assigning privileges outside of an approved list.
• If that list is equivalent to the permissions assigned to the user, then they cannot
create a principal that is more privileged than themselves.
• Use groups to share the limited IAM administration between users in a project.
• Service accounts are another vector for privilege escalation.
• The service account IAM policies, and who can edit them, need to be tightly
controlled.
• Two organization policy constraints to curtail the usage of service account keys
should be enforced by default on all projects.
•
Use Google Cloud Recommender to provide feedback on your identity perime‐
ter, and identify areas where users are too privileged, service accounts present a
vector for lateral movement, and service accounts are redundant.
8.2 Protecting Security Assets and Controls on AWS
Problem
You need to prevent people from escalating their own permissions within an account.
Solution
This recipe restricts a principal escalating privilege by creating another principal with
higher permissions.
If you haven’t already done so, familiarize yourself with Terraform and the different
authentication mechanisms in Chapter 11.
Create the following provider.tf file and run terraform init:
provider "aws" {}
terraform {
required_providers {
aws = {
source = "hashicorp/aws"
version = "~> 3"
}
}
}
412 | Chapter 8: Providing Internal Security Services

Create the following main.tf file and run terraform plan:
data "aws_caller_identity" "current" {}
locals {
all_roles = join("", [
"arn:aws:iam::",
data.aws_caller_identity.current.account_id,
":role/*"
])
all_users = join("", [
"arn:aws:iam::",
data.aws_caller_identity.current.account_id,
":user/*"
])
policy_arn = join("", [
"arn:aws:iam::",
data.aws_caller_identity.current.account_id,
":policy/",
local.policy_name
])
policy_name = "general_permissions_boundary"
}
resource "aws_iam_policy" "permissions_boundary" {
name = local.policy_name
path = "/"
description = "General Permission Boundary for Principals"
policy = data.aws_iam_policy_document.permissions_boundary.json
}
data "aws_iam_policy_document" "permissions_boundary" {
statement {
sid = "AllowFullAccess"
actions = ["*"]
effect = "Allow"
resources = ["*"]
}
statement {
sid = "DenyCostAndBillingAccess"
actions = [
"account:*",
"aws-portal:*",
"savingsplans:*",
"cur:*",
"ce:*"
]
effect = "Deny"
resources = ["*"]
}
8.2 Protecting Security Assets and Controls on AWS | 413

statement {
sid = "DenyEditAccessThisPolicy"
actions = [
"iam:DeletePolicy",
"iam:DeletePolicyVersion",
"iam:CreatePolicyVersion",
"iam:SetDefaultPolicyVersion"
]
effect = "Deny"
resources = [
local.policy_arn
]
}
statement {
sid = "DenyRemovalOfPermissionBoundary"
actions = [
"iam:DeleteUserPermissionsBoundary",
"iam:DeleteRolePermissionsBoundary"
]
effect = "Deny"
resources = [
local.all_users,
local.all_roles
]
condition {
test = "StringEquals"
variable = "iam:PermissionsBoundary"
values = [
local.policy_arn
]
}
}
statement {
sid = "DenyPrincipalCRUDWithoutPermissionBoundary"
actions = [
"iam:PutUserPermissionsBoundary",
"iam:PutRolePermissionsBoundary",
"iam:CreateUser",
"iam:CreateRole"
]
effect = "Deny"
resources = [
local.all_users,
local.all_roles
]
condition {
test = "StringNotEquals"
414 | Chapter 8: Providing Internal Security Services
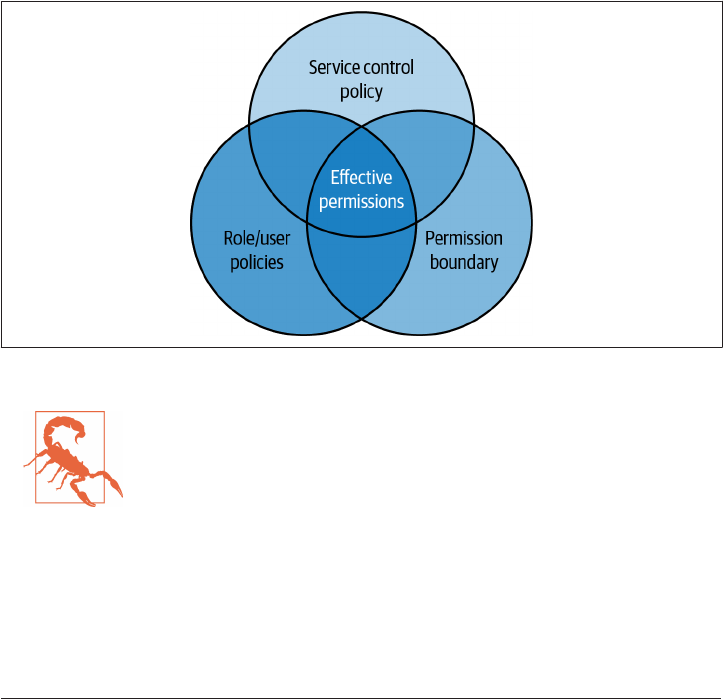
variable = "iam:PermissionsBoundary"
values = [
local.policy_arn
]
}
}
}
Review the resources that are going to be created, and then run terraform apply to
make the changes.
Discussion
Consuming teams in AWS need the ability to create their own IAM roles and policies.
But once their initial permission sets have been applied, you need the ability to ensure
they cannot create roles and policies that exceed those permissions. This is where
permission boundaries are required. To understand how permission boundaries
interact with policies and Service Control Policies (SCPs), see Figure 8-1.
Figure 8-1. Eective IAM permissions
IAM principals acting from outside your organization, for example,
an IAM user that has cross-account S3 bucket access, are not affec‐
ted by SCPs.
Instead, if they must assume a role in the account, then they are
beholden to the SCPs in place.
The permissions a principal has are the cross-section among the SCP, the permissions
boundary, and the policies attached to the role or user. The permissions boundary
policy defined in the recipe blocks a principal from accessing the services related to
costs and billing, enforces that any roles or users they create must have the same
8.2 Protecting Security Assets and Controls on AWS | 415

permissions boundary applied, and prevents them from editing the permissions
boundary itself. So given the following role defined in Terraform, although it has the
AdministratorAccess managed policy attached, users who assume that role still can‐
not access any APIs related to cost and billing:
resource "aws_iam_role" "example" {
name = "permissions_boundary_example"
assume_role_policy = data.aws_iam_policy_document.assume.json
managed_policy_arns = [
"arn:aws:iam::aws:policy/AdministratorAccess"
]
permissions_boundary = aws_iam_policy.permissions_boundary.arn
}
data "aws_iam_policy_document" "assume" {
statement {
effect = "Allow"
principals {
type = "AWS"
identifiers = [
join("", [
"arn:aws:iam::",
data.aws_caller_identity.current.account_id,
":root"
])
]
}
actions = ["sts:AssumeRole"]
}
}
As shown in Figure 8-1, SCPs can also be used to restrict access. A common use case
for SCPs is locking all principals from accessing certain resources, apart from a
known administration role. For example, if you were looking to prevent users within
an account from modifying AWS Config rules, you can apply the following SCP once
you have filled out the target_id and role_name variables:
resource "aws_organizations_policy" "prevent_config_access" {
name = "prevent_config_access"
content = data.aws_iam_policy_document.prevent_config_access.json
}
data "aws_iam_policy_document" "prevent_config_access" {
statement {
sid = "PreventConfigAccess"
action = [
"config:*"
]
416 | Chapter 8: Providing Internal Security Services

effect = "Deny"
resources = [
"*"
]
condition {
test = "StringNotLike"
variable = "aws:PrincipalARN"
values = [
"arn:aws:iam::*:role/${var.role_name}"
]
}
}
}
resource "aws_organizations_policy_attachment" "account" {
policy_id = aws_organizations_policy.prevent_config_access.id
target_id = var.target_id
}
Summary
Let’s summarize what was learned and deployed in this recipe:
•
On AWS, a principal’s effective permissions are determined by the cross-section
of the SCPs, the attached policies, and the permission boundary.
• You can write permission boundaries that require their attachment to new roles
and users.
• By doing so, you can prevent a principal from escalating their privilege while still
allowing them to create principals as required.
• You can also use SCPs to lock all principals in an account from accessing certain
APIs, apart from explicitly exempted principals.
8.3 Protecting Security Assets and Controls on Azure
Problem
You need to prevent people from escalating their own permissions within an account.
Solution
This recipe prevents a principal from elevating their privilege on a given resource.
If you haven’t already done so, familiarize yourself with Terraform and the different
authentication mechanisms in Chapter 11.
Create a variables.tf file and copy the following contents:
8.3 Protecting Security Assets and Controls on Azure | 417

variable "location" {
type = string
description = "The location to deploy the resources into"
}
variable "group_name" {
type = string
description = "The AAD group that can edit role assignments"
}
Then fill out the corresponding terraform.tfvars file:
location = ""
group_name = ""
Create the following provider.tf file and run terraform init:
terraform {
required_providers {
azurerm = {
source = "hashicorp/azurerm"
version = "~> 2"
}
azuread = {
source = "hashicorp/azuread"
version = "~> 2"
}
}
}
provider "azurerm" {
features {}
}
Create the following main.tf file and run terraform plan:
resource "azurerm_resource_group" "workload" {
name = "workload"
location = var.location
}
data "azuread_user" "access_admin" {
user_principal_name = var.upn
}
resource "azurerm_role_assignment" "access_admin" {
scope = azurerm_resource_group.workload.id
role_definition_name = "User Access Administrator"
principal_id = data.azuread_user.access_admin.object_id
}
resource "azurerm_policy_definition" "psep" {
name = "prevent-self-edit-permissions"
policy_type = "Custom"
418 | Chapter 8: Providing Internal Security Services

mode = "All"
display_name = "Prevent self editing of permissions"
metadata = <<METADATA
{
"category": "IAM"
}
METADATA
policy_rule = <<RULE
{
"if": {
"anyOf": [
{
"allOf": [
{
"field": "type",
"equals": "Microsoft.Authorization/roleAssignments"
},
{
"field": "Microsoft.Authorization/roleAssignments/principalId",
"equals": "[parameters('principalId')]"
}
]
}
]
},
"then": {
"effect": "Deny"
}
}
RULE
parameters = <<PARAMETERS
{
"principalId": {
"type": "string",
"defaultValue": "",
"metadata": {
"description": "The principal ID",
"displayName": "The principal ID"
}
}
}
PARAMETERS
}
resource "azurerm_resource_group_policy_assignment" "prevent_self_edit" {
name = "prevent-self-edit"
resource_group_id = azurerm_resource_group.workload.id
policy_definition_id = azurerm_policy_definition.psep.id
parameters = <<PARAMETERS
8.3 Protecting Security Assets and Controls on Azure | 419

{
"principalId": {
"value": "${data.azuread_user.access_admin.object_id}"
}
}
PARAMETERS
depends_on = [
azurerm_role_assignment.access_admin
]
}
Review the resources that are going to be created, and then run terraform apply to
make the changes.
Discussion
In Azure, permissions are attached directly to resources as extensions and are inher‐
ited down from management groups, to subscriptions, to resource groups, and finally
to individual resources. Although subscriptions are often highly multitenanted, team
boundaries should be enforced with resource groups at a minimum.
The built-in role for managing permissions is the User Access Administrator role, as
used in the recipe. However, this role by default allows a user to give themselves
owner permissions on the resource. In the recipe, through the creation of a custom
Azure Policy, you can prevent a user from modifying their own permissions for a
given scope. By matching that scope to the resource they are administrating permis‐
sions on, be that a subscription, resource group, or resource, you prevent them from
escalating privilege.
However, through the usage of managed identities, a user can still look to elevate
their privilege. A managed identity is a principal that can only be assumed by a given
Azure resource but cannot be assumed by a human user. For example, if a user has
the ability to edit the code within an Azure function, and manage the permissions of
the managed identity used by the function, they can operate with elevated permis‐
sions. Any user that has the User Access Administrator role on a resource in reality
has the full permissions of an Owner on that resource unless specifically blocked by
Azure Policy.
To prevent this, you can configure Azure Policy to block the setting of Owner permis‐
sions on an existing resource with the following Azure Policy definition, feeding in
the role definition ID as a parameter:
resource "azurerm_policy_definition" "prevent_specific_role_assignment" {
name = "prevent-specific-role-assignment"
policy_type = "Custom"
mode = "All"
display_name = "Prevent specific role assignment"
420 | Chapter 8: Providing Internal Security Services

metadata = <<METADATA
{
"category": "IAM"
}
METADATA
policy_rule = <<RULE
{
"if": {
"anyOf": [
{
"allOf": [
{
"field": "type",
"equals": "Microsoft.Authorization/roleAssignments"
},
{
"field": "Microsoft.Authorization/roleAssignments/roleDefinitionId",
"equals": "[parameters('definitionId')]"
}
]
}
]
},
"then": {
"effect": "Deny"
}
}
RULE
parameters = <<PARAMETERS
{
"definitionId": {
"type": "string",
"defaultValue": "",
"metadata": {
"description": "The role definition ID to prevent",
"displayName": "The role definition ID to prevent"
}
}
}
PARAMETERS
}
Rather than assigning users long-term privileged access, the Privileged Identity Man‐
agement (PIM) service on Azure provides an auditable approach to providing just-in-
time, time-bound elevated access. Currently, managing PIM is not possible through
Terraform. However, the general workflow for allowing access to a particular privi‐
leged role is as follows:
8.3 Protecting Security Assets and Controls on Azure | 421

1. An access review is configured, outlining the required approval steps for the role.
2. The role is assigned to principals within the tenant.
3. When the user requests to assume the role, the approval steps are triggered,
which, if successful, give the user the permissions for a specific time.
It is also possible to use PIM to give certain principals eternal elevated access, such as
the managed identities that are used as part of the CI/CD pipelines, as in Recipe 6.9,
where waiting for a human approval every time you deploy would be a significant
drag on productivity.
Summary
Let’s summarize what was learned and deployed in this recipe:
•
In Azure, permissions are applied directly to resources.
• To protect resources, it is often easiest to segment into different resource groups.
• By default, a principal with the User Access Administrator role can escalate their
privilege up to Owner level.
• You can use Azure Policy to prevent certain privilege escalation paths.
• Azure PIM allows for audited break-glass access to privileged roles.
8.4 Understanding Machine Status at Scale on GCP
Problem
You need inventory management for the virtual machines in your estate.
Solution
If you haven’t already done so, familiarize yourself with Terraform and the different
authentication mechanisms in Chapter 11.
Create a variables.tf file and copy the following contents:
variable "project" {
type = string
description = "The project to deploy the resources into"
}
variable "zone" {
type = string
description = "The zone to deploy resources into"
}
422 | Chapter 8: Providing Internal Security Services

Then fill out the corresponding terraform.tfvars file:
project = ""
zone = ""
Create the following provider.tf file and run terraform init:
provider "google" {
project = var.project
}
terraform {
required_providers {
google = {
source = "hashicorp/google"
version = "~> 4"
}
}
}
Create the following main.tf file and run terraform plan:
resource "google_project_service" "containerscanning" {
service = "containerscanning.googleapis.com"
disable_on_destroy = false
}
resource "google_project_service" "osconfig" {
service = "osconfig.googleapis.com"
disable_on_destroy = false
}
resource "google_compute_project_metadata_item" "osconfig" {
key = "enable-osconfig"
value = "TRUE"
}
resource "google_compute_project_metadata_item" "guest_attrs" {
key = "enable-guest-attributes"
value = "TRUE"
}
resource "google_project_service_identity" "containerscanning" {
provider = google-beta
service = "containerscanning.googleapis.com"
}
resource "google_project_service_identity" "osconfig" {
provider = google-beta
service = "osconfig.googleapis.com"
}
resource "google_project_iam_member" "containerscanning" {
project = var.project
8.4 Understanding Machine Status at Scale on GCP | 423

role = "roles/containeranalysis.ServiceAgent"
member = join("", [
"serviceAccount:",
google_project_service_identity.containerscanning.email
])
}
resource "google_project_iam_member" "osconfig" {
project = var.project
role = "roles/osconfig.serviceAgent"
member = join("", [
"serviceAccount:",
google_project_service_identity.osconfig.email
])
}
Review the resources that are going to be created, and then run terraform apply to
make the changes.
Discussion
VM Manager on GCP provides three primary functions for supporting fleets of vir‐
tual machines: inventory management, configuration management, and patch man‐
agement (covered in Recipe 8.7). Let’s quickly deploy a simple VM by adding and
applying the following Terraform:
resource "google_compute_instance" "example" {
name = "example"
machine_type = "f1-micro"
zone = var.zone
allow_stopping_for_update = true
boot_disk {
initialize_params {
image = "debian-cloud/debian-10-buster-v20211105"
}
}
network_interface {
network = "default"
access_config {}
}
service_account {
email = google_service_account.example.email
scopes = ["cloud-platform"]
}
}
resource "google_service_account" "example" {
424 | Chapter 8: Providing Internal Security Services

account_id = "example"
display_name = "example"
}
As the Google disk images come with the OS Config agent preinstalled, the recently
launched virtual machine will automatically appear in inventory listings. Run gcloud
alpha compute os-config inventories list to get a list of all the managed
machines in the project. Make a note of the ID of the bastion machine you created.
To get a breakdown of the packages installed on a particular instance, run the com‐
mand gcloud alpha compute os-config inventories describe <your-
instance-id> --view=full. This will print out to the console a list of all the
installed packages and pending updates. If Cloud Assets is configured, as in Recipe
3.10, then the enriched data will automatically flow to your asset registry.
To install new packages, create and assign OS policies to the instances. An OS policy
is a YAML definition that is then assigned to machines on a zone-by-zone basis. This
allows you to ensure that a baseline set of packages is installed on the machines and
to manage package updates via code. For example, a policy that ensures the stack‐
driver agent, for integration with Cloud Operations Suite, is installed is the following
policy.yaml:
osPolicies:
- id: install-stackdriver-agent
mode: ENFORCEMENT
resourceGroups:
- inventoryFilters:
- osShortName: debian
resources:
- id: setup-repo
repository:
apt:
archiveType: DEB
uri: https://packages.cloud.google.com/apt
distribution: google-cloud-monitoring-buster-all
components:
- main
gpgKey: https://packages.cloud.google.com/apt/doc/apt-key.gpg
- id: install-pkg
pkg:
desiredState: INSTALLED
apt:
name: stackdriver-agent
instanceFilter:
inventories:
- osShortName: debian
rollout:
disruptionBudget:
fixed: 10
minWaitDuration: 300s
8.4 Understanding Machine Status at Scale on GCP | 425

To create the policy, run the command gcloud alpha compute os-config os-
policy-assignments create stackdriver-debian --file=./policy.yaml. With
that policy in place, all Debian virtual machines in the project, in the zone specified in
your gcloud compute/zone property, will have the Stackdriver agent installed auto‐
matically if it is missing.
Summary
Let’s summarize what was learned and deployed in this recipe:
•
VM Manager allows you manage large fleets of virtual machines.
• Once configured with machines that have the OS Config agent installed, you can
get detailed information on each instance, including installed packages.
• With OS Config properly configured, you can use OS policies to enforce the exis‐
tence of packages on your machines.
8.5 Understanding Machine Status at Scale on AWS
Problem
You need inventory management for the virtual machines in your estate.
Solution
If you haven’t already done so, familiarize yourself with Terraform and the different
authentication mechanisms in Chapter 11.
Create the following provider.tf file and run terraform init:
provider "aws" {}
terraform {
required_providers {
aws = {
source = "hashicorp/aws"
version = "~> 3"
}
}
}
Create the following main.tf file and run terraform plan:
resource "aws_iam_instance_profile" "ssm_profile" {
name = "fleet"
role = aws_iam_role.role.name
}
resource "aws_iam_role" "role" {
426 | Chapter 8: Providing Internal Security Services

name = "fleet"
managed_policy_arns = [
"arn:aws:iam::aws:policy/AmazonSSMManagedInstanceCore"
]
assume_role_policy = data.aws_iam_policy_document.assume.json
}
data "aws_iam_policy_document" "assume" {
statement {
actions = [
"sts:AssumeRole",
]
principals {
type = "Service"
identifiers = [
"ec2.amazonaws.com"
]
}
}
}
resource "aws_ssm_association" "inventory" {
name = "AWS-GatherSoftwareInventory"
schedule_expression = "rate(1 day)"
targets {
key = "InstanceIds"
values = ["*"]
}
parameters = {
"applications" = "Enabled"
"awsComponents" = "Enabled"
"billingInfo" = "Enabled"
"customInventory" = "Enabled"
"instanceDetailedInformation" = "Enabled"
"networkConfig" = "Enabled"
"services" = "Enabled"
"windowsRoles" = "Enabled"
"windowsUpdates" = "Enabled"
}
}
Review the resources that are going to be created, and then run terraform apply to
make the changes.
Discussion
For AWS Systems Manager, SSM, and the variety of services that run under the ban‐
ner, including Fleet Manager, Inventory, and Session Manager, all rely on the SSM
8.5 Understanding Machine Status at Scale on AWS | 427

agent being installed and configured. Recipe 5.5 configures private endpoints so that
the required APIs are accessible. For a simplified example, the following Terraform
deploys an EC2 machine, using the instance profile from the recipe, into the default
VPC with a public IP address so it can access the APIs:
data "aws_ami" "ubuntu" {
most_recent = true
filter {
name = "name"
values = ["ubuntu/images/hvm-ssd/ubuntu-focal-20.04-amd64-server-*"]
}
filter {
name = "virtualization-type"
values = ["hvm"]
}
owners = ["099720109477"] # Canonical
}
resource "aws_instance" "this" {
ami = data.aws_ami.ubuntu.id
associate_public_ip_address = true
instance_type = "t2.micro"
iam_instance_profile = aws_iam_instance_profile.ssm_profile.name
}
output "instance_id" {
value = aws_instance.this.id
}
With that instance deployed, run aws ssm describe-instance-information to get a
high-level listing of all the SSM-managed EC2 machines in the account and region.
As part of the AWS-GatherSoftwareInventory SSM document association, the SSM
agent is also automatically reporting back inventory data on each instance. There are
currently 10 predefined inventory types available in SSM:
• AWS:AWSComponent
• AWS:Application
• AWS:File
•
AWS:InstanceDetailedInformation
• AWS:InstanceInformation
• AWS:Network
• AWS:Service
•
AWS:WindowsRegistry
428 | Chapter 8: Providing Internal Security Services

• AWS:WindowsRole
• AWS:WindowsUpdate
You can directly query the inventory information of a particular instance by running
the command aws ssm list-inventory-entries --instance-id <instance_id>
--type <inventory_type>.
Additionally, SSM provides the ability to install packages at scale across instances.
The following Terraform shows an example of deploying the Amazon CloudWatch
agent to all instances with a Type tag with the value Workload:
resource "aws_ssm_association" "cloudwatch_install" {
name = "AWS-ConfigureAWSPackage"
schedule_expression = "rate(1 day)"
targets {
key = "tag:Type"
values = ["Workload"]
}
parameters = {
"action" = "Install"
"installationType" = "In-place update"
"name" = "AmazonCloudWatchAgent"
}
}
The compliance of each instance within the account is automatically tracked based on
the associations that have been configured. To view compliance in the aggregate
across all instances, run the command aws ssm list-resource-compliance-
summaries. To drill down on compliance for a particular resource, run the command
aws ssm list-compliance-items --resource-ids <instance_id>.
Summary
Let’s summarize what was learned and deployed in this recipe:
• AWS SSM allows for the management of EC2 instances at scale.
•
For instances to appear in SSM, they need three things:
— The SSM agent is installed.
— An instance profile with the required permissions is attached.
— Access to the SSM APIs is available.
• By configuring an SSM document association for AWS-
GatherSoftwareInventory, you enable automated inventory reporting.
8.5 Understanding Machine Status at Scale on AWS | 429

• By configuring an SSM document association for AWS-ConfigureAWSPackage,
you can automatically install packages on targeted machines.
8.6 Understanding Machine Status at Scale on Azure
Problem
You need inventory management for the virtual machines in your estate.
Solution
Create the following provider.tf file and run terraform init:
terraform {
required_providers {
azurerm = {
source = "hashicorp/azurerm"
version = "~> 2"
}
}
}
provider "azurerm" {
features {}
}
Create the following main.tf file and run terraform plan:
resource "azurerm_resource_group" "management" {
name = "instance-management"
location = var.location
}
resource "azurerm_automation_account" "this" {
name = "instance-management"
location = azurerm_resource_group.management.location
resource_group_name = azurerm_resource_group.management.name
sku_name = "Basic"
}
resource "azurerm_log_analytics_workspace" "inventory" {
name = "inventory"
location = azurerm_resource_group.management.location
resource_group_name = azurerm_resource_group.management.name
sku = "PerGB2018"
retention_in_days = 30
}
resource "azurerm_log_analytics_linked_service" "automation_account" {
resource_group_name = azurerm_resource_group.management.name
430 | Chapter 8: Providing Internal Security Services

workspace_id = azurerm_log_analytics_workspace.inventory.id
read_access_id = azurerm_automation_account.this.id
}
resource "azurerm_log_analytics_solution" "updates" {
resource_group_name = azurerm_resource_group.management.name
location = azurerm_resource_group.management.location
solution_name = "Updates"
workspace_resource_id = azurerm_log_analytics_workspace.inventory.id
workspace_name = azurerm_log_analytics_workspace.inventory.name
plan {
publisher = "Microsoft"
product = "OMSGallery/Updates"
}
}
resource "azurerm_log_analytics_solution" "change_tracking" {
resource_group_name = azurerm_resource_group.management.name
location = azurerm_resource_group.management.location
solution_name = "ChangeTracking"
workspace_resource_id = azurerm_log_analytics_workspace.inventory.id
workspace_name = azurerm_log_analytics_workspace.inventory.name
plan {
publisher = "Microsoft"
product = "OMSGallery/ChangeTracking"
}
}
Review the resources that are going to be created, and then run terraform apply to
make the changes.
Discussion
Azure Automation allows for the management of fleets of virtual machines. It pro‐
vides three broad areas of capability: configuration management; update manage‐
ment, covered in Recipe 8.9; and process automation. Additionally, it supports both
Windows and Linux instances and can be configured to manage virtual machines
either on premises or in other clouds.
For a virtual machine to correctly report data into your Automation account, you will
need to configure a virtual machine extension. The extension configures the agents
on the machine to push data to the correct Log Analytics workspace. The following
Terraform sets up a Linux machine with the extension preconfigured:
locals {
inventory_workspace = azurerm_log_analytics_workspace.inventory
}
8.6 Understanding Machine Status at Scale on Azure | 431

resource "azurerm_linux_virtual_machine" "inventory" {
name = "inventory-example"
resource_group_name = azurerm_resource_group.management.name
location = azurerm_resource_group.management.location
size = "Standard_B1s"
admin_username = "adminuser"
network_interface_ids = [
azurerm_network_interface.inventory.id,
]
admin_ssh_key {
username = "adminuser"
public_key = file("~/.ssh/id_rsa.pub")
}
os_disk {
caching = "ReadWrite"
storage_account_type = "Standard_LRS"
}
source_image_reference {
publisher = "Canonical"
offer = "UbuntuServer"
sku = "16.04-LTS"
version = "latest"
}
identity {
type = "SystemAssigned"
}
}
resource "azurerm_virtual_machine_extension" "example" {
name = "OmsAgentForLinux"
virtual_machine_id = azurerm_linux_virtual_machine.inventory.id
publisher = "Microsoft.EnterpriseCloud.Monitoring"
type = "OmsAgentForLinux"
type_handler_version = "1.13"
settings = <<SETTINGS
{
"workspaceId": "${local.inventory_workspace.workspace_id}"
}
SETTINGS
protected_settings = <<SETTINGS
{
"workspaceKey": "${local.inventory_workspace.primary_shared_key}"
}
SETTINGS
}
432 | Chapter 8: Providing Internal Security Services

Once deployed, the instance inventory will be available in the Azure Portal, allowing
you to track the installed software across your fleet.
To install software to machines, and track their compliance against a baseline, you
can use Desired State Configuration, or DSC. DSC uses PowerShell scripts to declara‐
tively set the expected machine state, and takes actions to bring the machine into line.
The following Terraform outlines a basic DSC configuration that manages the instal‐
lation of the apache2 package on Linux virtual machines:
locals {
custom_data = <<CONTENT
wget ${join("/", [
"https://github.com/microsoft/omi/releases/download",
"v1.6.8-1/omi-1.6.8-1.ssl_100.ulinux.x64.deb"
)}
dpkg -i ./omi-1.6.8-1.ssl_100.ulinux.x64.deb
wget ${join("/", [
"https://github.com/microsoft/PowerShell-DSC-for-Linux",
"releases/download/v1.2.1-0/dsc-1.2.1-0.ssl_100.x64.deb"
)}
dpkg -i ./dsc-1.2.1-0.ssl_100.x64.deb
${join(" ", [
"/opt/microsoft/dsc/Scripts/Register.py",
azurerm_automation_account.this.dsc_primary_access_key,
azurerm_automation_account.this.dsc_server_endpoint,
azurerm_automation_dsc_configuration.example.name
])}
CONTENT
}
resource "azurerm_automation_module" "nx" {
name = "nx"
resource_group_name = azurerm_resource_group.management.name
automation_account_name = azurerm_automation_account.this.name
module_link {
uri = "https://www.powershellgallery.com/api/v2/package/nx/1.0"
}
}
resource "azurerm_automation_dsc_configuration" "example" {
name = "LinuxConfig"
resource_group_name = azurerm_resource_group.management.name
location = azurerm_resource_group.management.location
automation_account_name = azurerm_automation_account.this.name
content_embedded = <<CONTENT
Configuration LinuxConfig
{
Import-DscResource -ModuleName 'nx'
8.6 Understanding Machine Status at Scale on Azure | 433

Node IsPresent
{
nxPackage apache2
{
Name = 'apache2'
Ensure = 'Present'
PackageManager = 'Apt'
}
}
Node IsNotPresent
{
nxPackage apache2
{
Name = 'apache2'
Ensure = 'Absent'
}
}
}
CONTENT
depends_on = [
azurerm_automation_module.nx
]
}
With that defined, the virtual machine will need enrolling into DSC on boot up,
which can be achieved with custom data:
resource "azurerm_linux_virtual_machine" "inventory" {
...
custom_data = base64(local.custom_data)
...
}
Summary
Let’s summarize what was learned and deployed in this recipe:
• Azure Automation is a centralized fleet management service.
• By configuring virtual machines to report to the correct Log Analytics work‐
space, you can gather inventory data.
• Using desired state configuration allows you to install packages on machines and
track compliance against expected packages.
• For Linux virtual machines, you need to install the Open Management Infra‐
structure (OMI) and DSC packages.
•
For Windows machines, the required packages for DSC are preinstalled as part of
the operating system.
434 | Chapter 8: Providing Internal Security Services

8.7 Patching at Scale on GCP
Problem
You need to ensure that virtual machines are patched appropriately.
Solution
This recipe relies on VM Manager, as configured in Recipe 8.4. So if you haven’t
already completed that process for the project, do so first.
If you haven’t already done so, familiarize yourself with Terraform and the different
authentication mechanisms in Chapter 11.
Create a variables.tf file and copy the following contents:
variable "project" {
type = string
description = "The project to deploy the resources into"
}
variable "time_zone" {
type = string
description = "The IANA time zone to use for the schedule"
}
variable "time_of_day" {
type = object({
hours = number
minutes = number
seconds = number
})
description = "The time of day to run patching"
}
variable "week_ordinal" {
type = number
description = "The week of the month to run patching"
}
variable "day_of_week" {
type = string
description = "The day of the week to run patching"
}
variable "disruption_budget" {
type = number
description = "The max percentage of machines to disrupt with patching"
}
Then fill out the corresponding terraform.tfvars file:
8.7 Patching at Scale on GCP | 435

day_of_week = ""
disruption_budget = 0
project = ""
time_of_day = {
hours = 9
minutes = 0
seconds = 0
}
time_zone = ""
week_ordinal = 0
Create the following provider.tf file and run terraform init:
provider "google-beta" {
project = var.project
}
terraform {
required_providers {
google-beta = {
source = "hashicorp/google-beta"
version = "~> 4"
}
}
}
Create the following main.tf file and run terraform plan:
resource "google_os_config_patch_deployment" "patch" {
project = var.project
patch_deployment_id = "debian-patching"
instance_filter {
group_labels {
labels = {
os = "debian"
}
}
}
patch_config {
reboot_config = "ALWAYS"
apt {
type = "DIST"
}
}
recurring_schedule {
time_zone {
id = var.time_zone
}
436 | Chapter 8: Providing Internal Security Services

dynamic "time_of_day" {
for_each = toset([var.time_of_day])
content {
hours = time_of_day.value["hours"]
minutes = time_of_day.value["minutes"]
seconds = time_of_day.value["seconds"]
nanos = 0
}
}
monthly {
week_day_of_month {
week_ordinal = var.week_ordinal
day_of_week = var.day_of_week
}
}
}
rollout {
mode = "ZONE_BY_ZONE"
disruption_budget {
percentage = var.disruption_budget
}
}
}
Review the resources that are going to be created, and then run terraform apply to
make the changes.
Discussion
With VM Manager configured, you can use GCP’s managed patching service to keep
your virtual machines up to date. In the recipe, you created a patching plan targeting
Debian machines by means of labels. At present, the service also supports RHEL/
Centos, Rocky Linux, SUSE Enterprise, Ubuntu, and Windows Server. In each case,
on Linux it leverages the local package management solution for each distribution
and uses the Update Agent on Windows.
Within the GCP console, you have a dashboard that provides an overview of patch
compliance for the project. It shows a breakdown of the virtual machines by operat‐
ing system and provides a compliance breakdown by operating system type. Cur‐
rently, although SUSE Enterprise and Rocky Linux are supported for patching, they
do not report compliance data and appear as “No data” in the operating system
breakdown.
When looking to patch systems, you will often need to patch machines on different
schedules to reduce operational risk. Patch management provides multiple filtering
mechanisms to identify machine groups. The recipe leverages label-based filtering.
8.7 Patching at Scale on GCP | 437

Other options include filtering by zone, selecting specific instances, or targeting
based on instance name prefix.
When patching live systems, they often need to be taken out of circulation while the
patching is ongoing. Patch manager provides pre- and post-patch hooks to run
scripts on machines. The scripts can either be hosted directly on the machine or
dynamically pulled from a Cloud Storage bucket. For example, to run a script on a
Linux host prior to patching, add the following block to the patch_config block in
your Terraform resource definition:
pre_step {
linux_exec_step_config {
gcs_object {
bucket = "bucket-name"
object = "pre_patch.sh"
generation_number = "1"
}
}
}
As part of VM Manager, periodic scans are done to understand the active, known
vulnerabilities on the machines. To inspect a particular machine, first run gcloud
alpha compute os-config inventories list and make a note of the INSTANCE_ID
of your chosen machine. Next, run gcloud alpha compute os-config
vulnerability-reports describe <your_instance_id> to list all the known CVEs
currently affecting your machine.
Summary
Let’s summarize what was learned and deployed in this recipe:
• VM Manager provides a fully managed patching solution, OS patch
management.
• Patch management supports an array of Linux operating systems, Windows
Server, and Windows SQL Server.
• It provides a dashboard that summarizes compliance for the current project.
• When defining a patch deployment, you can specify filters to target only the
expected machines.
• You can also define pre- and post-patch hooks to run arbitrary scripts.
• As part of VM Manager, you also get vulnerability reports of all known CVEs
active on a given machine.
438 | Chapter 8: Providing Internal Security Services

8.8 Patching at Scale on AWS
Problem
You need to ensure that virtual machines are patched appropriately.
Solution
If you haven’t already done so, familiarize yourself with Terraform and the different
authentication mechanisms in Chapter 11.
Create a variables.tf file and copy the following contents:
variable "schedule" {
type = string
description = "The schedule for patching, e.g. cron(0 16 ? * TUE *)"
}
Then fill out the corresponding terraform.tfvars file:
schedule = ""
Create the following provider.tf file and run terraform init:
provider "aws" {}
terraform {
required_providers {
aws = {
source = "hashicorp/aws"
version = "~> 3"
}
}
}
Create the following main.tf file and run terraform plan:
resource "aws_ssm_maintenance_window" "patching" {
name = "maintenance-window-patching"
schedule = var.schedule
duration = 2
cutoff = 1
}
resource "aws_ssm_maintenance_window_task" "patching" {
max_concurrency = 50
max_errors = 0
priority = 1
task_arn = "AWS-RunPatchBaseline"
task_type = "RUN_COMMAND"
window_id = aws_ssm_maintenance_window.patching.id
targets {
8.8 Patching at Scale on AWS | 439

key = "WindowTargetIds"
values = [
aws_ssm_maintenance_window_target.patch_group.id
]
}
task_invocation_parameters {
run_command_parameters {
timeout_seconds = 600
parameter {
name = "Operation"
values = ["Install"]
}
parameter {
name = "SnapshotId"
values = ["{{WINDOW_EXECUTION_ID}}"]
}
}
}
}
resource "aws_ssm_maintenance_window_target" "patch_group" {
window_id = aws_ssm_maintenance_window.patching.id
name = "PatchingTarget"
resource_type = "INSTANCE"
targets {
key = "tag:Patch Group"
values = ["production"]
}
}
Review the resources that are going to be created, and then run terraform apply to
make the changes.
Discussion
This recipe configures patching so that any instance with a Patch Group tag of “pro‐
duction” will get patched as per the maintenance window you set. The patches to be
installed are defined by the default patch baselines AWS provides for common oper‐
ating systems.
To create custom baselines, the Patch Group tag is used, where AWS will automati‐
cally check for an existing patch group of the same name and use the custom base‐
lines as appropriate. The following Terraform configures a custom Ubuntu baseline
and assigns it to the “production” patch group:
440 | Chapter 8: Providing Internal Security Services

resource "aws_ssm_patch_baseline" "ubuntu" {
name = "CustomUbuntu20.10"
description = "All patches, including non-security"
operating_system = "UBUNTU"
approval_rule {
approve_after_days = 0
compliance_level = "CRITICAL"
enable_non_security = true
patch_filter {
key = "PRODUCT"
values = [
"Ubuntu20.10",
]
}
patch_filter {
key = "SECTION"
values = [
"*",
]
}
patch_filter {
key = "PRIORITY"
values = [
"*",
]
}
}
}
resource "aws_ssm_patch_group" "production" {
baseline_id = aws_ssm_patch_baseline.ubuntu.id
patch_group = "production"
}
With those resources created, any Ubuntu 20.10 instances with a Patch Group tag
with the value “production” will now be patched as per the custom baseline. All other
Ubuntu instances will be patched with the AWS default baseline.
As well as scheduled patching, AWS Patch Manager also has the option for running
on-demand patching when required. When running an on-demand patch execution,
you can also use lifecycle hooks to trigger SSM documents before patching, after
patching but before rebooting, after patching and rebooting if needed, and after a
scheduled reboot. What hooks are available is defined by the reboot option you
selected when triggering the patch job: “reboot if needed,” “do not reboot,” and
“schedule a reboot time.”
8.8 Patching at Scale on AWS | 441

Summary
Let’s summarize what was learned and deployed in this recipe:
•
AWS Patch Manager handles the patching of instances on AWS.
• It can be configured to run on a schedule and also allow on-demand patching.
• Scheduled patching occurs as per the schedule defined in the maintenance
window.
• On-demand patching allows for lifecycle hooks to run SSM documents as
required to configure the system before and after patching.
•
Patch Manager comes with default patch baselines for each supported operating
system.
• You can define custom baselines and associate them with a patch group.
• Patch group membership is defined by the “Patch Group” tag on an instance.
8.9 Patching at Scale on Azure
Problem
You need to ensure that virtual machines are patched appropriately.
Solution
This recipe is built on top of Recipe 8.6, so complete that recipe before continuing.
If you haven’t already done so, familiarize yourself with Terraform and the different
authentication mechanisms in Chapter 11.
Create a variables.tf file and copy the following contents:
variable "tag_key" {
type = string
description = "The tag key to use for machine selection"
}
variable "tag_values" {
type = list(string)
description = "The tag values to use for machine selection"
}
variable "time_zone" {
type = string
description = "The time zone to use for running updates"
}
variable "update_time" {
442 | Chapter 8: Providing Internal Security Services

type = string
description = "The time to run updates"
}
Then fill out the corresponding terraform.tfvars file:
tag_key = ""
tag_values = [""]
time_zone = ""
update_time = ""
Create the following provider.tf file and run terraform init:
terraform {
required_providers {
azurerm = {
source = "hashicorp/azurerm"
version = "~> 2"
}
}
}
provider "azurerm" {
features {}
}
Create the following main.tf file and run terraform plan:
data "azurerm_subscription" "current" {}
resource "time_offset" "tomorrow" {
offset_days = 1
}
locals {
update_date = substr(time_offset.tomorrow.rfc3339, 0, 10)
datetime = replace(
"${local.update_date}T${var.update_time}",
"/:/",
"-"
)
classifications = [
"Critical",
"Other",
"Security",
"Unclassified"
]
}
resource "azurerm_resource_group_template_deployment" "linux" {
name = "linux-weekly-patching"
resource_group_name = azurerm_resource_group.management.name
template_content = <<DEPLOY
8.9 Patching at Scale on Azure | 443

{
"$schema": ${join("", [
"https://schema.management.azure.com/,
"schemas/2019-04-01/deploymentTemplate.json#"
])},
"contentVersion": "1.0.0.0",
"parameters": {},
"resources": [
{
"type": ${join("/", [
"Microsoft.Automation",
"automationAccounts",
"softwareUpdateConfigurations",
])},
"apiVersion": "2019-06-01",
"name": "${azurerm_automation_account.this.name}/linux-weekly",
"properties": {
"scheduleInfo": {
"advancedSchedule": {
"weekDays": [ "Friday" ]
},
"frequency": "Week",
"interval": "1",
"startTime": "${local.update_date}T${var.update_time}:00-00:00",
"timeZone": "${var.time_zone}"
},
"updateConfiguration": {
"duration": "PT2H",
"linux": {
"includedPackageClassifications": ${local.classifications},
"rebootSetting": "IfRequired"
},
"operatingSystem": "Linux",
"targets": {
"azureQueries": [
{
"scope": [
"${data.azurerm_subscription.current.id}"
],
"tagSettings": {
"filterOperator": "Any",
"tags": {
"${var.tag_key}": ${var.tag_values}
}
}
}
]
}
}
}
}
]
444 | Chapter 8: Providing Internal Security Services

}
DEPLOY
deployment_mode = "Complete"
}
Review the resources that are going to be created, and then run terraform apply to
make the changes.
Discussion
This recipe configures a weekly update schedule for Linux machines. It automatically
targets all Linux machines with the given tags within the subscription. It is also possi‐
ble to configure the patching schedule to target specific machines for updates, which
is useful to specifically exclude patches from particular machines. The following
JSON snippet shows how to target specific machines:
{
...
"properties": {
...
"updateConfiguration": {
"duration": "PT2H",
"linux": {
"includedPackageClassifications": ${local.classifications},
"rebootSetting": "IfRequired"
},
"operatingSystem": "Linux",
"azureVirtualMachines": [
"${azurerm_linux_virtual_machine.example.id}"
]
},
...
}
...
}
When patching machines, pre- and post-patch tasks are often required for safe opera‐
tion. The template also provides a tasks key for configuring those tasks. The tasks
must exist as Azure Automation runbooks, which can be created with the following
Terraform:
resource "azurerm_automation_runbook" "pre_patch" {
name = "Pre-Patch"
location = azurerm_resource_group.management.location
resource_group_name = azurerm_resource_group.management.name
automation_account_name = azurerm_automation_account.this.name
log_verbose = "true"
log_progress = "true"
description = "Runs required pre-patch activities"
runbook_type = "PowerShellWorkflow"
8.9 Patching at Scale on Azure | 445

content = <<CONTENT
...
CONTENT
}
The runbook can then be referenced by adding a tasks object under the properties
key in the template, as shown in the following JSON snippet:
{
...
"properties": {
...
"tasks": {
"preTask": {
"parameters": {},
"source": "${azurerm_automation_runbook.pre_patch.name}"
}
},
...
}
...
}
By viewing the Azure Automation account in the portal and browsing to the update
management blade, you can see a dashboard that summarizes update compliance
across your fleet. It includes a per-instance breakdown of missing patches, allowing
you to understand how many known, active vulnerabilities exist.
Summary
Let’s summarize what was learned and deployed in this recipe:
• Azure Automation handles the patching and updating of machines.
• It can be configured to run on a schedule and also allows on-demand patching.
•
You can either explicitly set which machines are covered under the schedule or
use tagging to filter for machines.
• It is possible to define the schedule at both resource group and subscription
scopes.
• To cover the entire estate, combine with Recipe 6.12.
•
You can define runbooks to perform operations on machines before and after
patches are applied to ensure that patching can happen successfully.
446 | Chapter 8: Providing Internal Security Services

8.10 Data Backup on GCP
Problem
You need to securely back up data to protect from data loss.
Solution
If you haven’t already done so, familiarize yourself with Terraform and the different
authentication mechanisms in Chapter 11.
Create a variables.tf file and copy the following contents:
variable "project" {
type = string
description = "The project to deploy the resources into"
}
variable "region" {
type = string
description = "The region to deploy the resources into"
}
variable "secondary_zone" {
type = string
description = "The second zone to deploy the resources into"
}
variable "start_time_utc" {
type = string
description = "The snapshot start time in UTC"
}
variable "storage_locations" {
type = list(string)
description = "The locations to store the snapshot"
}
variable "zone" {
type = string
description = "The zone to deploy the resources into"
}
Then fill out the corresponding terraform.tfvars file:
project = ""
region = ""
secondary_zone = ""
start_time_utc = ""
storage_locations = [""]
zone = ""
8.10 Data Backup on GCP | 447

Create the following provider.tf file and run terraform init:
provider "google" {
project = var.project
region = var.region
}
terraform {
required_providers {
google = {
source = "hashicorp/google"
version = "~> 4"
}
}
}
Create the following main.tf file and run terraform plan:
resource "google_compute_resource_policy" "daily_snapshot" {
name = "daily-snapshots"
snapshot_schedule_policy {
schedule {
daily_schedule {
days_in_cycle = 1
start_time = var.start_time_utc
}
}
retention_policy {
max_retention_days = 10
on_source_disk_delete = "APPLY_RETENTION_POLICY"
}
snapshot_properties {
guest_flush = true
storage_locations = var.storage_locations
}
}
}
resource "google_compute_disk_resource_policy_attachment" "attachment" {
name = google_compute_resource_policy.daily_snapshot.name
disk = google_compute_disk.zonal.name
zone = "${var.region}-${var.zone}"
}
resource "google_compute_disk" "zonal" {
name = "daily-snapshot"
size = 10
type = "pd-ssd"
zone = "${var.region}-${var.zone}"
}
resource "google_compute_region_disk" "regional" {
name = "daily-snapshot"
448 | Chapter 8: Providing Internal Security Services

replica_zones = [
"${var.region}-${var.zone}",
"${var.region}-${var.secondary_zone}"
]
size = 10
type = "pd-ssd"
region = var.region
}
resource "google_compute_region_disk_resource_policy_attachment" "snapshot" {
name = google_compute_resource_policy.daily_snapshot.name
disk = google_compute_region_disk.regional.name
region = var.region
}
Review the resources that are going to be created, and then run terraform apply to
make the changes.
Discussion
As large volumes of business-critical data are stored in running virtual machines, this
recipe looks at how to take regular snapshots of disks on a schedule. As policies must
be explicitly applied to disks, this recipe should be combined with Recipe 6.10 to push
the resource policy out to all projects, and Recipe 6.1 to ensure that all disks have a
policy attached.
When running backups against live systems, it is critical to ensure that the snapshots
are application consistent. Imagine an application that stores data across multiple
attached disks. You need to complete snapshots of all the disks before another trans‐
action can be processed. To take application-consistent snapshots, you need to enable
guest_flush in the resource policy. On Windows, this will cause the snapshot to be a
Volume Shadow Copy Service (VSS) snapshot, which will preserve consistency. On
Linux, this will call the /etc/google/snapshots/pre.sh script before taking the
snapshot, and the /etc/google/snapshots/post.sh script afterwards. These two
scripts can be used to run any application-specific backup requirements, such as
flushing memory or stopping accepting requests.
Holistic and reliable data backup is central to an effective disaster recovery strategy.
By appropriately configuring the storage_locations variable, you can ensure that
your snapshots are available in the event of a regional failure. For example, putting
“EU” as the storage location will redundantly store the snapshot in multiple regions
in the EU.
When deploying backup schedules at scale, it is important to wrap them up in suffi‐
cient monitoring. Few things are worse than finding your backups have failed at the
exact moment you need to restore them. You should configure a logging metric and
8.10 Data Backup on GCP | 449

metric policy to trigger an alert whenever backups fail. The following Terraform cre‐
ates both required resources:
resource "google_logging_metric" "snapshot_failures" {
name = "snapshot_failures"
filter = <<FILTER
resource.type="gce_disk"
logName="projects/${var.project}/logs/cloudaudit.googleapis.com%2Fsystem_event"
protoPayload.methodName="ScheduledSnapshots"
severity="INFO"
FILTER
metric_descriptor {
metric_kind = "DELTA"
value_type = "INT64"
labels {
key = "status"
value_type = "STRING"
}
display_name = "Snapshot Failures"
}
label_extractors = {
"status" = "EXTRACT(protoPayload.response.status)"
}
}
resource "google_monitoring_alert_policy" "snapshot_failures" {
display_name = "Snapshot Failures"
combiner = "OR"
conditions {
display_name = "Failures"
condition_threshold {
aggregations {
alignment_period = "60s"
per_series_aligner = "ALIGN_SUM"
}
filter = join("", [
"resource.type=\"gce_disk\" ",
"metric.type=\"logging.googleapis.com/user/",
google_logging_metric.snapshot_failures.name,
"\" metric.label.\"status\"=\"DONE\""
])
duration = "0s"
comparison = "COMPARISON_GT"
trigger {
count = 1
}
}
}
}
Managed database services on GCP have their own specific backup solutions. For
BigQuery, a table is recoverable for seven days by using time decorators to perform
450 | Chapter 8: Providing Internal Security Services

queries against a particular point in time. Additionally, BigQuery transfers allow you
to copy datasets on a schedule to back up data or move data between regions to
enable regional failover. Cloud SQL automatically takes backups every four hours,
retaining the most recent seven by default, which, combined with transaction logs,
allows you to do point-in-time recovery. BigTable allows users to take manual back‐
ups, which you can automate and schedule with Cloud Scheduler and Cloud Func‐
tions. Spanner allows for the configuration of a retention period to enable point-in-
time recovery and manual backups, which can be handled similarly to BigTable
backups. Last, for Cloud Storage buckets, versioning enables the recovery of previous
objects, and turbo replication asynchronously replicates objects between buckets with
a 15-minute recovery point objective.
Summary
Let’s summarize what was learned and deployed in this recipe:
• Backups on GCP are handled on a service-by-service basis.
• Part of any backup strategy is ensuring that the proper monitoring is in place to
alert on failed backups.
• BigQuery, Cloud SQL, and Spanner all offer point-in-time recovery up to a cer‐
tain time period.
•
For services that do not have a managed backup schedule option, you can build
your own with Cloud Scheduler and Cloud Functions.
8.11 Data Backup on AWS
Problem
You need to securely back up data to protect from data loss.
Solution
If you haven’t already done so, familiarize yourself with Terraform and the different
authentication mechanisms in Chapter 11.
Create the following provider.tf file and run terraform init:
provider "aws" {}
terraform {
required_providers {
aws = {
source = "hashicorp/aws"
version = "~> 3"
}
8.11 Data Backup on AWS | 451

}
}
Create the following main.tf file and run terraform plan:
resource "aws_backup_vault" "this" {
name = "backups"
}
resource "aws_backup_plan" "weekly" {
name = "weekly"
rule {
rule_name = "Weekly"
target_vault_name = aws_backup_vault.this.name
schedule = "cron(0 12 ? * MON *)"
}
}
resource "aws_backup_region_settings" "test" {
resource_type_opt_in_preference = {
"Aurora" = true
"DocumentDB" = true
"DynamoDB" = true
"EBS" = true
"EC2" = true
"EFS" = true
"FSx" = true
"Neptune" = true
"RDS" = true
"Storage Gateway" = true
}
}
resource "aws_backup_selection" "weekly" {
iam_role_arn = aws_iam_role.backups.arn
name = "weekly"
plan_id = aws_backup_plan.weekly.id
selection_tag {
type = "STRINGEQUALS"
key = "backup"
value = "weekly"
}
}
resource "aws_iam_role" "backups" {
name = "backups"
assume_role_policy = data.aws_iam_policy_document.assume.json
managed_policy_arns = [
"arn:aws:iam::aws:policy/service-role/AWSBackupServiceRolePolicyForBackup"
]
}
452 | Chapter 8: Providing Internal Security Services

data "aws_iam_policy_document" "assume" {
statement {
actions = ["sts:AssumeRole"]
effect = "Allow"
principals {
type = "Service"
identifiers = ["backup.amazonaws.com"]
}
}
}
Review the resources that are going to be created, and then run terraform apply to
make the changes.
Discussion
This recipe creates the simplest possible weekly backup schedule that targets all sup‐
ported resources that have a backup tag of weekly. It also creates a backup vault called
“backups” where all the backups are stored indefinitely.
For cost and practicality reasons, data generally does not need retaining after a cer‐
tain time period, as more recent backups cover the business needs. AWS Backup
plans have a lifecycle configuration that can be applied to the rule. The following Ter‐
raform, for example, archives backups after a month to lower storage costs and dele‐
tes backups after a year:
rule {
rule_name = "Weekly"
target_vault_name = aws_backup_vault.this.name
schedule = "cron(0 12 ? * MON *)"
lifecycle {
cold_storage_after = 30
delete_after = 365
}
}
To enable point-in-time recovery for all supported resources, you need to enable con‐
tinuous backups for your backup rule. This can be done by adding a second rule block
in the following Terraform to your plan resource. Note that continuous backups cannot
be automatically moved to cold storage, and they must be deleted after 35 days.
rule {
rule_name = "WeeklyContinuous"
target_vault_name = aws_backup_vault.this.name
schedule = "cron(0 12 ? * MON *)"
enable_continuous_backup = true
lifecycle {
delete_after = 35
8.11 Data Backup on AWS | 453

}
}
For Windows machines, to achieve application consistent recovery, you should enable
VSS-based recovery by adding the following block to your backup plan definition:
advanced_backup_setting {
backup_options = {
WindowsVSS = "enabled"
}
resource_type = "EC2"
}
You can also configure copy actions to automatically copy backups to other regions
or accounts. The following Terraform shows how to set up a centralized vault for an
organization:
data "aws_organizations_organization" "current" {}
resource "aws_backup_vault" "central" {
name = "central"
}
resource "aws_backup_vault_policy" "org" {
backup_vault_name = aws_backup_vault.central.name
policy = data.aws_iam_policy_document.vault.json
}
data "aws_iam_policy_document" "vault" {
statement {
actions = ["backup:CopyIntoBackupVault"]
principals {
type = "AWS"
identifiers = ["*"]
}
resources = ["*"]
condition {
test = "StringEquals"
values = [
data.aws_organizations_organization.current.id
]
variable = "aws:PrincipalOrgID"
}
}
}
With that configured, you can set up the backup rule to automatically copy backups
to the vault with the following configuration in a rule block:
copy_action {
destination_vault_arn = aws_backup_vault.central.arn
454 | Chapter 8: Providing Internal Security Services

lifecycle {
cold_storage_after = "1"
}
}
Although you could combine this recipe with Recipe 6.11 to deploy plans to multiple
accounts, it is possible to configure backup policies at the organization level. First,
ensure your organization is configured to allow backup policies by updating your
organization resource like the following:
resource "aws_organizations_organization" "this" {
...
enabled_policy_types = [
...
"BACKUP_POLICY",
]
}
Then, create a backup policy and attach it to the organization, organizational unit, or
account you require. For example, the following Terraform creates a daily backup
policy that is applied to the entire organization:
resource "aws_organizations_policy" "daily_backups" {
name = "daily_backups"
type = "BACKUP_POLICY"
content = <<CONTENT
{
"plans": {
"daily": {
"regions": {
"@@assign": [
"${data.aws_region.current.name}"
]
},
"rules": {
"daily": {
"schedule_expression": { "@@assign": "cron(0 9 * * ? *)" },
"target_backup_vault_name": { "@@assign": "backups" }
}
},
"selections": {
"tags": {
"datatype": {
"iam_role_arn": { "@@assign": "arn:aws:iam::$account:role/backups" },
"tag_key": { "@@assign": "backup" },
"tag_value": { "@@assign": [ "daily" ] }
}
}
}
}
}
}
8.11 Data Backup on AWS | 455

CONTENT
}
resource "aws_organizations_policy_attachment" "root" {
policy_id = aws_organizations_policy.daily_backups.id
target_id = data.aws_organizations_organization.current.roots[0].id
}
Summary
Let’s summarize what was learned and deployed in this recipe:
• AWS Backup provides a managed backup service for many resource types.
• You can automatically configure lifecycle events to archive and delete redundant
backups.
•
Protect against account compromise and regional failures by automatically copy‐
ing backups to other regions and accounts.
• By configuring a backup policy at the organization level, you create centrally
managed backup plans.
8.12 Data Backup on Azure
Problem
You need to securely back up data to protect from data loss.
Solution
If you haven’t already done so, familiarize yourself with Terraform and the different
authentication mechanisms in Chapter 11.
Create the following variables.tf file:
variable "location" {
type = string
description = "The location to deploy resources into"
}
Then fill out the corresponding terraform.tfvars file:
location = ""
Create the following provider.tf file and run terraform init:
terraform {
required_providers {
azurerm = {
source = "hashicorp/azurerm"
version = "~> 2"
456 | Chapter 8: Providing Internal Security Services

}
}
}
provider "azurerm" {
features {}
}
Create the following main.tf file and run terraform plan:
resource "azurerm_resource_group" "backups" {
name = "backups"
location = var.location
}
resource "azurerm_recovery_services_vault" "this" {
name = "vault"
location = azurerm_resource_group.backups.location
resource_group_name = azurerm_resource_group.backups.name
sku = "Standard"
}
resource "azurerm_backup_policy_vm" "daily" {
name = "daily-vm-backups"
resource_group_name = azurerm_resource_group.backups.name
recovery_vault_name = azurerm_recovery_services_vault.this.name
backup {
frequency = "Daily"
time = "23:00"
}
retention_daily {
count = 14
}
}
Review the resources that are going to be created, and then run terraform apply to
make the changes.
Discussion
This recipe created a backup policy for virtual machines that runs daily and retains
backups for 14 days. In order to associate this policy with a virtual machine, you will
need to apply the following Terraform, replacing azurerm_linux_vir
tual_machine.example.id with a reference to your machine ID:
resource "azurerm_backup_protected_vm" "vm1" {
resource_group_name = azurerm_resource_group.backups.name
recovery_vault_name = azurerm_recovery_services_vault.this.name
source_vm_id = azurerm_linux_virtual_machine.example.id
8.12 Data Backup on Azure | 457

backup_policy_id = azurerm_backup_policy_vm.daily.id
}
In addition to specifying daily retention, it is also possible to define weekly, monthly,
and yearly retention periods to fulfill audit requirements.
To ensure that virtual machines are backed up correctly, Azure Policy provides a few
built-in policies that allow for reporting when machines are not actively covered by
backups, and that machines be assigned to a backup policy by default. To configure
these policies, apply the following Terraform:
data "azurerm_subscription" "current" {}
resource "azurerm_subscription_policy_assignment" "vm_backups" {
name = "vm_backups"
location = azurerm_resource_group.backups.location
subscription_id = data.azurerm_subscription.current.id
policy_definition_id = join("", [
"/providers/Microsoft.Authorization/policyDefinitions/",
"013e242c-8828-4970-87b3-ab247555486d"
])
identity {
type = "SystemAssigned"
}
}
resource "azurerm_resource_group_policy_assignment" "default_vm_backups" {
name = "default_vm_backups"
location = azurerm_resource_group.backups.location
resource_group_id = azurerm_resource_group.backups.id
policy_definition_id = join("", [
"/providers/Microsoft.Authorization/policyDefinitions/",
"09ce66bc-1220-4153-8104-e3f51c936913"
])
parameters = <<PARAMETERS
{
"vaultLocation": {
"value": "${azurerm_resource_group.backups.location}"
},
"backupPolicyId": {
"value": "${azurerm_backup_policy_vm.daily.id}"
}
}
PARAMETERS
identity {
type = "SystemAssigned"
}
}
458 | Chapter 8: Providing Internal Security Services

Both virtual machines and file shares are backed up using recovery services, whereas
other resources, such as managed PostgreSQL databases, are managed via data pro‐
tection. Both are managed via the portal in the backup center; however, they use dif‐
ferent APIs and therefore Terraform resources. The following is the Terraform
required to set up a backup policy for a specified database instance. It requires that a
connection string be configured and accessible in the Key Vault secret defined in the
secret_id variable.
locals {
vault = local.vault
}
resource "azurerm_data_protection_backup_vault" "this" {
name = "this"
resource_group_name = azurerm_resource_group.backups.name
location = azurerm_resource_group.backups.location
datastore_type = "VaultStore"
redundancy = "LocallyRedundant"
identity {
type = "SystemAssigned"
}
}
resource "azurerm_data_protection_backup_policy_postgresql" "weekly" {
name = "weekly"
resource_group_name = azurerm_resource_group.backups.name
vault_name = local.vault.name
backup_repeating_time_intervals = ["R/2021-11-24T11:30:00+00:00/P1W"]
default_retention_duration = "P1Y"
}
resource "azurerm_role_assignment" "reader" {
scope = var.database_id
role_definition_name = "Reader"
principal_id = local.vault.identity.0.principal_id
}
resource "azurerm_data_protection_backup_instance_postgresql" "target" {
name = "target"
location = azurerm_resource_group.backups.location
vault_id = azurerm_data_protection_backup_vault.example.id
database_id = var.database_id
backup_policy_id = azurerm_data_protection_backup_policy_postgresql.weekly.id
database_credential_key_vault_secret_id = var.secret_id
}
Summary
Let’s summarize what was learned and deployed in this recipe:
8.12 Data Backup on Azure | 459

• Azure Backup provides secure resource backups.
• It uses recovery services for virtual machines and file shares.
• It uses data protection services for other resources.
• You can use Azure Policy to report on whether resources are actively being
backed up, and apply default backup policies to resources.
460 | Chapter 8: Providing Internal Security Services

CHAPTER 9
Enabling Teams
Back in Chapter 1, I talked about how the modern security function is one of enable‐
ment, instead of the historical gatekeeping which is prevalent. In this chapter, you will
see patterns that allow you to overcome the challenge of shared resources: how you
can enable two teams to safely work on resources within the same account, project, or
subscription. The final three recipes look at how you can implement OWASP top 10–
focused security scanning on applications, allowing you to use those findings to open
up conversations with delivery teams about their DevSecOps practices and approach.
A common challenge a security team has when working with a mature cloud organi‐
zation is how to scale your impact without an ever-increasing headcount. In Chap‐
ter 6, the recipes show how engineering is a force multiplier for both yourself and
your team. The reason this book contains full Terraform implementations is to equip
you for what is now the minimum bar for modern security engineers.
When looking at how two teams interact at an organization, there are three modes of
interactivity (Team Topologies):
• Collaboration—highest throughput but highest cost
•
Facilitation—short-term focus on enablement and upskilling of a team
• “As-a-service”—removes dependencies by allowing teams to self-service
The more teams are able to interact with security in an “as-a-service” modality, the
wider and greater impact the security function can have.
461

Be mindful about how you interact with teams. Collaborating
between teams gives you high-throughput communication to work
through a challenge or problem; facilitate to teach teams new tools,
approaches, and mindsets; and look for opportunities to enable
self-service because they unlock the time to focus on higher-level
activities.
9.1 Enabling Project Sharing on GCP
Problem
A team has now split into two teams. Both need to work in the same project but need
to keep data secure from each other.
Solution
This recipe creates IAM policies that use conditions to selectively allow access to
resources.
If you haven’t already done so, familiarize yourself with Terraform and the different
authentication mechanisms in Chapter 11.
Create a variables.tf file and copy the following contents:
variable "project" {
type = string
description = "The project to deploy the resources into"
}
Then fill out the corresponding terraform.tfvars file:
project = ""
Create the following provider.tf file and run terraform init:
provider "google" {
project = var.project
}
terraform {
required_providers {
google = {
source = "hashicorp/google"
version = "~> 3"
}
}
}
Create the following main.tf file and run terraform plan:
462 | Chapter 9: Enabling Teams

resource "google_service_account" "red_team" {
account_id = "red-team"
display_name = "Red Team"
}
resource "google_service_account_key" "red_team" {
service_account_id = google_service_account.red_team.name
public_key_type = "TYPE_X509_PEM_FILE"
}
resource "local_file" "red_team" {
content = base64decode(google_service_account_key.red_team.private_key)
filename = "red_team.json"
}
resource "google_project_iam_member" "red_secrets" {
role = "roles/secretmanager.admin"
member = "serviceAccount:${google_service_account.red_team.email}"
condition {
title = "requires_red_team_name"
expression = "resource.name.endsWith('_red')"
}
}
Review the resources that are going to be created, and then run terraform apply to
make the changes.
Discussion
The condition defined in the recipe uses the resource name to ensure that the red
team can only interact with their own resources within the project. Conditions in
GCP IAM are defined using the Common Expression Language (CEL). For writing
conditions about resource properties, there are four pieces of data you can leverage:
the resource type, the resource name, the service being used, and the resource tags.
As tags are applied directly to the project, and not to resources within the project,
there is no way of leveraging those to allow for the sharing of projects.
As a test, the following Terraform installs a provider using the service account you
created earlier:
provider "google" {
project = var.project
}
provider "google" {
alias = "red_team"
project = var.project
credentials = local_file.red_team.filename
}
9.1 Enabling Project Sharing on GCP | 463

terraform {
required_providers {
google = {
source = "hashicorp/google"
version = "~> 3"
}
}
}
This Terraform creates a secret with the correct naming convention and uses the red
team service account to access it:
resource "google_project_service" "secrets_manager" {
service = "secretmanager.googleapis.com"
disable_on_destroy = false
}
resource "google_secret_manager_secret" "secret-basic" {
secret_id = "secret_red"
replication {
automatic = true
}
depends_on = [
google_project_service.secrets_manager
]
}
data "google_secret_manager_secret" "secret" {
provider = google.red_team
secret_id = google_secret_manager_secret.secret-basic.secret_id
}
When looking to apply conditions based on the resource name, you need to consult
the list of resources that support conditions based on that attribute, including Com‐
pute Engine, Secret Manager, and a handful of others. In addition to the endsWith
function used in the recipe, CEL also includes a startsWith function and an extract
function that allows for the extraction of particular values from properties. For exam‐
ple, resource.name.extract("projects/{project}/") extracts the project ID.
In addition to resource attributes in conditions, GCP provides a selection of request
attributes. These include the date and time of the request, the URL path specified, and
the destination IP and port. Common patterns using these include providing time-
limited privileges or rejecting if the user has not explicitly accessed via IAP.
Depending on the complexity of the architecture and the security requirements, part
of the application may need to be moved to another project to implement stronger
controls. Currently, there is no automated way of migrating resources between
464 | Chapter 9: Enabling Teams

projects; instead you will need to take and restore backups or stream the data into a
new project.
In realistic terms, sharing projects between teams is not an enduring model, as IAM
on GCP does not really support a form of ABAC that would be sufficient.
Summary
Let’s summarize what was learned and deployed in this recipe:
• GCP IAM allows you set conditions based on resource properties.
• When splitting a project between teams, the resource name attribute is the most
versatile.
• Conditions are not supported on all resource types.
•
Although you can have tag-based conditions, they are applied at the organiza‐
tion, folder, or project only.
• You can also have conditions based on the request attributes, such as date and
time.
• You should evaluate migrating parts of the application to new projects if you
need strong controls and boundaries.
9.2 Enabling Account Sharing on AWS
Problem
A team has now split into two teams. Both need to work in the same account but
need to keep data secure from each other.
Solution
This recipe creates IAM policies that use conditions to selectively allow access to
resources.
First, create the following provider.tf file and run terraform init:
provider "aws" {}
terraform {
required_providers {
aws = {
source = "hashicorp/aws"
version = "~> 3"
}
}
}
9.2 Enabling Account Sharing on AWS | 465

Then, create the following main.tf file and run terraform apply:
data "aws_caller_identity" "current" {}
resource "aws_iam_role" "red_team" {
name = "red_team"
assume_role_policy = data.aws_iam_policy_document.assume_policy.json
tags = {
"team-name": "red"
}
}
data "aws_iam_policy_document" "assume_policy" {
statement {
effect = "Allow"
actions = ["sts:AssumeRole"]
principals {
type = "AWS"
identifiers = [data.aws_caller_identity.current.account_id]
}
}
}
resource "aws_iam_policy" "secrets_management" {
name = "secrets_management"
path = "/"
policy = data.aws_iam_policy_document.secrets_management.json
}
resource "aws_iam_role_policy_attachment" "red_secrets_management" {
role = aws_iam_role.red_team.name
policy_arn = aws_iam_policy.secrets_management.arn
}
data "aws_iam_policy_document" "secrets_management" {
statement {
effect = "Allow"
actions = ["secretsmanager:*"]
resources = ["*"]
condition {
test = "StringEquals"
variable = "aws:ResourceTag/team-name"
values = [
"$${aws:PrincipalTag/team-name}"
]
}
condition {
test = "ForAllValues:StringEquals"
variable = "aws:TagKeys"
466 | Chapter 9: Enabling Teams

values = [
"team-name"
]
}
condition {
test = "StringEqualsIfExists"
variable = "aws:ResourceTag/team-name"
values = [
"$${aws:PrincipalTag/team-name}"
]
}
}
}
Discussion
IAM in AWS allows you to implement sophisticated Attribute Based Access Control
(ABAC), which dynamically leverages the properties on the principal when determin‐
ing access. In this recipe, the team-name tag is used to determine access, meaning that
you can apply the same policy to multiple principals and get the desired outcomes.
For example, the following provider definition and Terraform resource will work:
provider "aws" {
alias = "red"
assume_role {
role_arn = join("", [
"arn:aws:iam::",
data.aws_caller_identity.current.account_id,
":role/red_team"
])
}
}
resource "aws_secretsmanager_secret" "red" {
provider = aws.red
name = "red"
tags = {
"team-name": "red"
}
}
If you then created the same role but with a team-name tag value of blue, that role
would be unable to interact with the secret.
Not only does the ABAC approach enable account segregation where required, it also
allows for the creation of policies that are much closer to least privilege. It is impor‐
tant to note that not all resources support ABAC equally. In such cases it becomes
difficult or impossible to safely enable multiple team access to those resources. If
9.2 Enabling Account Sharing on AWS | 467

those edge cases are too critical to allow, then you will need to investigate options for
migrating part of the application into another account. This will leverage the hard
permission boundaries that exist between accounts to ensure safe operation.
ABAC is rightly seen as an advanced IAM topic, as it requires a solid understanding
of IAM policies to manage effectively. When first starting out in AWS, adopting role-
based access control (RBAC) will allow you to move much faster. Look for low-risk,
high-reward areas to experiment with ABAC as your understanding of AWS matures.
Other types of conditions are available on AWS; for example, you
can provide time-limited access to a particular role in a break-glass
situation or enforce particular KMS keys be used when interacting
with S3.
Summary
Let’s summarize what was learned and deployed in this recipe:
•
AWS provides a sophisticated ABAC model.
— It allows for dynamic policies based on the attributes of the principal.
• You deployed a role that had full access to Secrets Manager as long as the secret
was tagged appropriately.
• ABAC is powerful but comes with a learning curve and should be adopted with
caution.
•
Some resources do not support ABAC, and those that do often only support
ABAC on a subset of API calls.
• IAM conditions can be used for limited time access to permissions.
9.3 Enabling Resource Group Sharing on Azure
Problem
A team has now split into two teams. They need to migrate resources to separate
resource groups to establish new security boundaries.
Solution
This recipe shows how to migrate resources between resource groups.
If you haven’t already done so, familiarize yourself with Terraform and the different
authentication mechanisms in Chapter 11.
Create a variables.tf file and copy the following contents:
468 | Chapter 9: Enabling Teams

variable "location" {
type = string
description = "The Azure location for resources"
}
Then fill out the corresponding terraform.tfvars file:
location = ""
Create the following provider.tf file and run terraform init:
provider "azurerm" {
features {}
}
terraform {
required_providers {
azurerm = {
source = "hashicorp/azurerm"
version = "~> 2"
}
}
}
Create the following main.tf file and run terraform plan:
resource "azurerm_resource_group" "before" {
name = "before"
location = var.location
}
resource "azurerm_resource_group" "after" {
name = "after"
location = var.location
}
resource "azurerm_app_service_plan" "this" {
name = "this"
location = azurerm_resource_group.before.location
resource_group_name = azurerm_resource_group.before.name
sku {
tier = "Standard"
size = "S1"
}
}
output "move_command" {
value = join(" ", [
"az resource move --destination-group",
azurerm_resource_group.after.name,
"--ids",
azurerm_app_service_plan.this.id
])
9.3 Enabling Resource Group Sharing on Azure | 469

}
output "import_command" {
value = join(" ", [
"terraform import azurerm_app_service_plan.this",
replace(
azurerm_app_service_plan.this.id,
azurerm_resource_group.before.name,
azurerm_resource_group.after.name
)
])
}
Review the resources that are going to be created, and then run terraform apply to
make the changes.
Copy and run the move_command output, then the import_command output.
Update the azurerm_app_service_plan resource to look like the following:
resource "azurerm_app_service_plan" "this" {
name = "this"
location = azurerm_resource_group.after.location
resource_group_name = azurerm_resource_group.after.name
sku {
tier = "Standard"
size = "S1"
}
}
Discussion
When looking to move resources between resource groups and subscriptions, it is
worth sorting them into stateless resources, such as Azure Functions, and stateful
resources, such as databases. For stateless resources, it is often easier to re-create the
resources using IAC than migrate. For stateful resources, you can move the resource
or stand up a new resource and migrate the state.
In this recipe, you saw how to migrate a resource between two resource groups. The
general process is as follows:
1. Migrate the resource outside of Terraform.
2.
Re-import the resource.
3. Update the Terraform to match.
4. Run terraform plan to verify there are no planned changes.
470 | Chapter 9: Enabling Teams

In preparation for the move, you can use the az resource invoke-action --action
validateMoveResources CLI command to validate that the resources will move
successfully.
To move resources between subscriptions, instead of the --destination-group flag,
use the destination-subscription-id flag.
Currently, ABAC on Azure is in preview and is restricted purely to storage blobs. It is
possible to restrict access to blobs with particular tags with conditions that look like
the following:
(
(
!(ActionMatches{'Microsoft.Storage/storageAccounts/blobServices/
containers/blobs/read'}
AND
@Request[subOperation] ForAnyOfAnyValues:StringEqualsIgnoreCase
{'Blob.Read.WithTagConditions'})
)
OR
(
@Resource[Microsoft.Storage/storageAccounts/blobServices/containers/
blobs/tags:Project<$key_case_sensitive$>] StringEquals 'Cookbook'
)
)
Until ABAC is expanded to include a much wider resource pool, you should look to
stand up new versions of resources with IAC for stateless components and determine
on a case-by-case basis how to handle stateful components.
Summary
Let’s summarize what was learned and deployed in this recipe:
• Azure provides commands to move resources between resource groups and sub‐
scriptions.
• After moving resources around, you will need to re-import them into Terraform.
• By using the invoke-action command, you can test whether resources are mov‐
able in a risk-free way.
• ABAC is in its very early stages on Azure.
—
Currently the only supported resource is storage blobs.
9.3 Enabling Resource Group Sharing on Azure | 471

9.4 Application Security Scanning on GCP
Problem
As delivery teams are standing up applications in GCP, you want to run standard
security testing for common threats.
Solution
This recipe stands up an application in App Engine and runs a Web Security Scanner
scan.
If you haven’t already done so, familiarize yourself with Terraform and the different
authentication mechanisms in Chapter 11.
Create a variables.tf file and copy the following contents:
variable "project" {
type = string
description = "The project to deploy the resources into"
}
variable "location" {
type = string
description = "The location to deploy into"
}
Then fill out the corresponding terraform.tfvars file:
project = ""
location = ""
Create the following provider.tf file and run terraform init:
provider "google" {
project = var.project
}
provider "google-beta" {
project = var.project
}
terraform {
required_providers {
google = {
source = "hashicorp/google"
version = "~> 3"
}
}
}
Create the following main.tf file and run terraform plan:
472 | Chapter 9: Enabling Teams

data "google_project" "current" {}
locals {
required_apis = [
"websecurityscanner.googleapis.com",
"appengine.googleapis.com"
]
}
resource "google_project_service" "api" {
for_each = toset(local.required_apis)
service = each.value
disable_on_destroy = false
}
resource "google_app_engine_application" "app" {
project = data.google_project.current.project_id
location_id = var.location
depends_on = [
google_project_service.api
]
}
resource "local_file" "app_yaml" {
filename = "app.yaml"
content = <<FILE
runtime: python39
instance_class: F2
handlers:
- url: '/(.*)'
secure: always
static_files: index.html
upload: index.html
FILE
}
resource "local_file" "index_html" {
filename = "index.html"
content = <<FILE
<html>
<body>
<h1>Welcome to your App Engine application.</h1>
</body>
</html>
FILE
}
resource "null_resource" "deploy_app" {
provisioner "local-exec" {
9.4 Application Security Scanning on GCP | 473

command = "gcloud app deploy --project ${var.project}"
}
depends_on = [
google_app_engine_application.app,
local_file.app_yaml,
local_file.index_html
]
}
resource "google_security_scanner_scan_config" "app" {
provider = google-beta
display_name = "app-engine-scan"
starting_urls = [
"https://${google_app_engine_application.app.default_hostname}"
]
target_platforms = ["APP_ENGINE"]
}
resource "null_resource" "run_scan" {
provisioner "local-exec" {
command = join(" ", [
"gcloud alpha web-security-scanner scan-runs start",
google_security_scanner_scan_config.app.id
])
}
}
Review the resources that are going to be created, and then run terraform apply to
make the changes.
Discussion
The Web Security Scanner on GCP can perform two kinds of scans: managed and
custom. Managed scans are only available as part of the premium tier of the Security
Command Center. They run automatically on a weekly schedule, only performing
GET requests so as to not flood production applications with garbage data. They cen‐
tralize website vulnerability detection and don’t involve interacting with project teams
until problems are found.
Custom scans are configured at the project level and should be run initially against
nonproduction applications, as they attempt to enter data. When you have confidence
in using Web Security Scanner, it should also be run against production sites. Custom
scans can also be configured to run on an explicit schedule: daily, weekly, every two
weeks, and every four weeks. To limit the scope of the scan, you should both leverage
the excluded URLs feature and apply the inq-no-click CSS class to particular DOM
objects.
474 | Chapter 9: Enabling Teams

Both scan types report their findings into the Security Command Center. By combin‐
ing this recipe with Recipe 3.1, you can ensure that you get notified when high-
severity findings are uncovered.
When configuring custom scans, it is possible to allow the scan to impersonate a Goo‐
gle account, or provide it with credentials to authenticate as a non-Google account.
Also, when using IAP to protect your applications, give the Web Security Scanner ser‐
vice account, service-project-number@gcp-sa-websecurityscanner.iam.gservi
ceaccount.com, the IAP Secured Web App User role on your application.
For applications hosted on Compute Engine or Google Kubernetes Engine, you can
configure the scan to come from known, predictable IP ranges, allowing you to
understand which traffic is induced by the source IP range. If you select this option
for the scan, all traffic will come from IPs in the 34.66.18.0/26 and
34.66.114.64/26 ranges.
Summary
Let’s summarize what was learned and deployed in this recipe:
• GCP provides Web Security Scanner to perform application testing.
• Managed scans are part of the Security Command Center Premium Tier.
—
They centralize website vulnerability management for the organization.
— Managed scans run weekly and only perform GET requests.
• Custom scans are available to all GCP customers.
— They perform a more invasive test which attempts to enter data.
— Because of this, they should ideally be run against nonproduction systems.
•
Scans can be run against any public application hosted in App Engine, Google
Kubernetes Engine, or Compute Engine.
• You can give custom scans credentials to authenticate with the application.
9.5 Application Security Scanning on AWS
Problem
As delivery teams are standing up applications in AWS, you want to run standard
security testing to protect against common threats.
Solution
This recipe creates a CodeBuild project that runs the OWASP Zed Attack Proxy
(ZAP) container.
9.5 Application Security Scanning on AWS | 475

If you haven’t already done so, familiarize yourself with Terraform and the different
authentication mechanisms in Chapter 11.
Create a variables.tf file and copy the following contents:
variable "target_url" {
type = string
description = "The URL to scan"
}
Then fill out the corresponding terraform.tfvars file:
target_url = ""
Create the following provider.tf file and run terraform init:
provider "aws" {}
terraform {
required_providers {
aws = {
source = "hashicorp/aws"
version = "~> 3"
}
}
}
Create the following main.tf file and run terraform plan:
resource "aws_iam_role" "codebuild_service_role" {
name = "codebuild_service_role"
assume_role_policy = data.aws_iam_policy_document.assume.json
managed_policy_arns = [
"arn:aws:iam::aws:policy/service-role/AWSLambdaBasicExecutionRole"
]
}
data "aws_iam_policy_document" "assume" {
statement {
effect = "Allow"
actions = [
"sts:AssumeRole"
]
principals {
type = "Service"
identifiers = [
"codebuild.amazonaws.com"
]
}
}
}
476 | Chapter 9: Enabling Teams

resource "aws_codebuild_project" "zap" {
name = "owasp-zap"
service_role = aws_iam_role.codebuild_service_role.arn
artifacts {
type = "NO_ARTIFACTS"
}
environment {
compute_type = "BUILD_GENERAL1_SMALL"
image = "owasp/zap2docker-stable"
type = "LINUX_CONTAINER"
image_pull_credentials_type = "CODEBUILD"
}
source {
buildspec = <<BUILDSPEC
version: 0.2
phases:
build:
commands:
- zap-baseline.py -t ${var.target_url} -I
BUILDSPEC
type = "NO_SOURCE"
}
}
Review the resources that are going to be created, and then run terraform apply to
make the changes.
Discussion
AWS does not provide a managed web application security scanning tool. Instead,
this recipe set up a CodeBuild project that can be easily bolted onto CI/CD pipelines,
like those in Recipe 6.8, or invoked on demand. The results of the test are available in
the build logs but currently are not preserved anywhere.
Let’s look at how you can preserve the reports in S3. First, you’ll need to add the fol‐
lowing resources to the recipe to create the bucket and a policy for access:
data "aws_caller_identity" "current" {}
data "aws_iam_policy_document" "s3" {
statement {
effect = "Allow"
actions = [
"s3:PutObject"
]
resources = [
aws_s3_bucket.reports.arn
9.5 Application Security Scanning on AWS | 477

]
}
}
resource "aws_s3_bucket" "reports" {
bucket = "${data.aws_caller_identity.current.account_id}-reports"
}
Then you’ll need to attach that policy to the CodeBuild service role. Update the fol‐
lowing resource:
resource "aws_iam_role" "codebuild_service_role" {
name = "codebuild_service_role"
assume_role_policy = data.aws_iam_policy_document.assume.json
managed_policy_arns = [
"arn:aws:iam::aws:policy/service-role/AWSLambdaBasicExecutionRole"
]
inline_policy {
name = "s3access"
policy = data.aws_iam_policy_document.s3.json
}
}
Last, update the CodeBuild project to look like the following:
resource "aws_codebuild_project" "zap2" {
name = "owasp-zap2"
service_role = aws_iam_role.codebuild_service_role.arn
artifacts {
type = "NO_ARTIFACTS"
}
environment {
compute_type = "BUILD_GENERAL1_SMALL"
image = "aws/codebuild/standard:1.0"
type = "LINUX_CONTAINER"
image_pull_credentials_type = "CODEBUILD"
privileged_mode = true
}
source {
buildspec = <<BUILDSPEC
version: 0.2
phases:
build:
commands:
- ${join(" ", [
"docker run -v $${PWD}:/zap/wrk owasp/zap2docker-stable",
"zap-baseline.py -t",
var.target_url,
478 | Chapter 9: Enabling Teams

"-I -x report_xml"
])}
- ${join(" ", [
"aws s3api put-object --bucket",
aws_s3_bucket.reports.bucket,
"--key report.xml --body report_xml"
])}
BUILDSPEC
type = "NO_SOURCE"
}
}
As the OWASP container expects a volume to be mounted to produce a report, the
project now runs a standard AWS image and runs the OWASP container explicitly. This
then allows us to mount the volume and use the AWS CLI to upload the report to S3.
Summary
Let’s summarize what was learned and deployed in this recipe:
• AWS doesn’t provide a managed web application scanning tool.
•
By using CodeBuild, you can easily run the OWASP containerized scanning tool.
— By hosting it in CodeBuild, it is easy to add it to a CI/CD pipeline.
— You can see the scan output in the project logs.
— To persist the reports, upload them to S3.
9.6 Application Security Scanning on Azure
Problem
As delivery teams are standing up applications in Azure, you want to run standard
security testing for common threats.
Solution
This recipe creates an Azure Container Instance that runs the OWASP Zed Attack
Proxy (ZAP) container.
If you haven’t already done so, familiarize yourself with Terraform and the different
authentication mechanisms in Chapter 11.
Create a variables.tf file and copy the following contents:
variable "location" {
type = string
description = "The Azure location for resources"
}
9.6 Application Security Scanning on Azure | 479

variable "target_url" {
type = string
description = "The URL to scan"
}
Then fill out the corresponding terraform.tfvars file:
location = ""
target_url = ""
Create the following provider.tf file and run terraform init:
provider "azurerm" {
features {}
}
terraform {
required_providers {
azurerm = {
source = "hashicorp/azurerm"
version = "~> 2"
}
}
}
Create the following main.tf file and run terraform plan:
resource "azurerm_resource_group" "zap" {
name = "zap"
location = var.location
}
resource "azurerm_container_group" "zap" {
name = "zap"
location = azurerm_resource_group.zap.location
resource_group_name = azurerm_resource_group.zap.name
ip_address_type = "public"
os_type = "Linux"
restart_policy = "Never"
exposed_port = []
container {
name = "zap"
image = "owasp/zap2docker-stable"
cpu = "0.5"
memory = "1.5"
commands = [
"zap-baseline.py",
"-t",
var.target_url,
"-I"
]
480 | Chapter 9: Enabling Teams

ports {
port = 443
protocol = "TCP"
}
}
}
Review the resources that are going to be created, and then run terraform apply to
make the changes.
Discussion
Azure does not provide a managed web application scanning tool, so in this recipe,
you are using Azure container images to host an open source tool. To see the results
of the scan, run az container logs --resource-group zap --name zap. To pre‐
serve the reports from the scan, mount an Azure storage container into the container.
First, create the storage account and the share with the following resources, filling in
the storage account name:
resource "azurerm_storage_account" "reports" {
name = ""
resource_group_name = azurerm_resource_group.zap.name
location = azurerm_resource_group.zap.location
account_tier = "Standard"
account_replication_type = "GRS"
}
resource "azurerm_storage_share" "reports" {
name = "reports"
storage_account_name = azurerm_storage_account.reports.name
quota = 50
}
Next, update the azurerm_container_group resource to look like the following:
resource "azurerm_container_group" "zap" {
name = "zap"
location = azurerm_resource_group.zap.location
resource_group_name = azurerm_resource_group.zap.name
ip_address_type = "public"
os_type = "Linux"
restart_policy = "Never"
exposed_port = []
container {
name = "zap"
image = "owasp/zap2docker-stable"
cpu = "0.5"
memory = "1.5"
commands = [
"zap-baseline.py",
9.6 Application Security Scanning on Azure | 481

"-t",
var.target_url,
"-I",
"-x",
"report"
]
ports {
port = 443
protocol = "TCP"
}
volume {
name = "reports"
mount_path = "/zap/wrk"
storage_account_name = azurerm_storage_account.reports.name
storage_account_key = azurerm_storage_account.reports.primary_access_key
share_name = azurerm_storage_share.reports.name
}
}
}
Now, once the scan has completed, a report.xml file will be in the storage account.
By combining this recipe with Recipe 6.9, and integrating scanning into the CI/CD
pipelines that delivery teams use, you can make sure that every change to an application
goes through a scan before it’s allowed into production. When looking to run the scans
in an ad hoc fashion, you will need to delete and re-create the container instance. You
can delete just the container instance by running terraform destroy -t azurerm_con
tainer_group.zap. This will leave the storage account with the historical reports
untouched, and the container instance will be re-created next time apply is run.
Summary
Let’s summarize what was learned and deployed in this recipe:
• Azure Container Instances allow you to run arbitrary containers.
• As Azure doesn’t provide a managed web scanning service, you ran the OWASP
ZAP container.
• To save reports, you can mount a storage account share into the container.
• By building scanning into CI/CD pipelines, you can ensure that applications with
known vulnerabilities don’t make it to production.
• To run scans on demand, you need to delete specifically the container instance
with terraform destroy -t azurerm_container_group.zap.
482 | Chapter 9: Enabling Teams

CHAPTER 10
Security in the Future
The pace of innovation in the IT sector is continually increasing. With the shift from
IT as a cost center to IT as a source of competitive advantage, although the principles
of IT security have not fundamentally changed, the expectations from the business
demand a revolution in approach. By adopting cloud native tooling as part of your
security estate, you benefit from the rapid innovation of the cloud service providers,
which keeps pace with how cloud adoption is changing over time.
As cloud service provider solutions are most often offered as managed services, their
adoption also lowers the total cost of ownership (TCO) of your security tool chain.
Through a low-TCO approach, you unlock the ability to invest time and money in
higher-order initiatives, which enables a superior security posture. For example, run‐
ning a self-hosted patching service requires maintenance, ongoing server costs, and
recovery. By using the cloud vendor’s solution, you reduce the human effort required
and are provided with a contractually backed service-level agreement.
This book has shown, throughout the recipes, that you can solve the same set of secu‐
rity problems across each cloud. Sometimes the components of the solution look sim‐
ilar, such as with patching, and sometimes they look radically different, such as with
preventing privilege escalation. In real terms, being fluent across two clouds is not
twice as hard as being fluent in one, but it’s not far removed.
To prepare for the unknown, unpredictable, and emergent requirements, the best
defense is protecting the team’s capacity. A team that is operating at full capacity can‐
not absorb new work without compromise. Little’s law tells us that as you add more
work to a system or team, the response time gets exponentially worse as the arrival
rate of work outstrips the throughput. By adopting low-TCO approaches, you reduce
the draw on the team from their existing responsibilities, allowing them to broaden
their domain of control and scale their impact.
483

10.1 The Innite Game
The recipes in this book focused on core security problems, but security is an infinite
game. There is no way to win or achieve complete security. Your efforts are an attempt
to continue the game by preventing fatal breaches, enabling the business to produce
value securely, and ensuring that the teams remains healthy, happy, and capable.
The recipes in this book target the fundamental and common problems that exist
across businesses of all sizes and domains. Moving past the scope of the book, there
are two key areas of security that are being explored currently.
Zero Trust
First coined by the BeyondCorp whitepaper from Google, zero trust models are about
placing identity at the center of determining access.
Historically, network addresses determined your level of access. Once on the trusted
corporate intranet, you were often presented with highly privileged access, making it
easy for threat actors to spread throughout your estate.
To explore how Google made the transition to a zero trust model, with recommenda‐
tions about how your organization can do the same, read the “Migrating to Beyond‐
Corp: Maintaining Productivity While Improving Security Whitepaper”.
Supply Chain Security
Brought into the spotlight through compromises such as the SolarWinds breach,
there has been a renewed focus on how to build software from known safe compo‐
nents and being able to identify and remediate components that are discovered to
have vulnerabilities. In mid-2021, Google announced the Supply Chain Levels for
Software Artifacts (SLSA) framework, which aims to ensure the integrity of software
artifacts.
Going back to Chapter 1, I discussed how your security is only as strong as your
weakest link. Zero trust and supply chain security both solve real problems, but there
is a high likelihood that they are not the biggest problems you’re facing today.
As you mature your cloud native security approach, focusing on maintaining the low‐
est possible TCO, you can preserve the capacity to explore new domains as they
emerge, as opposed to being forever on the back foot.
10.2 Building Capability
As part of ensuring the enduring effectiveness of the security function, you require an
effective plan for continually building new capability. A helpful model in this space is
the three tiers of knowledge, skills, and operational capability.
484 | Chapter 10: Security in the Future

Knowledge is the total of what you understand, for example, understanding the KMS
service in your cloud of choice, how IAM works, or what the OSI model is. You
obtain knowledge by reading, taking online courses, and taking certification exams.
The discussion sections of the recipes in this book provide the knowledge required to
understand how security in the cloud works.
Skills are what you are able to do, for example, being able to write queries to parse
audit logs, write least-privilege IAM policies, or configure cloud resources in Terra‐
form. To build skills, you need to get hands-on experience in labs and sandboxes. The
recipes in this book are focused on giving you the skills required to complete required
tasks as a modern security engineer.
Operational capabilities are the problems you can solve, for example, being able to
respond to active threats in your environment, performing forensic analysis, or reme‐
diating compliance issues across your estate. Building these capabilities comes from a
variety of sources, such as mentoring, pairing, and game days. In Chapter 1 and the
overview of other chapters, I have talked about the necessary capabilities for a
modern security team.
With the ability to rapidly build replica or sandbox environments, game days are
becoming an increasingly popular training method. The worst time to learn how to
respond to an active threat in your environment is when one is happening. By invest‐
ing in simulating threats and reacting authentically to them, you build capability in a
safe and timely manner. Additionally, these investments become cornerstones of the
culture within the business; they show a real, visceral intent to make security job zero.
For an in-depth story of when I first ran an internal game day with lessons learned
targeting our cloud environments, see “Red Teaming AWS.” Additionally, the book
Security Chaos Engineering by Aaron Rinehart and Kelly Shortridge (O’Reilly)
explores this topic in depth.
When evaluating training, you should start at the operational capability you’re trying
to gain or expand. The capability is what is of value, as you’re then able to solve a
problem. To have a capability, you need the requisite knowledge and skills within the
team. So this leads us to a high-level framework for planning. First, outline a capabil‐
ity that needs cultivating or refining. Next, plan how to provide the team with the
required experience, whether that’s created internally or outsourced, and supplement
with other training to fill known knowledge and skills gaps. This allows you to ensure
your finite training resources are invested effectively and will drive business impact.
10.2 Building Capability | 485
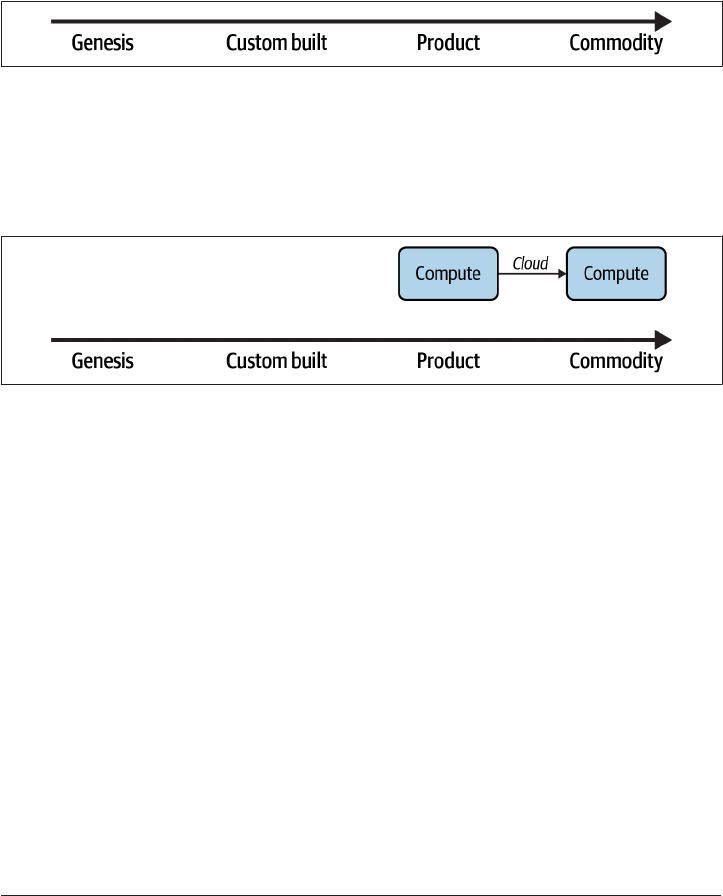
10.3 Building Situational Awareness
As the team’s capability matures, it can be difficult to see where the next logical step
is. What is the correct next problem to solve? To support the team in understanding
the current landscape and context, Wardley Mapping is a powerful tool. Initially cre‐
ated by Simon Wardley in 2005, you collaboratively produce a map that aligns tech‐
nologies and capabilities to the evolutionary axis shown in Figure 10-1.
Figure 10-1. Evolutionary axis
The cloud can be seen as a movement of compute resources from the product to
commodity, as shown in Figure 10-2. Rather than having to purchase capacity with
large data center contracts, or self-hosting the infrastructure, it becomes akin to any
other commodity such as water or electricity: it’s available on demand.
Figure 10-2. e evolution of compute
By mapping out domains under the purview of your team, you can identify cases
where capabilities are misaligned. Imagine a scenario where the creation and harden‐
ing of machine images is done with custom scripting that the team maintains and
extends over time. Adopting a tool such as HashiCorp Packer can drastically simplify
and reduce the total cost of ownership of the solution. By creating and revisiting
maps over time, you can identify opportunities and dependencies within your
domain. Taking the example of providing secure machines to your end users, you can
map that to include all the constituent components, as in Figure 10-3.
486 | Chapter 10: Security in the Future
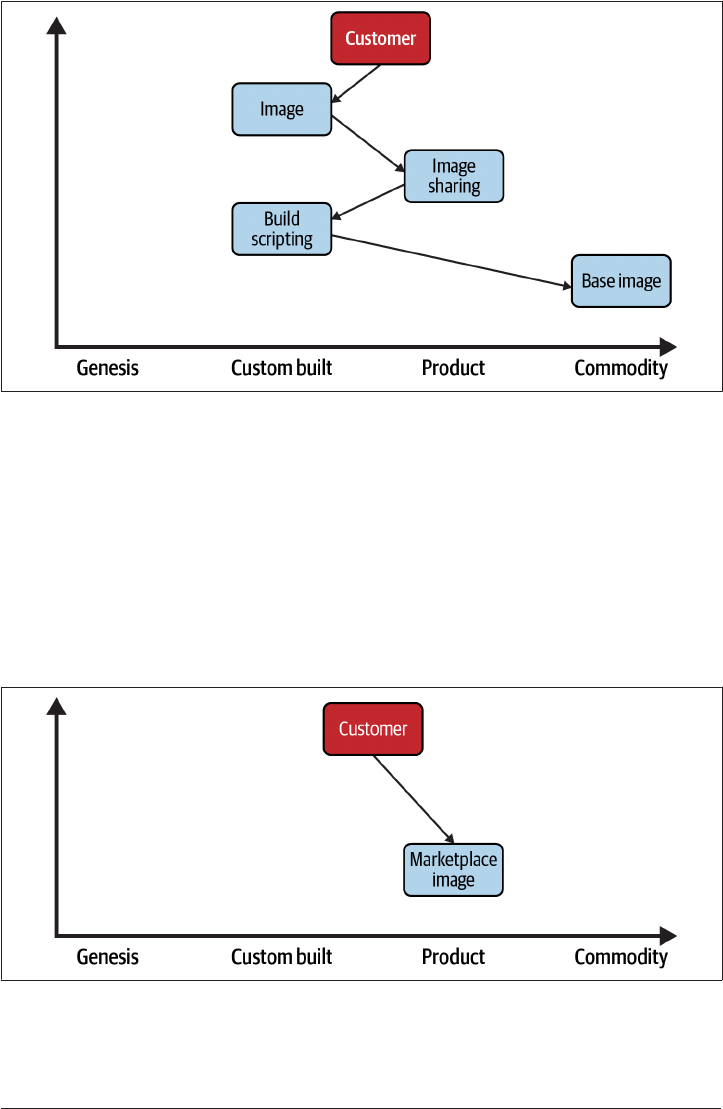
Figure 10-3. Providing hardened images
When looking at the map, you may disagree with the position of certain points or
think things are missing. That is by design. The power of mapping comes from the
conversations through the mapping process, more than the artifacts themselves. By
reaching a common understanding of the current landscape, you can plan the next
move while being mindful of the current context. Potentially, on reviewing this you
may decide that the hardening done on images has become standardized to the point
where the marketplace provides an image of sufficient quality. In that case, you can
redraw the map, as in Figure 10-4, showing a significant reduction in complexity and
maintenance.
Figure 10-4. Marketplace images
10.3 Building Situational Awareness | 487

Both the proposed training model and Wardley Maps are
customer-centric in their orientation. Everything is done working
back from the customer and their needs. By taking this empathetic
approach to managing security, you align your plans with the needs
of the business and are able to have more productive relationships.
As explained in Recipe 1.3, security teams operate as enabling
teams, focusing on uplifting and enabling value-stream-aligned
teams: this customer centricity is fundamental to your success as an
enabling team.
To explore Wardley Mapping further, a great starting point is the Learn Wardley
Mapping (LWM) website.
10.4 Conclusion
Cloud native security is both the same and different as security in other domains.
Armed with the recipes, you will be able to quickly create and configure resources to
provide a secure platform and guardrails for your engineering function. You will also
get the visibility to understand your security posture and compliance at scale and lev‐
erage automation and the cloud native tooling to maintain and iteratively improve
your posture over time.
The twin pressures of cost and time will always be pushing you to achieve more with
less. The secret to achieving this is by evaluating tools and processes by their endur‐
ing total cost of ownership, both human and financial. Investing in modern, predom‐
inantly managed options frees up you and your team to constantly attack higher-level
concerns and deliver greater value to the business.
As time passes from the publication of this book, newer services, approaches, and
options will become available. This chapter on exploring mindful training and Ward‐
ley Mapping will hopefully prepare you for the future, enabling you to pick the cor‐
rect choice for your context and success.
488 | Chapter 10: Security in the Future

CHAPTER 11
Terraform Primer
Terraform, made by HashiCorp, is an open source infrastructure-as-code (IaC) tool.
It allows you to work in a multicloud environment, keeping the tooling, processes,
and patterns the same. By having a library of providers, you can use Terraform to
interact with an ever-growing array of systems and platforms.
HashiCorp Configuration Language (HCL) is the common language that underlies
the HashiCorp tool suite. It is a declarative language, where you describe what you
want, rather than an imperative language, where you describe how you want some‐
thing done. For infrastructure, this means you describe your architecture, and Terra‐
form handles the mechanics of making that happen.
In the recipes, there is a general flow for writing and executing the Terraform
configurations:
1. Define and enter the recipe’s variables.
2. Define and install the providers by running terraform init.
3. Define the infrastructure and generate a plan by running terraform plan, which
outlines the changes Terraform will make.
4. Execute the changes by running terraform apply.
Common additional commands that form part of a Terraform workflow include
• terraform fmt, which formats the file in the working directory
• terraform validate, which checks whether your HCL is syntactically correct
• terraform destroy, which tears down provisioned infrastructure
489

11.1 Authenticating with GCP
The quickest approach to authenticate with the Google provider is by running gcloud
auth application-default login.
For production scenarios, changes should be made via service accounts, not user
accounts. The usage of automation and service accounts to run Terraform can be seen
in Recipe 6.7.
For full authentication instructions, refer to the Google provider documentation.
11.2 Authenticating with AWS
The quickest approach to authenticate with the AWS provider is by configuring the
AWS CLI tool. Terraform will use the default role defined in the CLI configuration,
unless overridden by environment variables. To assume other defined roles, tools like
AWSume simplify the process.
For production scenarios, changes should be made via roles assumed by automation
tooling, not user accounts. The usage of automation to run Terraform can be seen in
Recipe 6.8.
For full authentication instructions, refer to the AWS provider documentation.
11.3 Authenticating with Azure
The quickest approach to authenticate with the AzureRM provider is by running az
login.
For production scenarios, changes should be made via Managed Service Identities,
not user accounts. The usage of automation and Managed Service Identities to run
Terraform can be seen in Recipe 6.9.
For full authentication instructions, refer to the AzureRM provider documentation.
490 | Chapter 11: Terraform Primer

Index
A
ABAC (see Attribute Based Access Control)
accounts and users
AWS
account sharing, 465-468
centralizing users, 54-58
region locking, 43-47
scalable account structures on, 27-34
Azure
centralizing users on, 58-61
region locking on, 47-49
scalable subscription structures on,
35-40
GCP
centralizing users on, 49-54
region locking, 40-43
scalable project structures on, 19-27
activity logs, 90
Admin Write Activity logs, 98
ALB (see Application Load Balancers)
alerts (see failure alerts; log anomaly alerting)
Amazon Detective, 101
Amazon GuardDuty, 100
Amazon Inspector, 73
Amazon Macie, 73, 172
Amazon Web Services (AWS) (see also individ‐
ual tools beginning with "AWS")
accounts and users
centralizing users, 54-58
region locking, 43-47
scalable account structures on, 27-34
authenticating with Terraform, 490
compliance as code
detecting noncompliant infrastructure,
364-369
preventing noncompliant infrastructure,
379-383
remediating noncompliant infrastruc‐
ture, 396-400
tagging resources, 347-352
data handling
encrypting data at rest, 129-137
encrypting with your own keys, 147-151
in-transit encryption, 160-162
preventing data loss, 170-173
infrastructure as code
default encryption, 282-288
deployment at scale, 331-336
failure alerts, 299-303
robust deployment, 314-322
internal security services
backing up data, 451-456
inventory management for VMs,
426-430
patching at scale, 439-442
protecting security assets and controls,
412-417
networking
external access, 208-214
external network connectivity, 243-251
internal resource access, 225-231
private application access, 265-272
Virtual Private Clouds, 188-195
scaling security
centralizing logs, 82-88
infrastructure registry on, 110-118
log anomaly alerting, 98-102
491

Security Operations Center on, 71-74
teams
account sharing, 465-468
application security scanning, 475-479
Analytics Rules, 77
anomaly scores, 256
App Engine, 472
App Insights, 309
Application Load Balancer (ALB), 250
application logs, capturing with AWS Cloud‐
Watch, 85-88
application security groups, 217
application security scanning (see also private
applications; public applications)
on AWS, 475-479
on Azure, 479-482
on GCP, 472-475
ARM templates, 121
as-a-service team interactions, 461
attempted breaches, 13
Attribute Based Access Control (ABAC), 349,
354, 467
audit logs, 299 (see also cloud audit data logs;
centralizing logs)
authentication, with Terraform, 490
automated remediation, 395, 399
automatic network-level encryption, 241
AWS (see Amazon Web Services)
AWS Backup, 453
AWS CLI tool, 490
AWS CloudWatch, 85, 303
AWS Config, 113, 334, 364, 396
AWS customer managed key (CMK), 133
AWS EventBridge, 367
AWS Firewall Manager, 73
AWS Key Management Service (KMS), 133, 150
AWS Lambda, 302
AWS Patch Manager, 441
AWS Private Certificate Authority, 269
AWS PrivateLink, 265
AWS Security Hub
building SOCs, 73
preventing data loss, 172
AWS Systems Manager
inventory management for VMs, 427
private network access using, 208
AWS Transit Gateway, 225, 272
AWS Web Application Firewall, 249
AWS X-ray, 303
Azure
accounts and users
centralizing users, 58-61
region locking, 47-49
scalable subscription structures on,
35-40
authenticating with Terraform, 490
compliance as code
detecting noncompliant infrastructure,
369-375
preventing noncompliant infrastructure,
383-388
remediating noncompliant infrastruc‐
ture, 400-406
tagging resources, 352-357
data handling
encrypting data at rest, 137-143
encrypting with your own keys, 151-156
in-transit encryption, 162-165
preventing data loss, 174-179
infrastructure as code
default encryption, 288-294
deployment at scale, 336-339
failure alerts, 303-309
robust deployment, 322-328
internal security services
backing up data, 456-460
inventory management for VMs,
430-434
patching at scale, 442-446
protecting security assets and controls,
417-422
networking
external access, 214-219
external network connectivity, 251-257
internal resource access, 231-236
private application access, 272-276
Virtual Networks, 195-203
scaling security
centralizing logs, 88-94
infrastructure registry, 118-122
log anomaly alerting, 102-105
Security Operations Center on, 75-78
teams
application security scanning, 479-482
resource group sharing, 468-471
Azure Automation, 431, 446
Azure Backup, 460
Azure Bastion, 214
492 | Index

Azure DDoS protection, 195
Azure Defender, 104
Azure DevOps, 322
Azure Event Grid, 369, 400
Azure Firewall, 195
Azure Front Door, 251
Azure Functions Core Tools, 303, 369
Azure Load Balancers, 256
Azure Managed Applications, 294
Azure Monitor, 118
Azure Policy
backing up data, 458
blocking Owner permissions, 420
creating custom, 383
effects on resources, 384
network compliance checks, 201
remediation mechanisms, 405
Azure Portal, 214
Azure Private Link, 272
Azure Purview, 177
Azure Resource Graph, 121
Azure Resource Manager (ARM), 121
Azure Security Center
building SOCs, 76
configuring across all subscriptions, 339
encrypting data in transit, 164
log anomaly alerting, 104
Azure Sentinel, 76
Azure Traffic Manager, 256
AzureRM provider, 490
B
backup processes
importance of, 407
on AWS, 451-456
on Azure, 456-460
on GCP, 447-451
bastion host services, 218
BigQuery
backup solutions, 450
versus Cloud Storage, 80
in-transit encryption, 158
preventing data loss, 169
BitBucket, 11
Border Gateway Protocol (BGP), 233
Boyd, John, 63
branches, 234
breaches, measuring attempted, 13
break-glass situations, 468
breaking changes, 281
C
capability, three tiers of, 484
centralizing logs
on AWS, 82-88
on Azure, 88-94
on GCP, 78-82
centralizing users
on AWS, 54-58
on Azure, 58-61
on GCP, 49-54
changes rejected, percentage of, 14
Checkov
preventing noncompliant infrastructures on
AWS, 382
preventing noncompliant infrastructures on
Azure, 386
preventing noncompliant infrastructures on
GCP, 377
robust deployment on AWS, 321
robust deployment on Azure, 328
robust deployment on GCP, 314
CI/CD pipelines
benefits of, 12
on AWS, 314-322
on Azure, 322-328
on GCP, 309-314
CIS (Center for Internet Security) AWS Bench‐
marks, 73
Cloud Armor, 242
Cloud Asset Inventory
in-transit encryption, 158
trust but verify model, 108
Cloud Asset Organization Feed, 357, 388
Cloud Assets, 395, 425
cloud audit data logs, 98
Cloud External Key Manager (Cloud EKM),
146
Cloud Functions
benefits of, 298
posting alerts with, 357
preventing public Cloud Storage buckets
with, 388
scheduling automatic backups, 451
Cloud Hardware Security Module (HSM), 146
Cloud KMS, 128
cloud native security (see also internal security
services; scaling security; security)
Index | 493

advantages of cloud computing, 4
beginnings of the cloud, 4
benefits of, 483
challenges of, 488
definition of term, 3
paradox of, 341
properties common to cloud native solu‐
tions, 3
role of IAC in, 277
Cloud Operations Suite, 298, 425
Cloud Run, 299
Cloud Scheduler, 298, 451
Cloud Source Repositories, 314
Cloud SQL databases, 129, 451
Cloud Storage buckets
encrypting data at rest, 129
encrypting with your own keys, 145
preventing data loss, 169
preventing public, 388
CloudBuild, 313
CloudTrail, 85, 100, 302
CodeBuild, 320, 475
CodeCommit, 322
collaboration, 461
Common Expression Language (CEL), 463
common threats
scanning for on AWS, 475-479
scanning for on Azure, 479-482
scanning for on GCP, 472-475
compliance as code
AWS
detecting noncompliant infrastructure,
364-369
preventing noncompliant infrastructure,
379-383
remediating noncompliant infrastruc‐
ture, 396-400
tagging resources, 347-352
Azure
detecting noncompliant infrastructure,
369-375
preventing noncompliant infrastructure,
383-388
remediating noncompliant infrastruc‐
ture, 400-406
tagging resources, 352-357
challenges of, 341
classifying compliance changes, 341
GCP
detecting noncompliant infrastructure,
357-364
labelling resources, 342-347
preventing noncompliant infrastructure,
375-379
remediating noncompliant infrastruc‐
ture, 388-396
key activities, 341
compliance statistics, 13
complicated-subsystem teams, 6
Compute Engine
application security scanning, 475
default encryption, 278, 283, 288
encrypting data at rest, 129
private network access using, 203
continuous delivery (CD), 11-12 (see also
CI/CD pipelines)
continuous deployment, 12
continuous integration (CI), 11-12 (see also
CI/CD pipelines)
Continuous Integration jobs, 327
custom compliance policies, 364, 375
custom data identifiers, 172
custom scans, 474
customer-supplied encryption keys (CSEKs),
147
D
data encryption keys (DEKs), 123
data handling
AWS
backing up data, 451-456
encrypting data at rest, 129-137
encrypting with your own keys, 147-151
in-transit encryption, 160-162
preventing data loss, 170-173
Azure
backing up data, 456-460
encrypting data at rest, 137-143
encrypting with your own keys, 151-156
in-transit encryption, 162-165
preventing data loss, 174-179
envelope encryption, 123
GCP
backing up data, 447-451
encrypting data at rest, 124-129
encrypting with your own keys, 143-147
in-transit encryption, 156-160
preventing data loss, 165-170
494 | Index

unintentional public data storage, 395
Data Loss Prevention (DLP), 169
defense in depth, 15
DEK (see data encryption keys)
deployment
on AWS
at scale, 331-336
robust deployment, 314-322
on Azure
at scale, 336-339
robust deployment, 322-328
on GCP
at scale, 329-331
robust deployment, 309-314
Desired State Configuration (DSC), 433
DevOps, 7
DevSecOps, 10-12
Diagnostic Settings, 90
DLP (see Data Loss Prevention)
DSC (see Desired State Configuration)
E
EC2 (Elastic Compute Cloud) instances, private
network access using, 208
EKM (see Cloud External Key Manager)
Elastic Block Store (EBS), encrypting data at
rest, 132, 134
enablement teams, 6
encryption
AWS
data at rest, 129
default settings, 282-288
in-transit, 160-162
with your own keys, 147-151
Azure
data at rest, 137-143
default settings, 288-294
in-transit, 162-165
with your own keys, 151-156
envelope encryption, 123
GCP
data at rest, 124-129
default settings, 278-282
in-transit, 156-160
with your own keys, 143-147
envelope encryption, 123
Event Grid, 308
Event Threat Detection, 97
Eventarc, 299
EventBridge, 302
ExpressRoute gateways, 231
external network access
on AWS, 208-214
on Azure, 214-219
on GCP, 203-208
external network connectivity
on AWS, 243-251
on Azure, 251-257
on GCP, 236-243
F
facilitation, 461
failure alerts
on AWS, 299-303
on Azure, 303-309
on GCP, 294-299
findings, 172
firewalls
Azure firewall subnet, 195
Azure Front Door, 255
rules with insecure ports, 159
secure-by-default on GCP, 185
Five Ideals, 9
functions as a service (FaaS)
failure alerts on AWS, 299-303
failure alerts on Azure, 303-309
failure alerts on GCP, 294-299
G
Gateway Load Balancer, 230
GCP (see Google Cloud Platform)
GitHub, 11, 314
GitLab, 11
Google Cloud Platform (GCP) (see also indi‐
vidual tools beginning with "Cloud" or
"Google")
accounts and users
centralizing users, 49-54
region locking, 40-43
scalable project structures on, 19-27
authenticating with Terraform, 490
compliance as code
detecting noncompliant infrastructure,
357-364
labelling resources, 342-347
preventing noncompliant infrastructure,
375-379
Index | 495

remediating noncompliant infrastruc‐
ture, 388-396
data handling
encrypting data at rest, 124-129
encrypting with your own keys, 143-147
in-transit encryption, 156-160
preventing data loss, 165-170
infrastructure as code
default encryption, 278-282
deployment at scale, 329-331
failure alerts, 294-299
robust deployment, 309-314
internal security services
backing up data, 447-451
inventory management for VMs,
422-426
patching at scale, 435-438
protecting security assets and controls,
408-412
networking
external access, 203-208
external network connectivity, 236-243
internal resource access, 219-224
private application access, 257-265
Virtual Private Clouds, 182-187
scaling security
centralizing logs, 78-82
infrastructure registry, 106-110
log anomaly alerting, 94-98
Security Operations Center on, 64-71
teams
application security scanning, 472-475
project sharing, 462-465
Google Cloud Recommender, 411
Google Kubernetes Engine, 475
H
HashiCorp, 288, 294, 489
HashiCorp Configuration Language (HCL),
489
header filtering, 256
hot resources, 375
HSM (see Cloud Hardware Security Module)
hub-and-spoke network topology, 231
I
IaC (see infrastructure as code)
IAP (see Identity-Aware Proxy)
identity and access management (IAM)
enabling account sharing on AWS, 465
enabling project sharing on GCP, 462
IAM Access Analyzer, 73
IAM permissions, 128
Key Vaults in Azure, 141
limiting ability to grant roles on AWS, 415
limiting ability to grant roles on GCP, 408
identity perimeter, 407 (see also permissions)
Identity-Aware Proxy (IAP), 203
infrastructure as code (IaC)
AWS
default encryption, 282-288
deployment at scale, 331-336
functions as a service, 299-303
robust deployment, 314-322
Azure
default encryption, 288-294
deployment at scale, 336-339
functions as a service, 303-309
robust deployment, 322-328
benefits of, 277
GCP
default encryption, 278-282
deployment at scale, 329-331
functions as a service, 294-299
robust deployment, 309-314
role in cloud native environments, 277
Terraform, 489-490
infrastructure registries
on AWS, 110-118
on Azure, 118-122
on GCP, 106-110
internal resources (see also resources)
accessing on AWS, 225-231
accessing on Azure, 231-236
accessing on GCP, 219-224
patterns for accessing, 207
internal security services
AWS
backing up data, 451-456
inventory management for VMs,
426-430
patching at scale, 439-442
protecting security assets and controls,
412-417
Azure
backing up data, 456-460
inventory management for VMs,
430-434
496 | Index

patching at scale, 442-446
protecting security assets and controls,
417-422
GCP
backing up data, 447-451
inventory management for VMs,
422-426
patching at scale, 435-438
protecting security assets and controls,
408-412
key factors of scalable services, 407
internal subnets, 193, 201
J
job zero, 15
K
key encryption keys (KEKs), 123
Key Vault, 141, 293
KMS (see AWS Key Management Services;
Cloud KMS)
knowledge, skills, and operational capability,
484
L
least privilege access
definition of term, 14
on AWS, 54-58
on Azure, 58-61
on GCP, 49-54
load balancers
accepting HTTP traffic, 159
automatic network-level encryption, 241
Azure Load Balancers, 256
Network Load Balancer, 250
TLS offloading, 249
Log Analytics, 90
log anomaly alerting
on AWS, 98-102
on Azure, 102-105
on GCP, 94-98
logs (see activity logs; application logs; central‐
izing logs; log anomaly alerting; resource
logs)
M
main branches, 11
Managed AWS Config rules, detecting unen‐
crypted traffic, 161
managed data identifiers, 172
managed disks, encrypting data at rest, 139
managed identity, 420
Managed Protection Plus, 242
managed scans, 474
managed services, 483
metrics
attempted breaches prevented, 13
compliance statistics, 13
percentage of changes rejected, 14
service impacts incurred, 13
time to fix known vulnerabilities, 13
time to notify for known vulnerabilities, 12
Microsoft Threat Intelligence, 76
multicloud environments, 489
N
network access control lists (NACLs), 194
Network Load Balancer (NLB), 250
network security groups, 201
network tags, 345
Network Watcher, 201
networking
AWS
external access, 208-214
external network connectivity, 243-251
internal resource access, 225-231
private application access, 265-272
Virtual Private Clouds, 188-195
Azure
external access, 214-219
external network connectivity, 251-257
internal resource access, 231-236
private application access, 272-276
Virtual Networks, 195-203
GCP
external access, 203-208
external network connectivity, 236-243
internal resource access, 219-224
private application access, 257-265
Virtual Private Clouds, 182-187
private networks, 181
recommendations for, 181
zero-trust networking, 181
NGINX containers, 243, 262
NLB (see Network Load Balancer)
noncompliant infrastructure
Index | 497

AWS
detecting, 364-369
preventing, 379-383
remediating, 396-400
Azure
detecting, 369-375
preventing, 383-388
remediating, 400-406
GCP
detecting, 357-364
preventing, 375-379
remediating, 388-396
key activities concerning, 341
O
OODA loop, 63
operational capabilities, 485
organization policies, 376
organizations
converging on AWS, 33
converging on GCP, 25
hierarchy in AWS, 30
hierarchy in GCP, 22
recommended structure on AWS, 27
recommended structure on GCP, 19
OS Config, 425
OS policies, 425
OWASP threat vectors, 255, 461
OWASP Zed Attack Proxy (ZAP), 475, 479
P
Patch Group tags, 440
patches and updates
as mandatory for handling vulnerabilities,
407
at scale on AWS, 439-442
at scale on Azure, 442-446
at scale on GCP, 435-438
Payment Card Industry Data Security Standard
(PCI DSS), 73
percentage of changes rejected, 14
permission boundaries, 415
permissions
preventing unauthorized escalation on
AWS, 412-417
preventing unauthorized escalation on
Azure, 417-422
preventing unauthorized escalation on
GCP, 408-412
personally identifiable information (PII)
preventing data loss on AWS, 170, 172
preventing data loss on Azure, 174, 177
preventing data loss on GCP, 165, 169
platform teams, 6
PR (see pull requests)
principles of security
benefits of establishing, 14
defense in depth, 15
job zero, 15
least privilege access, 14
quality is built in, 15
weakest link, 14
private applications
on AWS, 265-272
on Azure, 272-276
on GCP, 257-265
Private Catalog, 282
private networks, 181 (see also networking)
private subnets, 193, 201
Privileged Identity Management (PIM), 421
projects
preventing permission escalation on GCP,
408-412
scalable project structures on GCP, 19-27,
329-331
sharing on GCP, 462-465
pseudonymization, 170
Pub/Sub topics, 108
public applications
on AWS, 243-251
on Azure, 251
on GCP, 237
public data storage, 395
public subnets, 193, 201
pull requests (PRs), 313, 320, 322, 327
Purview applications, 177
Q
quality is built in, 15
R
RAM (see Resource Access Manager)
RBAC (see role-based access control)
RDS (see Relational Database Service)
Recommender (see Google Cloud Recommen‐
der)
redaction, 170
region locking
498 | Index

on AWS, 43-47
on Azure, 47-49
on GCP, 40-43
Relational Database Service (RDS), encrypting
data at rest, 132, 135
Resource Access Manager (RAM), 230
resource groups, 349, 354, 468-471
Resource Inventory workbook, 120
resource logs, 90-94
resource tags, 345
resources (see also internal resources)
labelling on GCP, 342-347
permissions attached to on Azure, 420
sharing on AWS, 465-468
sharing on Azure, 468-471
sharing on GCP, 462-465
stateless versus stateful on Azure, 470
tagging on AWS, 347-352
tagging on Azure, 352-357
role-based access control (RBAC), 293, 468
roll forward versus roll back, 10
Route53 hosted zones, 244
S
S3 buckets (see Simple Storage Service)
scaling security (see also internal security serv‐
ices; security)
AWS
centralizing logs on, 82-88
deployment, 331-336
infrastructure registry on, 110-118
log anomaly alerting, 98-102
Security Operations Center on, 71-74
Azure
centralizing logs on, 88-94
deployment, 336-339
infrastructure registry on, 118-122
log anomaly alerting, 102-105
Security Operations Center on, 75-78
GCP
centralizing logs on, 78-82
deployment, 329-331
infrastructure registry on, 106-110
log anomaly alerting, 94-98
Security Operations Center, 64-71
SCPs (see Service Control Policies)
security (see also Cloud Native Security; inter‐
nal security services; scaling security)
as-a-service team interactions, 461
critical nature of, 1-3
DevSecOps, 7-12
future concerns
benefits of cloud native tooling, 483
building capability, 484
building situational awareness, 486-488
supply chain security, 484
zero trust models, 484
goal of modern security, 7, 484
measuring impact of, 12-14
overview of, 16
principles of, 14-16
role of in modern organizations, 5
security boundaries, 468
Security Command Center (SCC), 64-71, 344
Security Command Center (SCC) Premium,
363, 475
Security Incident and Event Management
(SIEM), 76
security marks, 344
Security Operations Centers (SOCs)
on AWS, 71-74
on Azure, 75-78
on GCP, 64-71
security-related labels, 344
security-related tags, 349, 354
service attachments, in GCP, 257
Service Catalog, 288
Service Control Policies (SCPs), 45, 379, 415
service tags, 256
Shared VPC, 219
SIEM (see Security Incident and Event Manage‐
ment)
Simple Storage Service (S3)
encrypting data at rest on AWS, 133, 136
encrypting with your own keys on AWS,
149
encrypting with your own keys on Azure,
154
hosting sites in S3 buckets, 250
public S3 buckets, 398
tagging resources, 347
situational awareness, 486-488
skills, 485
SLSA (see Supply Chain Levels for Software
Artifacts)
snapshots, 449, 449, 454
SOCs (see Security Operations Centers)
Spanner, 451
Index | 499

SSL offloading, 241
SSM (see AWS System Manager)
storage accounts, encrypting data at rest, 140
stream-aligned teams, 6
subnets
benefits of, 181
on AWS, 193
on Azure, 201
on GCP, 186
Subscription Activity logs, 90
subscription structures, 35-40
Supply Chain Levels for Software Artifacts
(SLSA), 484
supply chain security, 484
SystemAssigned identities, 141
T
tag editor service, 351
tag policies, 349
teams
application security scanning
on AWS, 475-479
on Azure, 479-482
on GCP, 472-475
deploying
accounts on AWS, 27-34
new folders on GCP, 19-27
subscriptions on Azure, 35-40
least privilege access
on AWS, 54-58
on Azure, 58-61
on GCP, 49-54
modes of interactivity, 461
OODA loop for incidents, 63
preparing for emergent threats, 483
region locking
on AWS, 43-47
on Azure, 47-49
on GCP, 40-43
sharing resources
on AWS, 465-468
on Azure, 468-471
on GCP, 462-465
topologies of, 6
Terraform
additional commands, 489
authenticating with AWS, 490
authenticating with Azure, 490
authenticating with GCP, 490
benefits of, 489
flow for configurations, 489
threat vectors, 255
three tiers of capability, 484
Three Ways, 8
TLS offloading, 249
total cost of ownership (TCO), 483
training, evaluating, 485
trunks, 11
trust but verify model, 108
tunneling, 205, 208, 230
U
User Access Administrator role, 420
users (see accounts and users)
V
version control
basics of, 11
on AWS, 314-322
on Azure, 322-328
on GCP, 309-314
Virtual Hub, 233
virtual machines
ability to manage, 407
AWS
backing up data, 451-456
inventory management on, 426-430
patching at scale, 439-442
Azure
backing up data, 456-460
inventory management on, 430-434
patching at scale, 442-446
GCP
backing up data, 447-451
Inventory management on, 422-426
patching at scale, 435-438
Virtual Networks (VNets)
external access, 214-219
secure-by-default, 195-203
Virtual Private Clouds (VPCs)
on AWS
external access, 208-214
secure-by-default, 188-195
VPC flow logs, 162, 380
on Azure (see Virtual Networks)
on GCP
external access, 203-208
secure-by-default, 182-187
500 | Index

Shared VPC, 219
VPC flow logs, 97
VPC Service Controls, 222
VM Manager, 424, 435
VNets (see Virtual Networks)
Volume Shadow Copy Service (VSS), 449, 454
VPCs (see Virtual Private Clouds)
VPN (virtual private network) gateways, 224,
234
VSS (see Volume Shadow Copy Service)
vulnerabilities
addressing through patches and updates,
407
metrics
service impacts incurred, 13
time to fix known, 13
time to notify for known, 12
OWASP threat vectors, 255, 461
preparing for emergent threats, 483
scanning for on AWS, 475-479
scanning for on Azure, 479-482
scanning for on GCP, 472-475
W
Wardley Mapping, 486-488
weakest link, 14
web application firewall (WAF), 242
web load balancers (see load balancers)
Web Security Scanner, 472
Z
Zed Attack Proxy (ZAP), 475, 479
zero trust models, 181, 484
Index | 501

About the Author
Josh Armitage is a self-described “professional loudmouth,” a distinguished technolo‐
gist at Contino (a digital transformation consultancy), and an international confer‐
ence speaker. Across his career, he has worked with many technologies, including
everything from mainframes to machine learning, as well as architecting world-first
event-sourced serverless architectures and running the first Australian production
Elastic Kubernetes Service application.
Experienced and certified across the three primary clouds, he works with regulated
enterprises, helping them digitally transform and taking them on a journey from the
command and control models of the past to IT as the key to business differentiation.
He has been recognized as both an AWS partner and a HashiCorp ambassador for his
speaking and writing to audiences around the world.
Outside of work, he spends evenings and weekends getting overly competitive at
board games with friends, going on adventures with his family, and cooking British
food to have a very literal slice of home.
Colophon
The animal on the cover of Cloud Native Security Cookbook is a hooked-bill kite
(Chondrohierax uncinatus). It is named for the distinct shape of its beak, which it uses
to break open the shells of tree snails. These snails form the bulk of its diet, though it
is also known to eat other small animals, including frogs, salamanders, small mam‐
mals, and insects. The hooked-bill kite’s range stretches from the Rio Grande Valley
of Texas to northern Argentina, and it is usually found in wooded areas where tree
snails are plentiful. It usually hunts by climbing and walking around tree branches,
looking for snails. When a kite finds a snail, it holds it with one foot while cracking
the shell open with its hooked bill.
Hooked-bill kites are slender, midsized raptors, ranging about 15 to 20 inches long
with a wingspan of about 30 to 40 inches. They have striped bellies and banded tails,
though they show a great deal of variation in their plumage from one region to
another. Males generally have gray or blackish undersides, while females are usually
brown or reddish. Their bill size also varies greatly according to the size of the snails
found in their range.
Hook-billed kites are considered a species of least concern, though deforestation and
climate change both pose threats to their habitat, and the closely related Cuban kite is
critically endangered. Many of the animals on O’Reilly covers are endangered; all of
them are important to the world.
The cover illustration is by Karen Montgomery, based on a black and white engraving
from Wood’s Illustrated Natural History. The cover fonts are Gilroy Semibold and
Guardian Sans. The text font is Adobe Minion Pro, the heading font is Adobe Myriad
Condensed, and the code font is Dalton Maag’s Ubuntu Mono.
